手把手教你使用Flask搭建ES搜索引擎(预备篇)


文章目录
/1 前言/
Elasticsearch 是一个开源的搜索引擎,建立在一个全文搜索引擎库 Apache Lucene™ 基础之上。
那么如何实现 Elasticsearch和 Python 的对接成为我们所关心的问题了 (怎么什么都要和 Python 关联啊)。
/2 Python 交互/
所以,Python 也就提供了可以对接 Elasticsearch的依赖库。
pip install elasticsearch
初始化连接一个 Elasticsearch 操作对象。
def __init__(self, index_type: str, index_name: str, ip="127.0.0.1"):

    # self.es = Elasticsearch([ip], http_auth=('username', 'password'), port=9200)
    self.es = Elasticsearch("localhost:9200")
    self.index_type = index_type
    self.index_name = index_name
默认端口 9200,初始化前请确保本地已搭建好 Elasticsearch的所属环境。
根据 ID 获取文档数据
def get_doc(self, uid):
    return self.es.get(index=self.index_name, id=uid)
插入文档数据
def insert_one(self, doc: dict):
    self.es.index(index=self.index_name, doc_type=self.index_type, body=doc)

def insert_array(self, docs: list):
    for doc in docs:
        self.es.index(index=self.index_name, doc_type=self.index_type, body=doc)
搜索文档数据
def search(self, query, count: int = 30):
    dsl = {
        "query": {
            "multi_match": {
                "query": query,
                "fields": ["title", "content", "link"]
            }
        },
        "highlight": {
            "fields": {
                "title": {}
            }
        }
    }
    match_data = self.es.search(index=self.index_name, body=dsl, size=count)
    return match_data

def __search(self, query: dict, count: int = 20): # count: 返回的数据大小
    results = []
    params = {
        'size': count
    }
    match_data = self.es.search(index=self.index_name, body=query, params=params)
    for hit in match_data['hits']['hits']:
        results.append(hit['_source'])

    return results
删除文档数据
def delete_index(self):
    try:
        self.es.indices.delete(index=self.index_name)
    except:
        pass
好啊,封装 search 类也是为了方便调用,整体贴一下。
from elasticsearch import Elasticsearch


class elasticSearch():

    def __init__(self, index_type: str, index_name: str, ip="127.0.0.1"):

        # self.es = Elasticsearch([ip], http_auth=('elastic', 'password'), port=9200)
        self.es = Elasticsearch("localhost:9200")
        self.index_type = index_type
        self.index_name = index_name

    def create_index(self):
        if self.es.indices.exists(index=self.index_name) is True:
            self.es.indices.delete(index=self.index_name)
        self.es.indices.create(index=self.index_name, ignore=400)

    def delete_index(self):
        try:
            self.es.indices.delete(index=self.index_name)
        except:
            pass

    def get_doc(self, uid):
        return self.es.get(index=self.index_name, id=uid)

    def insert_one(self, doc: dict):
        self.es.index(index=self.index_name, doc_type=self.index_type, body=doc)

    def insert_array(self, docs: list):
        for doc in docs:
            self.es.index(index=self.index_name, doc_type=self.index_type, body=doc)

    def search(self, query, count: int = 30):
        dsl = {
            "query": {
                "multi_match": {
                    "query": query,
                    "fields": ["title", "content", "link"]
                }
            },
            "highlight": {
                "fields": {
                    "title": {}
                }
            }
        }
        match_data = self.es.search(index=self.index_name, body=dsl, size=count)
        return match_data
尝试一下把 Mongodb 中的数据插入到 ES 中。
import json
from datetime import datetime
import pymongo
from app.elasticsearchClass import elasticSearch

client = pymongo.MongoClient('127.0.0.1', 27017)
db = client['spider']
sheet = db.get_collection('Spider').find({}, {'_id': 0, })

es = elasticSearch(index_type="spider_data",index_name="spider")
es.create_index()

for i in sheet:
    data = {
            'title': i["title"],
            'content':i["data"],
            'link': i["link"],
            'create_time':datetime.now()
        }

    es.insert_one(doc=data)
到 ES 中查看一下,启动 elasticsearch-head 插件。
如果是 npm 安装的那么 cd 到根目录之后直接 npm run start 就跑起来了。
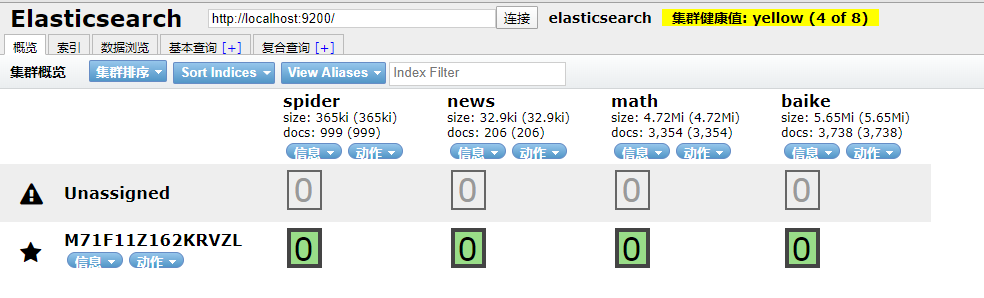
发现新加的 spider 数据文档确实已经进去了。
/3 爬虫入库/
要想实现 ES 搜索,首先要有数据支持,而海量的数据往往来自爬虫。
为了节省时间,编写一个最简单的爬虫,抓取 百度百科。
简单粗暴一点,先 递归获取 很多很多的 url 链接
import requests
import re
import time

exist_urls = []
headers = {
    'User-Agent': 'Mozilla/5.0 (Windows NT 6.1) AppleWebKit/537.36 (KHTML, like Gecko) Chrome/62.0.3202.62 Safari/537.36',
}

def get_link(url):
    try:
        response = requests.get(url=url, headers=headers)
        response.encoding = 'UTF-8'
        html = response.text
        link_lists = re.findall('.*?<a target=_blank href="/item/([^:#=<>]*?)".*?</a>', html)
        return link_lists
    except Exception as e:
        pass
    finally:
        exist_urls.append(url)


# 当爬取深度小于10层时,递归调用主函数,继续爬取第二层的所有链接
def main(start_url, depth=1):
    link_lists = get_link(start_url)
    if link_lists:
        unique_lists = list(set(link_lists) - set(exist_urls))
        for unique_url in unique_lists:
            unique_url = 'https://baike.baidu.com/item/' + unique_url

            with open('url.txt', 'a+') as f:
                f.write(unique_url + '\n')
                f.close()
        if depth < 10:
            main(unique_url, depth + 1)

if __name__ == '__main__':
    start_url = 'https://baike.baidu.com/item/%E7%99%BE%E5%BA%A6%E7%99%BE%E7%A7%91'
    main(start_url)
把全部 url 存到 url.txt 文件中之后,然后启动任务。
# parse.py
from celery import Celery
import requests
from lxml import etree
import pymongo
app = Celery('tasks', broker='redis://localhost:6379/2')
client = pymongo.MongoClient('localhost',27017)
db = client['baike']
@app.task
def get_url(link):
    item = {}
    headers = {'User-Agent':'Mozilla/5.0 (Macintosh; Intel Mac OS X 10_9_2) AppleWebKit/537.36 (KHTML, like Gecko) Chrome/34.0.1847.131 Safari/537.36'}
    res = requests.get(link,headers=headers)
    res.encoding = 'UTF-8'
    doc = etree.HTML(res.text)
    content = doc.xpath("//div[@class='lemma-summary']/div[@class='para']//text()")
    print(res.status_code)
    print(link,'\t','++++++++++++++++++++')
    item['link'] = link
    data = ''.join(content).replace(' ', '').replace('\t', '').replace('\n', '').replace('\r', '')
    item['data'] = data
    if db['Baike'].insert(dict(item)):
        print("is OK ...")
    else:
        print('Fail')
run.py 飞起来
from parse import get_url

def main(url):
    result = get_url.delay(url)
    return result

def run():
    with open('./url.txt', 'r') as f:
        for url in f.readlines():
            main(url.strip('\n'))

if __name__ == '__main__':
    run()
黑窗口键入
celery -A parse worker -l info -P gevent -c 10
哦豁 !! 你居然使用了 Celery 任务队列,gevent 模式,-c 就是10个线程刷刷刷就干起来了,速度杠杠的 !!
啥?分布式? 那就加多几台机器啦,直接把代码拷贝到目标服务器,通过 redis 共享队列协同多机抓取。
这里是先将数据存储到了 MongoDB 上(个人习惯),你也可以直接存到 ES 中,但是单条单条的插入速度堪忧(接下来会讲到优化,哈哈)。
使用前面的例子将 Mongo 中的数据批量导入到 ES 中,OK !!!
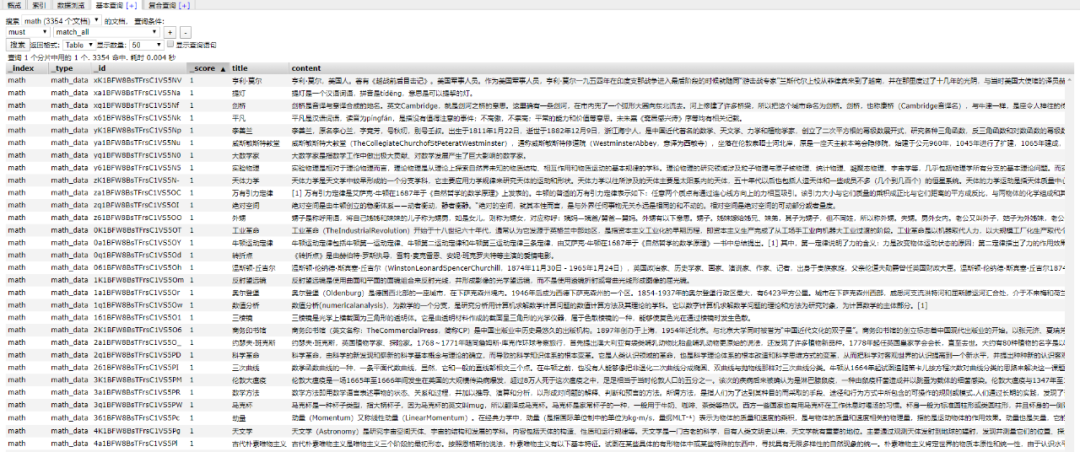
到这一个简单的数据抓取就已经完毕了。
好啦,现在 ES 中已经有了数据啦,接下来就应该是 Flask web 的操作啦,当然,Django,FastAPI 也很优秀。嘿嘿,你喜欢 !!
关于FastAPI 的文章可以看这个系列文章:
1、(入门篇)简析Python web框架FastAPI——一个比Flask和Tornada更高性能的API 框架
2、(进阶篇)Python web框架FastAPI——一个比Flask和Tornada更高性能的API 框架
3、(完结篇)Python web框架FastAPI——一个比Flask和Tornada更高性能的API 框架
/4 Flask 项目结构/
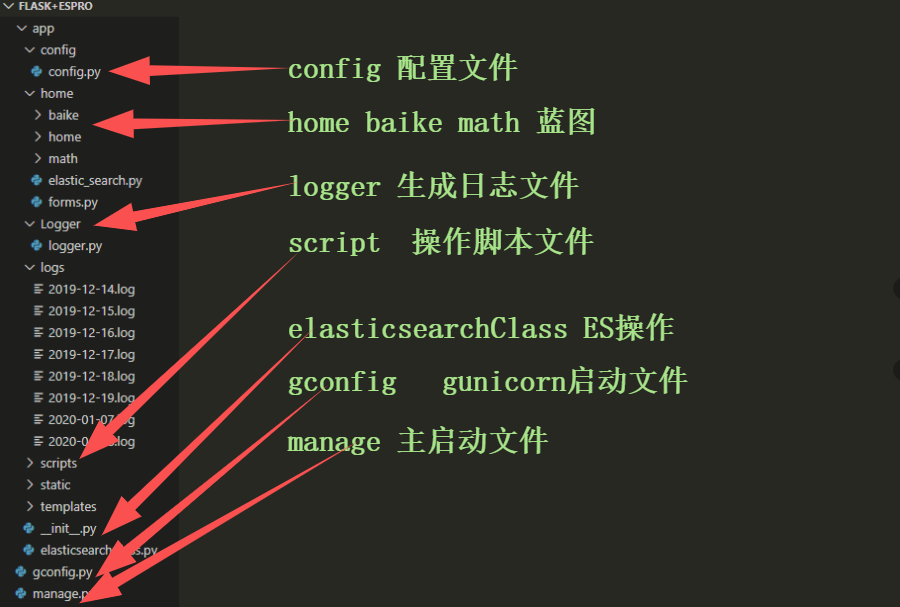
这样一来前期工作就差不多了,接下来剩下的工作主要集中于 Flask 的实际开发中,蓄力中 !!
**-----**------**-----**---**** End **-----**--------**-----**-****
往期精彩文章推荐:

欢迎各位大佬点击链接加入群聊【helloworld开发者社区】:https://jq.qq.com/?_wv=1027&k=mBlk6nzX进群交流IT技术热点。
本文转自 https://mp.weixin.qq.com/s/kZBcS-9esICzfS7C_tmovA,如有侵权,请联系删除。
评论
登录后参与技术讨论,分享你的经验与见解。
登录 / 注册暂无评论