【源码解析】springboot自动配置原理,以及mybatis怎么自动配置的

文章目录
springboot自动配置原理
1.搭建springboot
所有springboot需要引入的父项目:版本控制
<parent>
    <artifactId>spring-boot-starter-parent</artifactId>
    <groupId>org.springframework.boot</groupId>
    <version>2.1.11.RELEASE</version>
</parent>
它的父项目是
<groupId>org.springframework.boot</groupId>
<artifactId>spring-boot-dependencies</artifactId>
<version>2.1.11.RELEASE</version>
而这个项目就是Springboot的版本控制中心! )
然后我们需要引入需要使用的模块的启动器。由spring官方提供的命名规范为spring-boot-starter-xxx如
Spring-boot-starter-web
非spring官方提供的命名为xxx-spring-boot-starter如mybatis-spring-boot-starter
所谓启动器,本质上是一个空jar项目,这个项目只用来引入依赖。
<dependency>
    <groupId>org.springframework.boot</groupId>
    <artifactId>spring-boot-starter-web</artifactId>
</dependency>
最后,我们需要写一个启动类
package com.sunning;


import org.springframework.boot.SpringApplication;
import org.springframework.boot.autoconfigure.SpringBootApplication;

@SpringBootApplication
public class HelloSpringBootApplication {


    public static void main(String[] args) {


        SpringApplication.run(HelloSpringBootApplication.class,args);
    }
}
2.自动配置原理
@SpringBootApplication
@SpringBootConfiguration
@EnableAutoConfiguration
@ComponentScan(excludeFilters = { @Filter(type = FilterType.CUSTOM, classes = TypeExcludeFilter.class),
      @Filter(type = FilterType.CUSTOM, classes = AutoConfigurationExcludeFilter.class) })
等于上面三个注解
@SpringBootConfiguration
点进去看,就是一个@Configuration注解,声明这是个spring的配置类
@EnableAutoConfiguration
springboot启动最关键的注解
@Target(ElementType.TYPE)
@Retention(RetentionPolicy.RUNTIME)
@Documented
@Inherited
@AutoConfigurationPackage
@Import(AutoConfigurationImportSelector.class)
public @interface EnableAutoConfiguration {

   String ENABLED_OVERRIDE_PROPERTY = "spring.boot.enableautoconfiguration";

   /**
    * Exclude specific auto-configuration classes such that they will never be applied.
    * @return the classes to exclude
    */
   Class<?>[] exclude() default {};

   /**
    * Exclude specific auto-configuration class names such that they will never be
    * applied.
    * @return the class names to exclude
    * @since 1.3.0
    */
   String[] excludeName() default {};

}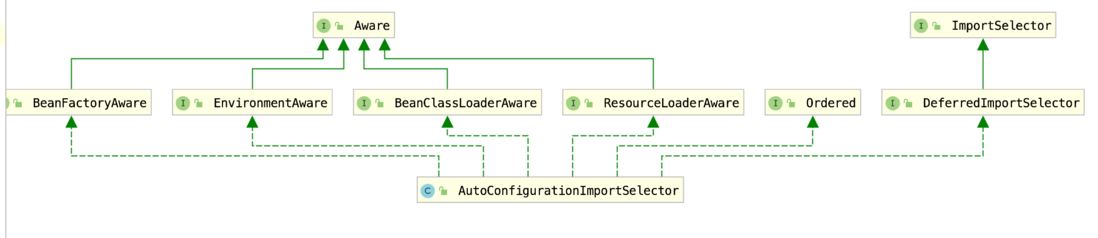
实现了ImportSelector接口
public interface ImportSelector {

   /**
    * Select and return the names of which class(es) should be imported based on
    * the {@link AnnotationMetadata} of the importing @{@link Configuration} class.
    */
   String[] selectImports(AnnotationMetadata importingClassMetadata);

}
该接口返回一个String[]数组, 表示要向容器注册的类的全类名
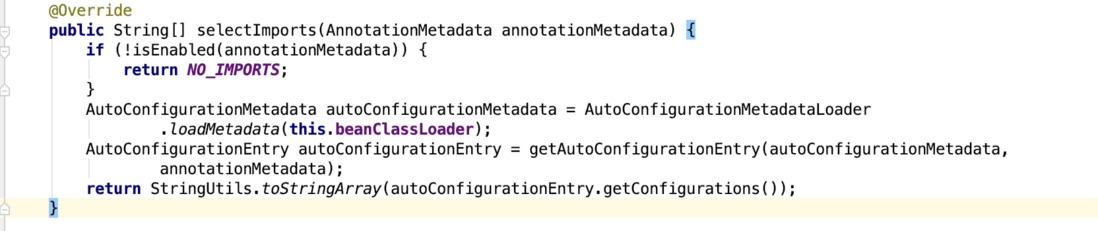

List<String> configurations = SpringFactoriesLoader.loadFactoryNames(getSpringFactoriesLoaderFactoryClass(),
      getBeanClassLoader());
SpringFactoriesLoader是spring提供的工具类,第一个参数是个Class对象,决定读取的key,为class对象的全类名,第二个参数是ClassLoader对象,决定从哪里开始找这个文件,去读取classpath:META-INF/spring.factories文件

自然也没有自动配置类。mybatis的自动配置类是mybatis提供的
读取这些value,将他们导入到核心容器。
此时spring自动配置包下的各种自动配置类就都被注册到核心容器中了
springboot会在启动时将这个包下的自动配置类注册到核心容器,而这些自动配置类说白了就是条件生效的@Configuration类。

@ConditionalOnClass注解表示一些类是不是存在当前类路径下,在才生效。
@ConditionalOnProperty相应的配置字段满足时才生效。
@ConditionalOnMissingBean 容器中没有某个bean时才生效。这时如果我们配置了,那么springboot就将不会给我们自动配置。
还有很多类似的,在同时满足这些条件后配置类才会生效。
可以看到所谓springboot自动配置就是引入了一些配置类,并且在一定条件下这些配置类才生效而已。springboot的原则是默认大于配置,所以当我们需要更改默认配置时,这些自动配置的源码就是很重要的参考依据了。典型的修改默认配置方法有:在配置文件中配置、在容器中注册特定bean、注入一些名为XXXConfigurer的类(比如实现了WebMvcConfigurer接口的类)等等。
可以在配置文件中设置logging.level.org.springframework.boot.autoconfigure=debug来查看自动配置的生效情况


@AutoConfigurationPackage
@Target(ElementType.TYPE)
@Retention(RetentionPolicy.RUNTIME)
@Documented
@Inherited
@Import(AutoConfigurationPackages.Registrar.class)
public @interface AutoConfigurationPackage {

}
由代码可见也就是一个@Import注解罢了。前面说Import后面可以接ImportSelector接口,将selectImports方法返回的String数组注册到核心容器。这里是另外一个Import支持的接口ImportBeanDefinitionRegistrar。
public interface ImportBeanDefinitionRegistrar {

   /**
    * Register bean definitions as necessary based on the given annotation metadata of
    * the importing {@code @Configuration} class.
    * <p>Note that {@link BeanDefinitionRegistryPostProcessor} types may <em>not</em> be
    * registered here, due to lifecycle constraints related to {@code @Configuration}
    * class processing.
    * @param importingClassMetadata annotation metadata of the importing class
    * @param registry current bean definition registry
    */
   void registerBeanDefinitions(AnnotationMetadata importingClassMetadata, BeanDefinitionRegistry registry);

}
该接口使用registry对核心容器中进行注册组件。
接下来我们重点关心@Import(AutoConfigurationPackages.Registrar.class)做了什么。
static class Registrar implements ImportBeanDefinitionRegistrar, DeterminableImports {

   @Override
   public void registerBeanDefinitions(AnnotationMetadata metadata, BeanDefinitionRegistry registry) {
      register(registry, new PackageImport(metadata).getPackageName());
   }

   @Override
   public Set<Object> determineImports(AnnotationMetadata metadata) {
      return Collections.singleton(new PackageImport(metadata));
   }

}
register(registry, new PackageImport(metadata).getPackageName());
new PackageImport(metadata).getPackageName()。相当于传入了被注解类的包名,在这里是就是HelloSpringBootApplication所在的包:com.sunning。接下来看register方法的逻辑
public static void register(BeanDefinitionRegistry registry, String... packageNames) {
   if (registry.containsBeanDefinition(BEAN)) {
      BeanDefinition beanDefinition = registry.getBeanDefinition(BEAN);
      ConstructorArgumentValues constructorArguments = beanDefinition.getConstructorArgumentValues();
      constructorArguments.addIndexedArgumentValue(0, addBasePackages(constructorArguments, packageNames));
   }
   else {
      GenericBeanDefinition beanDefinition = new GenericBeanDefinition();
      beanDefinition.setBeanClass(BasePackages.class);
      beanDefinition.getConstructorArgumentValues().addIndexedArgumentValue(0, packageNames);
      beanDefinition.setRole(BeanDefinition.ROLE_INFRASTRUCTURE);
      registry.registerBeanDefinition(BEAN, beanDefinition);
   }
}
这个方法就是判断核心容器是不是注册过了名叫BEAN(这个常量的值),如果有就往这个Bean的beanDefinition里面的构造方法加入packageNames。否则注册一个bean,名叫BEAN,是BasePackages类型,向他的构造方法里加入packageNames。
所以,由此可见这个注解的功能就是向核心容器中注册了一个BasePackages类型的bean,并且设置了他的构造方法为注了这个注解的类的包名。注册这个bean的目的也是为了之后的自动配置做准备,比如mybatis的自动配置中就用到了这个bean来确定在哪些包中扫描@Mapper注解。
@ComponentScan
对包进行扫描,由ConfigurationClassPostProcessor实现这个注解,有兴趣可以了解Spring的生命周期中的BeanFactoryPostProcessor接口。
3.以springboot整合mybatis为例子
依赖引入
<dependency>
    <groupId>org.mybatis.spring.boot</groupId>
    <artifactId>mybatis-spring-boot-starter</artifactId>
    <version>2.1.1</version>
</dependency>

<dependency>
    <groupId>mysql</groupId>
    <artifactId>mysql-connector-java</artifactId>
</dependency>
spring没有为mybatis提供启动器,自然也没有自动配置类。mybatis的自动配置类是mybatis提供的!
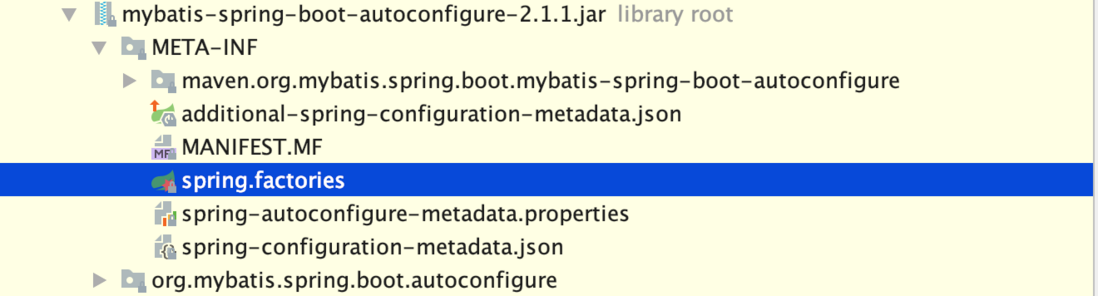
mybatis提供的自动配置包。由上面的原理可以知道,为了让自动配置类被容器加载,需在classpath:META-INF/spring.factories中指明需要被加载的自动配置类

可以看到mybatis提供了这些自动配置类。
MybatisAutoConfiguration
我们重点看这个类为我们提供了什么配置
可以看到生效条件,比如需要引入mybatis相关的依赖时,比如在核心容器中只有一个DataSource时,要在DataSource自动配置完成后才生效等等条件。并且开启了配置类@EnableConfigurationProperties(MybatisProperties.class)
构造方法
public MybatisAutoConfiguration(MybatisProperties properties, ObjectProvider<Interceptor[]> interceptorsProvider,
    ObjectProvider<TypeHandler[]> typeHandlersProvider, ObjectProvider<LanguageDriver[]> languageDriversProvider,
    ResourceLoader resourceLoader, ObjectProvider<DatabaseIdProvider> databaseIdProvider,
    ObjectProvider<List<ConfigurationCustomizer>> configurationCustomizersProvider) {
  this.properties = properties;
  this.interceptors = interceptorsProvider.getIfAvailable();
  this.typeHandlers = typeHandlersProvider.getIfAvailable();
  this.languageDrivers = languageDriversProvider.getIfAvailable();
  this.resourceLoader = resourceLoader;
  this.databaseIdProvider = databaseIdProvider.getIfAvailable();
  this.configurationCustomizers = configurationCustomizersProvider.getIfAvailable();
}
所以在该对象被实例化时会被注入一系列的bean,比如MybatisProperties对象。
SqlSessionFactory的创建
为容器中注入SqlSessionFactory对象,从容器中取dataSource(当我们引入spring-boot-starter-jdbc时会自动配置)作为参数。创建一个SqlSessionFactoryBean对象,这个对象是个工厂,用来生产SqlSessionFactory,我们调用factory对象的一系列set方法,最后调用getObject方法,获取SqlSessionFactory对象。中间的过程就是生成SqlSessionFactory需要的Configuration对象(取代mybatis的主配置文件)的过程。
@Bean
@ConditionalOnMissingBean
public SqlSessionFactory sqlSessionFactory(DataSource dataSource) throws Exception {
  SqlSessionFactoryBean factory = new SqlSessionFactoryBean();
  factory.setDataSource(dataSource);
  factory.setVfs(SpringBootVFS.class);
  if (StringUtils.hasText(this.properties.getConfigLocation())) {
    factory.setConfigLocation(this.resourceLoader.getResource(this.properties.getConfigLocation()));
  }
  applyConfiguration(factory);
  if (this.properties.getConfigurationProperties() != null) {
    factory.setConfigurationProperties(this.properties.getConfigurationProperties());
  }
  if (!ObjectUtils.isEmpty(this.interceptors)) {
    factory.setPlugins(this.interceptors);
  }
  if (this.databaseIdProvider != null) {
    factory.setDatabaseIdProvider(this.databaseIdProvider);
  }
  if (StringUtils.hasLength(this.properties.getTypeAliasesPackage())) {
    factory.setTypeAliasesPackage(this.properties.getTypeAliasesPackage());
  }
  if (this.properties.getTypeAliasesSuperType() != null) {
    factory.setTypeAliasesSuperType(this.properties.getTypeAliasesSuperType());
  }
  if (StringUtils.hasLength(this.properties.getTypeHandlersPackage())) {
    factory.setTypeHandlersPackage(this.properties.getTypeHandlersPackage());
  }
  if (!ObjectUtils.isEmpty(this.typeHandlers)) {
    factory.setTypeHandlers(this.typeHandlers);
  }
  if (!ObjectUtils.isEmpty(this.properties.resolveMapperLocations())) {
    factory.setMapperLocations(this.properties.resolveMapperLocations());
  }
  Set<String> factoryPropertyNames = Stream
      .of(new BeanWrapperImpl(SqlSessionFactoryBean.class).getPropertyDescriptors()).map(PropertyDescriptor::getName)
      .collect(Collectors.toSet());
  Class<? extends LanguageDriver> defaultLanguageDriver = this.properties.getDefaultScriptingLanguageDriver();
  if (factoryPropertyNames.contains("scriptingLanguageDrivers") && !ObjectUtils.isEmpty(this.languageDrivers)) {
    // Need to mybatis-spring 2.0.2+
    factory.setScriptingLanguageDrivers(this.languageDrivers);
    if (defaultLanguageDriver == null && this.languageDrivers.length == 1) {
      defaultLanguageDriver = this.languageDrivers[0].getClass();
    }
  }
  if (factoryPropertyNames.contains("defaultScriptingLanguageDriver")) {
    // Need to mybatis-spring 2.0.2+
    factory.setDefaultScriptingLanguageDriver(defaultLanguageDriver);
  }

  return factory.getObject();
}
可以再重点看看里面的applyConfiguration方法
private void applyConfiguration(SqlSessionFactoryBean factory) {
  Configuration configuration = this.properties.getConfiguration();
  if (configuration == null && !StringUtils.hasText(this.properties.getConfigLocation())) {
    configuration = new Configuration();
  }
  if (configuration != null && !CollectionUtils.isEmpty(this.configurationCustomizers)) {
    for (ConfigurationCustomizer customizer : this.configurationCustomizers) {
      customizer.customize(configuration);
    }
  }
  factory.setConfiguration(configuration);
}
这就是前面提到的XXXCustomizer对springboot配置修改例子。this.configurationCustomizers对象哪里来的,可以追溯的构造方法,所以是容器注入的。
SqlSessionTemplate的创建
@Bean
@ConditionalOnMissingBean
public SqlSessionTemplate sqlSessionTemplate(SqlSessionFactory sqlSessionFactory) {
  ExecutorType executorType = this.properties.getExecutorType();
  if (executorType != null) {
    return new SqlSessionTemplate(sqlSessionFactory, executorType);
  } else {
    return new SqlSessionTemplate(sqlSessionFactory);
  }
}
这个方法很简单,就是取刚刚注入的SqlSessionFactory,在他的基础上new了一个SqlSessionTemplate对象。
MapperScannerRegistrarNotFoundConfiguration类
来到文件的最后一部分
/**
 * If mapper registering configuration or mapper scanning configuration not present, this configuration allow to scan
 * mappers based on the same component-scanning path as Spring Boot itself.
 */
@org.springframework.context.annotation.Configuration
@Import(AutoConfiguredMapperScannerRegistrar.class)
@ConditionalOnMissingBean({ MapperFactoryBean.class, MapperScannerConfigurer.class })
public static class MapperScannerRegistrarNotFoundConfiguration implements InitializingBean {

  @Override
  public void afterPropertiesSet() {
    logger.debug(
        "Not found configuration for registering mapper bean using @MapperScan, MapperFactoryBean and MapperScannerConfigurer.");
  }

}
这是个静态内部类,只在@ConditionalOnMissingBean({ MapperFactoryBean.class, MapperScannerConfigurer.class })条件下生效,就是容器里没有MapperFactoryBean,MapperScannerConfigurer这两个类型的bean时才生效。
生效了什么:@Import(AutoConfiguredMapperScannerRegistrar.class):又是@Import注解引入,向容器中注册了一些bean罢了。而我们能够写完接口,添加上@Mapper注解,然后就可以注入mapper的,进行数据库访问这一些了操作都是由AutoConfiguredMapperScannerRegistrar.这个类来为我们实现的。
AutoConfiguredMapperScannerRegistrar

由于实现了ImportBeanDefinitionRegistar接口,我们看registerBeanDefinitions方法,就知道向容器中注册了什么。
@Override
public void registerBeanDefinitions(AnnotationMetadata importingClassMetadata, BeanDefinitionRegistry registry) {

  if (!AutoConfigurationPackages.has(this.beanFactory)) {
    logger.debug("Could not determine auto-configuration package, automatic mapper scanning disabled.");
    return;
  }

  logger.debug("Searching for mappers annotated with @Mapper");

  List<String> packages = AutoConfigurationPackages.get(this.beanFactory);
  if (logger.isDebugEnabled()) {
    packages.forEach(pkg -> logger.debug("Using auto-configuration base package '{}'", pkg));
  }

  BeanDefinitionBuilder builder = BeanDefinitionBuilder.genericBeanDefinition(MapperScannerConfigurer.class);
  builder.addPropertyValue("processPropertyPlaceHolders", true);
  builder.addPropertyValue("annotationClass", Mapper.class);
  builder.addPropertyValue("basePackage", StringUtils.collectionToCommaDelimitedString(packages));
  BeanWrapper beanWrapper = new BeanWrapperImpl(MapperScannerConfigurer.class);
  Stream.of(beanWrapper.getPropertyDescriptors())
      // Need to mybatis-spring 2.0.2+
      .filter(x -> x.getName().equals("lazyInitialization")).findAny()
      .ifPresent(x -> builder.addPropertyValue("lazyInitialization", "${mybatis.lazy-initialization:false}"));
  registry.registerBeanDefinition(MapperScannerConfigurer.class.getName(), builder.getBeanDefinition());
}
直接看最后一行
registry.registerBeanDefinition(MapperScannerConfigurer.class.getName(), builder.getBeanDefinition());无非就是注册了一个MapperScannerConfigurer,之前的代码都是在对这个BeanDefinition进行设置,比如设置了annotationClass属性为Mapper.class,供之后的扫描用。basePackage属性,为packages变量
可以看到packages变量怎么来的
List<String> packages = AutoConfigurationPackages.get(this.beanFactory);
原来是从核心容器里取的,点进这个方法
public static List<String> get(BeanFactory beanFactory) {
   try {
      return beanFactory.getBean(BEAN, BasePackages.class).get();//从容器里面拿!!!
   }
   catch (NoSuchBeanDefinitionException ex) {
      throw new IllegalStateException("Unable to retrieve @EnableAutoConfiguration base packages");
   }
}
这不就是@AutoConfigurationPackage注解注册的那个Bean吗?
MapperScannerConfigurer
最后看刚刚注册的这个类
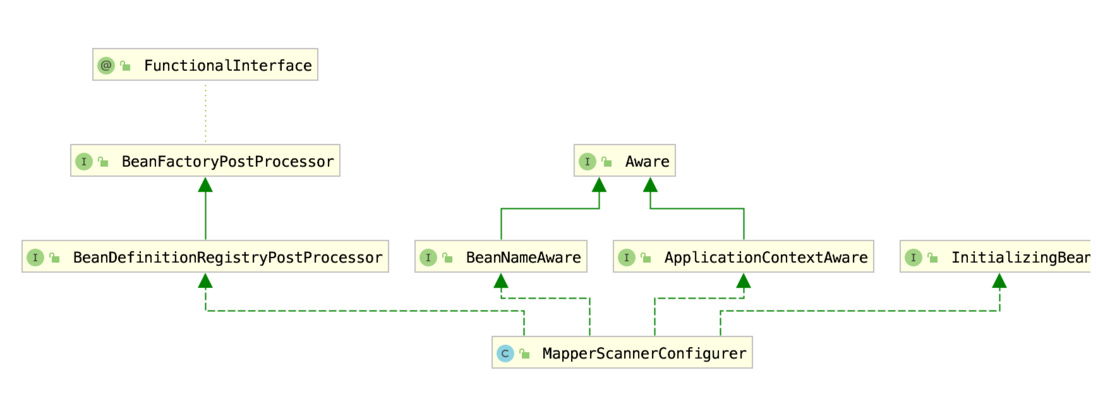
它实现了BeanDefinitionRegistryPostProcessor接口这个接口又实现了BeanFactoryPostProcessor接口。
补充spring生命周期
ApplicationContext会在refresh()方法中完成加载,这个方法由AbstractApplicationContext实现

1.子类对beanFactory做一些处理
2.初始化并且调用容器中的BeanFactoryPostProcessor对象
3.初始化BeanPostProcessor对象
4.初始化消息源
5.初始化应用事件多播器
6.onRefresh()方法调用,这个方法也是由子类去实现,例如在ServletWebServerApplicationContext中该方法的时间就是启动Servlet容器(典型的如Tomcat)
7.注册监听器
8.加载剩下的未被加载的非懒加载的bean
9.发布刷新完成的事件
由这个生命周期我们看到了两个特殊的接口
BeanFactoryPostProcessor和其子接口:在混沌时期,修改beanFactory。 典型的用法是,向里面注册bean。比如ConfigurationClassPostProcessor完成对@Component、@Import、@Bean等等注解的扫描,并且把它们全部都注册到核心容器中。
BeanPostProcessor和其子接口:在每个bean被创建,被初始化前后被调用。典型如AnnotationAwareAspectJAutoProxyCreator在每个bean被初始化后介入,对这个bean进行代理,从而实现aop功能。
在当前类在这个阶段
会调用postProcessBeanDefinitionRegistry(BeanDefinitionRegistry registry) 方法,向容器中注册一系列的Bean!
所以接下来我们就只需要知道,它在给我们注册了什么就行了。
@Override
public void postProcessBeanDefinitionRegistry(BeanDefinitionRegistry registry) {
  if (this.processPropertyPlaceHolders) {
    processPropertyPlaceHolders();
  }

  ClassPathMapperScanner scanner = new ClassPathMapperScanner(registry);
  scanner.setAddToConfig(this.addToConfig);
  scanner.setAnnotationClass(this.annotationClass);
  scanner.setMarkerInterface(this.markerInterface);
  scanner.setSqlSessionFactory(this.sqlSessionFactory);
  scanner.setSqlSessionTemplate(this.sqlSessionTemplate);
  scanner.setSqlSessionFactoryBeanName(this.sqlSessionFactoryBeanName);
  scanner.setSqlSessionTemplateBeanName(this.sqlSessionTemplateBeanName);
  scanner.setResourceLoader(this.applicationContext);
  scanner.setBeanNameGenerator(this.nameGenerator);
  scanner.setMapperFactoryBeanClass(this.mapperFactoryBeanClass);
  if (StringUtils.hasText(lazyInitialization)) {
    scanner.setLazyInitialization(Boolean.valueOf(lazyInitialization));
  }
  scanner.registerFilters();
  scanner.scan(
      StringUtils.tokenizeToStringArray(this.basePackage, ConfigurableApplicationContext.CONFIG_LOCATION_DELIMITERS));
}
它调用了ClassPathMapperScanner对象的scan方法,向容器中注册组件。
核心在
先调用父类的doScan
然后进行一个后处理
processBeanDefinitions(beanDefinitions);
而父类的这个方法扫描在basePackages中被@Mapper所注解的类,返回一堆beanDefinition

这里我写了一个Mapper,这个beanDefinition的类型是这个接口类型,而在后处理中,将这个类型改为org.mybatis.spring.mapper.MapperFactoryBean类型
private void processBeanDefinitions(Set<BeanDefinitionHolder> beanDefinitions) {
  GenericBeanDefinition definition;
  for (BeanDefinitionHolder holder : beanDefinitions) {
    definition = (GenericBeanDefinition) holder.getBeanDefinition();
    String beanClassName = definition.getBeanClassName();
    LOGGER.debug(() -> "Creating MapperFactoryBean with name '" + holder.getBeanName() + "' and '" + beanClassName
        + "' mapperInterface");

    // the mapper interface is the original class of the bean
    // but, the actual class of the bean is MapperFactoryBean
    definition.getConstructorArgumentValues().addGenericArgumentValue(beanClassName); // issue #59
    definition.setBeanClass(this.mapperFactoryBeanClass);//改了类型!

    definition.getPropertyValues().add("addToConfig", this.addToConfig);//设置属性

    boolean explicitFactoryUsed = false;
    if (StringUtils.hasText(this.sqlSessionFactoryBeanName)) {
      definition.getPropertyValues().add("sqlSessionFactory",
          new RuntimeBeanReference(this.sqlSessionFactoryBeanName));
      explicitFactoryUsed = true;
    } else if (this.sqlSessionFactory != null) {
      definition.getPropertyValues().add("sqlSessionFactory", this.sqlSessionFactory);
      explicitFactoryUsed = true;
    }

    if (StringUtils.hasText(this.sqlSessionTemplateBeanName)) {
      if (explicitFactoryUsed) {
        LOGGER.warn(
            () -> "Cannot use both: sqlSessionTemplate and sqlSessionFactory together. sqlSessionFactory is ignored.");
      }
      definition.getPropertyValues().add("sqlSessionTemplate",
          new RuntimeBeanReference(this.sqlSessionTemplateBeanName));
      explicitFactoryUsed = true;
    } else if (this.sqlSessionTemplate != null) {
      if (explicitFactoryUsed) {
        LOGGER.warn(
            () -> "Cannot use both: sqlSessionTemplate and sqlSessionFactory together. sqlSessionFactory is ignored.");
      }
      definition.getPropertyValues().add("sqlSessionTemplate", this.sqlSessionTemplate);
      explicitFactoryUsed = true;
    }

    if (!explicitFactoryUsed) {
      LOGGER.debug(() -> "Enabling autowire by type for MapperFactoryBean with name '" + holder.getBeanName() + "'.");
      definition.setAutowireMode(AbstractBeanDefinition.AUTOWIRE_BY_TYPE);//其他复杂属性,都去核心容器里拿!!!!
    }
    definition.setLazyInit(lazyInitialization);
  }
}
这里有几处重点1.改了beanDefinition的类型 2.设置了Mapper接口类型为MapperFactoryBean的构造函数参数
3.MapperFactoryBean的其他属性都去核心容器里拿(比如最重要的SqlSessionFactory,SqlSessionTemplate)
总结一下就是我们原来指向Mapper接口类的beanDefinition,被改成了指向MapperFactoryBean类,并且设置了这个类的一些属性(如把Mapper接口类设置为其构造方法的参数)。
org.mybatis.spring.mapper.MapperFactoryBean
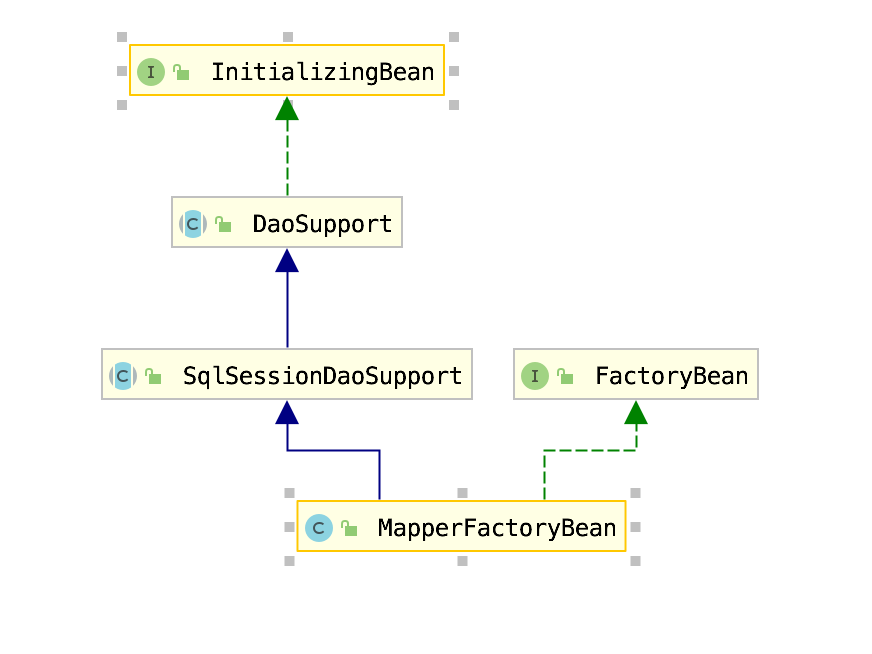
该类实现了FactoryBean接口,
@Override
public T getObject();
和我们之前用配置文件写工厂bean一样的原理。
也就是说真正在容器里的是getObject方法返回的那个对象
这个方法非常简单
@Override
public T getObject() throws Exception {
  return getSqlSession().getMapper(this.mapperInterface);
}
这就是我们最熟悉的,最经典的mybatis的使用了。所以我们才能@Autowired注入一个Mapper。
4.总结
1、@EnableAutoConfiguration注解会读取所有classpath:META-INF/Spring.factories,取key为org.springframework.boot.autoconfigure.EnableAutoConfiguration 下的所有value,将他们注册到核心容器。此时完成自动配置类的加载。
2、自动配置类上有大量自动配置生效的条件,满足这些条件才能够使自动配置类生效。典型的就是依赖是不是被引入了。
3、springboot采用了默认代替配置的策略,如果不满足需求,可以轻松更改默认配置。比如修改
application.yml/properties文件,手动注册bean,注册一些实现特殊接口的类。
4、所谓自动配置就是向容器注册组件。有一些组件实现了特殊的接口,影响着spring的生命周期。
5、mybatis为我们注册了SqlSessionFactory,SqlSessionTemplate,以及为每个@Mapper注册了一个Mapper实现类。
评论
登录后参与技术讨论,分享你的经验与见解。
登录 / 注册暂无评论