SpringBoot学习笔记--Web

文章目录
四、Web
1. 简介
使用SpringBoot
- 创建Spring Boot应用,选中我们需要的模块;
- SpringBoot已经默认将这些场景配置好了,只需要在配置文件中指定少量配置就可以运行起来
- 自己编写业务代码
自动配置原理?
xxxAutoConfiguration自动给容器中配置组件xxxProperties 配置类来封装配置文件的内容
2. SpringBoot对静态资源的映射规则
可以设置和资源有关的参数
@ConfigurationProperties(
    prefix = "spring.resources",
    ignoreUnknownFields = false
)
public class ResourceProperties implements ResourceLoaderAware
public void addResourceHandlers(ResourceHandlerRegistry registry) {
if (!this.resourceProperties.isAddMappings()) {
logger.debug("Default resource handling disabled");
} else {
Integer cachePeriod = this.resourceProperties.getCachePeriod();
if (!registry.hasMappingForPattern("/webjars/**")) {
this.customizeResourceHandlerRegistration(registry.addResourceHandler(new String[]{"/webjars/**"}).addResourceLocations(new String[]{"classpath:/META-INF/resources/webjars/"}).setCachePeriod(cachePeriod));
}
String staticPathPattern = this.mvcProperties.getStaticPathPattern();
if (!registry.hasMappingForPattern(staticPathPattern)) {
this.customizeResourceHandlerRegistration(registry.addResourceHandler(new String[]{staticPathPattern}).addResourceLocations(this.resourceProperties.getStaticLocations()).setCachePeriod(cachePeriod));
}
}
}-
所有/webjars/** 请求,都去classpath:/META-INF/resources/webjars/ 找资源
引入资源
        <!-- 引入jquery的webjar -->
        <dependency>
            <groupId>org.webjars</groupId>
            <artifactId>jquery</artifactId>
            <version>3.3.1</version>
        </dependency>
webjars:是指以jar的方式导入资源
<img width="352" alt="wx20180518-205514 2x" src="https://user-images.githubuse...;>
如访问:http://localhost:8080/webjars/jquery/3.3.1/jquery.js
-
"/**"访问当前项目的任何资源(静态资源的文件夹)
"classpath:/META-INF/resources/", "classpath:/resources/",
"classpath:/static/",
"classpath:/public/
"/"当前项目的根路径
注意:目前SpringBoot下的resources是类路径,并非该路径classpath:/resources/
localhost:8080/abc 默认去静态文件夹里面找abc
-
欢迎页:静态资源證下所有的index.html,被/**映射
@Bean public WelcomePageHandlerMapping welcomePageHandlerMapping( ResourceProperties resourceProperties) { return new WelcomePageHandlerMapping(resourceProperties.getWelcomePage(), this.mvcProperties.getStaticPathPattern()); } -
所有的**/favicon.ico都是在静态资源文件夹中找
@Configuration @ConditionalOnProperty(value = "spring.mvc.favicon.enabled", matchIfMissing = true) public static class FaviconConfiguration { private final ResourceProperties resourceProperties; public FaviconConfiguration(ResourceProperties resourceProperties) { this.resourceProperties = resourceProperties; } @Bean public SimpleUrlHandlerMapping faviconHandlerMapping() { SimpleUrlHandlerMapping mapping = new SimpleUrlHandlerMapping(); mapping.setOrder(Ordered.HIGHEST_PRECEDENCE + 1); mapping.setUrlMap(Collections.singletonMap("**/favicon.ico", faviconRequestHandler())); return mapping; } @Bean public ResourceHttpRequestHandler faviconRequestHandler() { ResourceHttpRequestHandler requestHandler = new ResourceHttpRequestHandler(); requestHandler .setLocations(this.resourceProperties.getFaviconLocations()); return requestHandler; } } - 自定义静态资源目录
spring.resources.static-locations=classpath:/hello/,classpath:/meituan/3. 模块引擎
JSP、Welocity、Freemarker、Thymeleaf

Spring Boot推荐使用的模块引擎Thymeleaf
3.1 引入Thymeleaf
        <!-- 引入thymeleaf-->
        <dependency>
            <groupId>org.springframework.boot</groupId>
            <artifactId>spring-boot-starter-thymeleaf</artifactId>
        </dependency>
使用Thymeleaf3
<properties>
    <thymeleaf.version>3.0.2.RELEASE</thymeleaf.version>
    <thymeleaf-layout-dialect.version>2.1.1</thymeleaf-layout-dialect.version>
</properties>
增加thymeleaf-layout支持
        <!--布局功能的支持程序 thymeleaf3主程序 layout2以上版本-->
        <thymeleaf-layout-dialect.version>2.2.2</thymeleaf-layout-dialect.version>
3.2 使用thymeleaf
@ConfigurationProperties(prefix = "spring.thymeleaf")
public class ThymeleafProperties {

    private static final Charset DEFAULT_ENCODING = Charset.forName("UTF-8");

    private static final MimeType DEFAULT_CONTENT_TYPE = MimeType.valueOf("text/html");

//只要我们把HTML页面放在classpath:/templates/,thymeleaf就可以自动渲染了
    public static final String DEFAULT_PREFIX = "classpath:/templates/";

    public static final String DEFAULT_SUFFIX = ".html";
只要我们把HTML页面放在classpath:/templates/,thymeleaf就可以自动渲染了
- 导入thymeleaf的名称空间
<html xmlns:th="http://www.thymeleaf.org">- 使用thymeleaf语法
<!DOCTYPE html>
<html lang="en">
<head>
    <meta charset="UTF-8">
    <title>success</title>
</head>
<body>
    <h1>成功!</h1>
    <!--将div中的文本内容设置为文本内指定的值-->
    <div th:text="${hello}">这是显示欢迎信息</div>
</body>
</html>
3.3 语法规则
- th:text:改变当前元素里面的文本内容
th: 做生意html属性,来替换原生属性的值
- 表达式语法

   Simple expressions:
       Variable Expressions: ${...}
           1. 获取对象的属性、调用方法
           2. 使用内置的基本对象
           3. 内置工具对象
       Selection Variable Expressions: *{...} 选择表达式
           补充:配合th:object使用
           <div th:object="${session.user}">
               <p>Name: <span th:text="*{firstName}">Sebastian</span>.</p>
               <p>Surname: <span th:text="*{lastName}">Pepper</span>.</p>
               <p>Nationality: <span th:text="*{nationality}">Saturn</span>.</p>
           </div>

       Message Expressions: #{...} 获取国际化内容

       Link URL Expressions: @{...} 定义URL链接

       Fragment Expressions: ~{...}

   Literals 字面量
       Text literals: 'one text' , 'Another one!' ,…
       Number literals: 0 , 34 , 3.0 , 12.3 ,…
       Boolean literals: true , false
       Null literal: null
       Literal tokens: one , sometext , main ,…
   Text operations: 文本操作
       String concatenation: +
       Literal substitutions: |The name is ${name}|
   Arithmetic operations: 数学运算
       Binary operators: + , - , * , / , %
       Minus sign (unary operator): -
   Boolean operations: 布尔运算
       Binary operators: and , or
       Boolean negation (unary operator): ! , not
   Comparisons and equality: 比较运算
       Comparators: > , < , >= , <= ( gt , lt , ge , le )
       Equality operators: == , != ( eq , ne )
   Conditional operators: 条件运算(三元运算)
       If-then: (if) ? (then)
       If-then-else: (if) ? (then) : (else)
       Default: (value) ?: (defaultvalue)
   Special tokens:
       Page 17 of 104
       No-Operation: _
4. SpringBoot对SpringMVC的自动配置
4.1 SpringBoot 对静态资源的映射规则
Spring Boot provides auto-configuration for Spring MVC that works well with most applications.
The auto-configuration adds the following features on top of Spring’s defaults:
Inclusion of
ContentNegotiatingViewResolverandBeanNameViewResolverbeans.
- 自动配置了ViewResolver(视图解析器:根据方法的返回值得到视图对象View,视图对象决定如何渲染,转发或重定向)
ContentNegotiatingViewResolver组合所有的视图解析器- 如何定制:可以自己给容器中添加一个视图解析器,
ContentNegotiatingViewResolver会自动将其组合起来- Support for serving static resources, including support for WebJars (see below).静态资源文件夹路径
Automatic registration of
Converter,GenericConverter,Formatterbeans.
- Converter 转换器 页面接收的数据类型转换使用Converter
- Formatter 格式化器,例如2018.5.22=》Date
- 自己添加的Convertor、Formattor只需放在容器中即可
Support for
HttpMessageConverters(see below).
HttpMessageConverterSpringMVC用来转换Http的请求和响应:User《=》jsonHttpMessageConverters从容器中确定;获取所有的HttpmessageConverter- 自己给容器中添加HttpMessageConverter,只需将自己的组件注册到容器中(@Bean @Component)
- Automatic registration of
MessageCodesResolver(see below).定义错误代码生成规则- Static
index.htmlsupport.静态首页访问- Custom
Faviconsupport (see below).Automatic use of a
ConfigurableWebBindingInitializerbean (see below).
- 可以配置一个
ConfigurableWebBindingInitializer来替换默认的(添加的容器中)ConfigurableWebBindingInitializer的作用是初始化WebDataBinderorg.springframework.boot.autoconfigure.web : web的所有自动配置场景
If you want to keep Spring Boot MVC features, and you just want to add additional MVC configuration (interceptors, formatters, view controllers etc.) you can add your own
@Configurationclass of typeWebMvcConfigurerAdapter, but without@EnableWebMvc. If you wish to provide custom instances ofRequestMappingHandlerMapping,RequestMappingHandlerAdapterorExceptionHandlerExceptionResolveryou can declare aWebMvcRegistrationsAdapterinstance providing such components.If you want to take complete control of Spring MVC, you can add your own
@Configurationannotated with@EnableWebMvc.
4.2 扩展SpringMVC
    <mvc:view-controller path="/hello" view-name="success" />
    <mvc:interceptors>
        <mvc:interceptor>
            <mvc:mapping path="/hello"/>
            <bean></bean>
        </mvc:interceptor>
    </mvc:interceptors>
编写一个配置类(@Configuration),是WebMvcConfigurerAdapter类型,不能标注@EnableWebMvc
既保留了所有的自动配置,也能使用自定义的扩展配置
@Configuration
public class MyMvcConfig extends WebMvcConfigurerAdapter {

    @Override
    public void addViewControllers(ViewControllerRegistry registry) {
        registry.addViewController("/meituan").setViewName("success");

    }
}
原理:
- WebMvcAutoConfiguration是SpringMVC的自动配置类;
- 在做其他自动配置时,会导入@Import({WebMvcAutoConfiguration.EnableWebMvcConfiguration.class})
@Configuration
    public static class EnableWebMvcConfiguration extends DelegatingWebMvcConfiguration


    @Configuration
public class DelegatingWebMvcConfiguration extends WebMvcConfigurationSupport {

    private final WebMvcConfigurerComposite configurers = new WebMvcConfigurerComposite();


    @Autowired(required = false)
    public void setConfigurers(List<WebMvcConfigurer> configurers) {
        if (!CollectionUtils.isEmpty(configurers)) {
            this.configurers.addWebMvcConfigurers(configurers);
            //一个参考实现,将所有的WebMvcConfigurer相关配置得了来一起调用
            /**    @Override
                    public void addViewControllers(ViewControllerRegistry registry) {
                        for (WebMvcConfigurer delegate : this.delegates) {
                            delegate.addViewControllers(registry);
                        }
                    }
                    */
        }
}- 容器中所有的WebMvcConfigurer都会共同起作用
- 自定义的配置类也会被调用
效果:SpringMVC的自动配置和自定义的扩展配置得了会起作用。
4.3 全面接管SpringMVC
SpringBoot对SpringMVC的自动配置不需要了,所有都手动配置
此时需要在配置类中添加@EnableWebMvc,SpringBoot对SpringMVC的自动配置都失效
原理:
@Retention(RetentionPolicy.RUNTIME)
@Target(ElementType.TYPE)
@Documented
@Import(DelegatingWebMvcConfiguration.class)
public @interface EnableWebMvc
@Configuration public class DelegatingWebMvcConfiguration extends WebMvcConfigurationSupport-
WebMvcAutoConfiguration要求没有WebMvcConfigurationSupport注解的类存在在容器中,而添加了@EnableWebMvc的注解恰恰是个WebMvcConfigurationSupport的子类
@Configuration @ConditionalOnWebApplication @ConditionalOnClass({Servlet.class, DispatcherServlet.class, WebMvcConfigurerAdapter.class}) @ConditionalOnMissingBean({WebMvcConfigurationSupport.class}) @AutoConfigureOrder(-2147483638) @AutoConfigureAfter({DispatcherServletAutoConfiguration.class, ValidationAutoConfiguration.class}) public class WebMvcAutoConfiguration - 导入的WebMvcConfigurationSupport只是SpringMVC的基本功能
5. 如何修改Spring Boot的默认配置
模式:
- SpringBoot在自动配置很多组件的时候,先看容器中有没有用户自己配置的,如果有就用用户配置的;如果没有才自动配置;如果有些组件可能有多个(ViewResolver),SpringBoot会将用户配置的和自己默认配置的组合起来
- 在SpringBoot中会有非常多的xxxConfigurer帮助我们进行扩展配置
- 在SpringBoot中会有很多的xxxCustomizer帮助我们进行定制配置
6. RestfulCRUD
6.1 引入资源
<!DOCTYPE html>
<html lang="en" xmlns:th="http://www.thymeleaf.org">
    <head>
        <meta http-equiv="Content-Type" content="text/html; charset=UTF-8" />
        <meta name="viewport" content="width=device-width, initial-scale=1, shrink-to-fit=no" />
        <meta name="description" content="" />
        <meta name="author" content="" />
        <title>Signin Template for Bootstrap</title>
        <!-- Bootstrap core CSS -->
        <link href="asserts/css/bootstrap.min.css" th:href="@{/webjars/bootstrap/4.0.0/css/bootstrap.css}" rel="stylesheet" />
        <!-- Custom styles for this template -->
        <link href="asserts/css/signin.css" th:href="@{/asserts/css/signin.css}" rel="stylesheet" />
    </head>

    <body class="text-center">
        <form class="form-signin" action="dashboard.html">
            <img class="mb-4" th:src="@{asserts/img/bootstrap-solid.svg}" src="asserts/img/bootstrap-solid.svg" alt="" width="72" height="72">
            <h1 class="h3 mb-3 font-weight-normal">Please sign in</h1>
            <label class="sr-only">Username</label>
            <input type="text" class="form-control" placeholder="Username" required="" autofocus="">
            <label class="sr-only">Password</label>
            <input type="password" class="form-control" placeholder="Password" required="">
            <div class="checkbox mb-3">
                <label>
          <input type="checkbox" value="remember-me"> Remember me
        </label>
            </div>
            <button class="btn btn-lg btn-primary btn-block" type="submit">Sign in</button>
            <p class="mt-5 mb-3 text-muted">© 2017-2018</p>
            <a class="btn btn-sm">中文</a>
            <a class="btn btn-sm">English</a>
        </form>

    </body>

</html>采用thymeleaf的写法,如<link href="asserts/css/bootstrap.min.css" th:href="@{/webjars/bootstrap/4.0.0/css/bootstrap.css}" rel="stylesheet" />好处是更改项目目录后不需要再修改代码
6.2 国际化
在SpringMVC中需要以下几个步骤
- 编写国际化配置文件
- 使用ResourceBundleMessageSour管理国际化资源文件
- 在页面使用fmt:message取出国际化内容
SpringBoot中的步骤为:
- 编写国际化配置文件,抽取页面需要显示的国际化消息
-
SpringBoot自动配置好了管理国际化资源文件的组件
@ConfigurationProperties(prefix = "spring.messages")
public class MessageSourceAutoConfiguration {

    private static final Resource[] NO_RESOURCES = {};

    /**
         * Comma-separated list of basenames (essentially a fully-qualified classpath
         * location), each following the ResourceBundle convention with relaxed support for
         * slash based locations. If it doesn't contain a package qualifier (such as

         */
    private String basename = "messages";//我们的配置文件可以直接放在类路径下,叫messages.properties,此时不需要做任何配置即可生效;如自定义,可以在application.properties中添加配置spring.messages.basename=i18n.login

    @Bean
    public MessageSource messageSource() {
        ResourceBundleMessageSource messageSource = new ResourceBundleMessageSource();
        if (StringUtils.hasText(this.basename)) {

            //设置国际化资源文件的基础名(去掉语言国家代码的)
            messageSource.setBasenames(StringUtils.commaDelimitedListToStringArray(
                StringUtils.trimAllWhitespace(this.basename)));
        }
        if (this.encoding != null) {
            messageSource.setDefaultEncoding(this.encoding.name());
        }
        messageSource.setFallbackToSystemLocale(this.fallbackToSystemLocale);
        messageSource.setCacheSeconds(this.cacheSeconds);
        messageSource.setAlwaysUseMessageFormat(this.alwaysUseMessageFormat);
        return messageSource;
    }

```
- 去页面获取国际化的值
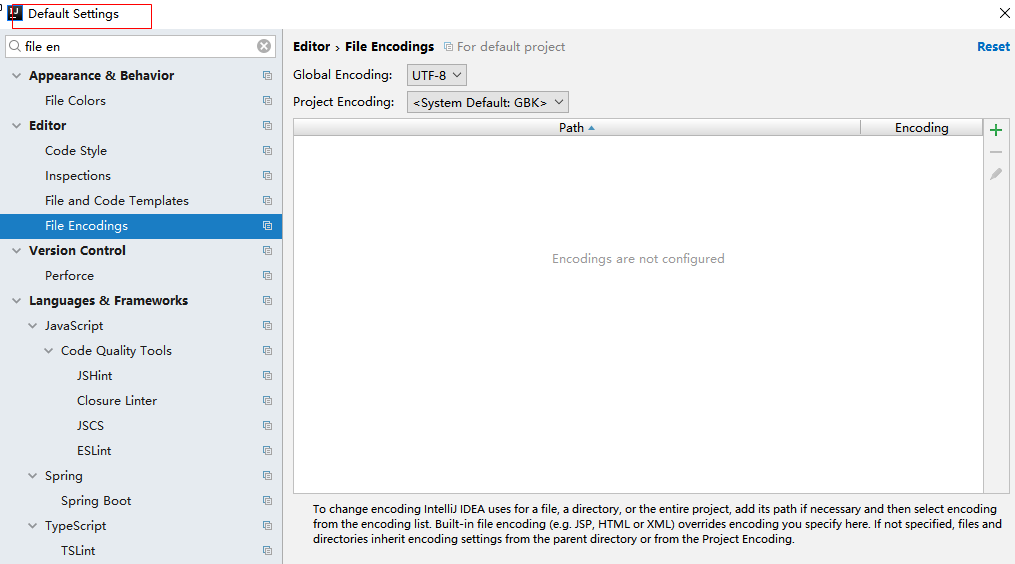
在idea中可以通过修改Other-Settings ---> Default Settings来修改全局配置
<!DOCTYPE html>
<html lang="en" xmlns:th="http://www.thymeleaf.org">
    <head>
        <meta http-equiv="Content-Type" content="text/html; charset=UTF-8" />
        <meta name="viewport" content="width=device-width, initial-scale=1, shrink-to-fit=no" />
        <meta name="description" content="" />
        <meta name="author" content="" />
        <title>Signin Template for Bootstrap</title>
        <!-- Bootstrap core CSS -->
        <link href="asserts/css/bootstrap.min.css" th:href="@{/webjars/bootstrap/4.0.0/css/bootstrap.css}" rel="stylesheet" />
        <!-- Custom styles for this template -->
        <link href="asserts/css/signin.css" th:href="@{/asserts/css/signin.css}" rel="stylesheet" />
    </head>

    <body class="text-center">
        <form class="form-signin" action="dashboard.html">
            <img class="mb-4" th:src="@{asserts/img/bootstrap-solid.svg}" src="asserts/img/bootstrap-solid.svg" alt="" width="72" height="72">
            <h1 class="h3 mb-3 font-weight-normal" th:text="#{login.tip}">Please sign in</h1>
            <label class="sr-only" th:text="#{login.username}">Username</label>
            <input type="text" class="form-control" placeholder="Username" required="" autofocus="">
            <label class="sr-only" th:text="#{login.password}">Password</label>
            <input type="password" class="form-control" placeholder="Password" required="">
            <div class="checkbox mb-3">
                <label>
          <input type="checkbox" value="remember-me" > [[#{login.remember}]]
        </label>
            </div>
            <button class="btn btn-lg btn-primary btn-block" type="submit" th:text="#{login.btn}">Sign in</button>
            <p class="mt-5 mb-3 text-muted">© 2017-2018</p>
            <a class="btn btn-sm">中文</a>
            <a class="btn btn-sm">English</a>
        </form>

    </body>

</html>
效果:根据浏览器语言设置的信息切换了国际化;
原理:
国际化Locale(区域信息对象):LocaleResolver(获取区域信息对象)
        @Bean
        @ConditionalOnMissingBean
        @ConditionalOnProperty(prefix = "spring.mvc", name = "locale")
        public LocaleResolver localeResolver() {
            if (this.mvcProperties
                    .getLocaleResolver() == WebMvcProperties.LocaleResolver.FIXED) {
                return new FixedLocaleResolver(this.mvcProperties.getLocale());
            }
            AcceptHeaderLocaleResolver localeResolver = new AcceptHeaderLocaleResolver();
            localeResolver.setDefaultLocale(this.mvcProperties.getLocale());
            return localeResolver;
        }
默认的区域信息解析器是根据请求头带来的区域信息获取Locale进行国际化- 点击链接切换Locale
自定义LocaleResolver
/**
 * 可以在链接上携带区域信息
 */

public class MylocaleResolver implements LocaleResolver {

    @Override
    public Locale resolveLocale(HttpServletRequest request) {
        String l = request.getParameter("l");
        Locale locale = Locale.getDefault();
        if (!StringUtils.isEmpty(l)) {
            String[] split = l.split("_");
            locale = new Locale(split[0], split[1]);
        }
        return locale;
    }

    @Override
    public void setLocale(HttpServletRequest request, HttpServletResponse response, Locale locale) {

    }
}


//在MyMvcConfig中添加组件
    @Bean
    public LocaleResolver localeResolver() {
        return new MylocaleResolver();
    }
6.3 登陆
开发期间模板引擎页面修改以后,要实时生效
-
禁用模板引擎的缓存
#禁用缓存 spring.thymeleaf.cache=false - 页面修改完成后ctrl+F9或cmd+F9:重新编译
登陆错误消息提示
<p style="color:red" th:text="${msg}" th:if="${not #strings.isEmpty(msg)}" />表单重复提交问题
    //所有的WebMvcConfigurerAdapter组件都会共同起作用
    @Bean//将组件注册在容器中
    public WebMvcConfigurerAdapter webMvcConfigurerAdapter() {
        WebMvcConfigurerAdapter adapter = new WebMvcConfigurerAdapter() {
            @Override
            public void addViewControllers(ViewControllerRegistry registry) {
                registry.addViewController("/").setViewName("login");
                registry.addViewController("/index.html").setViewName("login");

 //增加一条视图映射
                registry.addViewController("/main.html").setViewName("dashboard");
            }
        };
重定向:
    @PostMapping(value = "/user/login")
    public String login(@RequestParam("username") String username,
                        @RequestParam("password") String password,
                        Map<String, Object> map) {
        if (!StringUtils.isEmpty(username) && password.equals("123456")) {
            //登陆成功,防止表单重复提交,可以重定向到主页
            return "redirect:/main.html";
        } else {
            map.put("msg", "用户名密码错误");
            return "login";
        }
    }
6.4 拦截器进行登陆检查
自定义拦截器
/**
 * 进行登陆检查
 */
public class LoginHandlerInterceptor implements HandlerInterceptor {
    //目标方法执行之前
    @Override
    public boolean preHandle(HttpServletRequest request, HttpServletResponse response, Object handler) throws Exception {
        Object user = request.getSession().getAttribute("loginUser");
        if (user == null) {
            //未登陆,返回登陆页面
            //获取转发器,进行转发操作
            request.setAttribute("msg", "没有权限,请先登陆");
            request.getRequestDispatcher("/index.html").forward(request, response);
            return false;
        } else {
            //已登陆
            return true;
        }
    }

    @Override
    public void postHandle(HttpServletRequest request, HttpServletResponse response, Object handler, ModelAndView modelAndView) throws Exception {

    }

    @Override
    public void afterCompletion(HttpServletRequest request, HttpServletResponse response, Object handler, Exception ex) throws Exception {

    }
}
拦截器的注册
//所有的WebMvcConfigurerAdapter组件都会共同起作用
    @Bean//将组件注册在容器中
    public WebMvcConfigurerAdapter webMvcConfigurerAdapter() {
        WebMvcConfigurerAdapter adapter = new WebMvcConfigurerAdapter() {
            @Override
            public void addViewControllers(ViewControllerRegistry registry) {
                registry.addViewController("/").setViewName("login");
                registry.addViewController("/index.html").setViewName("login");
                registry.addViewController("/main.html").setViewName("dashboard");
            }

            @Override
            public void addInterceptors(InterceptorRegistry registry) {
                //静态资源:"*.css" "*.js"
                //SpringBoot已经做好了静态资源映射,不需要排除
                registry.addInterceptor(new LoginHandlerInterceptor()).addPathPatterns("/**")
                        .excludePathPatterns("/index.html", "/user/login", "/");
            }
        };

        return adapter;
    }
6.5 CRUD-员工列表
实验要求
-
RestfulCRUD:CRUD满足Rest风格
URI:/资源名称/资源标识 HTTp请求方式区分对资源CRUD操作
普通CRUD(uri来区分操作) RestfulCRUD 查询 getEMP emp---GET 添加 addEMP?xxx emp---POST 修改 updateEmp?id=xxx&xxx=xx emp/{id}---PUT 删除 deleteEmp?id=1 emp/{id}---DELETE -
实验的请求架构设计
请求URI 请求方式 查询所有员工 emps GET 查询某个员工(来到修改页面) emp/{id} 路径变量 GET 来到添加页面 emp GET 添加员工 emp POST 来到修改页面(查出员工进行信息回显) emp/{id} GET 修改员工 emp PUT 删除员工 emp/{id} DELETE -
员工列表
thymeleaf公共页面元素抽取
<div th:fragment="copy">
© 2011 The Good Thymes Virtual Grocery</div>
- 引入公共片段
<div th:insert="~{footer :: copy}"></div>
<!--或者-->
<div th:insert="footer :: copy"></div>
~{templatename::selector} 模板名::选择器
~{templatename::fragmentname} 模板名::片段名
- 默认效果
insert的功能片段在div的标签中
如果使用th:insert等属性进行引入,可以不用写~{}
行内写法可以加上
三种引入功能片段的th属性:

1. th:insert 将公共片段整个插入到声明引入的元素中
2.  th:replace 将声明引入的片段替换为公共片段
3.  th:include 将被引入的片段的内容包含进标签中

区别:
<footer th:fragment="copy">
© 2011 The Good Thymes Virtual Grocery</footer>
引入方式
<body>
   ...
   <div th:insert="footer :: copy"></div>
   <div th:replace="footer :: copy"></div>
   <div th:include="footer :: copy"></div>
</body>
效果
<body>
...
<div>
<footer>
© 2011 The Good Thymes Virtual Grocery
</footer>
</div>
<footer>
© 2011 The Good Thymes Virtual Grocery
</footer>
<div>
© 2011 The Good Thymes Virtual Grocery
</div></body>
提交的数据格式不对问题:生日-日期

2017-12-12  2017/12/12  2017.12.12

日期的格式化:SpringMVC将页面提交的值需要转换为指定的类型

2017-12-12---Date:类型转换,格式化

默认使用/来分隔
spring.mvc.date-format=yyyy-MM-dd
添加页面
<form>
   <div class="form-group">
       <label>LastName</label>
       <input type="text" class="form-control" placeholder="zhangsan">
   </div>
   <div class="form-group">
       <label>Email</label>
       <input type="email" class="form-control" placeholder="zhangsan@atguigu.com">
   </div>
   <div class="form-group">
       <label>Gender</label><br/>
       <div class="form-check form-check-inline">
           <input class="form-check-input" type="radio" name="gender"  value="1">
           <label class="form-check-label">男</label>
       </div>
       <div class="form-check form-check-inline">
           <input class="form-check-input" type="radio" name="gender"  value="0">
           <label class="form-check-label">女</label>
       </div>
   </div>
   <div class="form-group">
       <label>department</label>
       <select class="form-control">
           <option>1</option>
           <option>2</option>
           <option>3</option>
           <option>4</option>
           <option>5</option>
       </select>
   </div>
   <div class="form-group">
       <label>Birth</label>
       <input type="text" class="form-control" placeholder="zhangsan">
   </div>
   <button type="submit" class="btn btn-primary">添加</button>
</form>
提交的数据格式不对:生日:日期;

2017-12-12;2017/12/12;2017.12.12;

日期的格式化;SpringMVC将页面提交的值需要转换为指定的类型;

2017-12-12---Date; 类型转换,格式化;

默认日期是按照/的方式;

### 6.6 CRUD-员工修改

修改添加二合一表单
    <!--需要区分是员工修改还是添加;-->
    <form th:action="@{/emp}" method="post">
        <!--发送put请求修改员工数据-->
        <!--
    1、SpringMVC中配置HiddenHttpMethodFilter;(SpringBoot自动配置好的)
    2、页面创建一个post表单
    3、创建一个input项,name="_method";值就是我们指定的请求方式
    -->
        <input type="hidden" name="_method" value="put" th:if="${emp!=null}"/>
        <input type="hidden" name="id" th:if="${emp!=null}" th:value="${emp.id}">
        <div class="form-group">
            <label>LastName</label>
            <input name="lastName" type="text" class="form-control" placeholder="zhangsan" th:value="${emp!=null}?${emp.lastName}">
        </div>
        <div class="form-group">
            <label>Email</label>
            <input name="email" type="email" class="form-control" placeholder="zhangsan@atguigu.com" th:value="${emp!=null}?${emp.email}">
        </div>
        <div class="form-group">
            <label>Gender</label><br/>
            <div class="form-check form-check-inline">
                <input class="form-check-input" type="radio" name="gender" value="1" th:checked="${emp!=null}?${emp.gender==1}">
                <label class="form-check-label">男</label>
            </div>
            <div class="form-check form-check-inline">
                <input class="form-check-input" type="radio" name="gender" value="0" th:checked="${emp!=null}?${emp.gender==0}">
                <label class="form-check-label">女</label>
            </div>
        </div>
        <div class="form-group">
            <label>department</label>
            <!--提交的是部门的id-->
            <select class="form-control" name="department.id">
                <option th:selected="${emp!=null}?${dept.id == emp.department.id}" th:value="${dept.id}" th:each="dept:${depts}" th:text="${dept.departmentName}">1</option>
            </select>
        </div>
        <div class="form-group">
            <label>Birth</label>
            <input name="birth" type="text" class="form-control" placeholder="zhangsan" th:value="${emp!=null}?${#dates.format(emp.birth, 'yyyy-MM-dd HH:mm')}">
        </div>
        <button type="submit" class="btn btn-primary" th:text="${emp!=null}?'修改':'添加'">添加</button>
    </form>
    ```
6.7 CRUD-员工删除
<tr th:each="emp:${emps}">
    <td th:text="${emp.id}"></td>
    <td>[[${emp.lastName}]]</td>
    <td th:text="${emp.email}"></td>
    <td th:text="${emp.gender}==0?'女':'男'"></td>
    <td th:text="${emp.department.departmentName}"></td>
    <td th:text="${#dates.format(emp.birth, 'yyyy-MM-dd HH:mm')}"></td>
    <td>
        <a class="btn btn-sm btn-primary" th:href="@{/emp/}+${emp.id}">编辑</a>
        <button th:attr="del_uri=@{/emp/}+${emp.id}" class="btn btn-sm btn-danger deleteBtn">删除</button>
    </td>
</tr>


<script>
    $(".deleteBtn").click(function(){
        //删除当前员工的
        $("#deleteEmpForm").attr("action",$(this).attr("del_uri")).submit();
        return false;
    });
</script>
7. 错误处理机制
-
SpringBoot默认的错误处理机制
默认效果:
浏览器:返回一个默认的错误页面
浏览器发送请求时的请求头

如果是其他客户端访问,默认返回一个json数据
原理:
参照
ErrorMvcAutoConfiguration 给容器中添加了以下组件
DefaultErrorAttributesBasicErrorController @Controller @RequestMapping("${server.error.path:${error.path:/error}}") public class BasicErrorController extends AbstractErrorController { @RequestMapping(produces = "text/html")//将会产生html类型的数据 public ModelAndView errorHtml(HttpServletRequest request, HttpServletResponse response) { HttpStatus status = getStatus(request); Map<String, Object> model = Collections.unmodifiableMap(getErrorAttributes( request, isIncludeStackTrace(request, MediaType.TEXT_HTML))); response.setStatus(status.value()); //去哪个页面作为错误页面:包含页面地址和页面内容 ModelAndView modelAndView = resolveErrorView(request, response, status, model); return (modelAndView == null ? new ModelAndView("error", model) : modelAndView); } @RequestMapping @ResponseBody //产生json数据的 public ResponseEntity<Map<String, Object>> error(HttpServletRequest request) { Map<String, Object> body = getErrorAttributes(request, isIncludeStackTrace(request, MediaType.ALL)); HttpStatus status = getStatus(request); return new ResponseEntity<Map<String, Object>>(body, status); }ErrorPageCustomizer @Value("${error.path:/error}") private String path = "/error";系统出现错误之后来到error请求进行处理(web.xml注册的错误页面规则)-
DefaultErrorViewResolver

@Override
    public ModelAndView resolveErrorView(HttpServletRequest request, HttpStatus status,
            Map<String, Object> model) {
        ModelAndView modelAndView = resolve(String.valueOf(status), model);
        if (modelAndView == null && SERIES_VIEWS.containsKey(status.series())) {
            modelAndView = resolve(SERIES_VIEWS.get(status.series()), model);
        }
        return modelAndView;
    }

    private ModelAndView resolve(String viewName, Map<String, Object> model) {
    //默认SpringBoot可以去找到一个页面 error/404
        String errorViewName = "error/" + viewName;

        //模板引擎可以解析这个页面地址就用模板引擎解析
        TemplateAvailabilityProvider provider = this.templateAvailabilityProviders
                .getProvider(errorViewName, this.applicationContext);
        if (provider != null) {
            //模板引擎可用的情况下返回到errorViewName指定的视图地址
            return new ModelAndView(errorViewName, model);
        }
        // 模板引擎不可用,就在静态资源文件夹下找errorViewName对应的页面error/404.html
        return resolveResource(errorViewName, model);
    }
步骤:
一旦系统出现4xx或5xx之类的错误,
ErrorPageCustomizer就会生效(定制错误的响应规则);就会来到/error请求;就会被BasicErrorController处理;-
响应页面;去哪个页面是由
DefaultErrorViewResolver解析到的protected ModelAndView resolveErrorView(HttpServletRequest request, HttpServletResponse response, HttpStatus status, Map<String, Object> model) { for (ErrorViewResolver resolver : this.errorViewResolvers) { ModelAndView modelAndView = resolver.resolveErrorView(request, status, model); if (modelAndView != null) { return modelAndView; } } return null; }
-
-
如何定制错误响应
-
如何定制错误页面
- 有模板引擎的情况下,error/状态码.html 【将错误页面命名为 错误状态码.html放在模板引擎文件夹里面的error文件夹下】,发生此状态码的错误就会来到对应的页面
可以使用4xx和5xx作为错误页面的文件名来匹配这种类型的所有错误,精确优先(优先寻找 状态码.html 页面)
页面能获取的信息
timestamp 时间戳
status 状态码
error 错误提示
exception 异常
message 异常消息
errors JSR303数据校验的错误都在这里
- 没有模板引擎的情况下,在静态资源文件夹下找
- 都没有时,采用SpringBoot默认的错误页面
- 有模板引擎的情况下,error/状态码.html 【将错误页面命名为 错误状态码.html放在模板引擎文件夹里面的error文件夹下】,发生此状态码的错误就会来到对应的页面
-
如何定制错误的json数据
1)、自定义异常处理&返回定制json数据;
@ControllerAdvice public class MyExceptionHandler { @ResponseBody @ExceptionHandler(UserNotExistException.class) public Map<String,Object> handleException(Exception e){ Map<String,Object> map = new HashMap<>(); map.put("code","user.notexist"); map.put("message",e.getMessage()); return map; } } //没有自适应效果... 2)、转发到/error进行自适应响应效果处理
 @ExceptionHandler(UserNotExistException.class)
    public String handleException(Exception e, HttpServletRequest request){
        Map<String,Object> map = new HashMap<>();
        //传入我们自己的错误状态码  4xx 5xx,否则就不会进入定制错误页面的解析流程
        /**
-


           .getAttribute("javax.servlet.error.status_code");
           */
          request.setAttribute("javax.servlet.error.status_code",500);
          map.put("code","user.notexist");
          map.put("message",e.getMessage());
          //转发到/error
          return "forward:/error";
      }
  ```
-
将我们的定制数据携带出去;
出现错误以后,会来到/error请求,会被BasicErrorController处理,响应出去可以获取的数据是由getErrorAttributes得到的(是AbstractErrorController(ErrorController)规定的方法);
1、完全来编写一个ErrorController的实现类【或者是编写AbstractErrorController的子类】,放在容器中;
2、页面上能用的数据,或者是json返回能用的数据都是通过errorAttributes.getErrorAttributes得到;
容器中DefaultErrorAttributes.getErrorAttributes();默认进行数据处理的;
自定义ErrorAttributes
//给容器中加入我们自己定义的ErrorAttributes
@Component
public class MyErrorAttributes extends DefaultErrorAttributes {

    @Override
    public Map<String, Object> getErrorAttributes(RequestAttributes requestAttributes, boolean includeStackTrace) {
        Map<String, Object> map = super.getErrorAttributes(requestAttributes, includeStackTrace);
        map.put("company","atguigu");
        return map;
    }
}
最终的效果:响应是自适应的,可以通过定制ErrorAttributes改变需要返回的内容,

8. 配置嵌入式Servlet容器
SpringBoot默认使用Tomcat作为嵌入式的Servlet容器;

8.1 如何定制和修改Servlet容器的相关配置
- 修改和server有关的配置(ServerProperties【也是EmbeddedServletContainerCustomizer】);
server.port=8081
server.context-path=/crud

server.tomcat.uri-encoding=UTF-8

//通用的Servlet容器设置
server.xxx
//Tomcat的设置
server.tomcat.xxx- 编写一个EmbeddedServletContainerCustomizer:嵌入式的Servlet容器的定制器;来修改Servlet容器的配置
8.2 注册Servlet三大组件【Servlet、Filter、Listener】
由于SpringBoot默认是以jar包的方式启动嵌入式的Servlet容器来启动SpringBoot的web应用,没有web.xml文件。
注册三大组件用以下方式
ServletRegistrationBean
//注册三大组件
@Bean
public ServletRegistrationBean myServlet(){
    ServletRegistrationBean registrationBean = new ServletRegistrationBean(new MyServlet(),"/myServlet");
    return registrationBean;
}
FilterRegistrationBean
@Bean
public FilterRegistrationBean myFilter(){
    FilterRegistrationBean registrationBean = new FilterRegistrationBean();
    registrationBean.setFilter(new MyFilter());
    registrationBean.setUrlPatterns(Arrays.asList("/hello","/myServlet"));
    return registrationBean;
}
ServletListenerRegistrationBean
@Bean
public ServletListenerRegistrationBean myListener(){
    ServletListenerRegistrationBean<MyListener> registrationBean = new ServletListenerRegistrationBean<>(new MyListener());
    return registrationBean;
}
SpringBoot帮我们自动SpringMVC的时候,自动的注册SpringMVC的前端控制器;DIspatcherServlet;
DispatcherServletAutoConfiguration中:
@Bean(name = DEFAULT_DISPATCHER_SERVLET_REGISTRATION_BEAN_NAME)
@ConditionalOnBean(value = DispatcherServlet.class, name = DEFAULT_DISPATCHER_SERVLET_BEAN_NAME)
public ServletRegistrationBean dispatcherServletRegistration(
      DispatcherServlet dispatcherServlet) {
   ServletRegistrationBean registration = new ServletRegistrationBean(
         dispatcherServlet, this.serverProperties.getServletMapping());
    //默认拦截: “/” 所有请求;包静态资源,但是不拦截jsp请求;   “/*”会拦截jsp
    //可以通过server.servletPath来修改SpringMVC前端控制器默认拦截的请求路径

   registration.setName(DEFAULT_DISPATCHER_SERVLET_BEAN_NAME);
   registration.setLoadOnStartup(
         this.webMvcProperties.getServlet().getLoadOnStartup());
   if (this.multipartConfig != null) {
      registration.setMultipartConfig(this.multipartConfig);
   }
   return registration;
}
8.3 使用其他Servlet容器
Jetty(长连接)
Undertow(不支持JSP,并发性能好)

默认支持:
Tomcat(默认使用)
<dependency>
   <groupId>org.springframework.boot</groupId>
   <artifactId>spring-boot-starter-web</artifactId>
   引入web模块默认就是使用嵌入式的Tomcat作为Servlet容器;
</dependency>
Jetty
<!-- 引入web模块 -->
<dependency>
   <groupId>org.springframework.boot</groupId>
   <artifactId>spring-boot-starter-web</artifactId>
   <exclusions>
      <exclusion>
         <artifactId>spring-boot-starter-tomcat</artifactId>
         <groupId>org.springframework.boot</groupId>
      </exclusion>
   </exclusions>
</dependency>

<!--引入其他的Servlet容器-->
<dependency>
   <artifactId>spring-boot-starter-jetty</artifactId>
   <groupId>org.springframework.boot</groupId>
</dependency>
Undertow
<!-- 引入web模块 -->
<dependency>
   <groupId>org.springframework.boot</groupId>
   <artifactId>spring-boot-starter-web</artifactId>
   <exclusions>
      <exclusion>
         <artifactId>spring-boot-starter-tomcat</artifactId>
         <groupId>org.springframework.boot</groupId>
      </exclusion>
   </exclusions>
</dependency>

<!--引入其他的Servlet容器-->
<dependency>
   <artifactId>spring-boot-starter-undertow</artifactId>
   <groupId>org.springframework.boot</groupId>
</dependency>
8.4 嵌入式Servlet容器自动配置原理
EmbeddedServletContainerAutoConfiguration:嵌入式的Servlet容器自动配置?
@AutoConfigureOrder(Ordered.HIGHEST_PRECEDENCE)
@Configuration
@ConditionalOnWebApplication
@Import(BeanPostProcessorsRegistrar.class)
//导入BeanPostProcessorsRegistrar:Spring注解版;给容器中导入一些组件
//导入了EmbeddedServletContainerCustomizerBeanPostProcessor:
//后置处理器:bean初始化前后(创建完对象,还没赋值赋值)执行初始化工作
public class EmbeddedServletContainerAutoConfiguration {

    @Configuration
    @ConditionalOnClass({ Servlet.class, Tomcat.class })//判断当前是否引入了Tomcat依赖;
    @ConditionalOnMissingBean(value = EmbeddedServletContainerFactory.class, search = SearchStrategy.CURRENT)//判断当前容器没有用户自己定义EmbeddedServletContainerFactory:嵌入式的Servlet容器工厂;作用:创建嵌入式的Servlet容器
    public static class EmbeddedTomcat {

        @Bean
        public TomcatEmbeddedServletContainerFactory tomcatEmbeddedServletContainerFactory() {
            return new TomcatEmbeddedServletContainerFactory();
        }

    }

    /**
     * Nested configuration if Jetty is being used.
     */
    @Configuration
    @ConditionalOnClass({ Servlet.class, Server.class, Loader.class,
            WebAppContext.class })
    @ConditionalOnMissingBean(value = EmbeddedServletContainerFactory.class, search = SearchStrategy.CURRENT)
    public static class EmbeddedJetty {

        @Bean
        public JettyEmbeddedServletContainerFactory jettyEmbeddedServletContainerFactory() {
            return new JettyEmbeddedServletContainerFactory();
        }

    }

    /**
     * Nested configuration if Undertow is being used.
     */
    @Configuration
    @ConditionalOnClass({ Servlet.class, Undertow.class, SslClientAuthMode.class })
    @ConditionalOnMissingBean(value = EmbeddedServletContainerFactory.class, search = SearchStrategy.CURRENT)
    public static class EmbeddedUndertow {

        @Bean
        public UndertowEmbeddedServletContainerFactory undertowEmbeddedServletContainerFactory() {
            return new UndertowEmbeddedServletContainerFactory();
        }

    }
1)EmbeddedServletContainerFactory(嵌入式Servlet容器工厂)
public interface EmbeddedServletContainerFactory {

   //获取嵌入式的Servlet容器
   EmbeddedServletContainer getEmbeddedServletContainer(
         ServletContextInitializer... initializers);

}
2)EmbeddedServletContainer:(嵌入式的Servlet容器)

3)以TomcatEmbeddedServletContainerFactory为例
@Override
public EmbeddedServletContainer getEmbeddedServletContainer(
      ServletContextInitializer... initializers) {
    //创建一个Tomcat
   Tomcat tomcat = new Tomcat();

    //配置Tomcat的基本环节
   File baseDir = (this.baseDirectory != null ? this.baseDirectory
         : createTempDir("tomcat"));
   tomcat.setBaseDir(baseDir.getAbsolutePath());
   Connector connector = new Connector(this.protocol);
   tomcat.getService().addConnector(connector);
   customizeConnector(connector);
   tomcat.setConnector(connector);
   tomcat.getHost().setAutoDeploy(false);
   configureEngine(tomcat.getEngine());
   for (Connector additionalConnector : this.additionalTomcatConnectors) {
      tomcat.getService().addConnector(additionalConnector);
   }
   prepareContext(tomcat.getHost(), initializers);

    //将配置好的Tomcat传入进去,返回一个EmbeddedServletContainer;并且启动Tomcat服务器
   return getTomcatEmbeddedServletContainer(tomcat);
}
4)我们对嵌入式容器的配置修改是怎么生效?
ServerProperties、EmbeddedServletContainerCustomizer
EmbeddedServletContainerCustomizer:定制器帮我们修改了Servlet容器的配置?
怎么修改的原理?
5)容器中导入了EmbeddedServletContainerCustomizerBeanPostProcessor
//初始化之前
@Override
public Object postProcessBeforeInitialization(Object bean, String beanName)
      throws BeansException {
    //如果当前初始化的是一个ConfigurableEmbeddedServletContainer类型的组件
   if (bean instanceof ConfigurableEmbeddedServletContainer) {
       //
      postProcessBeforeInitialization((ConfigurableEmbeddedServletContainer) bean);
   }
   return bean;
}

private void postProcessBeforeInitialization(
            ConfigurableEmbeddedServletContainer bean) {
    //获取所有的定制器,调用每一个定制器的customize方法来给Servlet容器进行属性赋值;
    for (EmbeddedServletContainerCustomizer customizer : getCustomizers()) {
        customizer.customize(bean);
    }
}

private Collection<EmbeddedServletContainerCustomizer> getCustomizers() {
    if (this.customizers == null) {
        // Look up does not include the parent context
        this.customizers = new ArrayList<EmbeddedServletContainerCustomizer>(
            this.beanFactory
            //从容器中获取所有这个类型的组件:EmbeddedServletContainerCustomizer
            //定制Servlet容器,给容器中可以添加一个EmbeddedServletContainerCustomizer类型的组件
            .getBeansOfType(EmbeddedServletContainerCustomizer.class,
                            false, false)
            .values());
        Collections.sort(this.customizers, AnnotationAwareOrderComparator.INSTANCE);
        this.customizers = Collections.unmodifiableList(this.customizers);
    }
    return this.customizers;
}

ServerProperties也是定制器
步骤:
- SpringBoot根据导入的依赖情况,给容器中添加相应的EmbeddedServletContainerFactory【TomcatEmbeddedServletContainerFactory】
- 容器中某个组件要创建对象就会惊动后置处理器;EmbeddedServletContainerCustomizerBeanPostProcessor;只要是嵌入式的Servlet容器工厂,后置处理器就工作;
- 后置处理器,从容器中获取所有的EmbeddedServletContainerCustomizer,调用定制器的定制方法
8.5 嵌入式Servlet容器启动原理
什么时候创建嵌入式的Servlet容器工厂?什么时候获取嵌入式的Servlet容器并启动Tomcat;
获取嵌入式的Servlet容器工厂:
1)SpringBoot应用启动运行run方法
2)refreshContext(context);SpringBoot刷新IOC容器【创建IOC容器对象,并初始化容器,创建容器中的每一个组件】;如果是web应用创建AnnotationConfigEmbeddedWebApplicationContext,否则:AnnotationConfigApplicationContext
3)refresh(context);刷新刚才创建好的ioc容器;
public void refresh() throws BeansException, IllegalStateException {
   synchronized (this.startupShutdownMonitor) {
      // Prepare this context for refreshing.
      prepareRefresh();

      // Tell the subclass to refresh the internal bean factory.
      ConfigurableListableBeanFactory beanFactory = obtainFreshBeanFactory();

      // Prepare the bean factory for use in this context.
      prepareBeanFactory(beanFactory);

      try {
         // Allows post-processing of the bean factory in context subclasses.
         postProcessBeanFactory(beanFactory);

         // Invoke factory processors registered as beans in the context.
         invokeBeanFactoryPostProcessors(beanFactory);

         // Register bean processors that intercept bean creation.
         registerBeanPostProcessors(beanFactory);

         // Initialize message source for this context.
         initMessageSource();

         // Initialize event multicaster for this context.
         initApplicationEventMulticaster();

         // Initialize other special beans in specific context subclasses.
         onRefresh();

         // Check for listener beans and register them.
         registerListeners();

         // Instantiate all remaining (non-lazy-init) singletons.
         finishBeanFactoryInitialization(beanFactory);

         // Last step: publish corresponding event.
         finishRefresh();
      }

      catch (BeansException ex) {
         if (logger.isWarnEnabled()) {
            logger.warn("Exception encountered during context initialization - " +
                  "cancelling refresh attempt: " + ex);
         }

         // Destroy already created singletons to avoid dangling resources.
         destroyBeans();

         // Reset 'active' flag.
         cancelRefresh(ex);

         // Propagate exception to caller.
         throw ex;
      }

      finally {
         // Reset common introspection caches in Spring's core, since we
         // might not ever need metadata for singleton beans anymore...
         resetCommonCaches();
      }
   }
}
4)onRefresh(); web的ioc容器重写了onRefresh方法
5)webioc容器会创建嵌入式的Servlet容器;createEmbeddedServletContainer();
6)获取嵌入式的Servlet容器工厂:
EmbeddedServletContainerFactory containerFactory = getEmbeddedServletContainerFactory();
从ioc容器中获取EmbeddedServletContainerFactory 组件;TomcatEmbeddedServletContainerFactory创建对象,后置处理器一看是这个对象,就获取所有的定制器来先定制Servlet容器的相关配置;
7)使用容器工厂获取嵌入式的Servlet容器:this.embeddedServletContainer = containerFactory.getEmbeddedServletContainer(getSelfInitializer());
8)嵌入式的Servlet容器创建对象并启动Servlet容器;
先启动嵌入式的Servlet容器,再将ioc容器中剩下没有创建出的对象获取出来;
==IOC容器启动创建嵌入式的Servlet容器==
评论
登录后参与技术讨论,分享你的经验与见解。
登录 / 注册暂无评论