MyBatisPlus与AJAX

文章目录
1.MybatisPlus
1.1 MP介绍
MyBatis-Plus(简称 MP)是一个 MyBatis 的增强工具,在 MyBatis 的基础上只做增强不做改变,为简化开发、提高效率而生。
1.2 特性
无侵入:只做增强不做改变,引入它不会对现有工程产生影响,如丝般顺滑
损耗小:启动即会自动注入基本 CURD,性能基本无损耗,直接面向对象操作
强大的 CRUD 操作:内置通用 Mapper、通用 Service,仅仅通过少量配置即可实现单表大部分 CRUD 操作,更有强大的条件构造器,满足各类使用需求
支持 Lambda 形式调用:通过 Lambda 表达式,方便的编写各类查询条件,无需再担心字段写错
支持主键自动生成:支持多达 4 种主键策略(内含分布式唯一 ID 生成器 - Sequence),可自由配置,完美解决主键问题
支持 ActiveRecord 模式:支持 ActiveRecord 形式调用,实体类只需继承 Model 类即可进行强大的 CRUD 操作
支持自定义全局通用操作:支持全局通用方法注入( Write once, use anywhere )
内置代码生成器:采用代码或者 Maven 插件可快速生成 Mapper 、 Model 、 Service 、 Controller 层代码,支持模板引擎,更有超多自定义配置等您来使用
内置分页插件:基于 MyBatis 物理分页,开发者无需关心具体操作,配置好插件之后,写分页等同于普通 List 查询
分页插件支持多种数据库:支持 MySQL、MariaDB、Oracle、DB2、H2、HSQL、SQLite、Postgre、SQLServer 等多种数据库
内置性能分析插件:可输出 Sql 语句以及其执行时间,建议开发测试时启用该功能,能快速揪出慢查询
内置全局拦截插件:提供全表 delete 、 update 操作智能分析阻断,也可自定义拦截规则,预防误操作
资料来源 :https://baomidou.com/
1.3 ORM思想
1.3.1 业务场景
一个开发三十年的程序猿 ,业务相当熟练,但是为了完成业务也需要写特别简单的sql语句.
需求:能否有效的提高开发的效率
1.3.2 ORM介绍
对象关系映射(Object Relational Mapping,简称ORM)模式是一种为了解决面向对象与关系数据库存在的互不匹配的现象的技术。简单的说,ORM是通过使用描述对象和数据库之间映射的元数据,将程序中的对象自动持久化到关系数据库中。那么,到底如何实现持久化呢?一种简单的方案是采用硬编码方式,为每一种可能的数据库访问操作提供单独的方法。
知识铺垫:
SQL语句面向过程的语言. sql: select * from user 数据库返回一个ResultSet 结果集对象~~~User对象 需要自己手动分装,效率低
ORM方式:以对象的方法操作数据库,可以实现结果集与对象的自动的映射
1.4 MybatisPlus工作原理说明
`1. 对象与哪张表完成映射 自定义注解进行标识
2. 对象的属性与表中字段如何让一一对应  起名时应该写成一样的,利用特定的注解指定
3. 工具方法如何简化 :MP动态的 生成CRUD操作接口,只要其他的Mapper接口继承
4. 对象如何转换为sql语句   利用对象中的属性的值动态拼接即可`
1.5 MP具体实现
1.5.1 导入jar包
说明 :MybatisPlus jar包中包含了 Mybais的信息 要将原来的mybatis jar包删掉
`<!--spring整合mybatis-plus -->
        <dependency>
            <groupId>com.baomidou</groupId>
            <artifactId>mybatis-plus-boot-starter</artifactId>
            <version>3.2.0</version>
        </dependency>`
1.5.2 编辑POJO对象
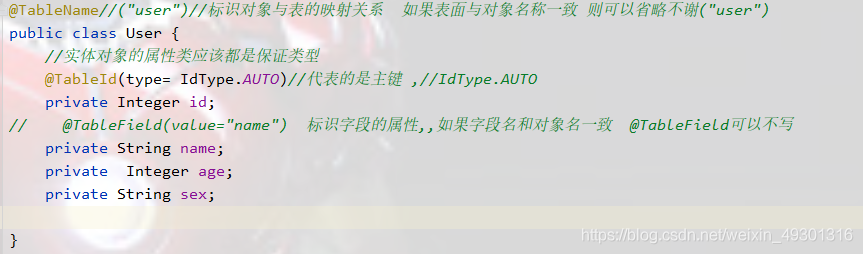
1.5.3 mapper接口继承
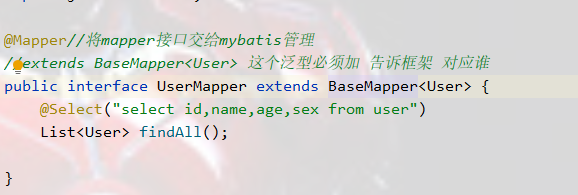
1.5.4 编辑配置yml文件

1.5.5 实现类修改

- AJAX
========
2.1 创建web项目
2.1.1 创建maven项目

2.1.2 编辑POM文件
`<?xml version="1.0" encoding="UTF-8"?>
<project xmlns="http://maven.apache.org/POM/4.0.0"
         xmlns:xsi="http://www.w3.org/2001/XMLSchema-instance"
         xsi:schemaLocation="http://maven.apache.org/POM/4.0.0 http://maven.apache.org/xsd/maven-4.0.0.xsd">
    <modelVersion>4.0.0</modelVersion>

    <groupId>org.jt</groupId>
    <artifactId>springboot_demo3</artifactId>
    <version>1.0-SNAPSHOT</version>

    <!--指定项目打包方式-->
    <packaging>war</packaging>
    <parent>
        <groupId>org.springframework.boot</groupId>
        <artifactId>spring-boot-starter-parent</artifactId>
        <version>2.3.4.RELEASE</version>
        <relativePath/> <!-- lookup parent from repository -->
    </parent>
    <properties>
        <java.version>1.8</java.version>
    </properties>

    <dependencies>
        <dependency>
            <groupId>org.springframework.boot</groupId>
            <artifactId>spring-boot-starter-jdbc</artifactId>
        </dependency>
        <dependency>
            <groupId>org.springframework.boot</groupId>
            <artifactId>spring-boot-starter-web</artifactId>
        </dependency>

        <dependency>
            <groupId>org.springframework.boot</groupId>
            <artifactId>spring-boot-devtools</artifactId>
            <scope>runtime</scope>
            <optional>true</optional>
        </dependency>
        <dependency>
            <groupId>mysql</groupId>
            <artifactId>mysql-connector-java</artifactId>
            <scope>runtime</scope>
        </dependency>
        <dependency>
            <groupId>org.projectlombok</groupId>
            <artifactId>lombok</artifactId>
            <optional>true</optional>
        </dependency>
        <dependency>
            <groupId>org.springframework.boot</groupId>
            <artifactId>spring-boot-starter-test</artifactId>
            <scope>test</scope>
            <exclusions>
                <exclusion>
                    <groupId>org.junit.vintage</groupId>
                    <artifactId>junit-vintage-engine</artifactId>
                </exclusion>
            </exclusions>
        </dependency>
        <!--spring整合mybatis-plus -->
        <dependency>
            <groupId>com.baomidou</groupId>
            <artifactId>mybatis-plus-boot-starter</artifactId>
            <version>3.2.0</version>
        </dependency>

        <!--springBoot整合JSP添加依赖  -->
        <!--servlet依赖 -->
        <dependency>
            <groupId>javax.servlet</groupId>
            <artifactId>javax.servlet-api</artifactId>
        </dependency>

        <!--jstl依赖 -->
        <dependency>
            <groupId>javax.servlet</groupId>
            <artifactId>jstl</artifactId>
        </dependency>

        <!--使jsp页面生效 -->
        <dependency>
            <groupId>org.apache.tomcat.embed</groupId>
            <artifactId>tomcat-embed-jasper</artifactId>
        </dependency>
    </dependencies>

    <build>
        <plugins>
            <plugin>
                <groupId>org.springframework.boot</groupId>
                <artifactId>spring-boot-maven-plugin</artifactId>
            </plugin>
        </plugins>
    </build>

</project>`

*   1
*   2
*   3
*   4
*   5
*   6
*   7
*   8
*   9
*   10
*   11
*   12
*   13
*   14
*   15
*   16
*   17
*   18
*   19
*   20
*   21
*   22
*   23
*   24
*   25
*   26
*   27
*   28
*   29
*   30
*   31
*   32
*   33
*   34
*   35
*   36
*   37
*   38
*   39
*   40
*   41
*   42
*   43
*   44
*   45
*   46
*   47
*   48
*   49
*   50
*   51
*   52
*   53
*   54
*   55
*   56
*   57
*   58
*   59
*   60
*   61
*   62
*   63
*   64
*   65
*   66
*   67
*   68
*   69
*   70
*   71
*   72
*   73
*   74
*   75
*   76
*   77
*   78
*   79
*   80
*   81
*   82
*   83
*   84
*   85
*   86
*   87
*   88
*   89
*   90
*   91
*   92
*   93
*   94
*   95
*   96
2.1.3 添加 jsp页面
`<%@ page language="java" contentType="text/html; charset=utf-8" pageEncoding="utf-8"%>
<%@ taglib uri="http://java.sun.com/jsp/jstl/core" prefix="c"%>
<!DOCTYPE html PUBLIC "-//W3C//DTD HTML 4.01 Transitional//EN" "http://www.w3.org/TR/html4/loose.dtd">
<html>
<head>
<title>您好Springboot</title>
</head>
<body>
    <table border="1px" width="65%" align="center">
        <tr>
            <td colspan="6" align="center"><h3>学生信息</h3></td>
        </tr>
        <tr>
            <th>编号</th>
            <th>姓名</th>
            <th>年龄</th>
            <th>性别</th>
            <th></th>
        </tr>

        <c:forEach items="${userList}" var="u">
            <tr>
                <th>${u.id}</th>
                <th>${u.name}</th>
                <th>${u.age}</th>
                <th>${u.sex}</th>
            </tr>
        </c:forEach>
    </table>
</body>
</html>`

*   1
*   2
*   3
*   4
*   5
*   6
*   7
*   8
*   9
*   10
*   11
*   12
*   13
*   14
*   15
*   16
*   17
*   18
*   19
*   20
*   21
*   22
*   23
*   24
*   25
*   26
*   27
*   28
*   29
*   30
*   31
2.1.4 建立如下resource结构
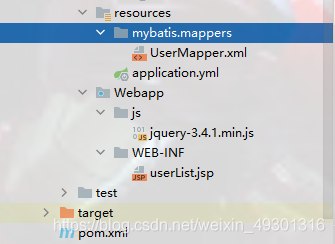
2.1.5 编辑POJO
`package com.jt.pojo;

import com.baomidou.mybatisplus.annotation.IdType;

import com.baomidou.mybatisplus.annotation.TableId;
import com.baomidou.mybatisplus.annotation.TableName;
import lombok.Data;
import lombok.experimental.Accessors;

@Data
@TableName
@Accessors(chain = true)
public class User {
    @TableId(type= IdType.AUTO)
    private Integer id;//主键自增
    private  String name;
    private  Integer age;
    private String sex;
}`

*   1
*   2
*   3
*   4
*   5
*   6
*   7
*   8
*   9
*   10
*   11
*   12
*   13
*   14
*   15
*   16
*   17
*   18
*   19
*   20
2.1.6 编辑 yml文件
`server:
  port: 8090
  servlet:
    context-path: /
spring:
  datasource:
    driver-class-name: com.mysql.cj.jdbc.Driver
    url: jdbc:mysql://127.0.0.1:3306/jtdb?serverTimezone=GMT%2B8&useUnicode=true&characterEncoding=utf8&autoReconnect=true&allowMultiQueries=true
    username: root
    password: 123456

  mvc: #引入mvn配置
    view:
      prefix: /WEB-INF/     # /默认代表根目录 src/main/webapp
      suffix: .jsp

mybatis-plus:
  #别名包定义Mapper的resultType中需要写类名之后自动拼接
  type-aliases-package: com.jt.pojo
  #加载制定xml映射文件
  mapper-locations: classpath:/mybatis/mappers/*.xml
  #开启驼峰映射
  configuration:
    map-underscore-to-camel-case: true


#实现sql打印
logging:
  level:
    com.jt.mapper: debug`

*   1
*   2
*   3
*   4
*   5
*   6
*   7
*   8
*   9
*   10
*   11
*   12
*   13
*   14
*   15
*   16
*   17
*   18
*   19
*   20
*   21
*   22
*   23
*   24
*   25
*   26
*   27
*   28
*   29
*   30
*   31
*   32
*   33
2.1.7 解决页面访问404 问题
编辑好 mapper service controller 包后 启动页面会有404
先点击这里的 edit Configurations…
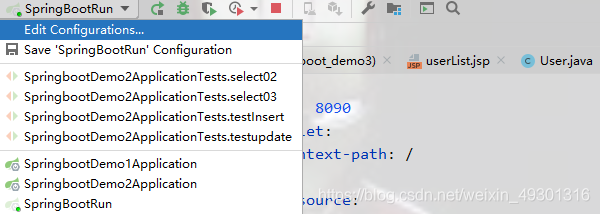
找到当前启动类所在module路径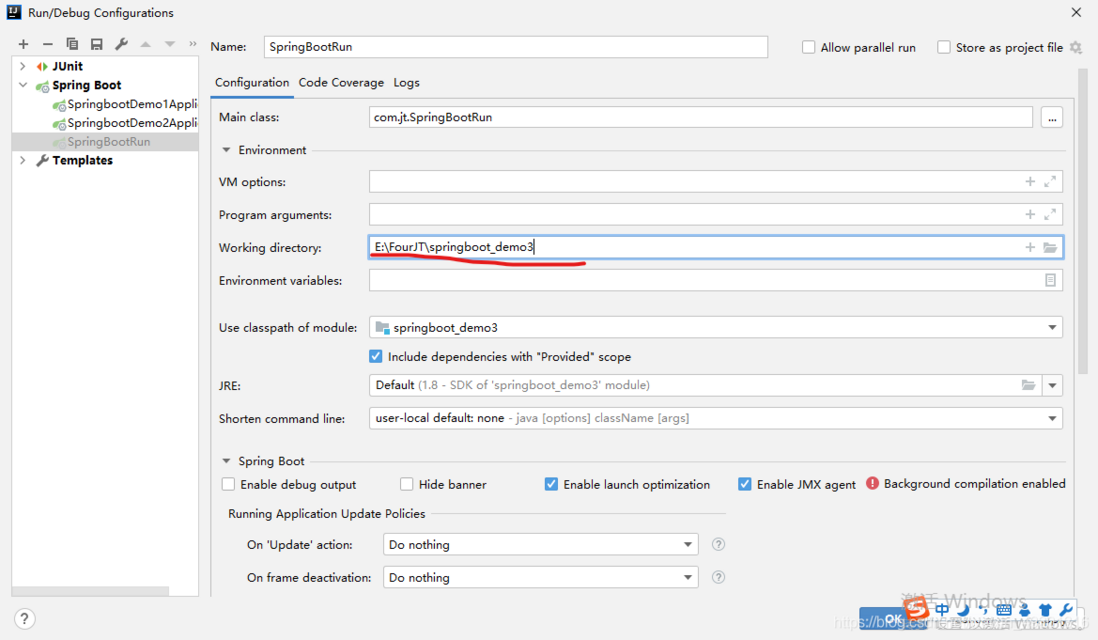
在启动项目 输入正确的路径 即可打开 jsp页面
2.1.8实现同步数据传输的过程
- 编辑Controller页面
`package com.jt.controller;

import com.jt.pojo.User;
import com.jt.service.UserService;
import org.springframework.beans.factory.annotation.Autowired;
import org.springframework.stereotype.Controller;
import org.springframework.ui.Model;
import org.springframework.web.bind.annotation.RequestMapping;

import java.util.List;

@Controller
public class UserController {
    @Autowired
    private UserService userService;

    /**
     * url: localhost:8090/findAll
     * 跳转到页面 userList.jsp
     */
    @RequestMapping("/findAll")
    public String findAll(Model model){
        //1.查询用户列表信息
        List<User> userList = userService.findAll();
        //2.将数据保存到request对象中,之后返回给用户  这就叫视图渲染过程
        model.addAttribute("userList",userList);

        return "userList";

    }
}`

*   1
*   2
*   3
*   4
*   5
*   6
*   7
*   8
*   9
*   10
*   11
*   12
*   13
*   14
*   15
*   16
*   17
*   18
*   19
*   20
*   21
*   22
*   23
*   24
*   25
*   26
*   27
*   28
*   29
*   30
*   31
*   32
2)编辑serviceImpl
`package com.jt.service.impl;

import com.jt.mapper.UserMapper;
import com.jt.pojo.User;
import com.jt.service.UserService;
import org.apache.ibatis.annotations.Mapper;
import org.springframework.beans.factory.annotation.Autowired;
import org.springframework.stereotype.Service;

import java.util.List;

@Service
public class UserServiceImpl implements UserService {
    @Autowired
    private UserMapper userMapper;
    @Override
    public List<User> findAll() {

        return userMapper.selectList(null);
    }

}`

*   1
*   2
*   3
*   4
*   5
*   6
*   7
*   8
*   9
*   10
*   11
*   12
*   13
*   14
*   15
*   16
*   17
*   18
*   19
*   20
*   21
*   22
*   23
*   24
*   25
- 页面呈现

2.2 异步方式调用
2.2.1 AJAX 原理
特点: 局部刷新 :异步调用(加载)
axaj 引擎 是一种代理机制 在服务器和客户端中间 负责数据的异步加载
调用原理说明:
- 用户将请求发给AJAX引擎进行处理,之后等待引擎返回数据
- ajax引擎接受用户请求后,代替用户访问后端服务器
- 后端服务器接受请求后,执行业务处理,并且返回 返回值
- ajax引擎收到返回值后要第一时间通知客户,利用回调函数将数据传给客户端,ajax调用成功

2.3 ajax获取用户信息
2.3.1 准备ajax的页面
说明 将原来的userlist.jsp 复制一份改名ajax.jsp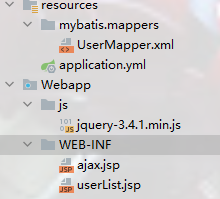
2.3.2 编辑js界面
`<%@ page language="java" contentType="text/html; charset=utf-8" pageEncoding="utf-8"%>
<%@ taglib uri="http://java.sun.com/jsp/jstl/core" prefix="c"%>
<!DOCTYPE html PUBLIC "-//W3C//DTD HTML 4.01 Transitional//EN" "http://www.w3.org/TR/html4/loose.dtd">
<html>
<head>
<title>您好Springboot</title>

<!-- 导入函数类库 -->
<script src="../js/jquery-3.4.1.min.js"></script>
<script type="text/javascript"> //让js页面加载完成
    $(function(){
        /**
         * 需求:利用ajax方式获取user数据信息
         * 请求网址:/findAll
         * 知识点:
         *     返回值类型
         * 1.$.get(url地址,传递的参数,回调函数,返回值类型)
         * 2.$post(url地址,传递的参数,回调函数,返回值类型)
         * 3.getJson(...)
         */
        $.get("/findAjax",{id:40},function(result){
            /* //1.可以使用js中的for循环
            for(let i=0;i<result.length;i++){

            } */
        /*     for(let index in result){
                console.log(index)
            } */
            for(let user of result){
                let id = user.id;
                let name = user.name;
                let age = user.age;
                let sex = user.sex;
                let tr="<tr align='center'><td>"+id+"</td><td>"+name+"</td><td>"+age+"</td><td>"+sex+"</td></tr>"
                $("#tab1").append(tr);
            }

        })

    }) </script>

</head>
<body>
    <table id="tab1" border="1px" width="65%" align="center">
        <tr>
            <td colspan="6" align="center"><h3>学生信息</h3></td>
        </tr>
        <tr>
            <th>编号</th>
            <th>姓名</th>
            <th>年龄</th>
            <th>性别</th>
            <th></th>
        </tr>
    </table>
</body>
</html>`

*   1
*   2
*   3
*   4
*   5
*   6
*   7
*   8
*   9
*   10
*   11
*   12
*   13
*   14
*   15
*   16
*   17
*   18
*   19
*   20
*   21
*   22
*   23
*   24
*   25
*   26
*   27
*   28
*   29
*   30
*   31
*   32
*   33
*   34
*   35
*   36
*   37
*   38
*   39
*   40
*   41
*   42
*   43
*   44
*   45
*   46
*   47
*   48
*   49
*   50
*   51
*   52
*   53
*   54
*   55
*   56
*   57
*   58
*   59
2.3.3 编辑controller
`package com.jt.controller;

import com.jt.pojo.User;
import com.jt.service.UserService;
import org.springframework.beans.factory.annotation.Autowired;
import org.springframework.stereotype.Controller;
import org.springframework.ui.Model;
import org.springframework.web.bind.annotation.RequestMapping;
import org.springframework.web.bind.annotation.ResponseBody;

import java.util.List;

@Controller
public class UserController {
    @Autowired
    private UserService userService;

    /**
     * url: localhost:8090/findAll
     * 跳转到页面 userList.jsp
     */
    @RequestMapping("/findAll")
    public String findAll(Model model){
        //1.查询用户列表信息
        List<User> userList = userService.findAll();
        //2.将数据保存到request对象中,之后返回给用户  这就叫视图渲染过程
        model.addAttribute("userList",userList);

        return "userList";

    }
    /**
     * 实现页面的跳转
     * url:localhost:8090/ajax
     * 跳转的页面:ajax.jsp
     */
    @RequestMapping("ajax")
    public String ajax(){
        return "ajax";
    }
    /**
     * 实现ajax业务调用
     * url:http://localhost:8090/findAjax?id=40
     * 参数id
     * 返回值list<User>
     */
    @RequestMapping("findAjax")
    @ResponseBody       //ajax结束标识
    public List<User> findAjax(Integer id){
        return userService.findAll();
    }
}`

*   1
*   2
*   3
*   4
*   5
*   6
*   7
*   8
*   9
*   10
*   11
*   12
*   13
*   14
*   15
*   16
*   17
*   18
*   19
*   20
*   21
*   22
*   23
*   24
*   25
*   26
*   27
*   28
*   29
*   30
*   31
*   32
*   33
*   34
*   35
*   36
*   37
*   38
*   39
*   40
*   41
*   42
*   43
*   44
*   45
*   46
*   47
*   48
*   49
*   50
*   51
*   52
*   53
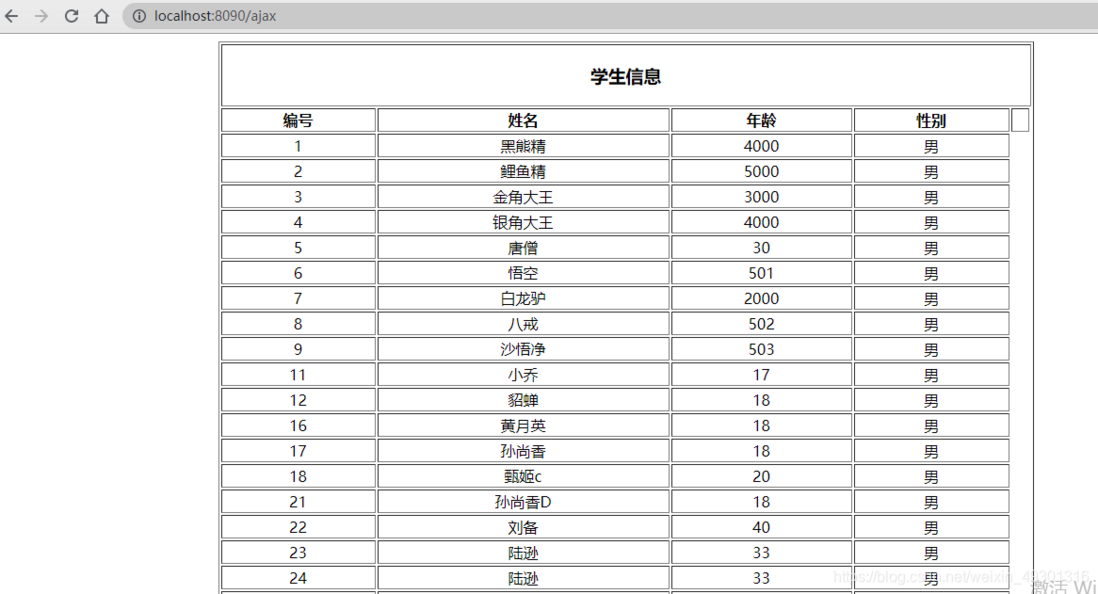
2.3.3 界面展示
评论
登录后参与技术讨论,分享你的经验与见解。
登录 / 注册暂无评论