SpringBoot整合Thymeleaf视图

文章目录
3.1 Thymeleaf视图介绍
先看下官网的介绍:
==Thymeleaf是适用于Web和独立环境的现代服务器端Java模板引擎。
Thymeleaf的主要目标是为您的开发工作流程带来优雅的自然模板 -HTML可以在浏览器中正确显示,也可以作为静态原型工作,从而可以在开发团队中加强协作。
Thymeleaf拥有适用于Spring Framework的模块,与您喜欢的工具的大量集成以及插入您自己的功能的能力,对于现代HTML5 JVM Web开发而言,Thymeleaf是理想的选择。==
在SpringBoot中,SpringBoot对Thymeleaf提供了良好的支持,同时也提供了自动化配置,因此在SpringBoot中使用Thymeleaf非常快捷方便。
3.2 创建SpringBoot项目
创建方法建议使用IDEA快速创建SpringBoot项目,并选择web、Thymeleaf依赖: 
创建完成后,IDEA自动在pom中加入了web和Thymeleaf依赖管理,pom.xml:
<dependencies><dependency><groupId>org.springframework.boot</groupId><artifactId>spring-boot-starter-thymeleaf</artifactId></dependency><dependency><groupId>org.springframework.boot</groupId><artifactId>spring-boot-starter-web</artifactId></dependency><dependency><groupId>org.springframework.boot</groupId><artifactId>spring-boot-starter-test</artifactId><scope>test</scope></dependency></dependencies>
项目架构: 
3.2 配置Thymeleaf
SpringBoot为Thymeleaf提供了自动化配置类ThymeleafAutoConfiguration,源码:
@Configuration@EnableConfigurationProperties({ThymeleafProperties.class})@ConditionalOnClass({TemplateMode.class, SpringTemplateEngine.class})@AutoConfigureAfter({WebMvcAutoConfiguration.class, WebFluxAutoConfiguration.class})publicclass ThymeleafAutoConfiguration {...}
可以看出相关的配置信息是从ThymeleafProperties类中获得的,进一步查看ThymeleafProperties的源码:
@ConfigurationProperties( prefix ="spring.thymeleaf")publicclass ThymeleafProperties { privatestaticfinalCharset DEFAULT_ENCODING; publicstaticfinalString DEFAULT_PREFIX ="classpath:/templates/"; publicstaticfinalString DEFAULT_SUFFIX =".html"; privatebooleancheckTemplate =true; privatebooleancheckTemplateLocation =true; privateString prefix ="classpath:/templates/"; privateString suffix =".html"; privateString mode ="HTML"; //省略}
从该配置可以看出默认的Thymeleaf存放位置是classpath:/templates/,即resources/templates/下,刚刚我们使用IDEA创建项目时,已经自动生成了该目录。
我们如果需要对Thymeleaf的配置进行更改,可直接在application.properties中配置:
是否开启缓存,默认为truespring.thymeleaf.cache=false#检查模板文件是否存在spring.thymeleaf.check-template=true#检查模本目录是否存在spring.thymeleaf.check-template-location=true#模板文件编码spring.thymeleaf.encoding=UTF-8#模板位置spring.thymeleaf.prefix=classpath:/templates/#模板文件后缀名spring.thymeleaf.suffix=.html#Content-typespring.thymeleaf.servlet.content-type=text/html3.3 编写Demo
1、新建User和UserController:
User.java:
packagecom.gongsir.springboot02.pojo;publicclass User { privateString name; privateString major; privateString grade; public String getName() { returnname; } public void setName(String name) { this.name = name; } public String getMajor() { returnmajor; } public void setMajor(String major) { this.major = major; } public String getGrade() { returngrade; } public void setGrade(String grade) { this.grade = grade; }}
UserController.java:
@Controllerpublicclass UserController { @GetMapping(path ="/users") public ModelAndView getUsers(){ List<User> list =newArrayList<>(); User u1 =newUser(); u1.setName("龚涛"); u1.setMajor("计算机"); u1.setGrade("2017"); list.add(u1); User u2 =newUser(); u2.setName("李诗雅"); u2.setMajor("网络工程"); u2.setGrade("2017"); list.add(u2); //视图模板文件的名字,需在template目录下创建同名模板文件 ModelAndView mv =newModelAndView("users"); mv.addObject("users",list); returnmv; }}
2、在模板目录下新建users.html模板文件,显示数据:
<!DOCTYPE html><html lang="en" xmlns:th="http://www.thymeleaf.org"><head><meta charset="UTF-8"><title>用户列表</title></head><body><table border="1px sold black"><tr><td>姓名</td><td>专业</td><td>年级</td></tr><tr th:each="user:${users}"><td th:text="${user.name}"></td><td th:text="${user.major}"></td><td th:text="${user.grade}"></td></tr></table></body></html>
3、启动项目,访问http://localhost:8080/users,如图: 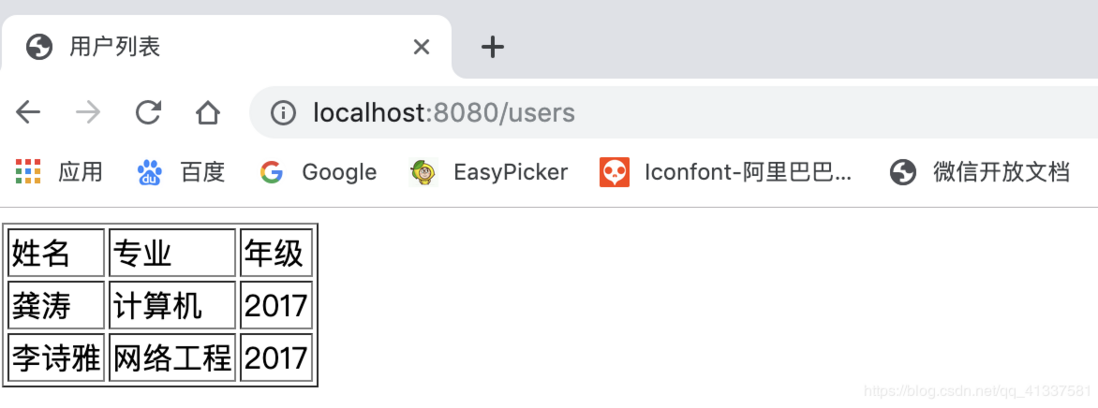
评论
登录后参与技术讨论,分享你的经验与见解。
登录 / 注册暂无评论