step by step教你深入Vue3.0(Vue-cli4)项目打包性能优化实践

文章目录
感谢参考原文-http://bjbsair.com/2020-03-27...
记录了自己的博客在禁用缓存的情况下,从八九秒加载时间到最终985ms的优化实践,开启缓存的情况下能达到138ms的访问速度
本人的个人博客采用的是Vue-cli4.1.2 + typescript构建的,项目目录结构如下
├─ src    //主文件
│  ├─ api    //接口文件夹
|  |  |- config.js    //后端接口地址的配置,将测试、开发、生产环境分开
|  |  └─ user.js      //接口文件,配置了token请求头,具体接口根据需求修改
│  ├─ assets   //资源文件
│  ├─ components   //公用组件
│  ├─ directive   //vue自定义指令
|  ├─ filters      //存放过滤器文件,自带了手机号加密,手机号格式化,时间日期处理
|  ├─ interceptors    //存放axios拦截器配置,写入了接口调用的loading加载以及http状态码报错拦截
|  ├─ interceptors    //放置公用的接口,对数据进行类型限制
|  ├─ layout      //布局文件,通过子路由渲染方式实现,具体HTML布局根据需求修改
|  ├─ mixins      //混入文件,配置了一个平滑滚动的方法
|  ├─ plugins     //外部插件文件夹,配置了按需引入的element-ui
|  ├─ reg    //存放正则以及校验的文件夹
|  |  |- reg.ts      //存放正则表达式,自带了传真,邮箱,qq,手机号,银行卡号,固定电话,密码强度校验正则
|  |  └─ validator.ts      //存放element-ui自定义校验,自带了传真,邮箱,qq,手机号,银行卡号,固定电话,密码强度自定义校验
|  ├─ router      //路由文件
|  ├─ store       //vuex全局变量文件
|  |  |- index.ts      //store主文件
|  |  └─ module     //store模块文件夹
|  |  |  └─ user.ts      //存放user相关的全局变量
|  ├─ stylus   //css预处理器文件夹
|  |  |- reset.styl      //样式初始化文件,自带了非标准盒子,a标签清除下划线,清除内外边距,禁止图片拖拽等效果
|  |  └─ color.styl     //颜色变量文件
|  ├─ utils   //公用方法文件夹
|  |  |- area.ts      //存放省市区三级地区的数据
|  |  |- array.ts      //存放数组相关的公用方法,自带了两个元素交换位置,元素前进后退一格,元素置顶或末尾,去重,删除指定元素操作
|  |  └─ object.ts    //存放对象相关的公用方法,自带了对象清空所有值的方法
|  ├─ views   //页面文件夹
|  ├─ main.ts   //主配置文件
|  ├─ babel.config.js   //babel配置文件,写入了element-ui按需加载的配置
|  ├─ package.json   //npm的包管理文件
|  ├─ tsconfig.json   //ts配置文件
|  ├─ vue.config.js   //vue配置文件
1.关闭productionSourceMap
首先,由于最新版的脚手架不自带配置文件了,先在根目录新建vue.config.js文件,关闭productionSourceMap,在vue.config.js中写入如下内容
module.exports = {
    productionSourceMap: false
}
2.开启Gzip压缩
安装插件compression-webpack-plugin,打开代码压缩,npm install --save-dev compression-webpack-plugin,现在的vue.config.js代码如下,但是,需要注意的是,服务器上nginx也必须开启gzip才能生效
// 是否为生产环境
const isProduction = process.env.NODE_ENV !== 'development';

// gzip压缩
const CompressionWebpackPlugin = require('compression-webpack-plugin')

module.exports = {
    productionSourceMap: false,
    configureWebpack: config => {
        // 生产环境相关配置
        if (isProduction) {
            //gzip压缩
            const productionGzipExtensions = ['html', 'js', 'css']
            config.plugins.push(
                new CompressionWebpackPlugin({
                    filename: '[path].gz[query]',
                    algorithm: 'gzip',
                    test: new RegExp(
                        '\\.(' + productionGzipExtensions.join('|') + ')$'
                    ),
                    threshold: 10240, // 只有大小大于该值的资源会被处理 10240
                    minRatio: 0.8, // 只有压缩率小于这个值的资源才会被处理
                    deleteOriginalAssets: false // 删除原文件
                })
            )
        }
    }
}
打开nginx文件夹下的nginx.conf文件,在http模块中写入以下内容
 # 开启gzip
    gzip on;

    # 启用gzip压缩的最小文件,小于设置值的文件将不会压缩
    gzip_min_length 1k;

    # gzip 压缩级别,1-9,数字越大压缩的越好,也越占用CPU时间,后面会有详细说明
    gzip_comp_level 2;

    # 进行压缩的文件类型。javascript有多种形式,后面的图片压缩不需要的可以自行删除
    gzip_types text/plain application/javascript application/x-javascript text/css application/xml text/javascript application/x-httpd-php image/jpeg image/gif image/png;

    # 是否在http header中添加Vary: Accept-Encoding,建议开启
    gzip_vary on;

    # 设置压缩所需要的缓冲区大小
    gzip_buffers 4 16k;
然后输入命令nginx -s reload重启nginx服务
如果后端nginx开启了gzip,可以从network中的Content-Encoding中看到gzip
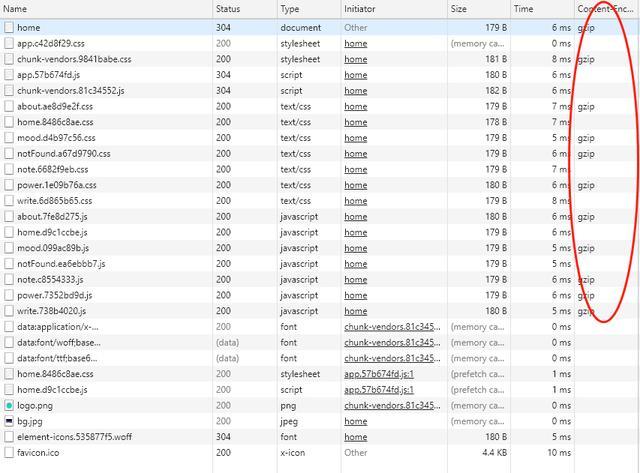
image.png
3.开启CDN加速(建议选配,CDN虽然速度快,但没有本地打包稳定)
将使用的插件使用cdn链接,并且配置webpack将使用CDN的插件不进行打包,别忘记还要再index.html中引入js以及css
// 是否为生产环境
const isProduction = process.env.NODE_ENV !== 'development';

// 本地环境是否需要使用cdn
const devNeedCdn = false

// cdn链接
const cdn = {
    // cdn:模块名称和模块作用域命名(对应window里面挂载的变量名称)
    externals: {
        vue: 'Vue',
        vuex: 'Vuex',
        'vue-router': 'VueRouter',
        'marked': 'marked',
        'highlight.js': 'hljs',
        'nprogress': 'NProgress'
    },
    // cdn的css链接
    css: [
        'https://cdn.bootcss.com/nprogress/0.2.0/nprogress.min.css'
    ],
    // cdn的js链接
    js: [
        'https://cdn.bootcss.com/vue/2.6.10/vue.min.js',
        'https://cdn.bootcss.com/vuex/3.1.2/vuex.min.js',
        'https://cdn.bootcss.com/vue-router/3.1.3/vue-router.min.js',
        'https://cdn.bootcss.com/marked/0.8.0/marked.min.js',
        'https://cdn.bootcss.com/highlight.js/9.18.1/highlight.min.js',
        'https://cdn.bootcss.com/nprogress/0.2.0/nprogress.min.js'
    ]
}

module.exports = {
    chainWebpack: config => {
        // ============注入cdn start============
        config.plugin('html').tap(args => {
            // 生产环境或本地需要cdn时,才注入cdn
            if (isProduction || devNeedCdn) args[0].cdn = cdn
            return args
        })
        // ============注入cdn start============
    },
    configureWebpack: config => {
        // 用cdn方式引入,则构建时要忽略相关资源
        if (isProduction || devNeedCdn) config.externals = cdn.externals
    }
}
接下来,在index.html中引入使用了CDN的链接
<!DOCTYPE html>
<html lang="en" style="width: 100%;height: 100%;">
  <head>
    <meta charset="utf-8">
    <meta http-equiv="X-UA-Compatible" content="IE=edge">
    <meta >
    <link rel="icon" href="<%= BASE_URL %>favicon.ico">

    <!-- 使用CDN的CSS文件 -->
    <% for (var i in htmlWebpackPlugin.options.cdn &&
    htmlWebpackPlugin.options.cdn.css) { %>
    <link
            href="<%= htmlWebpackPlugin.options.cdn.css[i] %>"
            rel="stylesheet"
    />
    <% } %>
    <!-- 使用CDN的CSS文件 -->

    <title>CoolDream</title>
  </head>
  <body style="width: 100%;height: 100%;">
    <noscript>
      <strong>We're sorry but blog doesn't work properly without JavaScript enabled. Please enable it to continue.</strong>
    </noscript>
    <div id="app"></div>
    <!-- built files will be auto injected -->

    <!-- 使用CDN的JS文件 -->
    <% for (var i in htmlWebpackPlugin.options.cdn &&
    htmlWebpackPlugin.options.cdn.js) { %>
    <script src="<%= htmlWebpackPlugin.options.cdn.js[i] %>"></script>
    <% } %>
    <!-- 使用CDN的JS文件 -->

  </body>
</html>
打包后抛到服务器上,打开开发者工具的network,如果看到http请求cdn,那么就代表配置成功了,如图所示

image.png
4.代码压缩
先安装插件npm i -D uglifyjs-webpack-plugin
然后在最上方引入依赖
// 代码压缩
const UglifyJsPlugin = require('uglifyjs-webpack-plugin')
在configureWebpack模块中引入代码压缩
// 代码压缩
config.plugins.push(
    new UglifyJsPlugin({
        uglifyOptions: {
            //生产环境自动删除console
            compress: {
                drop_debugger: true,
                drop_console: true,
                pure_funcs: ['console.log']
            }
        },
        sourceMap: false,
        parallel: true
    })
)
5.公共代码抽离,写在configureWebpack模块中
// 公共代码抽离
config.optimization = {
    splitChunks: {
        cacheGroups: {
            vendor: {
                chunks: 'all',
                test: /node_modules/,
                name: 'vendor',
                minChunks: 1,
                maxInitialRequests: 5,
                minSize: 0,
                priority: 100
            },
            common: {
                chunks: 'all',
                test: /[\\/]src[\\/]js[\\/]/,
                name: 'common',
                minChunks: 2,
                maxInitialRequests: 5,
                minSize: 0,
                priority: 60
            },
            styles: {
                name: 'styles',
                test: /\.(sa|sc|c)ss$/,
                chunks: 'all',
                enforce: true
            },
            runtimeChunk: {
                name: 'manifest'
            }
        }
    }
}
6.图片压缩()
1.使用图片压缩插件
- 先安装插件npm install image-webpack-loader --save-dev
- 在chainWebpack中新增以下代码
// ============压缩图片 start============
config.module
    .rule('images')
    .use('image-webpack-loader')
    .loader('image-webpack-loader')
    .options({ bypassOnDebug: true })
    .end()
// ============压缩图片 end============
- 所以最终的配置如下
// 是否为生产环境
const isProduction = process.env.NODE_ENV !== 'development';

// 代码压缩
const UglifyJsPlugin = require('uglifyjs-webpack-plugin')

// gzip压缩
const CompressionWebpackPlugin = require('compression-webpack-plugin')

// 本地环境是否需要使用cdn
const devNeedCdn = false

// cdn链接
const cdn = {
    // cdn:模块名称和模块作用域命名(对应window里面挂载的变量名称)
    externals: {
        vue: 'Vue',
        vuex: 'Vuex',
        'vue-router': 'VueRouter',
        'marked': 'marked',
        'highlight.js': 'hljs',
        'nprogress': 'NProgress'
    },
    // cdn的css链接
    css: [
        'https://cdn.bootcss.com/nprogress/0.2.0/nprogress.min.css'
    ],
    // cdn的js链接
    js: [
        'https://cdn.bootcss.com/vue/2.6.10/vue.min.js',
        'https://cdn.bootcss.com/vuex/3.1.2/vuex.min.js',
        'https://cdn.bootcss.com/vue-router/3.1.3/vue-router.min.js',
        'https://cdn.bootcss.com/marked/0.8.0/marked.min.js',
        'https://cdn.bootcss.com/highlight.js/9.18.1/highlight.min.js',
        'https://cdn.bootcss.com/nprogress/0.2.0/nprogress.min.js'
    ]
}

module.exports = {
    productionSourceMap: false,
    chainWebpack: config => {
        // ============注入cdn start============
        config.plugin('html').tap(args => {
            // 生产环境或本地需要cdn时,才注入cdn
            if (isProduction || devNeedCdn) args[0].cdn = cdn
            return args
        })
        // ============注入cdn start============

        // ============压缩图片 start============
        config.module
            .rule('images')
            .use('image-webpack-loader')
            .loader('image-webpack-loader')
            .options({ bypassOnDebug: true })
            .end()
        // ============压缩图片 end============
    },
    configureWebpack: config => {
        // 用cdn方式引入,则构建时要忽略相关资源
        if (isProduction || devNeedCdn) config.externals = cdn.externals

        // 生产环境相关配置
        if (isProduction) {
            //gzip压缩
            const productionGzipExtensions = ['html', 'js', 'css']
            config.plugins.push(
                new CompressionWebpackPlugin({
                    filename: '[path].gz[query]',
                    algorithm: 'gzip',
                    test: new RegExp(
                        '\\.(' + productionGzipExtensions.join('|') + ')$'
                    ),
                    threshold: 10240, // 只有大小大于该值的资源会被处理 10240
                    minRatio: 0.8, // 只有压缩率小于这个值的资源才会被处理
                    deleteOriginalAssets: false // 删除原文件
                })
            )

            // 代码压缩
            config.plugins.push(
                new UglifyJsPlugin({
                    uglifyOptions: {
                        //生产环境自动删除console
                        compress: {
                            drop_debugger: true,
                            drop_console: true,
                            pure_funcs: ['console.log']
                        }
                    },
                    sourceMap: false,
                    parallel: true
                })
            )
        }

        // 公共代码抽离
        config.optimization = {
            splitChunks: {
                cacheGroups: {
                    vendor: {
                        chunks: 'all',
                        test: /node_modules/,
                        name: 'vendor',
                        minChunks: 1,
                        maxInitialRequests: 5,
                        minSize: 0,
                        priority: 100
                    },
                    common: {
                        chunks: 'all',
                        test: /[\\/]src[\\/]js[\\/]/,
                        name: 'common',
                        minChunks: 2,
                        maxInitialRequests: 5,
                        minSize: 0,
                        priority: 60
                    },
                    styles: {
                        name: 'styles',
                        test: /\.(sa|sc|c)ss$/,
                        chunks: 'all',
                        enforce: true
                    },
                    runtimeChunk: {
                        name: 'manifest'
                    }
                }
            }
        }
    }
}
2.将静态资源存储在云端,个人用的七牛云,对象存储用于存储文件,使用cdn加速让存储的静态资源访问速度更快。(推荐,速度能快挺多)
- 我个人申请了七牛云,实名认证就有10G空间可用,每个月有10G的免费流量,不过不绑定域名的话只有30天体验机会,我是绑定了我的域名进行DNS解析中转,具体的操作可以参考这一篇博客,https://www.cnblogs.com/mazhi...
7.nginx配置缓存同样也可以提高网站的访问速度(虽然这点有点偏离前端打包主题了,但是对于自己独立开发个人博客网站的前端来说还是非常有用的!)
在nginx.conf的http模块中写入一下内容
 # 设置缓存路径并且使用一块最大100M的共享内存,用于硬盘上的文件索引,包括文件名和请求次数,每个文件在1天内若不活跃(无请求)则从硬盘上淘汰,硬盘缓存最大10G,满了则根据LRU算法自动清除缓存。
    proxy_cache_path /var/cache/nginx/cache levels=1:2 keys_zone=imgcache:100m inactive=1d max_size=10g;
然后在nginx.conf的serve模块中写入一下内容,保存配置,nginx -s reload重启服务即可看到效果
location ~* ^.+\.(css|js|ico|gif|jpg|jpeg|png)$ {
 log_not_found off;
 # 关闭日志
 access_log off;
 # 缓存时间7天
 expires 7d;
 # 源服务器
 proxy_pass http://localhost:8888;
 # 指定上面设置的缓存区域
 proxy_cache imgcache;
 # 缓存过期管理
 proxy_cache_valid 200 302 1d;
 proxy_cache_valid 404 10m;
 proxy_cache_valid any 1h;
 proxy_cache_use_stale error timeout invalid_header updating http_500 http_502 http_503 http_504;
 }
记录了自己的博客在禁用缓存的情况下,从八九秒加载时间到最终985ms的优化实践,开启缓存的情况下能达到138ms的访问速度
本人的个人博客采用的是Vue-cli4.1.2 + typescript构建的,项目目录结构如下
├─ src    //主文件
│  ├─ api    //接口文件夹
|  |  |- config.js    //后端接口地址的配置,将测试、开发、生产环境分开
|  |  └─ user.js      //接口文件,配置了token请求头,具体接口根据需求修改
│  ├─ assets   //资源文件
│  ├─ components   //公用组件
│  ├─ directive   //vue自定义指令
|  ├─ filters      //存放过滤器文件,自带了手机号加密,手机号格式化,时间日期处理
|  ├─ interceptors    //存放axios拦截器配置,写入了接口调用的loading加载以及http状态码报错拦截
|  ├─ interceptors    //放置公用的接口,对数据进行类型限制
|  ├─ layout      //布局文件,通过子路由渲染方式实现,具体HTML布局根据需求修改
|  ├─ mixins      //混入文件,配置了一个平滑滚动的方法
|  ├─ plugins     //外部插件文件夹,配置了按需引入的element-ui
|  ├─ reg    //存放正则以及校验的文件夹
|  |  |- reg.ts      //存放正则表达式,自带了传真,邮箱,qq,手机号,银行卡号,固定电话,密码强度校验正则
|  |  └─ validator.ts      //存放element-ui自定义校验,自带了传真,邮箱,qq,手机号,银行卡号,固定电话,密码强度自定义校验
|  ├─ router      //路由文件
|  ├─ store       //vuex全局变量文件
|  |  |- index.ts      //store主文件
|  |  └─ module     //store模块文件夹
|  |  |  └─ user.ts      //存放user相关的全局变量
|  ├─ stylus   //css预处理器文件夹
|  |  |- reset.styl      //样式初始化文件,自带了非标准盒子,a标签清除下划线,清除内外边距,禁止图片拖拽等效果
|  |  └─ color.styl     //颜色变量文件
|  ├─ utils   //公用方法文件夹
|  |  |- area.ts      //存放省市区三级地区的数据
|  |  |- array.ts      //存放数组相关的公用方法,自带了两个元素交换位置,元素前进后退一格,元素置顶或末尾,去重,删除指定元素操作
|  |  └─ object.ts    //存放对象相关的公用方法,自带了对象清空所有值的方法
|  ├─ views   //页面文件夹
|  ├─ main.ts   //主配置文件
|  ├─ babel.config.js   //babel配置文件,写入了element-ui按需加载的配置
|  ├─ package.json   //npm的包管理文件
|  ├─ tsconfig.json   //ts配置文件
|  ├─ vue.config.js   //vue配置文件
1.关闭productionSourceMap
首先,由于最新版的脚手架不自带配置文件了,先在根目录新建vue.config.js文件,关闭productionSourceMap,在vue.config.js中写入如下内容
module.exports = {
    productionSourceMap: false
}
2.开启Gzip压缩
安装插件compression-webpack-plugin,打开代码压缩,npm install --save-dev compression-webpack-plugin,现在的vue.config.js代码如下,但是,需要注意的是,服务器上nginx也必须开启gzip才能生效
// 是否为生产环境
const isProduction = process.env.NODE_ENV !== 'development';

// gzip压缩
const CompressionWebpackPlugin = require('compression-webpack-plugin')

module.exports = {
    productionSourceMap: false,
    configureWebpack: config => {
        // 生产环境相关配置
        if (isProduction) {
            //gzip压缩
            const productionGzipExtensions = ['html', 'js', 'css']
            config.plugins.push(
                new CompressionWebpackPlugin({
                    filename: '[path].gz[query]',
                    algorithm: 'gzip',
                    test: new RegExp(
                        '\\.(' + productionGzipExtensions.join('|') + ')$'
                    ),
                    threshold: 10240, // 只有大小大于该值的资源会被处理 10240
                    minRatio: 0.8, // 只有压缩率小于这个值的资源才会被处理
                    deleteOriginalAssets: false // 删除原文件
                })
            )
        }
    }
}
打开nginx文件夹下的nginx.conf文件,在http模块中写入以下内容
 # 开启gzip
    gzip on;

    # 启用gzip压缩的最小文件,小于设置值的文件将不会压缩
    gzip_min_length 1k;

    # gzip 压缩级别,1-9,数字越大压缩的越好,也越占用CPU时间,后面会有详细说明
    gzip_comp_level 2;

    # 进行压缩的文件类型。javascript有多种形式,后面的图片压缩不需要的可以自行删除
    gzip_types text/plain application/javascript application/x-javascript text/css application/xml text/javascript application/x-httpd-php image/jpeg image/gif image/png;

    # 是否在http header中添加Vary: Accept-Encoding,建议开启
    gzip_vary on;

    # 设置压缩所需要的缓冲区大小
    gzip_buffers 4 16k;
然后输入命令nginx -s reload重启nginx服务
如果后端nginx开启了gzip,可以从network中的Content-Encoding中看到gzip
image.png
3.开启CDN加速(建议选配,CDN虽然速度快,但没有本地打包稳定)
将使用的插件使用cdn链接,并且配置webpack将使用CDN的插件不进行打包,别忘记还要再index.html中引入js以及css
// 是否为生产环境
const isProduction = process.env.NODE_ENV !== 'development';

// 本地环境是否需要使用cdn
const devNeedCdn = false

// cdn链接
const cdn = {
    // cdn:模块名称和模块作用域命名(对应window里面挂载的变量名称)
    externals: {
        vue: 'Vue',
        vuex: 'Vuex',
        'vue-router': 'VueRouter',
        'marked': 'marked',
        'highlight.js': 'hljs',
        'nprogress': 'NProgress'
    },
    // cdn的css链接
    css: [
        'https://cdn.bootcss.com/nprogress/0.2.0/nprogress.min.css'
    ],
    // cdn的js链接
    js: [
        'https://cdn.bootcss.com/vue/2.6.10/vue.min.js',
        'https://cdn.bootcss.com/vuex/3.1.2/vuex.min.js',
        'https://cdn.bootcss.com/vue-router/3.1.3/vue-router.min.js',
        'https://cdn.bootcss.com/marked/0.8.0/marked.min.js',
        'https://cdn.bootcss.com/highlight.js/9.18.1/highlight.min.js',
        'https://cdn.bootcss.com/nprogress/0.2.0/nprogress.min.js'
    ]
}

module.exports = {
    chainWebpack: config => {
        // ============注入cdn start============
        config.plugin('html').tap(args => {
            // 生产环境或本地需要cdn时,才注入cdn
            if (isProduction || devNeedCdn) args[0].cdn = cdn
            return args
        })
        // ============注入cdn start============
    },
    configureWebpack: config => {
        // 用cdn方式引入,则构建时要忽略相关资源
        if (isProduction || devNeedCdn) config.externals = cdn.externals
    }
}
接下来,在index.html中引入使用了CDN的链接
<!DOCTYPE html>
<html lang="en" style="width: 100%;height: 100%;">
  <head>
    <meta charset="utf-8">
    <meta http-equiv="X-UA-Compatible" content="IE=edge">
    <meta >
    <link rel="icon" href="<%= BASE_URL %>favicon.ico">

    <!-- 使用CDN的CSS文件 -->
    <% for (var i in htmlWebpackPlugin.options.cdn &&
    htmlWebpackPlugin.options.cdn.css) { %>
    <link
            href="<%= htmlWebpackPlugin.options.cdn.css[i] %>"
            rel="stylesheet"
    />
    <% } %>
    <!-- 使用CDN的CSS文件 -->

    <title>CoolDream</title>
  </head>
  <body style="width: 100%;height: 100%;">
    <noscript>
      <strong>We're sorry but blog doesn't work properly without JavaScript enabled. Please enable it to continue.</strong>
    </noscript>
    <div id="app"></div>
    <!-- built files will be auto injected -->

    <!-- 使用CDN的JS文件 -->
    <% for (var i in htmlWebpackPlugin.options.cdn &&
    htmlWebpackPlugin.options.cdn.js) { %>
    <script src="<%= htmlWebpackPlugin.options.cdn.js[i] %>"></script>
    <% } %>
    <!-- 使用CDN的JS文件 -->

  </body>
</html>
打包后抛到服务器上,打开开发者工具的network,如果看到http请求cdn,那么就代表配置成功了,如图所示
image.png
4.代码压缩
先安装插件npm i -D uglifyjs-webpack-plugin
然后在最上方引入依赖
// 代码压缩
const UglifyJsPlugin = require('uglifyjs-webpack-plugin')
在configureWebpack模块中引入代码压缩
// 代码压缩
config.plugins.push(
    new UglifyJsPlugin({
        uglifyOptions: {
            //生产环境自动删除console
            compress: {
                drop_debugger: true,
                drop_console: true,
                pure_funcs: ['console.log']
            }
        },
        sourceMap: false,
        parallel: true
    })
)
5.公共代码抽离,写在configureWebpack模块中
// 公共代码抽离
config.optimization = {
    splitChunks: {
        cacheGroups: {
            vendor: {
                chunks: 'all',
                test: /node_modules/,
                name: 'vendor',
                minChunks: 1,
                maxInitialRequests: 5,
                minSize: 0,
                priority: 100
            },
            common: {
                chunks: 'all',
                test: /[\\/]src[\\/]js[\\/]/,
                name: 'common',
                minChunks: 2,
                maxInitialRequests: 5,
                minSize: 0,
                priority: 60
            },
            styles: {
                name: 'styles',
                test: /\.(sa|sc|c)ss$/,
                chunks: 'all',
                enforce: true
            },
            runtimeChunk: {
                name: 'manifest'
            }
        }
    }
}
6.图片压缩()
1.使用图片压缩插件
- 先安装插件npm install image-webpack-loader --save-dev
- 在chainWebpack中新增以下代码
// ============压缩图片 start============
config.module
    .rule('images')
    .use('image-webpack-loader')
    .loader('image-webpack-loader')
    .options({ bypassOnDebug: true })
    .end()
// ============压缩图片 end============
- 所以最终的配置如下
// 是否为生产环境
const isProduction = process.env.NODE_ENV !== 'development';

// 代码压缩
const UglifyJsPlugin = require('uglifyjs-webpack-plugin')

// gzip压缩
const CompressionWebpackPlugin = require('compression-webpack-plugin')

// 本地环境是否需要使用cdn
const devNeedCdn = false

// cdn链接
const cdn = {
    // cdn:模块名称和模块作用域命名(对应window里面挂载的变量名称)
    externals: {
        vue: 'Vue',
        vuex: 'Vuex',
        'vue-router': 'VueRouter',
        'marked': 'marked',
        'highlight.js': 'hljs',
        'nprogress': 'NProgress'
    },
    // cdn的css链接
    css: [
        'https://cdn.bootcss.com/nprogress/0.2.0/nprogress.min.css'
    ],
    // cdn的js链接
    js: [
        'https://cdn.bootcss.com/vue/2.6.10/vue.min.js',
        'https://cdn.bootcss.com/vuex/3.1.2/vuex.min.js',
        'https://cdn.bootcss.com/vue-router/3.1.3/vue-router.min.js',
        'https://cdn.bootcss.com/marked/0.8.0/marked.min.js',
        'https://cdn.bootcss.com/highlight.js/9.18.1/highlight.min.js',
        'https://cdn.bootcss.com/nprogress/0.2.0/nprogress.min.js'
    ]
}

module.exports = {
    productionSourceMap: false,
    chainWebpack: config => {
        // ============注入cdn start============
        config.plugin('html').tap(args => {
            // 生产环境或本地需要cdn时,才注入cdn
            if (isProduction || devNeedCdn) args[0].cdn = cdn
            return args
        })
        // ============注入cdn start============

        // ============压缩图片 start============
        config.module
            .rule('images')
            .use('image-webpack-loader')
            .loader('image-webpack-loader')
            .options({ bypassOnDebug: true })
            .end()
        // ============压缩图片 end============
    },
    configureWebpack: config => {
        // 用cdn方式引入,则构建时要忽略相关资源
        if (isProduction || devNeedCdn) config.externals = cdn.externals

        // 生产环境相关配置
        if (isProduction) {
            //gzip压缩
            const productionGzipExtensions = ['html', 'js', 'css']
            config.plugins.push(
                new CompressionWebpackPlugin({
                    filename: '[path].gz[query]',
                    algorithm: 'gzip',
                    test: new RegExp(
                        '\\.(' + productionGzipExtensions.join('|') + ')$'
                    ),
                    threshold: 10240, // 只有大小大于该值的资源会被处理 10240
                    minRatio: 0.8, // 只有压缩率小于这个值的资源才会被处理
                    deleteOriginalAssets: false // 删除原文件
                })
            )

            // 代码压缩
            config.plugins.push(
                new UglifyJsPlugin({
                    uglifyOptions: {
                        //生产环境自动删除console
                        compress: {
                            drop_debugger: true,
                            drop_console: true,
                            pure_funcs: ['console.log']
                        }
                    },
                    sourceMap: false,
                    parallel: true
                })
            )
        }

        // 公共代码抽离
        config.optimization = {
            splitChunks: {
                cacheGroups: {
                    vendor: {
                        chunks: 'all',
                        test: /node_modules/,
                        name: 'vendor',
                        minChunks: 1,
                        maxInitialRequests: 5,
                        minSize: 0,
                        priority: 100
                    },
                    common: {
                        chunks: 'all',
                        test: /[\\/]src[\\/]js[\\/]/,
                        name: 'common',
                        minChunks: 2,
                        maxInitialRequests: 5,
                        minSize: 0,
                        priority: 60
                    },
                    styles: {
                        name: 'styles',
                        test: /\.(sa|sc|c)ss$/,
                        chunks: 'all',
                        enforce: true
                    },
                    runtimeChunk: {
                        name: 'manifest'
                    }
                }
            }
        }
    }
}
2.将静态资源存储在云端,个人用的七牛云,对象存储用于存储文件,使用cdn加速让存储的静态资源访问速度更快。(推荐,速度能快挺多)
- 我个人申请了七牛云,实名认证就有10G空间可用,每个月有10G的免费流量,不过不绑定域名的话只有30天体验机会,我是绑定了我的域名进行DNS解析中转,具体的操作可以参考这一篇博客,https://www.cnblogs.com/mazhi...
7.nginx配置缓存同样也可以提高网站的访问速度(虽然这点有点偏离前端打包主题了,但是对于自己独立开发个人博客网站的前端来说还是非常有用的!)
在nginx.conf的http模块中写入一下内容
 # 设置缓存路径并且使用一块最大100M的共享内存,用于硬盘上的文件索引,包括文件名和请求次数,每个文件在1天内若不活跃(无请求)则从硬盘上淘汰,硬盘缓存最大10G,满了则根据LRU算法自动清除缓存。
    proxy_cache_path /var/cache/nginx/cache levels=1:2 keys_zone=imgcache:100m inactive=1d max_size=10g;
然后在nginx.conf的serve模块中写入一下内容,保存配置,nginx -s reload重启服务即可看到效果
location ~* ^.+\.(css|js|ico|gif|jpg|jpeg|png)$ {
 log_not_found off;
 # 关闭日志
 access_log off;
 # 缓存时间7天
 expires 7d;
 # 源服务器
 proxy_pass http://localhost:8888;
 # 指定上面设置的缓存区域
 proxy_cache imgcache;
 # 缓存过期管理
 proxy_cache_valid 200 302 1d;
 proxy_cache_valid 404 10m;
 proxy_cache_valid any 1h;
 proxy_cache_use_stale error timeout invalid_header updating http_500 http_502 http_503 http_504;
 }
记录了自己的博客在禁用缓存的情况下,从八九秒加载时间到最终985ms的优化实践,开启缓存的情况下能达到138ms的访问速度
本人的个人博客采用的是Vue-cli4.1.2 + typescript构建的,项目目录结构如下
├─ src    //主文件
│  ├─ api    //接口文件夹
|  |  |- config.js    //后端接口地址的配置,将测试、开发、生产环境分开
|  |  └─ user.js      //接口文件,配置了token请求头,具体接口根据需求修改
│  ├─ assets   //资源文件
│  ├─ components   //公用组件
│  ├─ directive   //vue自定义指令
|  ├─ filters      //存放过滤器文件,自带了手机号加密,手机号格式化,时间日期处理
|  ├─ interceptors    //存放axios拦截器配置,写入了接口调用的loading加载以及http状态码报错拦截
|  ├─ interceptors    //放置公用的接口,对数据进行类型限制
|  ├─ layout      //布局文件,通过子路由渲染方式实现,具体HTML布局根据需求修改
|  ├─ mixins      //混入文件,配置了一个平滑滚动的方法
|  ├─ plugins     //外部插件文件夹,配置了按需引入的element-ui
|  ├─ reg    //存放正则以及校验的文件夹
|  |  |- reg.ts      //存放正则表达式,自带了传真,邮箱,qq,手机号,银行卡号,固定电话,密码强度校验正则
|  |  └─ validator.ts      //存放element-ui自定义校验,自带了传真,邮箱,qq,手机号,银行卡号,固定电话,密码强度自定义校验
|  ├─ router      //路由文件
|  ├─ store       //vuex全局变量文件
|  |  |- index.ts      //store主文件
|  |  └─ module     //store模块文件夹
|  |  |  └─ user.ts      //存放user相关的全局变量
|  ├─ stylus   //css预处理器文件夹
|  |  |- reset.styl      //样式初始化文件,自带了非标准盒子,a标签清除下划线,清除内外边距,禁止图片拖拽等效果
|  |  └─ color.styl     //颜色变量文件
|  ├─ utils   //公用方法文件夹
|  |  |- area.ts      //存放省市区三级地区的数据
|  |  |- array.ts      //存放数组相关的公用方法,自带了两个元素交换位置,元素前进后退一格,元素置顶或末尾,去重,删除指定元素操作
|  |  └─ object.ts    //存放对象相关的公用方法,自带了对象清空所有值的方法
|  ├─ views   //页面文件夹
|  ├─ main.ts   //主配置文件
|  ├─ babel.config.js   //babel配置文件,写入了element-ui按需加载的配置
|  ├─ package.json   //npm的包管理文件
|  ├─ tsconfig.json   //ts配置文件
|  ├─ vue.config.js   //vue配置文件
1.关闭productionSourceMap
首先,由于最新版的脚手架不自带配置文件了,先在根目录新建vue.config.js文件,关闭productionSourceMap,在vue.config.js中写入如下内容
module.exports = {
    productionSourceMap: false
}
2.开启Gzip压缩
安装插件compression-webpack-plugin,打开代码压缩,npm install --save-dev compression-webpack-plugin,现在的vue.config.js代码如下,但是,需要注意的是,服务器上nginx也必须开启gzip才能生效
// 是否为生产环境
const isProduction = process.env.NODE_ENV !== 'development';

// gzip压缩
const CompressionWebpackPlugin = require('compression-webpack-plugin')

module.exports = {
    productionSourceMap: false,
    configureWebpack: config => {
        // 生产环境相关配置
        if (isProduction) {
            //gzip压缩
            const productionGzipExtensions = ['html', 'js', 'css']
            config.plugins.push(
                new CompressionWebpackPlugin({
                    filename: '[path].gz[query]',
                    algorithm: 'gzip',
                    test: new RegExp(
                        '\\.(' + productionGzipExtensions.join('|') + ')$'
                    ),
                    threshold: 10240, // 只有大小大于该值的资源会被处理 10240
                    minRatio: 0.8, // 只有压缩率小于这个值的资源才会被处理
                    deleteOriginalAssets: false // 删除原文件
                })
            )
        }
    }
}
打开nginx文件夹下的nginx.conf文件,在http模块中写入以下内容
 # 开启gzip
    gzip on;

    # 启用gzip压缩的最小文件,小于设置值的文件将不会压缩
    gzip_min_length 1k;

    # gzip 压缩级别,1-9,数字越大压缩的越好,也越占用CPU时间,后面会有详细说明
    gzip_comp_level 2;

    # 进行压缩的文件类型。javascript有多种形式,后面的图片压缩不需要的可以自行删除
    gzip_types text/plain application/javascript application/x-javascript text/css application/xml text/javascript application/x-httpd-php image/jpeg image/gif image/png;

    # 是否在http header中添加Vary: Accept-Encoding,建议开启
    gzip_vary on;

    # 设置压缩所需要的缓冲区大小
    gzip_buffers 4 16k;
然后输入命令nginx -s reload重启nginx服务
如果后端nginx开启了gzip,可以从network中的Content-Encoding中看到gzip
image.png
3.开启CDN加速(建议选配,CDN虽然速度快,但没有本地打包稳定)
将使用的插件使用cdn链接,并且配置webpack将使用CDN的插件不进行打包,别忘记还要再index.html中引入js以及css
// 是否为生产环境
const isProduction = process.env.NODE_ENV !== 'development';

// 本地环境是否需要使用cdn
const devNeedCdn = false

// cdn链接
const cdn = {
    // cdn:模块名称和模块作用域命名(对应window里面挂载的变量名称)
    externals: {
        vue: 'Vue',
        vuex: 'Vuex',
        'vue-router': 'VueRouter',
        'marked': 'marked',
        'highlight.js': 'hljs',
        'nprogress': 'NProgress'
    },
    // cdn的css链接
    css: [
        'https://cdn.bootcss.com/nprogress/0.2.0/nprogress.min.css'
    ],
    // cdn的js链接
    js: [
        'https://cdn.bootcss.com/vue/2.6.10/vue.min.js',
        'https://cdn.bootcss.com/vuex/3.1.2/vuex.min.js',
        'https://cdn.bootcss.com/vue-router/3.1.3/vue-router.min.js',
        'https://cdn.bootcss.com/marked/0.8.0/marked.min.js',
        'https://cdn.bootcss.com/highlight.js/9.18.1/highlight.min.js',
        'https://cdn.bootcss.com/nprogress/0.2.0/nprogress.min.js'
    ]
}

module.exports = {
    chainWebpack: config => {
        // ============注入cdn start============
        config.plugin('html').tap(args => {
            // 生产环境或本地需要cdn时,才注入cdn
            if (isProduction || devNeedCdn) args[0].cdn = cdn
            return args
        })
        // ============注入cdn start============
    },
    configureWebpack: config => {
        // 用cdn方式引入,则构建时要忽略相关资源
        if (isProduction || devNeedCdn) config.externals = cdn.externals
    }
}
接下来,在index.html中引入使用了CDN的链接
<!DOCTYPE html>
<html lang="en" style="width: 100%;height: 100%;">
  <head>
    <meta charset="utf-8">
    <meta http-equiv="X-UA-Compatible" content="IE=edge">
    <meta >
    <link rel="icon" href="<%= BASE_URL %>favicon.ico">

    <!-- 使用CDN的CSS文件 -->
    <% for (var i in htmlWebpackPlugin.options.cdn &&
    htmlWebpackPlugin.options.cdn.css) { %>
    <link
            href="<%= htmlWebpackPlugin.options.cdn.css[i] %>"
            rel="stylesheet"
    />
    <% } %>
    <!-- 使用CDN的CSS文件 -->

    <title>CoolDream</title>
  </head>
  <body style="width: 100%;height: 100%;">
    <noscript>
      <strong>We're sorry but blog doesn't work properly without JavaScript enabled. Please enable it to continue.</strong>
    </noscript>
    <div id="app"></div>
    <!-- built files will be auto injected -->

    <!-- 使用CDN的JS文件 -->
    <% for (var i in htmlWebpackPlugin.options.cdn &&
    htmlWebpackPlugin.options.cdn.js) { %>
    <script src="<%= htmlWebpackPlugin.options.cdn.js[i] %>"></script>
    <% } %>
    <!-- 使用CDN的JS文件 -->

  </body>
</html>
打包后抛到服务器上,打开开发者工具的network,如果看到http请求cdn,那么就代表配置成功了,如图所示
image.png
4.代码压缩
先安装插件npm i -D uglifyjs-webpack-plugin
然后在最上方引入依赖
// 代码压缩
const UglifyJsPlugin = require('uglifyjs-webpack-plugin')
在configureWebpack模块中引入代码压缩
// 代码压缩
config.plugins.push(
    new UglifyJsPlugin({
        uglifyOptions: {
            //生产环境自动删除console
            compress: {
                drop_debugger: true,
                drop_console: true,
                pure_funcs: ['console.log']
            }
        },
        sourceMap: false,
        parallel: true
    })
)
5.公共代码抽离,写在configureWebpack模块中
// 公共代码抽离
config.optimization = {
    splitChunks: {
        cacheGroups: {
            vendor: {
                chunks: 'all',
                test: /node_modules/,
                name: 'vendor',
                minChunks: 1,
                maxInitialRequests: 5,
                minSize: 0,
                priority: 100
            },
            common: {
                chunks: 'all',
                test: /[\\/]src[\\/]js[\\/]/,
                name: 'common',
                minChunks: 2,
                maxInitialRequests: 5,
                minSize: 0,
                priority: 60
            },
            styles: {
                name: 'styles',
                test: /\.(sa|sc|c)ss$/,
                chunks: 'all',
                enforce: true
            },
            runtimeChunk: {
                name: 'manifest'
            }
        }
    }
}
6.图片压缩()
1.使用图片压缩插件
- 先安装插件npm install image-webpack-loader --save-dev
- 在chainWebpack中新增以下代码
// ============压缩图片 start============
config.module
    .rule('images')
    .use('image-webpack-loader')
    .loader('image-webpack-loader')
    .options({ bypassOnDebug: true })
    .end()
// ============压缩图片 end============
- 所以最终的配置如下
// 是否为生产环境
const isProduction = process.env.NODE_ENV !== 'development';

// 代码压缩
const UglifyJsPlugin = require('uglifyjs-webpack-plugin')

// gzip压缩
const CompressionWebpackPlugin = require('compression-webpack-plugin')

// 本地环境是否需要使用cdn
const devNeedCdn = false

// cdn链接
const cdn = {
    // cdn:模块名称和模块作用域命名(对应window里面挂载的变量名称)
    externals: {
        vue: 'Vue',
        vuex: 'Vuex',
        'vue-router': 'VueRouter',
        'marked': 'marked',
        'highlight.js': 'hljs',
        'nprogress': 'NProgress'
    },
    // cdn的css链接
    css: [
        'https://cdn.bootcss.com/nprogress/0.2.0/nprogress.min.css'
    ],
    // cdn的js链接
    js: [
        'https://cdn.bootcss.com/vue/2.6.10/vue.min.js',
        'https://cdn.bootcss.com/vuex/3.1.2/vuex.min.js',
        'https://cdn.bootcss.com/vue-router/3.1.3/vue-router.min.js',
        'https://cdn.bootcss.com/marked/0.8.0/marked.min.js',
        'https://cdn.bootcss.com/highlight.js/9.18.1/highlight.min.js',
        'https://cdn.bootcss.com/nprogress/0.2.0/nprogress.min.js'
    ]
}

module.exports = {
    productionSourceMap: false,
    chainWebpack: config => {
        // ============注入cdn start============
        config.plugin('html').tap(args => {
            // 生产环境或本地需要cdn时,才注入cdn
            if (isProduction || devNeedCdn) args[0].cdn = cdn
            return args
        })
        // ============注入cdn start============

        // ============压缩图片 start============
        config.module
            .rule('images')
            .use('image-webpack-loader')
            .loader('image-webpack-loader')
            .options({ bypassOnDebug: true })
            .end()
        // ============压缩图片 end============
    },
    configureWebpack: config => {
        // 用cdn方式引入,则构建时要忽略相关资源
        if (isProduction || devNeedCdn) config.externals = cdn.externals

        // 生产环境相关配置
        if (isProduction) {
            //gzip压缩
            const productionGzipExtensions = ['html', 'js', 'css']
            config.plugins.push(
                new CompressionWebpackPlugin({
                    filename: '[path].gz[query]',
                    algorithm: 'gzip',
                    test: new RegExp(
                        '\\.(' + productionGzipExtensions.join('|') + ')$'
                    ),
                    threshold: 10240, // 只有大小大于该值的资源会被处理 10240
                    minRatio: 0.8, // 只有压缩率小于这个值的资源才会被处理
                    deleteOriginalAssets: false // 删除原文件
                })
            )

            // 代码压缩
            config.plugins.push(
                new UglifyJsPlugin({
                    uglifyOptions: {
                        //生产环境自动删除console
                        compress: {
                            drop_debugger: true,
                            drop_console: true,
                            pure_funcs: ['console.log']
                        }
                    },
                    sourceMap: false,
                    parallel: true
                })
            )
        }

        // 公共代码抽离
        config.optimization = {
            splitChunks: {
                cacheGroups: {
                    vendor: {
                        chunks: 'all',
                        test: /node_modules/,
                        name: 'vendor',
                        minChunks: 1,
                        maxInitialRequests: 5,
                        minSize: 0,
                        priority: 100
                    },
                    common: {
                        chunks: 'all',
                        test: /[\\/]src[\\/]js[\\/]/,
                        name: 'common',
                        minChunks: 2,
                        maxInitialRequests: 5,
                        minSize: 0,
                        priority: 60
                    },
                    styles: {
                        name: 'styles',
                        test: /\.(sa|sc|c)ss$/,
                        chunks: 'all',
                        enforce: true
                    },
                    runtimeChunk: {
                        name: 'manifest'
                    }
                }
            }
        }
    }
}
2.将静态资源存储在云端,个人用的七牛云,对象存储用于存储文件,使用cdn加速让存储的静态资源访问速度更快。(推荐,速度能快挺多)
- 我个人申请了七牛云,实名认证就有10G空间可用,每个月有10G的免费流量,不过不绑定域名的话只有30天体验机会,我是绑定了我的域名进行DNS解析中转,具体的操作可以参考这一篇博客,https://www.cnblogs.com/mazhi...
7.nginx配置缓存同样也可以提高网站的访问速度(虽然这点有点偏离前端打包主题了,但是对于自己独立开发个人博客网站的前端来说还是非常有用的!)
在nginx.conf的http模块中写入一下内容
 # 设置缓存路径并且使用一块最大100M的共享内存,用于硬盘上的文件索引,包括文件名和请求次数,每个文件在1天内若不活跃(无请求)则从硬盘上淘汰,硬盘缓存最大10G,满了则根据LRU算法自动清除缓存。
    proxy_cache_path /var/cache/nginx/cache levels=1:2 keys_zone=imgcache:100m inactive=1d max_size=10g;
然后在nginx.conf的serve模块中写入一下内容,保存配置,nginx -s reload重启服务即可看到效果
location ~* ^.+\.(css|js|ico|gif|jpg|jpeg|png)$ {
 log_not_found off;
 # 关闭日志
 access_log off;
 # 缓存时间7天
 expires 7d;
 # 源服务器
 proxy_pass http://localhost:8888;
 # 指定上面设置的缓存区域
 proxy_cache imgcache;
 # 缓存过期管理
 proxy_cache_valid 200 302 1d;
 proxy_cache_valid 404 10m;
 proxy_cache_valid any 1h;
 proxy_cache_use_stale error timeout invalid_header updating http_500 http_502 http_503 http_504;
 }
记录了自己的博客在禁用缓存的情况下,从八九秒加载时间到最终985ms的优化实践,开启缓存的情况下能达到138ms的访问速度
本人的个人博客采用的是Vue-cli4.1.2 + typescript构建的,项目目录结构如下
├─ src    //主文件
│  ├─ api    //接口文件夹
|  |  |- config.js    //后端接口地址的配置,将测试、开发、生产环境分开
|  |  └─ user.js      //接口文件,配置了token请求头,具体接口根据需求修改
│  ├─ assets   //资源文件
│  ├─ components   //公用组件
│  ├─ directive   //vue自定义指令
|  ├─ filters      //存放过滤器文件,自带了手机号加密,手机号格式化,时间日期处理
|  ├─ interceptors    //存放axios拦截器配置,写入了接口调用的loading加载以及http状态码报错拦截
|  ├─ interceptors    //放置公用的接口,对数据进行类型限制
|  ├─ layout      //布局文件,通过子路由渲染方式实现,具体HTML布局根据需求修改
|  ├─ mixins      //混入文件,配置了一个平滑滚动的方法
|  ├─ plugins     //外部插件文件夹,配置了按需引入的element-ui
|  ├─ reg    //存放正则以及校验的文件夹
|  |  |- reg.ts      //存放正则表达式,自带了传真,邮箱,qq,手机号,银行卡号,固定电话,密码强度校验正则
|  |  └─ validator.ts      //存放element-ui自定义校验,自带了传真,邮箱,qq,手机号,银行卡号,固定电话,密码强度自定义校验
|  ├─ router      //路由文件
|  ├─ store       //vuex全局变量文件
|  |  |- index.ts      //store主文件
|  |  └─ module     //store模块文件夹
|  |  |  └─ user.ts      //存放user相关的全局变量
|  ├─ stylus   //css预处理器文件夹
|  |  |- reset.styl      //样式初始化文件,自带了非标准盒子,a标签清除下划线,清除内外边距,禁止图片拖拽等效果
|  |  └─ color.styl     //颜色变量文件
|  ├─ utils   //公用方法文件夹
|  |  |- area.ts      //存放省市区三级地区的数据
|  |  |- array.ts      //存放数组相关的公用方法,自带了两个元素交换位置,元素前进后退一格,元素置顶或末尾,去重,删除指定元素操作
|  |  └─ object.ts    //存放对象相关的公用方法,自带了对象清空所有值的方法
|  ├─ views   //页面文件夹
|  ├─ main.ts   //主配置文件
|  ├─ babel.config.js   //babel配置文件,写入了element-ui按需加载的配置
|  ├─ package.json   //npm的包管理文件
|  ├─ tsconfig.json   //ts配置文件
|  ├─ vue.config.js   //vue配置文件
1.关闭productionSourceMap
首先,由于最新版的脚手架不自带配置文件了,先在根目录新建vue.config.js文件,关闭productionSourceMap,在vue.config.js中写入如下内容
module.exports = {
    productionSourceMap: false
}
2.开启Gzip压缩
安装插件compression-webpack-plugin,打开代码压缩,npm install --save-dev compression-webpack-plugin,现在的vue.config.js代码如下,但是,需要注意的是,服务器上nginx也必须开启gzip才能生效
// 是否为生产环境
const isProduction = process.env.NODE_ENV !== 'development';

// gzip压缩
const CompressionWebpackPlugin = require('compression-webpack-plugin')

module.exports = {
    productionSourceMap: false,
    configureWebpack: config => {
        // 生产环境相关配置
        if (isProduction) {
            //gzip压缩
            const productionGzipExtensions = ['html', 'js', 'css']
            config.plugins.push(
                new CompressionWebpackPlugin({
                    filename: '[path].gz[query]',
                    algorithm: 'gzip',
                    test: new RegExp(
                        '\\.(' + productionGzipExtensions.join('|') + ')$'
                    ),
                    threshold: 10240, // 只有大小大于该值的资源会被处理 10240
                    minRatio: 0.8, // 只有压缩率小于这个值的资源才会被处理
                    deleteOriginalAssets: false // 删除原文件
                })
            )
        }
    }
}
打开nginx文件夹下的nginx.conf文件,在http模块中写入以下内容
 # 开启gzip
    gzip on;

    # 启用gzip压缩的最小文件,小于设置值的文件将不会压缩
    gzip_min_length 1k;

    # gzip 压缩级别,1-9,数字越大压缩的越好,也越占用CPU时间,后面会有详细说明
    gzip_comp_level 2;

    # 进行压缩的文件类型。javascript有多种形式,后面的图片压缩不需要的可以自行删除
    gzip_types text/plain application/javascript application/x-javascript text/css application/xml text/javascript application/x-httpd-php image/jpeg image/gif image/png;

    # 是否在http header中添加Vary: Accept-Encoding,建议开启
    gzip_vary on;

    # 设置压缩所需要的缓冲区大小
    gzip_buffers 4 16k;
然后输入命令nginx -s reload重启nginx服务
如果后端nginx开启了gzip,可以从network中的Content-Encoding中看到gzip
image.png
3.开启CDN加速(建议选配,CDN虽然速度快,但没有本地打包稳定)
将使用的插件使用cdn链接,并且配置webpack将使用CDN的插件不进行打包,别忘记还要再index.html中引入js以及css
// 是否为生产环境
const isProduction = process.env.NODE_ENV !== 'development';

// 本地环境是否需要使用cdn
const devNeedCdn = false

// cdn链接
const cdn = {
    // cdn:模块名称和模块作用域命名(对应window里面挂载的变量名称)
    externals: {
        vue: 'Vue',
        vuex: 'Vuex',
        'vue-router': 'VueRouter',
        'marked': 'marked',
        'highlight.js': 'hljs',
        'nprogress': 'NProgress'
    },
    // cdn的css链接
    css: [
        'https://cdn.bootcss.com/nprogress/0.2.0/nprogress.min.css'
    ],
    // cdn的js链接
    js: [
        'https://cdn.bootcss.com/vue/2.6.10/vue.min.js',
        'https://cdn.bootcss.com/vuex/3.1.2/vuex.min.js',
        'https://cdn.bootcss.com/vue-router/3.1.3/vue-router.min.js',
        'https://cdn.bootcss.com/marked/0.8.0/marked.min.js',
        'https://cdn.bootcss.com/highlight.js/9.18.1/highlight.min.js',
        'https://cdn.bootcss.com/nprogress/0.2.0/nprogress.min.js'
    ]
}

module.exports = {
    chainWebpack: config => {
        // ============注入cdn start============
        config.plugin('html').tap(args => {
            // 生产环境或本地需要cdn时,才注入cdn
            if (isProduction || devNeedCdn) args[0].cdn = cdn
            return args
        })
        // ============注入cdn start============
    },
    configureWebpack: config => {
        // 用cdn方式引入,则构建时要忽略相关资源
        if (isProduction || devNeedCdn) config.externals = cdn.externals
    }
}
接下来,在index.html中引入使用了CDN的链接
<!DOCTYPE html>
<html lang="en" style="width: 100%;height: 100%;">
  <head>
    <meta charset="utf-8">
    <meta http-equiv="X-UA-Compatible" content="IE=edge">
    <meta >
    <link rel="icon" href="<%= BASE_URL %>favicon.ico">

    <!-- 使用CDN的CSS文件 -->
    <% for (var i in htmlWebpackPlugin.options.cdn &&
    htmlWebpackPlugin.options.cdn.css) { %>
    <link
            href="<%= htmlWebpackPlugin.options.cdn.css[i] %>"
            rel="stylesheet"
    />
    <% } %>
    <!-- 使用CDN的CSS文件 -->

    <title>CoolDream</title>
  </head>
  <body style="width: 100%;height: 100%;">
    <noscript>
      <strong>We're sorry but blog doesn't work properly without JavaScript enabled. Please enable it to continue.</strong>
    </noscript>
    <div id="app"></div>
    <!-- built files will be auto injected -->

    <!-- 使用CDN的JS文件 -->
    <% for (var i in htmlWebpackPlugin.options.cdn &&
    htmlWebpackPlugin.options.cdn.js) { %>
    <script src="<%= htmlWebpackPlugin.options.cdn.js[i] %>"></script>
    <% } %>
    <!-- 使用CDN的JS文件 -->

  </body>
</html>
打包后抛到服务器上,打开开发者工具的network,如果看到http请求cdn,那么就代表配置成功了,如图所示
image.png
4.代码压缩
先安装插件npm i -D uglifyjs-webpack-plugin
然后在最上方引入依赖
// 代码压缩
const UglifyJsPlugin = require('uglifyjs-webpack-plugin')
在configureWebpack模块中引入代码压缩
// 代码压缩
config.plugins.push(
    new UglifyJsPlugin({
        uglifyOptions: {
            //生产环境自动删除console
            compress: {
                drop_debugger: true,
                drop_console: true,
                pure_funcs: ['console.log']
            }
        },
        sourceMap: false,
        parallel: true
    })
)
5.公共代码抽离,写在configureWebpack模块中
// 公共代码抽离
config.optimization = {
    splitChunks: {
        cacheGroups: {
            vendor: {
                chunks: 'all',
                test: /node_modules/,
                name: 'vendor',
                minChunks: 1,
                maxInitialRequests: 5,
                minSize: 0,
                priority: 100
            },
            common: {
                chunks: 'all',
                test: /[\\/]src[\\/]js[\\/]/,
                name: 'common',
                minChunks: 2,
                maxInitialRequests: 5,
                minSize: 0,
                priority: 60
            },
            styles: {
                name: 'styles',
                test: /\.(sa|sc|c)ss$/,
                chunks: 'all',
                enforce: true
            },
            runtimeChunk: {
                name: 'manifest'
            }
        }
    }
}
6.图片压缩()
1.使用图片压缩插件
- 先安装插件npm install image-webpack-loader --save-dev
- 在chainWebpack中新增以下代码
// ============压缩图片 start============
config.module
    .rule('images')
    .use('image-webpack-loader')
    .loader('image-webpack-loader')
    .options({ bypassOnDebug: true })
    .end()
// ============压缩图片 end============
- 所以最终的配置如下
// 是否为生产环境
const isProduction = process.env.NODE_ENV !== 'development';

// 代码压缩
const UglifyJsPlugin = require('uglifyjs-webpack-plugin')

// gzip压缩
const CompressionWebpackPlugin = require('compression-webpack-plugin')

// 本地环境是否需要使用cdn
const devNeedCdn = false

// cdn链接
const cdn = {
    // cdn:模块名称和模块作用域命名(对应window里面挂载的变量名称)
    externals: {
        vue: 'Vue',
        vuex: 'Vuex',
        'vue-router': 'VueRouter',
        'marked': 'marked',
        'highlight.js': 'hljs',
        'nprogress': 'NProgress'
    },
    // cdn的css链接
    css: [
        'https://cdn.bootcss.com/nprogress/0.2.0/nprogress.min.css'
    ],
    // cdn的js链接
    js: [
        'https://cdn.bootcss.com/vue/2.6.10/vue.min.js',
        'https://cdn.bootcss.com/vuex/3.1.2/vuex.min.js',
        'https://cdn.bootcss.com/vue-router/3.1.3/vue-router.min.js',
        'https://cdn.bootcss.com/marked/0.8.0/marked.min.js',
        'https://cdn.bootcss.com/highlight.js/9.18.1/highlight.min.js',
        'https://cdn.bootcss.com/nprogress/0.2.0/nprogress.min.js'
    ]
}

module.exports = {
    productionSourceMap: false,
    chainWebpack: config => {
        // ============注入cdn start============
        config.plugin('html').tap(args => {
            // 生产环境或本地需要cdn时,才注入cdn
            if (isProduction || devNeedCdn) args[0].cdn = cdn
            return args
        })
        // ============注入cdn start============

        // ============压缩图片 start============
        config.module
            .rule('images')
            .use('image-webpack-loader')
            .loader('image-webpack-loader')
            .options({ bypassOnDebug: true })
            .end()
        // ============压缩图片 end============
    },
    configureWebpack: config => {
        // 用cdn方式引入,则构建时要忽略相关资源
        if (isProduction || devNeedCdn) config.externals = cdn.externals

        // 生产环境相关配置
        if (isProduction) {
            //gzip压缩
            const productionGzipExtensions = ['html', 'js', 'css']
            config.plugins.push(
                new CompressionWebpackPlugin({
                    filename: '[path].gz[query]',
                    algorithm: 'gzip',
                    test: new RegExp(
                        '\\.(' + productionGzipExtensions.join('|') + ')$'
                    ),
                    threshold: 10240, // 只有大小大于该值的资源会被处理 10240
                    minRatio: 0.8, // 只有压缩率小于这个值的资源才会被处理
                    deleteOriginalAssets: false // 删除原文件
                })
            )

            // 代码压缩
            config.plugins.push(
                new UglifyJsPlugin({
                    uglifyOptions: {
                        //生产环境自动删除console
                        compress: {
                            drop_debugger: true,
                            drop_console: true,
                            pure_funcs: ['console.log']
                        }
                    },
                    sourceMap: false,
                    parallel: true
                })
            )
        }

        // 公共代码抽离
        config.optimization = {
            splitChunks: {
                cacheGroups: {
                    vendor: {
                        chunks: 'all',
                        test: /node_modules/,
                        name: 'vendor',
                        minChunks: 1,
                        maxInitialRequests: 5,
                        minSize: 0,
                        priority: 100
                    },
                    common: {
                        chunks: 'all',
                        test: /[\\/]src[\\/]js[\\/]/,
                        name: 'common',
                        minChunks: 2,
                        maxInitialRequests: 5,
                        minSize: 0,
                        priority: 60
                    },
                    styles: {
                        name: 'styles',
                        test: /\.(sa|sc|c)ss$/,
                        chunks: 'all',
                        enforce: true
                    },
                    runtimeChunk: {
                        name: 'manifest'
                    }
                }
            }
        }
    }
}
2.将静态资源存储在云端,个人用的七牛云,对象存储用于存储文件,使用cdn加速让存储的静态资源访问速度更快。(推荐,速度能快挺多)
- 我个人申请了七牛云,实名认证就有10G空间可用,每个月有10G的免费流量,不过不绑定域名的话只有30天体验机会,我是绑定了我的域名进行DNS解析中转,具体的操作可以参考这一篇博客,https://www.cnblogs.com/mazhi...
7.nginx配置缓存同样也可以提高网站的访问速度(虽然这点有点偏离前端打包主题了,但是对于自己独立开发个人博客网站的前端来说还是非常有用的!)
在nginx.conf的http模块中写入一下内容
 # 设置缓存路径并且使用一块最大100M的共享内存,用于硬盘上的文件索引,包括文件名和请求次数,每个文件在1天内若不活跃(无请求)则从硬盘上淘汰,硬盘缓存最大10G,满了则根据LRU算法自动清除缓存。
    proxy_cache_path /var/cache/nginx/cache levels=1:2 keys_zone=imgcache:100m inactive=1d max_size=10g;
然后在nginx.conf的serve模块中写入一下内容,保存配置,nginx -s reload重启服务即可看到效果
location ~* ^.+\.(css|js|ico|gif|jpg|jpeg|png)$ {
 log_not_found off;
 # 关闭日志
 access_log off;
 # 缓存时间7天
 expires 7d;
 # 源服务器
 proxy_pass http://localhost:8888;
 # 指定上面设置的缓存区域
 proxy_cache imgcache;
 # 缓存过期管理
 proxy_cache_valid 200 302 1d;
 proxy_cache_valid 404 10m;
 proxy_cache_valid any 1h;
 proxy_cache_use_stale error timeout invalid_header updating http_500 http_502 http_503 http_504;
 }
记录了自己的博客在禁用缓存的情况下,从八九秒加载时间到最终985ms的优化实践,开启缓存的情况下能达到138ms的访问速度
本人的个人博客采用的是Vue-cli4.1.2 + typescript构建的,项目目录结构如下
├─ src    //主文件
│  ├─ api    //接口文件夹
|  |  |- config.js    //后端接口地址的配置,将测试、开发、生产环境分开
|  |  └─ user.js      //接口文件,配置了token请求头,具体接口根据需求修改
│  ├─ assets   //资源文件
│  ├─ components   //公用组件
│  ├─ directive   //vue自定义指令
|  ├─ filters      //存放过滤器文件,自带了手机号加密,手机号格式化,时间日期处理
|  ├─ interceptors    //存放axios拦截器配置,写入了接口调用的loading加载以及http状态码报错拦截
|  ├─ interceptors    //放置公用的接口,对数据进行类型限制
|  ├─ layout      //布局文件,通过子路由渲染方式实现,具体HTML布局根据需求修改
|  ├─ mixins      //混入文件,配置了一个平滑滚动的方法
|  ├─ plugins     //外部插件文件夹,配置了按需引入的element-ui
|  ├─ reg    //存放正则以及校验的文件夹
|  |  |- reg.ts      //存放正则表达式,自带了传真,邮箱,qq,手机号,银行卡号,固定电话,密码强度校验正则
|  |  └─ validator.ts      //存放element-ui自定义校验,自带了传真,邮箱,qq,手机号,银行卡号,固定电话,密码强度自定义校验
|  ├─ router      //路由文件
|  ├─ store       //vuex全局变量文件
|  |  |- index.ts      //store主文件
|  |  └─ module     //store模块文件夹
|  |  |  └─ user.ts      //存放user相关的全局变量
|  ├─ stylus   //css预处理器文件夹
|  |  |- reset.styl      //样式初始化文件,自带了非标准盒子,a标签清除下划线,清除内外边距,禁止图片拖拽等效果
|  |  └─ color.styl     //颜色变量文件
|  ├─ utils   //公用方法文件夹
|  |  |- area.ts      //存放省市区三级地区的数据
|  |  |- array.ts      //存放数组相关的公用方法,自带了两个元素交换位置,元素前进后退一格,元素置顶或末尾,去重,删除指定元素操作
|  |  └─ object.ts    //存放对象相关的公用方法,自带了对象清空所有值的方法
|  ├─ views   //页面文件夹
|  ├─ main.ts   //主配置文件
|  ├─ babel.config.js   //babel配置文件,写入了element-ui按需加载的配置
|  ├─ package.json   //npm的包管理文件
|  ├─ tsconfig.json   //ts配置文件
|  ├─ vue.config.js   //vue配置文件
1.关闭productionSourceMap
首先,由于最新版的脚手架不自带配置文件了,先在根目录新建vue.config.js文件,关闭productionSourceMap,在vue.config.js中写入如下内容
module.exports = {
    productionSourceMap: false
}
2.开启Gzip压缩
安装插件compression-webpack-plugin,打开代码压缩,npm install --save-dev compression-webpack-plugin,现在的vue.config.js代码如下,但是,需要注意的是,服务器上nginx也必须开启gzip才能生效
// 是否为生产环境
const isProduction = process.env.NODE_ENV !== 'development';

// gzip压缩
const CompressionWebpackPlugin = require('compression-webpack-plugin')

module.exports = {
    productionSourceMap: false,
    configureWebpack: config => {
        // 生产环境相关配置
        if (isProduction) {
            //gzip压缩
            const productionGzipExtensions = ['html', 'js', 'css']
            config.plugins.push(
                new CompressionWebpackPlugin({
                    filename: '[path].gz[query]',
                    algorithm: 'gzip',
                    test: new RegExp(
                        '\\.(' + productionGzipExtensions.join('|') + ')$'
                    ),
                    threshold: 10240, // 只有大小大于该值的资源会被处理 10240
                    minRatio: 0.8, // 只有压缩率小于这个值的资源才会被处理
                    deleteOriginalAssets: false // 删除原文件
                })
            )
        }
    }
}
打开nginx文件夹下的nginx.conf文件,在http模块中写入以下内容
 # 开启gzip
    gzip on;

    # 启用gzip压缩的最小文件,小于设置值的文件将不会压缩
    gzip_min_length 1k;

    # gzip 压缩级别,1-9,数字越大压缩的越好,也越占用CPU时间,后面会有详细说明
    gzip_comp_level 2;

    # 进行压缩的文件类型。javascript有多种形式,后面的图片压缩不需要的可以自行删除
    gzip_types text/plain application/javascript application/x-javascript text/css application/xml text/javascript application/x-httpd-php image/jpeg image/gif image/png;

    # 是否在http header中添加Vary: Accept-Encoding,建议开启
    gzip_vary on;

    # 设置压缩所需要的缓冲区大小
    gzip_buffers 4 16k;
然后输入命令nginx -s reload重启nginx服务
如果后端nginx开启了gzip,可以从network中的Content-Encoding中看到gzip
image.png
3.开启CDN加速(建议选配,CDN虽然速度快,但没有本地打包稳定)
将使用的插件使用cdn链接,并且配置webpack将使用CDN的插件不进行打包,别忘记还要再index.html中引入js以及css
// 是否为生产环境
const isProduction = process.env.NODE_ENV !== 'development';

// 本地环境是否需要使用cdn
const devNeedCdn = false

// cdn链接
const cdn = {
    // cdn:模块名称和模块作用域命名(对应window里面挂载的变量名称)
    externals: {
        vue: 'Vue',
        vuex: 'Vuex',
        'vue-router': 'VueRouter',
        'marked': 'marked',
        'highlight.js': 'hljs',
        'nprogress': 'NProgress'
    },
    // cdn的css链接
    css: [
        'https://cdn.bootcss.com/nprogress/0.2.0/nprogress.min.css'
    ],
    // cdn的js链接
    js: [
        'https://cdn.bootcss.com/vue/2.6.10/vue.min.js',
        'https://cdn.bootcss.com/vuex/3.1.2/vuex.min.js',
        'https://cdn.bootcss.com/vue-router/3.1.3/vue-router.min.js',
        'https://cdn.bootcss.com/marked/0.8.0/marked.min.js',
        'https://cdn.bootcss.com/highlight.js/9.18.1/highlight.min.js',
        'https://cdn.bootcss.com/nprogress/0.2.0/nprogress.min.js'
    ]
}

module.exports = {
    chainWebpack: config => {
        // ============注入cdn start============
        config.plugin('html').tap(args => {
            // 生产环境或本地需要cdn时,才注入cdn
            if (isProduction || devNeedCdn) args[0].cdn = cdn
            return args
        })
        // ============注入cdn start============
    },
    configureWebpack: config => {
        // 用cdn方式引入,则构建时要忽略相关资源
        if (isProduction || devNeedCdn) config.externals = cdn.externals
    }
}
接下来,在index.html中引入使用了CDN的链接
<!DOCTYPE html>
<html lang="en" style="width: 100%;height: 100%;">
  <head>
    <meta charset="utf-8">
    <meta http-equiv="X-UA-Compatible" content="IE=edge">
    <meta >
    <link rel="icon" href="<%= BASE_URL %>favicon.ico">

    <!-- 使用CDN的CSS文件 -->
    <% for (var i in htmlWebpackPlugin.options.cdn &&
    htmlWebpackPlugin.options.cdn.css) { %>
    <link
            href="<%= htmlWebpackPlugin.options.cdn.css[i] %>"
            rel="stylesheet"
    />
    <% } %>
    <!-- 使用CDN的CSS文件 -->

    <title>CoolDream</title>
  </head>
  <body style="width: 100%;height: 100%;">
    <noscript>
      <strong>We're sorry but blog doesn't work properly without JavaScript enabled. Please enable it to continue.</strong>
    </noscript>
    <div id="app"></div>
    <!-- built files will be auto injected -->

    <!-- 使用CDN的JS文件 -->
    <% for (var i in htmlWebpackPlugin.options.cdn &&
    htmlWebpackPlugin.options.cdn.js) { %>
    <script src="<%= htmlWebpackPlugin.options.cdn.js[i] %>"></script>
    <% } %>
    <!-- 使用CDN的JS文件 -->

  </body>
</html>
打包后抛到服务器上,打开开发者工具的network,如果看到http请求cdn,那么就代表配置成功了,如图所示
image.png
4.代码压缩
先安装插件npm i -D uglifyjs-webpack-plugin
然后在最上方引入依赖
// 代码压缩
const UglifyJsPlugin = require('uglifyjs-webpack-plugin')
在configureWebpack模块中引入代码压缩
// 代码压缩
config.plugins.push(
    new UglifyJsPlugin({
        uglifyOptions: {
            //生产环境自动删除console
            compress: {
                drop_debugger: true,
                drop_console: true,
                pure_funcs: ['console.log']
            }
        },
        sourceMap: false,
        parallel: true
    })
)
5.公共代码抽离,写在configureWebpack模块中
// 公共代码抽离
config.optimization = {
    splitChunks: {
        cacheGroups: {
            vendor: {
                chunks: 'all',
                test: /node_modules/,
                name: 'vendor',
                minChunks: 1,
                maxInitialRequests: 5,
                minSize: 0,
                priority: 100
            },
            common: {
                chunks: 'all',
                test: /[\\/]src[\\/]js[\\/]/,
                name: 'common',
                minChunks: 2,
                maxInitialRequests: 5,
                minSize: 0,
                priority: 60
            },
            styles: {
                name: 'styles',
                test: /\.(sa|sc|c)ss$/,
                chunks: 'all',
                enforce: true
            },
            runtimeChunk: {
                name: 'manifest'
            }
        }
    }
}
6.图片压缩()
1.使用图片压缩插件
- 先安装插件npm install image-webpack-loader --save-dev
- 在chainWebpack中新增以下代码
// ============压缩图片 start============
config.module
    .rule('images')
    .use('image-webpack-loader')
    .loader('image-webpack-loader')
    .options({ bypassOnDebug: true })
    .end()
// ============压缩图片 end============
- 所以最终的配置如下
// 是否为生产环境
const isProduction = process.env.NODE_ENV !== 'development';

// 代码压缩
const UglifyJsPlugin = require('uglifyjs-webpack-plugin')

// gzip压缩
const CompressionWebpackPlugin = require('compression-webpack-plugin')

// 本地环境是否需要使用cdn
const devNeedCdn = false

// cdn链接
const cdn = {
    // cdn:模块名称和模块作用域命名(对应window里面挂载的变量名称)
    externals: {
        vue: 'Vue',
        vuex: 'Vuex',
        'vue-router': 'VueRouter',
        'marked': 'marked',
        'highlight.js': 'hljs',
        'nprogress': 'NProgress'
    },
    // cdn的css链接
    css: [
        'https://cdn.bootcss.com/nprogress/0.2.0/nprogress.min.css'
    ],
    // cdn的js链接
    js: [
        'https://cdn.bootcss.com/vue/2.6.10/vue.min.js',
        'https://cdn.bootcss.com/vuex/3.1.2/vuex.min.js',
        'https://cdn.bootcss.com/vue-router/3.1.3/vue-router.min.js',
        'https://cdn.bootcss.com/marked/0.8.0/marked.min.js',
        'https://cdn.bootcss.com/highlight.js/9.18.1/highlight.min.js',
        'https://cdn.bootcss.com/nprogress/0.2.0/nprogress.min.js'
    ]
}

module.exports = {
    productionSourceMap: false,
    chainWebpack: config => {
        // ============注入cdn start============
        config.plugin('html').tap(args => {
            // 生产环境或本地需要cdn时,才注入cdn
            if (isProduction || devNeedCdn) args[0].cdn = cdn
            return args
        })
        // ============注入cdn start============

        // ============压缩图片 start============
        config.module
            .rule('images')
            .use('image-webpack-loader')
            .loader('image-webpack-loader')
            .options({ bypassOnDebug: true })
            .end()
        // ============压缩图片 end============
    },
    configureWebpack: config => {
        // 用cdn方式引入,则构建时要忽略相关资源
        if (isProduction || devNeedCdn) config.externals = cdn.externals

        // 生产环境相关配置
        if (isProduction) {
            //gzip压缩
            const productionGzipExtensions = ['html', 'js', 'css']
            config.plugins.push(
                new CompressionWebpackPlugin({
                    filename: '[path].gz[query]',
                    algorithm: 'gzip',
                    test: new RegExp(
                        '\\.(' + productionGzipExtensions.join('|') + ')$'
                    ),
                    threshold: 10240, // 只有大小大于该值的资源会被处理 10240
                    minRatio: 0.8, // 只有压缩率小于这个值的资源才会被处理
                    deleteOriginalAssets: false // 删除原文件
                })
            )

            // 代码压缩
            config.plugins.push(
                new UglifyJsPlugin({
                    uglifyOptions: {
                        //生产环境自动删除console
                        compress: {
                            drop_debugger: true,
                            drop_console: true,
                            pure_funcs: ['console.log']
                        }
                    },
                    sourceMap: false,
                    parallel: true
                })
            )
        }

        // 公共代码抽离
        config.optimization = {
            splitChunks: {
                cacheGroups: {
                    vendor: {
                        chunks: 'all',
                        test: /node_modules/,
                        name: 'vendor',
                        minChunks: 1,
                        maxInitialRequests: 5,
                        minSize: 0,
                        priority: 100
                    },
                    common: {
                        chunks: 'all',
                        test: /[\\/]src[\\/]js[\\/]/,
                        name: 'common',
                        minChunks: 2,
                        maxInitialRequests: 5,
                        minSize: 0,
                        priority: 60
                    },
                    styles: {
                        name: 'styles',
                        test: /\.(sa|sc|c)ss$/,
                        chunks: 'all',
                        enforce: true
                    },
                    runtimeChunk: {
                        name: 'manifest'
                    }
                }
            }
        }
    }
}
2.将静态资源存储在云端,个人用的七牛云,对象存储用于存储文件,使用cdn加速让存储的静态资源访问速度更快。(推荐,速度能快挺多)
- 我个人申请了七牛云,实名认证就有10G空间可用,每个月有10G的免费流量,不过不绑定域名的话只有30天体验机会,我是绑定了我的域名进行DNS解析中转,具体的操作可以参考这一篇博客,https://www.cnblogs.com/mazhi...
7.nginx配置缓存同样也可以提高网站的访问速度(虽然这点有点偏离前端打包主题了,但是对于自己独立开发个人博客网站的前端来说还是非常有用的!)
在nginx.conf的http模块中写入一下内容
 # 设置缓存路径并且使用一块最大100M的共享内存,用于硬盘上的文件索引,包括文件名和请求次数,每个文件在1天内若不活跃(无请求)则从硬盘上淘汰,硬盘缓存最大10G,满了则根据LRU算法自动清除缓存。
    proxy_cache_path /var/cache/nginx/cache levels=1:2 keys_zone=imgcache:100m inactive=1d max_size=10g;
然后在nginx.conf的serve模块中写入一下内容,保存配置,nginx -s reload重启服务即可看到效果
location ~* ^.+\.(css|js|ico|gif|jpg|jpeg|png)$ {
 log_not_found off;
 # 关闭日志
 access_log off;
 # 缓存时间7天
 expires 7d;
 # 源服务器
 proxy_pass http://localhost:8888;
 # 指定上面设置的缓存区域
 proxy_cache imgcache;
 # 缓存过期管理
 proxy_cache_valid 200 302 1d;
 proxy_cache_valid 404 10m;
 proxy_cache_valid any 1h;
 proxy_cache_use_stale error timeout invalid_header updating http_500 http_502 http_503 http_504;
 }
记录了自己的博客在禁用缓存的情况下,从八九秒加载时间到最终985ms的优化实践,开启缓存的情况下能达到138ms的访问速度
本人的个人博客采用的是Vue-cli4.1.2 + typescript构建的,项目目录结构如下
├─ src    //主文件
│  ├─ api    //接口文件夹
|  |  |- config.js    //后端接口地址的配置,将测试、开发、生产环境分开
|  |  └─ user.js      //接口文件,配置了token请求头,具体接口根据需求修改
│  ├─ assets   //资源文件
│  ├─ components   //公用组件
│  ├─ directive   //vue自定义指令
|  ├─ filters      //存放过滤器文件,自带了手机号加密,手机号格式化,时间日期处理
|  ├─ interceptors    //存放axios拦截器配置,写入了接口调用的loading加载以及http状态码报错拦截
|  ├─ interceptors    //放置公用的接口,对数据进行类型限制
|  ├─ layout      //布局文件,通过子路由渲染方式实现,具体HTML布局根据需求修改
|  ├─ mixins      //混入文件,配置了一个平滑滚动的方法
|  ├─ plugins     //外部插件文件夹,配置了按需引入的element-ui
|  ├─ reg    //存放正则以及校验的文件夹
|  |  |- reg.ts      //存放正则表达式,自带了传真,邮箱,qq,手机号,银行卡号,固定电话,密码强度校验正则
|  |  └─ validator.ts      //存放element-ui自定义校验,自带了传真,邮箱,qq,手机号,银行卡号,固定电话,密码强度自定义校验
|  ├─ router      //路由文件
|  ├─ store       //vuex全局变量文件
|  |  |- index.ts      //store主文件
|  |  └─ module     //store模块文件夹
|  |  |  └─ user.ts      //存放user相关的全局变量
|  ├─ stylus   //css预处理器文件夹
|  |  |- reset.styl      //样式初始化文件,自带了非标准盒子,a标签清除下划线,清除内外边距,禁止图片拖拽等效果
|  |  └─ color.styl     //颜色变量文件
|  ├─ utils   //公用方法文件夹
|  |  |- area.ts      //存放省市区三级地区的数据
|  |  |- array.ts      //存放数组相关的公用方法,自带了两个元素交换位置,元素前进后退一格,元素置顶或末尾,去重,删除指定元素操作
|  |  └─ object.ts    //存放对象相关的公用方法,自带了对象清空所有值的方法
|  ├─ views   //页面文件夹
|  ├─ main.ts   //主配置文件
|  ├─ babel.config.js   //babel配置文件,写入了element-ui按需加载的配置
|  ├─ package.json   //npm的包管理文件
|  ├─ tsconfig.json   //ts配置文件
|  ├─ vue.config.js   //vue配置文件
1.关闭productionSourceMap
首先,由于最新版的脚手架不自带配置文件了,先在根目录新建vue.config.js文件,关闭productionSourceMap,在vue.config.js中写入如下内容
module.exports = {
    productionSourceMap: false
}
2.开启Gzip压缩
安装插件compression-webpack-plugin,打开代码压缩,npm install --save-dev compression-webpack-plugin,现在的vue.config.js代码如下,但是,需要注意的是,服务器上nginx也必须开启gzip才能生效
// 是否为生产环境
const isProduction = process.env.NODE_ENV !== 'development';

// gzip压缩
const CompressionWebpackPlugin = require('compression-webpack-plugin')

module.exports = {
    productionSourceMap: false,
    configureWebpack: config => {
        // 生产环境相关配置
        if (isProduction) {
            //gzip压缩
            const productionGzipExtensions = ['html', 'js', 'css']
            config.plugins.push(
                new CompressionWebpackPlugin({
                    filename: '[path].gz[query]',
                    algorithm: 'gzip',
                    test: new RegExp(
                        '\\.(' + productionGzipExtensions.join('|') + ')$'
                    ),
                    threshold: 10240, // 只有大小大于该值的资源会被处理 10240
                    minRatio: 0.8, // 只有压缩率小于这个值的资源才会被处理
                    deleteOriginalAssets: false // 删除原文件
                })
            )
        }
    }
}
打开nginx文件夹下的nginx.conf文件,在http模块中写入以下内容
 # 开启gzip
    gzip on;

    # 启用gzip压缩的最小文件,小于设置值的文件将不会压缩
    gzip_min_length 1k;

    # gzip 压缩级别,1-9,数字越大压缩的越好,也越占用CPU时间,后面会有详细说明
    gzip_comp_level 2;

    # 进行压缩的文件类型。javascript有多种形式,后面的图片压缩不需要的可以自行删除
    gzip_types text/plain application/javascript application/x-javascript text/css application/xml text/javascript application/x-httpd-php image/jpeg image/gif image/png;

    # 是否在http header中添加Vary: Accept-Encoding,建议开启
    gzip_vary on;

    # 设置压缩所需要的缓冲区大小
    gzip_buffers 4 16k;
然后输入命令nginx -s reload重启nginx服务
如果后端nginx开启了gzip,可以从network中的Content-Encoding中看到gzip
image.png
3.开启CDN加速(建议选配,CDN虽然速度快,但没有本地打包稳定)
将使用的插件使用cdn链接,并且配置webpack将使用CDN的插件不进行打包,别忘记还要再index.html中引入js以及css
// 是否为生产环境
const isProduction = process.env.NODE_ENV !== 'development';

// 本地环境是否需要使用cdn
const devNeedCdn = false

// cdn链接
const cdn = {
    // cdn:模块名称和模块作用域命名(对应window里面挂载的变量名称)
    externals: {
        vue: 'Vue',
        vuex: 'Vuex',
        'vue-router': 'VueRouter',
        'marked': 'marked',
        'highlight.js': 'hljs',
        'nprogress': 'NProgress'
    },
    // cdn的css链接
    css: [
        'https://cdn.bootcss.com/nprogress/0.2.0/nprogress.min.css'
    ],
    // cdn的js链接
    js: [
        'https://cdn.bootcss.com/vue/2.6.10/vue.min.js',
        'https://cdn.bootcss.com/vuex/3.1.2/vuex.min.js',
        'https://cdn.bootcss.com/vue-router/3.1.3/vue-router.min.js',
        'https://cdn.bootcss.com/marked/0.8.0/marked.min.js',
        'https://cdn.bootcss.com/highlight.js/9.18.1/highlight.min.js',
        'https://cdn.bootcss.com/nprogress/0.2.0/nprogress.min.js'
    ]
}

module.exports = {
    chainWebpack: config => {
        // ============注入cdn start============
        config.plugin('html').tap(args => {
            // 生产环境或本地需要cdn时,才注入cdn
            if (isProduction || devNeedCdn) args[0].cdn = cdn
            return args
        })
        // ============注入cdn start============
    },
    configureWebpack: config => {
        // 用cdn方式引入,则构建时要忽略相关资源
        if (isProduction || devNeedCdn) config.externals = cdn.externals
    }
}
接下来,在index.html中引入使用了CDN的链接
<!DOCTYPE html>
<html lang="en" style="width: 100%;height: 100%;">
  <head>
    <meta charset="utf-8">
    <meta http-equiv="X-UA-Compatible" content="IE=edge">
    <meta >
    <link rel="icon" href="<%= BASE_URL %>favicon.ico">

    <!-- 使用CDN的CSS文件 -->
    <% for (var i in htmlWebpackPlugin.options.cdn &&
    htmlWebpackPlugin.options.cdn.css) { %>
    <link
            href="<%= htmlWebpackPlugin.options.cdn.css[i] %>"
            rel="stylesheet"
    />
    <% } %>
    <!-- 使用CDN的CSS文件 -->

    <title>CoolDream</title>
  </head>
  <body style="width: 100%;height: 100%;">
    <noscript>
      <strong>We're sorry but blog doesn't work properly without JavaScript enabled. Please enable it to continue.</strong>
    </noscript>
    <div id="app"></div>
    <!-- built files will be auto injected -->

    <!-- 使用CDN的JS文件 -->
    <% for (var i in htmlWebpackPlugin.options.cdn &&
    htmlWebpackPlugin.options.cdn.js) { %>
    <script src="<%= htmlWebpackPlugin.options.cdn.js[i] %>"></script>
    <% } %>
    <!-- 使用CDN的JS文件 -->

  </body>
</html>
打包后抛到服务器上,打开开发者工具的network,如果看到http请求cdn,那么就代表配置成功了,如图所示
image.png
4.代码压缩
先安装插件npm i -D uglifyjs-webpack-plugin
然后在最上方引入依赖
// 代码压缩
const UglifyJsPlugin = require('uglifyjs-webpack-plugin')
在configureWebpack模块中引入代码压缩
// 代码压缩
config.plugins.push(
    new UglifyJsPlugin({
        uglifyOptions: {
            //生产环境自动删除console
            compress: {
                drop_debugger: true,
                drop_console: true,
                pure_funcs: ['console.log']
            }
        },
        sourceMap: false,
        parallel: true
    })
)
5.公共代码抽离,写在configureWebpack模块中
// 公共代码抽离
config.optimization = {
    splitChunks: {
        cacheGroups: {
            vendor: {
                chunks: 'all',
                test: /node_modules/,
                name: 'vendor',
                minChunks: 1,
                maxInitialRequests: 5,
                minSize: 0,
                priority: 100
            },
            common: {
                chunks: 'all',
                test: /[\\/]src[\\/]js[\\/]/,
                name: 'common',
                minChunks: 2,
                maxInitialRequests: 5,
                minSize: 0,
                priority: 60
            },
            styles: {
                name: 'styles',
                test: /\.(sa|sc|c)ss$/,
                chunks: 'all',
                enforce: true
            },
            runtimeChunk: {
                name: 'manifest'
            }
        }
    }
}
6.图片压缩()
1.使用图片压缩插件
- 先安装插件npm install image-webpack-loader --save-dev
- 在chainWebpack中新增以下代码
// ============压缩图片 start============
config.module
    .rule('images')
    .use('image-webpack-loader')
    .loader('image-webpack-loader')
    .options({ bypassOnDebug: true })
    .end()
// ============压缩图片 end============
- 所以最终的配置如下
// 是否为生产环境
const isProduction = process.env.NODE_ENV !== 'development';

// 代码压缩
const UglifyJsPlugin = require('uglifyjs-webpack-plugin')

// gzip压缩
const CompressionWebpackPlugin = require('compression-webpack-plugin')

// 本地环境是否需要使用cdn
const devNeedCdn = false

// cdn链接
const cdn = {
    // cdn:模块名称和模块作用域命名(对应window里面挂载的变量名称)
    externals: {
        vue: 'Vue',
        vuex: 'Vuex',
        'vue-router': 'VueRouter',
        'marked': 'marked',
        'highlight.js': 'hljs',
        'nprogress': 'NProgress'
    },
    // cdn的css链接
    css: [
        'https://cdn.bootcss.com/nprogress/0.2.0/nprogress.min.css'
    ],
    // cdn的js链接
    js: [
        'https://cdn.bootcss.com/vue/2.6.10/vue.min.js',
        'https://cdn.bootcss.com/vuex/3.1.2/vuex.min.js',
        'https://cdn.bootcss.com/vue-router/3.1.3/vue-router.min.js',
        'https://cdn.bootcss.com/marked/0.8.0/marked.min.js',
        'https://cdn.bootcss.com/highlight.js/9.18.1/highlight.min.js',
        'https://cdn.bootcss.com/nprogress/0.2.0/nprogress.min.js'
    ]
}

module.exports = {
    productionSourceMap: false,
    chainWebpack: config => {
        // ============注入cdn start============
        config.plugin('html').tap(args => {
            // 生产环境或本地需要cdn时,才注入cdn
            if (isProduction || devNeedCdn) args[0].cdn = cdn
            return args
        })
        // ============注入cdn start============

        // ============压缩图片 start============
        config.module
            .rule('images')
            .use('image-webpack-loader')
            .loader('image-webpack-loader')
            .options({ bypassOnDebug: true })
            .end()
        // ============压缩图片 end============
    },
    configureWebpack: config => {
        // 用cdn方式引入,则构建时要忽略相关资源
        if (isProduction || devNeedCdn) config.externals = cdn.externals

        // 生产环境相关配置
        if (isProduction) {
            //gzip压缩
            const productionGzipExtensions = ['html', 'js', 'css']
            config.plugins.push(
                new CompressionWebpackPlugin({
                    filename: '[path].gz[query]',
                    algorithm: 'gzip',
                    test: new RegExp(
                        '\\.(' + productionGzipExtensions.join('|') + ')$'
                    ),
                    threshold: 10240, // 只有大小大于该值的资源会被处理 10240
                    minRatio: 0.8, // 只有压缩率小于这个值的资源才会被处理
                    deleteOriginalAssets: false // 删除原文件
                })
            )

            // 代码压缩
            config.plugins.push(
                new UglifyJsPlugin({
                    uglifyOptions: {
                        //生产环境自动删除console
                        compress: {
                            drop_debugger: true,
                            drop_console: true,
                            pure_funcs: ['console.log']
                        }
                    },
                    sourceMap: false,
                    parallel: true
                })
            )
        }

        // 公共代码抽离
        config.optimization = {
            splitChunks: {
                cacheGroups: {
                    vendor: {
                        chunks: 'all',
                        test: /node_modules/,
                        name: 'vendor',
                        minChunks: 1,
                        maxInitialRequests: 5,
                        minSize: 0,
                        priority: 100
                    },
                    common: {
                        chunks: 'all',
                        test: /[\\/]src[\\/]js[\\/]/,
                        name: 'common',
                        minChunks: 2,
                        maxInitialRequests: 5,
                        minSize: 0,
                        priority: 60
                    },
                    styles: {
                        name: 'styles',
                        test: /\.(sa|sc|c)ss$/,
                        chunks: 'all',
                        enforce: true
                    },
                    runtimeChunk: {
                        name: 'manifest'
                    }
                }
            }
        }
    }
}
2.将静态资源存储在云端,个人用的七牛云,对象存储用于存储文件,使用cdn加速让存储的静态资源访问速度更快。(推荐,速度能快挺多)
- 我个人申请了七牛云,实名认证就有10G空间可用,每个月有10G的免费流量,不过不绑定域名的话只有30天体验机会,我是绑定了我的域名进行DNS解析中转,具体的操作可以参考这一篇博客,https://www.cnblogs.com/mazhi...
7.nginx配置缓存同样也可以提高网站的访问速度(虽然这点有点偏离前端打包主题了,但是对于自己独立开发个人博客网站的前端来说还是非常有用的!)
在nginx.conf的http模块中写入一下内容
 # 设置缓存路径并且使用一块最大100M的共享内存,用于硬盘上的文件索引,包括文件名和请求次数,每个文件在1天内若不活跃(无请求)则从硬盘上淘汰,硬盘缓存最大10G,满了则根据LRU算法自动清除缓存。
    proxy_cache_path /var/cache/nginx/cache levels=1:2 keys_zone=imgcache:100m inactive=1d max_size=10g;
然后在nginx.conf的serve模块中写入一下内容,保存配置,nginx -s reload重启服务即可看到效果
location ~* ^.+\.(css|js|ico|gif|jpg|jpeg|png)$ {
 log_not_found off;
 # 关闭日志
 access_log off;
 # 缓存时间7天
 expires 7d;
 # 源服务器
 proxy_pass http://localhost:8888;
 # 指定上面设置的缓存区域
 proxy_cache imgcache;
 # 缓存过期管理
 proxy_cache_valid 200 302 1d;
 proxy_cache_valid 404 10m;
 proxy_cache_valid any 1h;
 proxy_cache_use_stale error timeout invalid_header updating http_500 http_502 http_503 http_504;
 }
记录了自己的博客在禁用缓存的情况下,从八九秒加载时间到最终985ms的优化实践,开启缓存的情况下能达到138ms的访问速度
本人的个人博客采用的是Vue-cli4.1.2 + typescript构建的,项目目录结构如下
├─ src    //主文件
│  ├─ api    //接口文件夹
|  |  |- config.js    //后端接口地址的配置,将测试、开发、生产环境分开
|  |  └─ user.js      //接口文件,配置了token请求头,具体接口根据需求修改
│  ├─ assets   //资源文件
│  ├─ components   //公用组件
│  ├─ directive   //vue自定义指令
|  ├─ filters      //存放过滤器文件,自带了手机号加密,手机号格式化,时间日期处理
|  ├─ interceptors    //存放axios拦截器配置,写入了接口调用的loading加载以及http状态码报错拦截
|  ├─ interceptors    //放置公用的接口,对数据进行类型限制
|  ├─ layout      //布局文件,通过子路由渲染方式实现,具体HTML布局根据需求修改
|  ├─ mixins      //混入文件,配置了一个平滑滚动的方法
|  ├─ plugins     //外部插件文件夹,配置了按需引入的element-ui
|  ├─ reg    //存放正则以及校验的文件夹
|  |  |- reg.ts      //存放正则表达式,自带了传真,邮箱,qq,手机号,银行卡号,固定电话,密码强度校验正则
|  |  └─ validator.ts      //存放element-ui自定义校验,自带了传真,邮箱,qq,手机号,银行卡号,固定电话,密码强度自定义校验
|  ├─ router      //路由文件
|  ├─ store       //vuex全局变量文件
|  |  |- index.ts      //store主文件
|  |  └─ module     //store模块文件夹
|  |  |  └─ user.ts      //存放user相关的全局变量
|  ├─ stylus   //css预处理器文件夹
|  |  |- reset.styl      //样式初始化文件,自带了非标准盒子,a标签清除下划线,清除内外边距,禁止图片拖拽等效果
|  |  └─ color.styl     //颜色变量文件
|  ├─ utils   //公用方法文件夹
|  |  |- area.ts      //存放省市区三级地区的数据
|  |  |- array.ts      //存放数组相关的公用方法,自带了两个元素交换位置,元素前进后退一格,元素置顶或末尾,去重,删除指定元素操作
|  |  └─ object.ts    //存放对象相关的公用方法,自带了对象清空所有值的方法
|  ├─ views   //页面文件夹
|  ├─ main.ts   //主配置文件
|  ├─ babel.config.js   //babel配置文件,写入了element-ui按需加载的配置
|  ├─ package.json   //npm的包管理文件
|  ├─ tsconfig.json   //ts配置文件
|  ├─ vue.config.js   //vue配置文件
1.关闭productionSourceMap
首先,由于最新版的脚手架不自带配置文件了,先在根目录新建vue.config.js文件,关闭productionSourceMap,在vue.config.js中写入如下内容
module.exports = {
    productionSourceMap: false
}
2.开启Gzip压缩
安装插件compression-webpack-plugin,打开代码压缩,npm install --save-dev compression-webpack-plugin,现在的vue.config.js代码如下,但是,需要注意的是,服务器上nginx也必须开启gzip才能生效
// 是否为生产环境
const isProduction = process.env.NODE_ENV !== 'development';

// gzip压缩
const CompressionWebpackPlugin = require('compression-webpack-plugin')

module.exports = {
    productionSourceMap: false,
    configureWebpack: config => {
        // 生产环境相关配置
        if (isProduction) {
            //gzip压缩
            const productionGzipExtensions = ['html', 'js', 'css']
            config.plugins.push(
                new CompressionWebpackPlugin({
                    filename: '[path].gz[query]',
                    algorithm: 'gzip',
                    test: new RegExp(
                        '\\.(' + productionGzipExtensions.join('|') + ')$'
                    ),
                    threshold: 10240, // 只有大小大于该值的资源会被处理 10240
                    minRatio: 0.8, // 只有压缩率小于这个值的资源才会被处理
                    deleteOriginalAssets: false // 删除原文件
                })
            )
        }
    }
}
打开nginx文件夹下的nginx.conf文件,在http模块中写入以下内容
 # 开启gzip
    gzip on;

    # 启用gzip压缩的最小文件,小于设置值的文件将不会压缩
    gzip_min_length 1k;

    # gzip 压缩级别,1-9,数字越大压缩的越好,也越占用CPU时间,后面会有详细说明
    gzip_comp_level 2;

    # 进行压缩的文件类型。javascript有多种形式,后面的图片压缩不需要的可以自行删除
    gzip_types text/plain application/javascript application/x-javascript text/css application/xml text/javascript application/x-httpd-php image/jpeg image/gif image/png;

    # 是否在http header中添加Vary: Accept-Encoding,建议开启
    gzip_vary on;

    # 设置压缩所需要的缓冲区大小
    gzip_buffers 4 16k;
然后输入命令nginx -s reload重启nginx服务
如果后端nginx开启了gzip,可以从network中的Content-Encoding中看到gzip
image.png
3.开启CDN加速(建议选配,CDN虽然速度快,但没有本地打包稳定)
将使用的插件使用cdn链接,并且配置webpack将使用CDN的插件不进行打包,别忘记还要再index.html中引入js以及css
// 是否为生产环境
const isProduction = process.env.NODE_ENV !== 'development';

// 本地环境是否需要使用cdn
const devNeedCdn = false

// cdn链接
const cdn = {
    // cdn:模块名称和模块作用域命名(对应window里面挂载的变量名称)
    externals: {
        vue: 'Vue',
        vuex: 'Vuex',
        'vue-router': 'VueRouter',
        'marked': 'marked',
        'highlight.js': 'hljs',
        'nprogress': 'NProgress'
    },
    // cdn的css链接
    css: [
        'https://cdn.bootcss.com/nprogress/0.2.0/nprogress.min.css'
    ],
    // cdn的js链接
    js: [
        'https://cdn.bootcss.com/vue/2.6.10/vue.min.js',
        'https://cdn.bootcss.com/vuex/3.1.2/vuex.min.js',
        'https://cdn.bootcss.com/vue-router/3.1.3/vue-router.min.js',
        'https://cdn.bootcss.com/marked/0.8.0/marked.min.js',
        'https://cdn.bootcss.com/highlight.js/9.18.1/highlight.min.js',
        'https://cdn.bootcss.com/nprogress/0.2.0/nprogress.min.js'
    ]
}

module.exports = {
    chainWebpack: config => {
        // ============注入cdn start============
        config.plugin('html').tap(args => {
            // 生产环境或本地需要cdn时,才注入cdn
            if (isProduction || devNeedCdn) args[0].cdn = cdn
            return args
        })
        // ============注入cdn start============
    },
    configureWebpack: config => {
        // 用cdn方式引入,则构建时要忽略相关资源
        if (isProduction || devNeedCdn) config.externals = cdn.externals
    }
}
接下来,在index.html中引入使用了CDN的链接
<!DOCTYPE html>
<html lang="en" style="width: 100%;height: 100%;">
  <head>
    <meta charset="utf-8">
    <meta http-equiv="X-UA-Compatible" content="IE=edge">
    <meta >
    <link rel="icon" href="<%= BASE_URL %>favicon.ico">

    <!-- 使用CDN的CSS文件 -->
    <% for (var i in htmlWebpackPlugin.options.cdn &&
    htmlWebpackPlugin.options.cdn.css) { %>
    <link
            href="<%= htmlWebpackPlugin.options.cdn.css[i] %>"
            rel="stylesheet"
    />
    <% } %>
    <!-- 使用CDN的CSS文件 -->

    <title>CoolDream</title>
  </head>
  <body style="width: 100%;height: 100%;">
    <noscript>
      <strong>We're sorry but blog doesn't work properly without JavaScript enabled. Please enable it to continue.</strong>
    </noscript>
    <div id="app"></div>
    <!-- built files will be auto injected -->

    <!-- 使用CDN的JS文件 -->
    <% for (var i in htmlWebpackPlugin.options.cdn &&
    htmlWebpackPlugin.options.cdn.js) { %>
    <script src="<%= htmlWebpackPlugin.options.cdn.js[i] %>"></script>
    <% } %>
    <!-- 使用CDN的JS文件 -->

  </body>
</html>
打包后抛到服务器上,打开开发者工具的network,如果看到http请求cdn,那么就代表配置成功了,如图所示
image.png
4.代码压缩
先安装插件npm i -D uglifyjs-webpack-plugin
然后在最上方引入依赖
// 代码压缩
const UglifyJsPlugin = require('uglifyjs-webpack-plugin')
在configureWebpack模块中引入代码压缩
// 代码压缩
config.plugins.push(
    new UglifyJsPlugin({
        uglifyOptions: {
            //生产环境自动删除console
            compress: {
                drop_debugger: true,
                drop_console: true,
                pure_funcs: ['console.log']
            }
        },
        sourceMap: false,
        parallel: true
    })
)
5.公共代码抽离,写在configureWebpack模块中
// 公共代码抽离
config.optimization = {
    splitChunks: {
        cacheGroups: {
            vendor: {
                chunks: 'all',
                test: /node_modules/,
                name: 'vendor',
                minChunks: 1,
                maxInitialRequests: 5,
                minSize: 0,
                priority: 100
            },
            common: {
                chunks: 'all',
                test: /[\\/]src[\\/]js[\\/]/,
                name: 'common',
                minChunks: 2,
                maxInitialRequests: 5,
                minSize: 0,
                priority: 60
            },
            styles: {
                name: 'styles',
                test: /\.(sa|sc|c)ss$/,
                chunks: 'all',
                enforce: true
            },
            runtimeChunk: {
                name: 'manifest'
            }
        }
    }
}
6.图片压缩()
1.使用图片压缩插件
- 先安装插件npm install image-webpack-loader --save-dev
- 在chainWebpack中新增以下代码
// ============压缩图片 start============
config.module
    .rule('images')
    .use('image-webpack-loader')
    .loader('image-webpack-loader')
    .options({ bypassOnDebug: true })
    .end()
// ============压缩图片 end============
- 所以最终的配置如下
// 是否为生产环境
const isProduction = process.env.NODE_ENV !== 'development';

// 代码压缩
const UglifyJsPlugin = require('uglifyjs-webpack-plugin')

// gzip压缩
const CompressionWebpackPlugin = require('compression-webpack-plugin')

// 本地环境是否需要使用cdn
const devNeedCdn = false

// cdn链接
const cdn = {
    // cdn:模块名称和模块作用域命名(对应window里面挂载的变量名称)
    externals: {
        vue: 'Vue',
        vuex: 'Vuex',
        'vue-router': 'VueRouter',
        'marked': 'marked',
        'highlight.js': 'hljs',
        'nprogress': 'NProgress'
    },
    // cdn的css链接
    css: [
        'https://cdn.bootcss.com/nprogress/0.2.0/nprogress.min.css'
    ],
    // cdn的js链接
    js: [
        'https://cdn.bootcss.com/vue/2.6.10/vue.min.js',
        'https://cdn.bootcss.com/vuex/3.1.2/vuex.min.js',
        'https://cdn.bootcss.com/vue-router/3.1.3/vue-router.min.js',
        'https://cdn.bootcss.com/marked/0.8.0/marked.min.js',
        'https://cdn.bootcss.com/highlight.js/9.18.1/highlight.min.js',
        'https://cdn.bootcss.com/nprogress/0.2.0/nprogress.min.js'
    ]
}

module.exports = {
    productionSourceMap: false,
    chainWebpack: config => {
        // ============注入cdn start============
        config.plugin('html').tap(args => {
            // 生产环境或本地需要cdn时,才注入cdn
            if (isProduction || devNeedCdn) args[0].cdn = cdn
            return args
        })
        // ============注入cdn start============

        // ============压缩图片 start============
        config.module
            .rule('images')
            .use('image-webpack-loader')
            .loader('image-webpack-loader')
            .options({ bypassOnDebug: true })
            .end()
        // ============压缩图片 end============
    },
    configureWebpack: config => {
        // 用cdn方式引入,则构建时要忽略相关资源
        if (isProduction || devNeedCdn) config.externals = cdn.externals

        // 生产环境相关配置
        if (isProduction) {
            //gzip压缩
            const productionGzipExtensions = ['html', 'js', 'css']
            config.plugins.push(
                new CompressionWebpackPlugin({
                    filename: '[path].gz[query]',
                    algorithm: 'gzip',
                    test: new RegExp(
                        '\\.(' + productionGzipExtensions.join('|') + ')$'
                    ),
                    threshold: 10240, // 只有大小大于该值的资源会被处理 10240
                    minRatio: 0.8, // 只有压缩率小于这个值的资源才会被处理
                    deleteOriginalAssets: false // 删除原文件
                })
            )

            // 代码压缩
            config.plugins.push(
                new UglifyJsPlugin({
                    uglifyOptions: {
                        //生产环境自动删除console
                        compress: {
                            drop_debugger: true,
                            drop_console: true,
                            pure_funcs: ['console.log']
                        }
                    },
                    sourceMap: false,
                    parallel: true
                })
            )
        }

        // 公共代码抽离
        config.optimization = {
            splitChunks: {
                cacheGroups: {
                    vendor: {
                        chunks: 'all',
                        test: /node_modules/,
                        name: 'vendor',
                        minChunks: 1,
                        maxInitialRequests: 5,
                        minSize: 0,
                        priority: 100
                    },
                    common: {
                        chunks: 'all',
                        test: /[\\/]src[\\/]js[\\/]/,
                        name: 'common',
                        minChunks: 2,
                        maxInitialRequests: 5,
                        minSize: 0,
                        priority: 60
                    },
                    styles: {
                        name: 'styles',
                        test: /\.(sa|sc|c)ss$/,
                        chunks: 'all',
                        enforce: true
                    },
                    runtimeChunk: {
                        name: 'manifest'
                    }
                }
            }
        }
    }
}
2.将静态资源存储在云端,个人用的七牛云,对象存储用于存储文件,使用cdn加速让存储的静态资源访问速度更快。(推荐,速度能快挺多)
- 我个人申请了七牛云,实名认证就有10G空间可用,每个月有10G的免费流量,不过不绑定域名的话只有30天体验机会,我是绑定了我的域名进行DNS解析中转,具体的操作可以参考这一篇博客,https://www.cnblogs.com/mazhi...
7.nginx配置缓存同样也可以提高网站的访问速度(虽然这点有点偏离前端打包主题了,但是对于自己独立开发个人博客网站的前端来说还是非常有用的!)
在nginx.conf的http模块中写入一下内容
 # 设置缓存路径并且使用一块最大100M的共享内存,用于硬盘上的文件索引,包括文件名和请求次数,每个文件在1天内若不活跃(无请求)则从硬盘上淘汰,硬盘缓存最大10G,满了则根据LRU算法自动清除缓存。
    proxy_cache_path /var/cache/nginx/cache levels=1:2 keys_zone=imgcache:100m inactive=1d max_size=10g;
然后在nginx.conf的serve模块中写入一下内容,保存配置,nginx -s reload重启服务即可看到效果
location ~* ^.+\.(css|js|ico|gif|jpg|jpeg|png)$ {
 log_not_found off;
 # 关闭日志
 access_log off;
 # 缓存时间7天
 expires 7d;
 # 源服务器
 proxy_pass http://localhost:8888;
 # 指定上面设置的缓存区域
 proxy_cache imgcache;
 # 缓存过期管理
 proxy_cache_valid 200 302 1d;
 proxy_cache_valid 404 10m;
 proxy_cache_valid any 1h;
 proxy_cache_use_stale error timeout invalid_header updating http_500 http_502 http_503 http_504;
 }
记录了自己的博客在禁用缓存的情况下,从八九秒加载时间到最终985ms的优化实践,开启缓存的情况下能达到138ms的访问速度
本人的个人博客采用的是Vue-cli4.1.2 + typescript构建的,项目目录结构如下
├─ src    //主文件
│  ├─ api    //接口文件夹
|  |  |- config.js    //后端接口地址的配置,将测试、开发、生产环境分开
|  |  └─ user.js      //接口文件,配置了token请求头,具体接口根据需求修改
│  ├─ assets   //资源文件
│  ├─ components   //公用组件
│  ├─ directive   //vue自定义指令
|  ├─ filters      //存放过滤器文件,自带了手机号加密,手机号格式化,时间日期处理
|  ├─ interceptors    //存放axios拦截器配置,写入了接口调用的loading加载以及http状态码报错拦截
|  ├─ interceptors    //放置公用的接口,对数据进行类型限制
|  ├─ layout      //布局文件,通过子路由渲染方式实现,具体HTML布局根据需求修改
|  ├─ mixins      //混入文件,配置了一个平滑滚动的方法
|  ├─ plugins     //外部插件文件夹,配置了按需引入的element-ui
|  ├─ reg    //存放正则以及校验的文件夹
|  |  |- reg.ts      //存放正则表达式,自带了传真,邮箱,qq,手机号,银行卡号,固定电话,密码强度校验正则
|  |  └─ validator.ts      //存放element-ui自定义校验,自带了传真,邮箱,qq,手机号,银行卡号,固定电话,密码强度自定义校验
|  ├─ router      //路由文件
|  ├─ store       //vuex全局变量文件
|  |  |- index.ts      //store主文件
|  |  └─ module     //store模块文件夹
|  |  |  └─ user.ts      //存放user相关的全局变量
|  ├─ stylus   //css预处理器文件夹
|  |  |- reset.styl      //样式初始化文件,自带了非标准盒子,a标签清除下划线,清除内外边距,禁止图片拖拽等效果
|  |  └─ color.styl     //颜色变量文件
|  ├─ utils   //公用方法文件夹
|  |  |- area.ts      //存放省市区三级地区的数据
|  |  |- array.ts      //存放数组相关的公用方法,自带了两个元素交换位置,元素前进后退一格,元素置顶或末尾,去重,删除指定元素操作
|  |  └─ object.ts    //存放对象相关的公用方法,自带了对象清空所有值的方法
|  ├─ views   //页面文件夹
|  ├─ main.ts   //主配置文件
|  ├─ babel.config.js   //babel配置文件,写入了element-ui按需加载的配置
|  ├─ package.json   //npm的包管理文件
|  ├─ tsconfig.json   //ts配置文件
|  ├─ vue.config.js   //vue配置文件
1.关闭productionSourceMap
首先,由于最新版的脚手架不自带配置文件了,先在根目录新建vue.config.js文件,关闭productionSourceMap,在vue.config.js中写入如下内容
module.exports = {
    productionSourceMap: false
}
2.开启Gzip压缩
安装插件compression-webpack-plugin,打开代码压缩,npm install --save-dev compression-webpack-plugin,现在的vue.config.js代码如下,但是,需要注意的是,服务器上nginx也必须开启gzip才能生效
// 是否为生产环境
const isProduction = process.env.NODE_ENV !== 'development';

// gzip压缩
const CompressionWebpackPlugin = require('compression-webpack-plugin')

module.exports = {
    productionSourceMap: false,
    configureWebpack: config => {
        // 生产环境相关配置
        if (isProduction) {
            //gzip压缩
            const productionGzipExtensions = ['html', 'js', 'css']
            config.plugins.push(
                new CompressionWebpackPlugin({
                    filename: '[path].gz[query]',
                    algorithm: 'gzip',
                    test: new RegExp(
                        '\\.(' + productionGzipExtensions.join('|') + ')$'
                    ),
                    threshold: 10240, // 只有大小大于该值的资源会被处理 10240
                    minRatio: 0.8, // 只有压缩率小于这个值的资源才会被处理
                    deleteOriginalAssets: false // 删除原文件
                })
            )
        }
    }
}
打开nginx文件夹下的nginx.conf文件,在http模块中写入以下内容
 # 开启gzip
    gzip on;

    # 启用gzip压缩的最小文件,小于设置值的文件将不会压缩
    gzip_min_length 1k;

    # gzip 压缩级别,1-9,数字越大压缩的越好,也越占用CPU时间,后面会有详细说明
    gzip_comp_level 2;

    # 进行压缩的文件类型。javascript有多种形式,后面的图片压缩不需要的可以自行删除
    gzip_types text/plain application/javascript application/x-javascript text/css application/xml text/javascript application/x-httpd-php image/jpeg image/gif image/png;

    # 是否在http header中添加Vary: Accept-Encoding,建议开启
    gzip_vary on;

    # 设置压缩所需要的缓冲区大小
    gzip_buffers 4 16k;
然后输入命令nginx -s reload重启nginx服务
如果后端nginx开启了gzip,可以从network中的Content-Encoding中看到gzip
image.png
3.开启CDN加速(建议选配,CDN虽然速度快,但没有本地打包稳定)
将使用的插件使用cdn链接,并且配置webpack将使用CDN的插件不进行打包,别忘记还要再index.html中引入js以及css
// 是否为生产环境
const isProduction = process.env.NODE_ENV !== 'development';

// 本地环境是否需要使用cdn
const devNeedCdn = false

// cdn链接
const cdn = {
    // cdn:模块名称和模块作用域命名(对应window里面挂载的变量名称)
    externals: {
        vue: 'Vue',
        vuex: 'Vuex',
        'vue-router': 'VueRouter',
        'marked': 'marked',
        'highlight.js': 'hljs',
        'nprogress': 'NProgress'
    },
    // cdn的css链接
    css: [
        'https://cdn.bootcss.com/nprogress/0.2.0/nprogress.min.css'
    ],
    // cdn的js链接
    js: [
        'https://cdn.bootcss.com/vue/2.6.10/vue.min.js',
        'https://cdn.bootcss.com/vuex/3.1.2/vuex.min.js',
        'https://cdn.bootcss.com/vue-router/3.1.3/vue-router.min.js',
        'https://cdn.bootcss.com/marked/0.8.0/marked.min.js',
        'https://cdn.bootcss.com/highlight.js/9.18.1/highlight.min.js',
        'https://cdn.bootcss.com/nprogress/0.2.0/nprogress.min.js'
    ]
}

module.exports = {
    chainWebpack: config => {
        // ============注入cdn start============
        config.plugin('html').tap(args => {
            // 生产环境或本地需要cdn时,才注入cdn
            if (isProduction || devNeedCdn) args[0].cdn = cdn
            return args
        })
        // ============注入cdn start============
    },
    configureWebpack: config => {
        // 用cdn方式引入,则构建时要忽略相关资源
        if (isProduction || devNeedCdn) config.externals = cdn.externals
    }
}
接下来,在index.html中引入使用了CDN的链接
<!DOCTYPE html>
<html lang="en" style="width: 100%;height: 100%;">
  <head>
    <meta charset="utf-8">
    <meta http-equiv="X-UA-Compatible" content="IE=edge">
    <meta >
    <link rel="icon" href="<%= BASE_URL %>favicon.ico">

    <!-- 使用CDN的CSS文件 -->
    <% for (var i in htmlWebpackPlugin.options.cdn &&
    htmlWebpackPlugin.options.cdn.css) { %>
    <link
            href="<%= htmlWebpackPlugin.options.cdn.css[i] %>"
            rel="stylesheet"
    />
    <% } %>
    <!-- 使用CDN的CSS文件 -->

    <title>CoolDream</title>
  </head>
  <body style="width: 100%;height: 100%;">
    <noscript>
      <strong>We're sorry but blog doesn't work properly without JavaScript enabled. Please enable it to continue.</strong>
    </noscript>
    <div id="app"></div>
    <!-- built files will be auto injected -->

    <!-- 使用CDN的JS文件 -->
    <% for (var i in htmlWebpackPlugin.options.cdn &&
    htmlWebpackPlugin.options.cdn.js) { %>
    <script src="<%= htmlWebpackPlugin.options.cdn.js[i] %>"></script>
    <% } %>
    <!-- 使用CDN的JS文件 -->

  </body>
</html>
打包后抛到服务器上,打开开发者工具的network,如果看到http请求cdn,那么就代表配置成功了,如图所示
image.png
4.代码压缩
先安装插件npm i -D uglifyjs-webpack-plugin
然后在最上方引入依赖
// 代码压缩
const UglifyJsPlugin = require('uglifyjs-webpack-plugin')
在configureWebpack模块中引入代码压缩
// 代码压缩
config.plugins.push(
    new UglifyJsPlugin({
        uglifyOptions: {
            //生产环境自动删除console
            compress: {
                drop_debugger: true,
                drop_console: true,
                pure_funcs: ['console.log']
            }
        },
        sourceMap: false,
        parallel: true
    })
)
5.公共代码抽离,写在configureWebpack模块中
// 公共代码抽离
config.optimization = {
    splitChunks: {
        cacheGroups: {
            vendor: {
                chunks: 'all',
                test: /node_modules/,
                name: 'vendor',
                minChunks: 1,
                maxInitialRequests: 5,
                minSize: 0,
                priority: 100
            },
            common: {
                chunks: 'all',
                test: /[\\/]src[\\/]js[\\/]/,
                name: 'common',
                minChunks: 2,
                maxInitialRequests: 5,
                minSize: 0,
                priority: 60
            },
            styles: {
                name: 'styles',
                test: /\.(sa|sc|c)ss$/,
                chunks: 'all',
                enforce: true
            },
            runtimeChunk: {
                name: 'manifest'
            }
        }
    }
}
6.图片压缩()
1.使用图片压缩插件
- 先安装插件npm install image-webpack-loader --save-dev
- 在chainWebpack中新增以下代码
// ============压缩图片 start============
config.module
    .rule('images')
    .use('image-webpack-loader')
    .loader('image-webpack-loader')
    .options({ bypassOnDebug: true })
    .end()
// ============压缩图片 end============
- 所以最终的配置如下
// 是否为生产环境
const isProduction = process.env.NODE_ENV !== 'development';

// 代码压缩
const UglifyJsPlugin = require('uglifyjs-webpack-plugin')

// gzip压缩
const CompressionWebpackPlugin = require('compression-webpack-plugin')

// 本地环境是否需要使用cdn
const devNeedCdn = false

// cdn链接
const cdn = {
    // cdn:模块名称和模块作用域命名(对应window里面挂载的变量名称)
    externals: {
        vue: 'Vue',
        vuex: 'Vuex',
        'vue-router': 'VueRouter',
        'marked': 'marked',
        'highlight.js': 'hljs',
        'nprogress': 'NProgress'
    },
    // cdn的css链接
    css: [
        'https://cdn.bootcss.com/nprogress/0.2.0/nprogress.min.css'
    ],
    // cdn的js链接
    js: [
        'https://cdn.bootcss.com/vue/2.6.10/vue.min.js',
        'https://cdn.bootcss.com/vuex/3.1.2/vuex.min.js',
        'https://cdn.bootcss.com/vue-router/3.1.3/vue-router.min.js',
        'https://cdn.bootcss.com/marked/0.8.0/marked.min.js',
        'https://cdn.bootcss.com/highlight.js/9.18.1/highlight.min.js',
        'https://cdn.bootcss.com/nprogress/0.2.0/nprogress.min.js'
    ]
}

module.exports = {
    productionSourceMap: false,
    chainWebpack: config => {
        // ============注入cdn start============
        config.plugin('html').tap(args => {
            // 生产环境或本地需要cdn时,才注入cdn
            if (isProduction || devNeedCdn) args[0].cdn = cdn
            return args
        })
        // ============注入cdn start============

        // ============压缩图片 start============
        config.module
            .rule('images')
            .use('image-webpack-loader')
            .loader('image-webpack-loader')
            .options({ bypassOnDebug: true })
            .end()
        // ============压缩图片 end============
    },
    configureWebpack: config => {
        // 用cdn方式引入,则构建时要忽略相关资源
        if (isProduction || devNeedCdn) config.externals = cdn.externals

        // 生产环境相关配置
        if (isProduction) {
            //gzip压缩
            const productionGzipExtensions = ['html', 'js', 'css']
            config.plugins.push(
                new CompressionWebpackPlugin({
                    filename: '[path].gz[query]',
                    algorithm: 'gzip',
                    test: new RegExp(
                        '\\.(' + productionGzipExtensions.join('|') + ')$'
                    ),
                    threshold: 10240, // 只有大小大于该值的资源会被处理 10240
                    minRatio: 0.8, // 只有压缩率小于这个值的资源才会被处理
                    deleteOriginalAssets: false // 删除原文件
                })
            )

            // 代码压缩
            config.plugins.push(
                new UglifyJsPlugin({
                    uglifyOptions: {
                        //生产环境自动删除console
                        compress: {
                            drop_debugger: true,
                            drop_console: true,
                            pure_funcs: ['console.log']
                        }
                    },
                    sourceMap: false,
                    parallel: true
                })
            )
        }

        // 公共代码抽离
        config.optimization = {
            splitChunks: {
                cacheGroups: {
                    vendor: {
                        chunks: 'all',
                        test: /node_modules/,
                        name: 'vendor',
                        minChunks: 1,
                        maxInitialRequests: 5,
                        minSize: 0,
                        priority: 100
                    },
                    common: {
                        chunks: 'all',
                        test: /[\\/]src[\\/]js[\\/]/,
                        name: 'common',
                        minChunks: 2,
                        maxInitialRequests: 5,
                        minSize: 0,
                        priority: 60
                    },
                    styles: {
                        name: 'styles',
                        test: /\.(sa|sc|c)ss$/,
                        chunks: 'all',
                        enforce: true
                    },
                    runtimeChunk: {
                        name: 'manifest'
                    }
                }
            }
        }
    }
}
2.将静态资源存储在云端,个人用的七牛云,对象存储用于存储文件,使用cdn加速让存储的静态资源访问速度更快。(推荐,速度能快挺多)
- 我个人申请了七牛云,实名认证就有10G空间可用,每个月有10G的免费流量,不过不绑定域名的话只有30天体验机会,我是绑定了我的域名进行DNS解析中转,具体的操作可以参考这一篇博客,https://www.cnblogs.com/mazhi...
7.nginx配置缓存同样也可以提高网站的访问速度(虽然这点有点偏离前端打包主题了,但是对于自己独立开发个人博客网站的前端来说还是非常有用的!)
在nginx.conf的http模块中写入一下内容
 # 设置缓存路径并且使用一块最大100M的共享内存,用于硬盘上的文件索引,包括文件名和请求次数,每个文件在1天内若不活跃(无请求)则从硬盘上淘汰,硬盘缓存最大10G,满了则根据LRU算法自动清除缓存。
    proxy_cache_path /var/cache/nginx/cache levels=1:2 keys_zone=imgcache:100m inactive=1d max_size=10g;
然后在nginx.conf的serve模块中写入一下内容,保存配置,nginx -s reload重启服务即可看到效果
location ~* ^.+\.(css|js|ico|gif|jpg|jpeg|png)$ {
 log_not_found off;
 # 关闭日志
 access_log off;
 # 缓存时间7天
 expires 7d;
 # 源服务器
 proxy_pass http://localhost:8888;
 # 指定上面设置的缓存区域
 proxy_cache imgcache;
 # 缓存过期管理
 proxy_cache_valid 200 302 1d;
 proxy_cache_valid 404 10m;
 proxy_cache_valid any 1h;
 proxy_cache_use_stale error timeout invalid_header updating http_500 http_502 http_503 http_504;
 }
记录了自己的博客在禁用缓存的情况下,从八九秒加载时间到最终985ms的优化实践,开启缓存的情况下能达到138ms的访问速度
本人的个人博客采用的是Vue-cli4.1.2 + typescript构建的,项目目录结构如下
├─ src    //主文件
│  ├─ api    //接口文件夹
|  |  |- config.js    //后端接口地址的配置,将测试、开发、生产环境分开
|  |  └─ user.js      //接口文件,配置了token请求头,具体接口根据需求修改
│  ├─ assets   //资源文件
│  ├─ components   //公用组件
│  ├─ directive   //vue自定义指令
|  ├─ filters      //存放过滤器文件,自带了手机号加密,手机号格式化,时间日期处理
|  ├─ interceptors    //存放axios拦截器配置,写入了接口调用的loading加载以及http状态码报错拦截
|  ├─ interceptors    //放置公用的接口,对数据进行类型限制
|  ├─ layout      //布局文件,通过子路由渲染方式实现,具体HTML布局根据需求修改
|  ├─ mixins      //混入文件,配置了一个平滑滚动的方法
|  ├─ plugins     //外部插件文件夹,配置了按需引入的element-ui
|  ├─ reg    //存放正则以及校验的文件夹
|  |  |- reg.ts      //存放正则表达式,自带了传真,邮箱,qq,手机号,银行卡号,固定电话,密码强度校验正则
|  |  └─ validator.ts      //存放element-ui自定义校验,自带了传真,邮箱,qq,手机号,银行卡号,固定电话,密码强度自定义校验
|  ├─ router      //路由文件
|  ├─ store       //vuex全局变量文件
|  |  |- index.ts      //store主文件
|  |  └─ module     //store模块文件夹
|  |  |  └─ user.ts      //存放user相关的全局变量
|  ├─ stylus   //css预处理器文件夹
|  |  |- reset.styl      //样式初始化文件,自带了非标准盒子,a标签清除下划线,清除内外边距,禁止图片拖拽等效果
|  |  └─ color.styl     //颜色变量文件
|  ├─ utils   //公用方法文件夹
|  |  |- area.ts      //存放省市区三级地区的数据
|  |  |- array.ts      //存放数组相关的公用方法,自带了两个元素交换位置,元素前进后退一格,元素置顶或末尾,去重,删除指定元素操作
|  |  └─ object.ts    //存放对象相关的公用方法,自带了对象清空所有值的方法
|  ├─ views   //页面文件夹
|  ├─ main.ts   //主配置文件
|  ├─ babel.config.js   //babel配置文件,写入了element-ui按需加载的配置
|  ├─ package.json   //npm的包管理文件
|  ├─ tsconfig.json   //ts配置文件
|  ├─ vue.config.js   //vue配置文件
1.关闭productionSourceMap
首先,由于最新版的脚手架不自带配置文件了,先在根目录新建vue.config.js文件,关闭productionSourceMap,在vue.config.js中写入如下内容
module.exports = {
    productionSourceMap: false
}
2.开启Gzip压缩
安装插件compression-webpack-plugin,打开代码压缩,npm install --save-dev compression-webpack-plugin,现在的vue.config.js代码如下,但是,需要注意的是,服务器上nginx也必须开启gzip才能生效
// 是否为生产环境
const isProduction = process.env.NODE_ENV !== 'development';

// gzip压缩
const CompressionWebpackPlugin = require('compression-webpack-plugin')

module.exports = {
    productionSourceMap: false,
    configureWebpack: config => {
        // 生产环境相关配置
        if (isProduction) {
            //gzip压缩
            const productionGzipExtensions = ['html', 'js', 'css']
            config.plugins.push(
                new CompressionWebpackPlugin({
                    filename: '[path].gz[query]',
                    algorithm: 'gzip',
                    test: new RegExp(
                        '\\.(' + productionGzipExtensions.join('|') + ')$'
                    ),
                    threshold: 10240, // 只有大小大于该值的资源会被处理 10240
                    minRatio: 0.8, // 只有压缩率小于这个值的资源才会被处理
                    deleteOriginalAssets: false // 删除原文件
                })
            )
        }
    }
}
打开nginx文件夹下的nginx.conf文件,在http模块中写入以下内容
 # 开启gzip
    gzip on;

    # 启用gzip压缩的最小文件,小于设置值的文件将不会压缩
    gzip_min_length 1k;

    # gzip 压缩级别,1-9,数字越大压缩的越好,也越占用CPU时间,后面会有详细说明
    gzip_comp_level 2;

    # 进行压缩的文件类型。javascript有多种形式,后面的图片压缩不需要的可以自行删除
    gzip_types text/plain application/javascript application/x-javascript text/css application/xml text/javascript application/x-httpd-php image/jpeg image/gif image/png;

    # 是否在http header中添加Vary: Accept-Encoding,建议开启
    gzip_vary on;

    # 设置压缩所需要的缓冲区大小
    gzip_buffers 4 16k;
然后输入命令nginx -s reload重启nginx服务
如果后端nginx开启了gzip,可以从network中的Content-Encoding中看到gzip
image.png
3.开启CDN加速(建议选配,CDN虽然速度快,但没有本地打包稳定)
将使用的插件使用cdn链接,并且配置webpack将使用CDN的插件不进行打包,别忘记还要再index.html中引入js以及css
// 是否为生产环境
const isProduction = process.env.NODE_ENV !== 'development';

// 本地环境是否需要使用cdn
const devNeedCdn = false

// cdn链接
const cdn = {
    // cdn:模块名称和模块作用域命名(对应window里面挂载的变量名称)
    externals: {
        vue: 'Vue',
        vuex: 'Vuex',
        'vue-router': 'VueRouter',
        'marked': 'marked',
        'highlight.js': 'hljs',
        'nprogress': 'NProgress'
    },
    // cdn的css链接
    css: [
        'https://cdn.bootcss.com/nprogress/0.2.0/nprogress.min.css'
    ],
    // cdn的js链接
    js: [
        'https://cdn.bootcss.com/vue/2.6.10/vue.min.js',
        'https://cdn.bootcss.com/vuex/3.1.2/vuex.min.js',
        'https://cdn.bootcss.com/vue-router/3.1.3/vue-router.min.js',
        'https://cdn.bootcss.com/marked/0.8.0/marked.min.js',
        'https://cdn.bootcss.com/highlight.js/9.18.1/highlight.min.js',
        'https://cdn.bootcss.com/nprogress/0.2.0/nprogress.min.js'
    ]
}

module.exports = {
    chainWebpack: config => {
        // ============注入cdn start============
        config.plugin('html').tap(args => {
            // 生产环境或本地需要cdn时,才注入cdn
            if (isProduction || devNeedCdn) args[0].cdn = cdn
            return args
        })
        // ============注入cdn start============
    },
    configureWebpack: config => {
        // 用cdn方式引入,则构建时要忽略相关资源
        if (isProduction || devNeedCdn) config.externals = cdn.externals
    }
}
接下来,在index.html中引入使用了CDN的链接
<!DOCTYPE html>
<html lang="en" style="width: 100%;height: 100%;">
  <head>
    <meta charset="utf-8">
    <meta http-equiv="X-UA-Compatible" content="IE=edge">
    <meta >
    <link rel="icon" href="<%= BASE_URL %>favicon.ico">

    <!-- 使用CDN的CSS文件 -->
    <% for (var i in htmlWebpackPlugin.options.cdn &&
    htmlWebpackPlugin.options.cdn.css) { %>
    <link
            href="<%= htmlWebpackPlugin.options.cdn.css[i] %>"
            rel="stylesheet"
    />
    <% } %>
    <!-- 使用CDN的CSS文件 -->

    <title>CoolDream</title>
  </head>
  <body style="width: 100%;height: 100%;">
    <noscript>
      <strong>We're sorry but blog doesn't work properly without JavaScript enabled. Please enable it to continue.</strong>
    </noscript>
    <div id="app"></div>
    <!-- built files will be auto injected -->

    <!-- 使用CDN的JS文件 -->
    <% for (var i in htmlWebpackPlugin.options.cdn &&
    htmlWebpackPlugin.options.cdn.js) { %>
    <script src="<%= htmlWebpackPlugin.options.cdn.js[i] %>"></script>
    <% } %>
    <!-- 使用CDN的JS文件 -->

  </body>
</html>
打包后抛到服务器上,打开开发者工具的network,如果看到http请求cdn,那么就代表配置成功了,如图所示
image.png
4.代码压缩
先安装插件npm i -D uglifyjs-webpack-plugin
然后在最上方引入依赖
// 代码压缩
const UglifyJsPlugin = require('uglifyjs-webpack-plugin')
在configureWebpack模块中引入代码压缩
// 代码压缩
config.plugins.push(
    new UglifyJsPlugin({
        uglifyOptions: {
            //生产环境自动删除console
            compress: {
                drop_debugger: true,
                drop_console: true,
                pure_funcs: ['console.log']
            }
        },
        sourceMap: false,
        parallel: true
    })
)
5.公共代码抽离,写在configureWebpack模块中
// 公共代码抽离
config.optimization = {
    splitChunks: {
        cacheGroups: {
            vendor: {
                chunks: 'all',
                test: /node_modules/,
                name: 'vendor',
                minChunks: 1,
                maxInitialRequests: 5,
                minSize: 0,
                priority: 100
            },
            common: {
                chunks: 'all',
                test: /[\\/]src[\\/]js[\\/]/,
                name: 'common',
                minChunks: 2,
                maxInitialRequests: 5,
                minSize: 0,
                priority: 60
            },
            styles: {
                name: 'styles',
                test: /\.(sa|sc|c)ss$/,
                chunks: 'all',
                enforce: true
            },
            runtimeChunk: {
                name: 'manifest'
            }
        }
    }
}
6.图片压缩()
1.使用图片压缩插件
- 先安装插件npm install image-webpack-loader --save-dev
- 在chainWebpack中新增以下代码
// ============压缩图片 start============
config.module
    .rule('images')
    .use('image-webpack-loader')
    .loader('image-webpack-loader')
    .options({ bypassOnDebug: true })
    .end()
// ============压缩图片 end============
- 所以最终的配置如下
// 是否为生产环境
const isProduction = process.env.NODE_ENV !== 'development';

// 代码压缩
const UglifyJsPlugin = require('uglifyjs-webpack-plugin')

// gzip压缩
const CompressionWebpackPlugin = require('compression-webpack-plugin')

// 本地环境是否需要使用cdn
const devNeedCdn = false

// cdn链接
const cdn = {
    // cdn:模块名称和模块作用域命名(对应window里面挂载的变量名称)
    externals: {
        vue: 'Vue',
        vuex: 'Vuex',
        'vue-router': 'VueRouter',
        'marked': 'marked',
        'highlight.js': 'hljs',
        'nprogress': 'NProgress'
    },
    // cdn的css链接
    css: [
        'https://cdn.bootcss.com/nprogress/0.2.0/nprogress.min.css'
    ],
    // cdn的js链接
    js: [
        'https://cdn.bootcss.com/vue/2.6.10/vue.min.js',
        'https://cdn.bootcss.com/vuex/3.1.2/vuex.min.js',
        'https://cdn.bootcss.com/vue-router/3.1.3/vue-router.min.js',
        'https://cdn.bootcss.com/marked/0.8.0/marked.min.js',
        'https://cdn.bootcss.com/highlight.js/9.18.1/highlight.min.js',
        'https://cdn.bootcss.com/nprogress/0.2.0/nprogress.min.js'
    ]
}

module.exports = {
    productionSourceMap: false,
    chainWebpack: config => {
        // ============注入cdn start============
        config.plugin('html').tap(args => {
            // 生产环境或本地需要cdn时,才注入cdn
            if (isProduction || devNeedCdn) args[0].cdn = cdn
            return args
        })
        // ============注入cdn start============

        // ============压缩图片 start============
        config.module
            .rule('images')
            .use('image-webpack-loader')
            .loader('image-webpack-loader')
            .options({ bypassOnDebug: true })
            .end()
        // ============压缩图片 end============
    },
    configureWebpack: config => {
        // 用cdn方式引入,则构建时要忽略相关资源
        if (isProduction || devNeedCdn) config.externals = cdn.externals

        // 生产环境相关配置
        if (isProduction) {
            //gzip压缩
            const productionGzipExtensions = ['html', 'js', 'css']
            config.plugins.push(
                new CompressionWebpackPlugin({
                    filename: '[path].gz[query]',
                    algorithm: 'gzip',
                    test: new RegExp(
                        '\\.(' + productionGzipExtensions.join('|') + ')$'
                    ),
                    threshold: 10240, // 只有大小大于该值的资源会被处理 10240
                    minRatio: 0.8, // 只有压缩率小于这个值的资源才会被处理
                    deleteOriginalAssets: false // 删除原文件
                })
            )

            // 代码压缩
            config.plugins.push(
                new UglifyJsPlugin({
                    uglifyOptions: {
                        //生产环境自动删除console
                        compress: {
                            drop_debugger: true,
                            drop_console: true,
                            pure_funcs: ['console.log']
                        }
                    },
                    sourceMap: false,
                    parallel: true
                })
            )
        }

        // 公共代码抽离
        config.optimization = {
            splitChunks: {
                cacheGroups: {
                    vendor: {
                        chunks: 'all',
                        test: /node_modules/,
                        name: 'vendor',
                        minChunks: 1,
                        maxInitialRequests: 5,
                        minSize: 0,
                        priority: 100
                    },
                    common: {
                        chunks: 'all',
                        test: /[\\/]src[\\/]js[\\/]/,
                        name: 'common',
                        minChunks: 2,
                        maxInitialRequests: 5,
                        minSize: 0,
                        priority: 60
                    },
                    styles: {
                        name: 'styles',
                        test: /\.(sa|sc|c)ss$/,
                        chunks: 'all',
                        enforce: true
                    },
                    runtimeChunk: {
                        name: 'manifest'
                    }
                }
            }
        }
    }
}
2.将静态资源存储在云端,个人用的七牛云,对象存储用于存储文件,使用cdn加速让存储的静态资源访问速度更快。(推荐,速度能快挺多)
- 我个人申请了七牛云,实名认证就有10G空间可用,每个月有10G的免费流量,不过不绑定域名的话只有30天体验机会,我是绑定了我的域名进行DNS解析中转,具体的操作可以参考这一篇博客,https://www.cnblogs.com/mazhi...
7.nginx配置缓存同样也可以提高网站的访问速度(虽然这点有点偏离前端打包主题了,但是对于自己独立开发个人博客网站的前端来说还是非常有用的!)
在nginx.conf的http模块中写入一下内容
 # 设置缓存路径并且使用一块最大100M的共享内存,用于硬盘上的文件索引,包括文件名和请求次数,每个文件在1天内若不活跃(无请求)则从硬盘上淘汰,硬盘缓存最大10G,满了则根据LRU算法自动清除缓存。
    proxy_cache_path /var/cache/nginx/cache levels=1:2 keys_zone=imgcache:100m inactive=1d max_size=10g;
然后在nginx.conf的serve模块中写入一下内容,保存配置,nginx -s reload重启服务即可看到效果
location ~* ^.+\.(css|js|ico|gif|jpg|jpeg|png)$ {
 log_not_found off;
 # 关闭日志
 access_log off;
 # 缓存时间7天
 expires 7d;
 # 源服务器
 proxy_pass http://localhost:8888;
 # 指定上面设置的缓存区域
 proxy_cache imgcache;
 # 缓存过期管理
 proxy_cache_valid 200 302 1d;
 proxy_cache_valid 404 10m;
 proxy_cache_valid any 1h;
 proxy_cache_use_stale error timeout invalid_header updating http_500 http_502 http_503 http_504;
 }
评论
登录后参与技术讨论,分享你的经验与见解。
登录 / 注册暂无评论