SpringBoot Maven 打包(可运行)

Stella981
• 阅读 463

示例工程:SpringBoot + Maven

1.使用SpringBoot自带插件

pom.xml文件中添加如下代码:

(代码不设置行号,方便后续拷贝。)

<build>
    <plugins>
        <plugin>
            <groupId>org.springframework.boot</groupId>
            <artifactId>spring-boot-maven-plugin</artifactId>
            <configuration>
                <!-- 工程主入口-->
                <mainClass>com.gannalyo.plugin.MySampleMavenPackagePluginApplication</mainClass>
            </configuration>
            <executions>
                <execution>
                    <goals>
                        <goal>repackage</goal>
                    </goals>
                </execution>
            </executions>
        </plugin>
    </plugins>
</build>

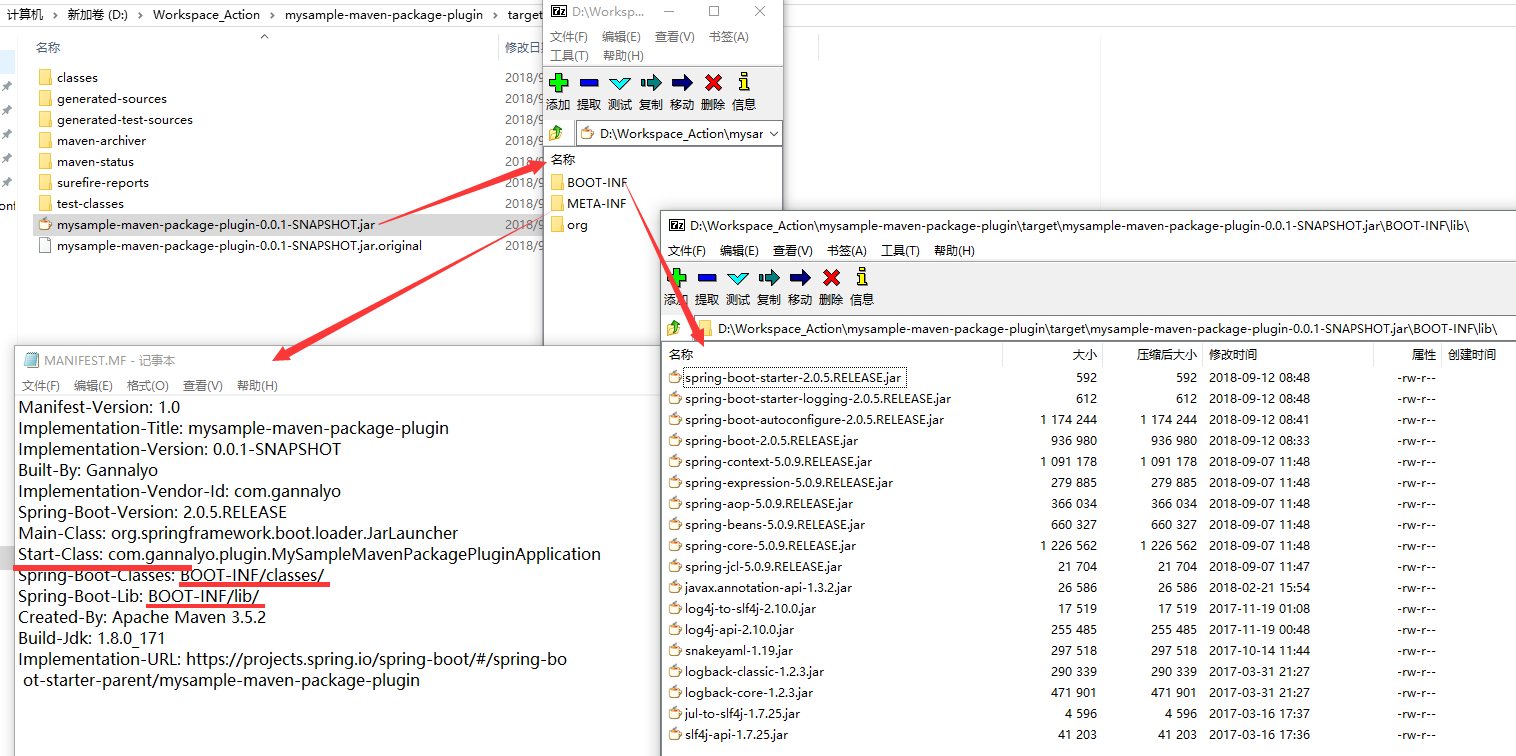
运行【mvn clean install】命令即可。

效果:
SpringBoot Maven 打包(可运行)

2.使用assembly插件

 pom.xml文件中添加如下代码:

<build>
    <plugins>
        <!-- 使用assembly插件打可运行jar和tar.gz包 -->
        <plugin>
            <groupId>org.apache.maven.plugins</groupId>
            <artifactId>maven-jar-plugin</artifactId>
            <configuration>
                <archive>
                    <manifest>
                        <!-- 工程主入口 -->
                        <mainClass>com.gannalyo.plugin.MySampleMavenPackagePluginApplication</mainClass>
                        <addClasspath>true</addClasspath>
                        <!-- 此处如果设置,会在Manifest.MF文件中的引入jar包前加上此前缀,此处我注释掉了,否则可运行jar要放在lib同级目录而不是lib里面 -->
                        <!-- <classpathPrefix>lib/</classpathPrefix> -->
                    </manifest>
                    <manifestEntries>
                        <Class-Path>./</Class-Path>
                    </manifestEntries>
                </archive>
            </configuration>
        </plugin>
        <plugin>
            <artifactId>maven-assembly-plugin</artifactId>
            <configuration>
                <!-- 不添加assembly的id到打包后的文件名称中 -->
                <appendAssemblyId>false</appendAssemblyId>
                <descriptors>
                    <!-- assembly.xml主要包含内容:打包后的文件格式、都包含哪些文件、不同文件的目录(如bin、lib、conf、README.md)、权限等 -->
                    <descriptor>src/main/assembly/assembly.xml</descriptor>
                </descriptors>
            </configuration>
            <executions>
                <execution>
                    <id>make-assembly</id>
                    <phase>package</phase>
                    <goals>
                        <goal>single</goal>
                    </goals>
                </execution>
            </executions>
        </plugin>
    </plugins>
</build>

文件《assembly.xml》:

<?xml version="1.0" encoding="UTF-8"?>
<assembly
    xmlns="http://maven.apache.org/plugins/maven-assembly-plugin/assembly/2.0.0"
    xmlns:xsi="http://www.w3.org/2001/XMLSchema-instance"
    xsi:schemaLocation="http://maven.apache.org/plugins/maven-assembly-plugin/assembly/2.0.0 http://maven.apache.org/xsd/assembly-2.0.0.xsd">
    <!-- id可随意写,当然最好有意义 -->   <id>package</id>
    <formats>
        <!-- 压缩文件类型:zip、tar、tar.gz/tgz、tar.bz2/tbz2、jar、dir、war -->
        <format>tar.gz</format>
    </formats>
    <includeBaseDirectory>true</includeBaseDirectory>
    <fileSets>
        <!-- 需要包含的文件与输出的路径 -->
        <fileSet>
            <directory>src/main/resources</directory>
            <outputDirectory>/conf</outputDirectory>
        </fileSet>
    </fileSets>
    <files>
        <!-- 打包时把start.bat和start.sh文件放在bin目录 -->
        <file>
            <source>start.bat</source>
            <outputDirectory>/bin</outputDirectory>
        </file>
        <file>
            <source>start.sh</source>
            <outputDirectory>/bin</outputDirectory>
            <!-- 赋予可执行权限 -->
            <fileMode>755</fileMode>
        </file>
        <!-- 打包时把README.md文件放在根目录 -->
        <file>
            <source>README.md</source>
        </file>
    </files>
    <dependencySets>
        <dependencySet>
            <!-- 存放依赖位置,即压缩包下的根目录下的lib文件夹中 -->
            <outputDirectory>/lib</outputDirectory>
            <scope>runtime</scope>
        </dependencySet>
    </dependencySets>
</assembly>

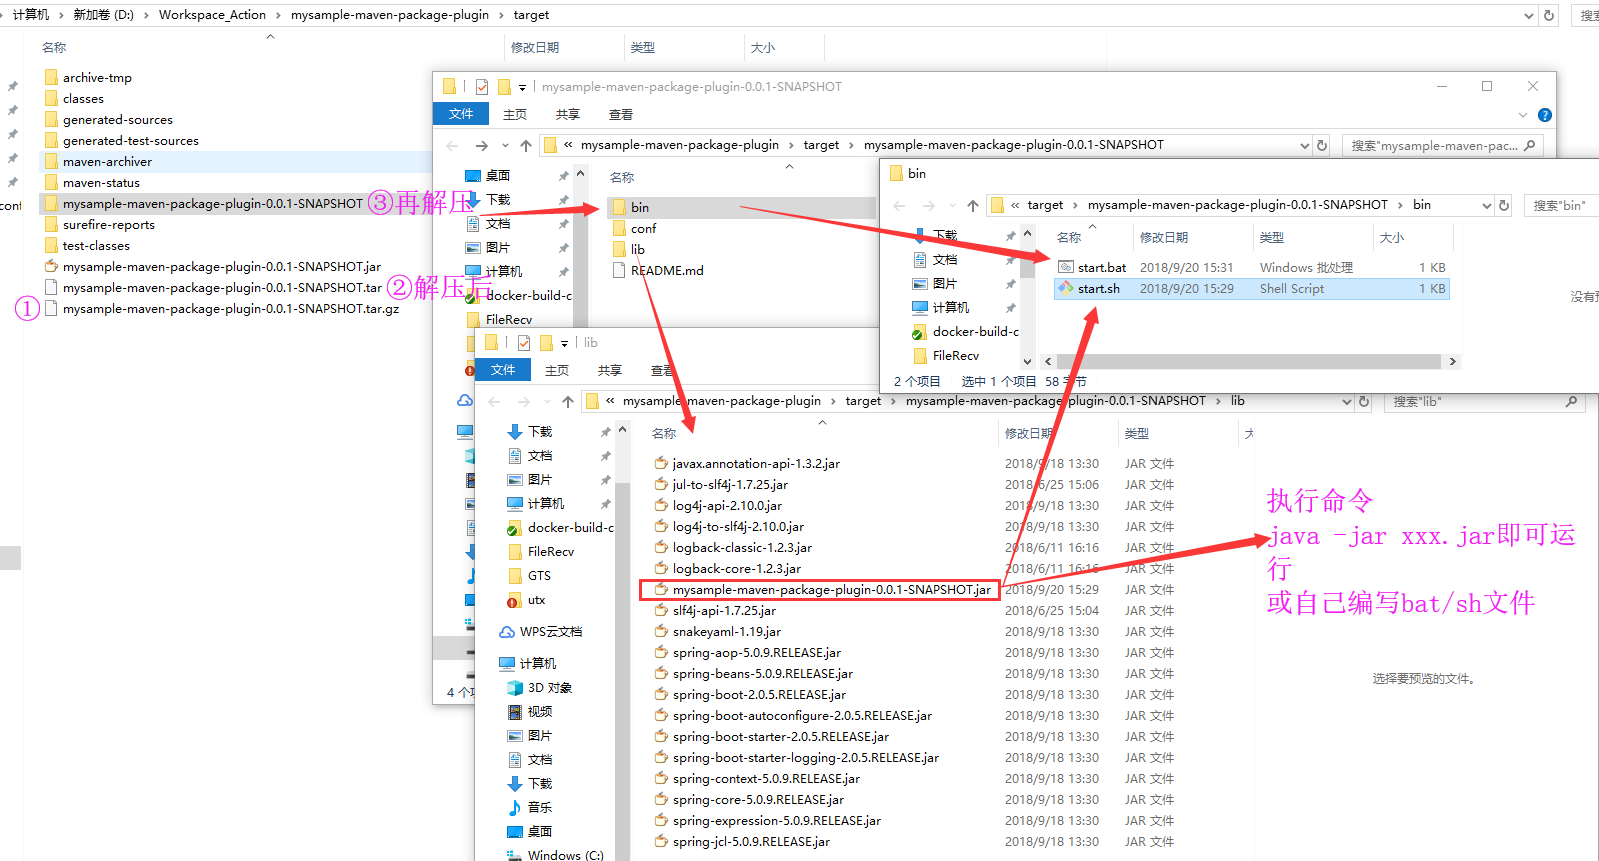
运行【mvn clean install】命令即可。

效果:
SpringBoot Maven 打包(可运行)

Linux下解压tar.gz后运行bin/start.sh文件,成功启动工程:

SpringBoot Maven 打包(可运行)

官网:http://maven.apache.org/plugins/maven-assembly-plugin/assembly.html

点赞
收藏
评论区
推荐文章
blmius blmius
2年前
MySQL:[Err] 1292 - Incorrect datetime value: ‘0000-00-00 00:00:00‘ for column ‘CREATE_TIME‘ at row 1
文章目录问题用navicat导入数据时,报错:原因这是因为当前的MySQL不支持datetime为0的情况。解决修改sql\mode:sql\mode:SQLMode定义了MySQL应支持的SQL语法、数据校验等,这样可以更容易地在不同的环境中使用MySQL。全局s
Jacquelyn38 Jacquelyn38
2年前
2020年前端实用代码段,为你的工作保驾护航
有空的时候,自己总结了几个代码段,在开发中也经常使用,谢谢。1、使用解构获取json数据let jsonData  id: 1,status: "OK",data: 'a', 'b';let  id, status, data: number   jsonData;console.log(id, status, number )
Easter79 Easter79
2年前
SpringBoot打包部署简单说明
SpringBoot项目打包部署1\.jar包部署添加一个插件<!打包插件<build<plugins<plugin<groupId
Stella981 Stella981
2年前
Android So动态加载 优雅实现与原理分析
背景:漫品Android客户端集成适配转换功能(基于目标识别(So库35M)和人脸识别库(5M)),导致apk体积50M左右,为优化客户端体验,决定实现So文件动态加载.!(https://oscimg.oschina.net/oscnet/00d1ff90e4b34869664fef59e3ec3fdd20b.png)点击上方“蓝字”关注我
Wesley13 Wesley13
2年前
mysql设置时区
mysql设置时区mysql\_query("SETtime\_zone'8:00'")ordie('时区设置失败,请联系管理员!');中国在东8区所以加8方法二:selectcount(user\_id)asdevice,CONVERT\_TZ(FROM\_UNIXTIME(reg\_time),'08:00','0
Stella981 Stella981
2年前
SpringBoot打包部署简单说明
SpringBoot项目打包部署1\.jar包部署添加一个插件<!打包插件<build<plugins<plugin<groupId
Stella981 Stella981
2年前
Django中Admin中的一些参数配置
设置在列表中显示的字段,id为django模型默认的主键list_display('id','name','sex','profession','email','qq','phone','status','create_time')设置在列表可编辑字段list_editable
Wesley13 Wesley13
2年前
MySQL部分从库上面因为大量的临时表tmp_table造成慢查询
背景描述Time:20190124T00:08:14.70572408:00User@Host:@Id:Schema:sentrymetaLast_errno:0Killed:0Query_time:0.315758Lock_
为什么mysql不推荐使用雪花ID作为主键
作者:毛辰飞背景在mysql中设计表的时候,mysql官方推荐不要使用uuid或者不连续不重复的雪花id(long形且唯一),而是推荐连续自增的主键id,官方的推荐是auto_increment,那么为什么不建议采用uuid,使用uuid究
Python进阶者 Python进阶者
3个月前
Excel中这日期老是出来00:00:00,怎么用Pandas把这个去除
大家好,我是皮皮。一、前言前几天在Python白银交流群【上海新年人】问了一个Pandas数据筛选的问题。问题如下:这日期老是出来00:00:00,怎么把这个去除。二、实现过程后来【论草莓如何成为冻干莓】给了一个思路和代码如下:pd.toexcel之前把这