Hbase的安装和基本使用

文章目录
Hbase介绍
HBase是一个开源的非关系型分布式数据库(NoSQL),它参考了谷歌的BigTable建模,实现的编程语言为 Java。它是Apache软件基金会的Hadoop项目的一部分,运行于HDFS文件系统之上,为 Hadoop 提供类似于BigTable 规模的服务。因此,它可以容错地存储海量稀疏的数据。
Hbase安装
安装环境
三台虚拟机:master、slave1、slave2, 已经安装好Hadoop环境和zookeeper
下载Hbase安装包,根据你自己的需求下载对应的安装包
wget http://archive.apache.org/dist/hbase/0.98.24/hbase-0.98.24-hadoop2-bin.tar.gz
也可以直接去镜像网站下载,地址:http://archive.apache.org/dist/ 下载好后,解压安装包
tar -zxvf hbase-0.98.24-hadoop2-bin.tar.gz
添加Hbase的环境变量
//打开~/.bashrc文件
vim ~/.bashrc
//然后在里边追加两行
export HBASE_HOME=/usr/local/src/hbase-0.98.24-hadoop2
export PATH=$PATH:$HBASE_HOME/bin
//然后保存退出,source一下
source ~/.bashrc
配置Hbase 打开Hbase目录下conf/hbase-env.sh(如果没有新建一个)
vim conf/hbase-env.sh
//添加下边两个配置
export JAVA_HOME=/usr/local/src/jdk1.8.0_171  //java home
export HBASE_MANAGES_ZK=false  //是否使用自带的zookeeper,自己有安装的话就用自己的,没有就用自带的
配置hbase-site.xml文件
vim conf/hbase-site.xml
//添加如下配置
<configuration>
        <property>
                <name>hbase.rootdir</name>
                <value>hdfs://master:9000/hbase</value>
        </property>
        <property>
                <name>hbase.cluster.distributed</name>
                <value>true</value>
        </property>
        <property>
                <name>hbase.zookeeper.quorum</name>
                <value>master,slave1,slave2</value>
        </property>
        <property>
                <name>dfs.replication</name>
                <value>2</value>
        </property>
</configuration>
修改regionservers文件
vim conf/regionservers
//添加需要安装regionserver的机器节点
slave1
slave2
到这里Hbase简单的环境就搭建好了
Hbase的启动
启动Hbase需要首先启动Hadoop和zookeeper
启动Hadoop
master机器节点
//进入到Hadoop目录的sbin下
./start-all.sh
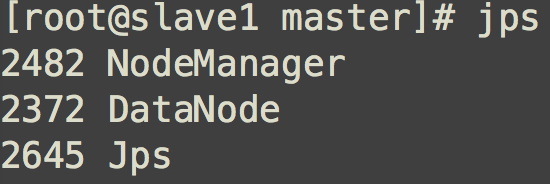
查看Hadoop是不是启动成功 master机器节点,jps查看进程看到图中进程说明成功启动 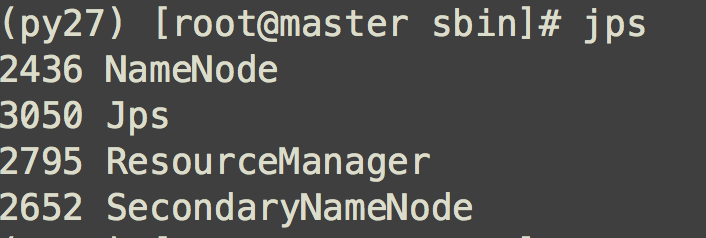 slave机器节点,jps查看
Zookeeper启动
master和slave节点都执行,进入zookeeper安装目录bin目录下
zkServer.sh start
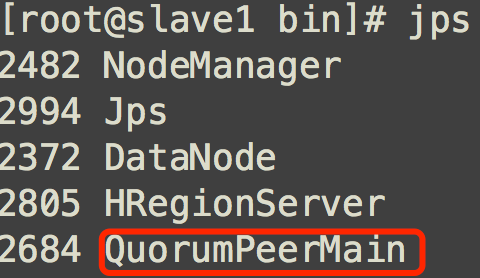
然后jps查看进程,能看到QuorumPeerMain说明Zookeeper启动成功 
 ####启动Hbase 在Hadoop和Zookeeper都启动之后就可以启动Hbase了,进入Hbase的安装目录的bin目录下
./start-hbase.sh
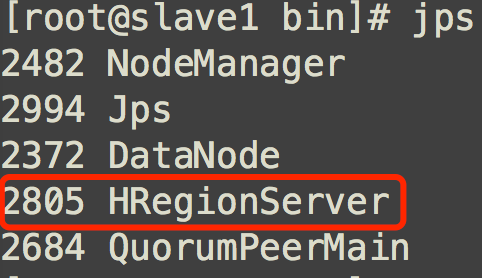
jps查看进程,在master能看到Hmaster进程,在slave节点能看到HRegionServer进程,说明Hbase启动成功 
 也可以通过网址来检查,http://master:60010/master-status
Hbase简单的shell命令操作
进入shell命令模式,在bin目录下执行
./hbase shell
hbase(main):001:0>
查看当前所有表
hbase(main):003:0> list TABLE
0 row(s) in 0.1510 seconds=> []
创建表
hbase(main):006:0> create 'test_table' , 'mate_data', 'action' 0 row(s) in 2.4390 seconds
=> Hbase::Table - test_table
查看表详情
hbase(main):009:0> desc 'test_table' Table test_table is ENABLED
test_table
COLUMN FAMILIES DESCRIPTION
{NAME => 'action', BLOOMFILTER => 'ROW', VERSIONS => '1', IN_MEMORY => 'false', KEEP_DELETED_CELLS => 'FALSE', DATA_BLOCK_EN CODING => 'NONE', TTL => 'FOREVER', COMPRESSION => 'NONE', MIN_VERSIONS => '0', BLOCKCACHE => 'true', BLOCKSIZE => '65536', REPLICATION_SCOPE => '0'}
{NAME => 'mate_data', BLOOMFILTER => 'ROW', VERSIONS => '1', IN_MEMORY => 'false', KEEP_DELETED_CELLS => 'FALSE', DATA_BLOCK _ENCODING => 'NONE', TTL => 'FOREVER', COMPRESSION => 'NONE', MIN_VERSIONS => '0', BLOCKCACHE => 'true', BLOCKSIZE => '65536 ', REPLICATION_SCOPE => '0'}
2 row(s) in 0.0520 seconds增加列簇
hbase(main):010:0> alter 'test_table', {NAME => 'new', VERSIONS => '2', IN_MEMORY => 'true'} Updating all regions with the new schema... 0/1 regions updated. 1/1 regions updated. Done. 0 row(s) in 2.2790 seconds
hbase(main):011:0> desc 'test_table' Table test_table is ENABLED
test_table
COLUMN FAMILIES DESCRIPTION
{NAME => 'action', BLOOMFILTER => 'ROW', VERSIONS => '1', IN_MEMORY => 'false', KEEP_DELETED_CELLS => 'FALSE', DATA_BLOCK_EN CODING => 'NONE', TTL => 'FOREVER', COMPRESSION => 'NONE', MIN_VERSIONS => '0', BLOCKCACHE => 'true', BLOCKSIZE => '65536', REPLICATION_SCOPE => '0'}
{NAME => 'mate_data', BLOOMFILTER => 'ROW', VERSIONS => '1', IN_MEMORY => 'false', KEEP_DELETED_CELLS => 'FALSE', DATA_BLOCK _ENCODING => 'NONE', TTL => 'FOREVER', COMPRESSION => 'NONE', MIN_VERSIONS => '0', BLOCKCACHE => 'true', BLOCKSIZE => '65536 ', REPLICATION_SCOPE => '0'}
{NAME => 'new', BLOOMFILTER => 'ROW', VERSIONS => '2', IN_MEMORY => 'true', KEEP_DELETED_CELLS => 'FALSE', DATA_BLOCK_ENCODI NG => 'NONE', TTL => 'FOREVER', COMPRESSION => 'NONE', MIN_VERSIONS => '0', BLOCKCACHE => 'true', BLOCKSIZE => '65536', REPL ICATION_SCOPE => '0'}
3 row(s) in 0.0570 seconds删除列簇
hbase(main):013:0> alter 'test_table', {NAME => 'new', METHOD => 'delete'} Updating all regions with the new schema... 0/1 regions updated. 1/1 regions updated. Done. 0 row(s) in 2.2390 seconds
hbase(main):014:0> desc 'test_table' Table test_table is ENABLED
test_table
COLUMN FAMILIES DESCRIPTION
{NAME => 'action', BLOOMFILTER => 'ROW', VERSIONS => '1', IN_MEMORY => 'false', KEEP_DELETED_CELLS => 'FALSE', DATA_BLOCK_EN CODING => 'NONE', TTL => 'FOREVER', COMPRESSION => 'NONE', MIN_VERSIONS => '0', BLOCKCACHE => 'true', BLOCKSIZE => '65536', REPLICATION_SCOPE => '0'}
{NAME => 'mate_data', BLOOMFILTER => 'ROW', VERSIONS => '1', IN_MEMORY => 'false', KEEP_DELETED_CELLS => 'FALSE', DATA_BLOCK _ENCODING => 'NONE', TTL => 'FOREVER', COMPRESSION => 'NONE', MIN_VERSIONS => '0', BLOCKCACHE => 'true', BLOCKSIZE => '65536 ', REPLICATION_SCOPE => '0'}
2 row(s) in 0.0430 seconds删除表
//首先disable hbase(main):016:0> disable 'test_table' 0 row(s) in 1.2980 seconds //然后再删除 hbase(main):017:0> drop 'test_table' 0 row(s) in 0.2020 seconds //查看是否删除 hbase(main):018:0> list TABLE
0 row(s) in 0.0070 seconds=> []
往表里写数据并查看
hbase(main):021:0> put 'test_table', '1001', 'mate_data:name', 'zhangsan' 0 row(s) in 0.1400 seconds
hbase(main):022:0> put 'test_table', '1002', 'mate_data:name', 'lisi' 0 row(s) in 0.0110 seconds
hbase(main):023:0> put 'test_table', '1001', 'mate_data:gender', 'woman' 0 row(s) in 0.0170 seconds
hbase(main):024:0> put 'test_table', '1002', 'mate_data:age', '25' 0 row(s) in 0.0140 seconds
hbase(main):025:0> scan 'test_table' ROW COLUMN+CELL
1001 column=mate_data:gender, timestamp=1540034584363, value=woman
1001 column=mate_data:name, timestamp=1540034497293, value=zhangsan
1002 column=mate_data:age, timestamp=1540034603800, value=25
1002 column=mate_data:name, timestamp=1540034519659, value=lisi
2 row(s) in 0.0410 seconds读取数据
hbase(main):026:0> get 'test_table', '1001' COLUMN CELL
mate_data:gender timestamp=1540034584363, value=woman
mate_data:name timestamp=1540034497293, value=zhangsan
2 row(s) in 0.0340 secondshbase(main):027:0> get 'test_table', '1001', 'mate_data:name' COLUMN CELL
mate_data:name timestamp=1540034497293, value=zhangsan
1 row(s) in 0.0320 seconds查看行数
hbase(main):028:0> count 'test_table' 2 row(s) in 0.0390 seconds
=> 2
清空表数据
hbase(main):029:0> truncate 'test_table' Truncating 'test_table' table (it may take a while):
- Disabling table...
- Truncating table... 0 row(s) in 1.5220 seconds
通过Python脚本来操作Hbase
不能通过Python脚本来直接操作Hbase,必须要借助thrift服务作为中间层,所以需要两个Python模块:hbase模块和thrift模块,和安装thrift来实现Python对Hbase的操作 ####安装thrift并获得thrift模块
下载安装thrift
wget http://archive.apache.org/dist/thrift/0.11.0/thrift-0.11.0.tar.gz tar -zxvf thrift-0.11.0.tar.gz cd thrift-0.11.0/ ./configure make make install cd lib/py/build/lib.linux-x86_64-2.7
然后就能看到thrift模块
获得hbase模块
下载Hbase源码包
wget http://archive.apache.org/dist/hbase/0.98.24/hbase-0.98.24-src.tar.gz tar -zxvf hbase-0.98.24-src.tar.gz
产生hbase模块
//进入该目录 cd /usr/local/src/hbase-0.98.24/hbase-thrift/src/main/resources/org/apache/hadoop/hbase/thrift //执行如下命令,产生gen-py目录 thrift --gen py Hbase.thrift //进入该目录就能得到生成的hbase模块 cd gen-py
使用Python写数据
创建表
from thrift.transport import TSocket from thrift.protocol import TBinaryProtocol
from hbase import Hbase from hbase.ttypes import *
transport = TSocket.TSocket('master', 9090) transport = TTransport.TBufferedTransport(transport)
protocol = TBinaryProtocol.TBinaryProtocol(transport)
client = Hbase.Client(protocol)
transport.open()
base_info_contents = ColumnDescriptor(name='columnName1', maxVersions=1) other_info_contents = ColumnDescriptor(name='columnName2', maxVersions=1)
client.createTable('tableName', [base_info_contents,other_info_contents])
插入数据
from thrift.transport import TSocket from thrift.protocol import TBinaryProtocol
from hbase import Hbase from hbase.ttypes import *
transport = TSocket.TSocket('master', 9090) transport = TTransport.TBufferedTransport(transport)
protocol = TBinaryProtocol.TBinaryProtocol(transport)
client = Hbase.Client(protocol)
transport.open()
table_name = 'tableName' rowKey = 'rowKeyName' mutations = [Mutation(column="columnName:columnPro", value="valueName")] client.mutateRow(table_name,rowKey,mutations,None)
查看数据
from thrift.transport import TSocket from thrift.protocol import TBinaryProtocol
from hbase import Hbase from hbase.ttypes import *
transport = TSocket.TSocket('master', 9090) transport = TTransport.TBufferedTransport(transport)
protocol = TBinaryProtocol.TBinaryProtocol(transport)
client = Hbase.Client(protocol)
transport.open()
table_name = 'tableName' rowKey = 'rowKeyName'
result = client.getRow(table_name,rowKey,None)
for l in result: print "the row is "+ l.row for k,v in l.columns.items(): print '\t'.join([k,v.value]) from thrift.transport import TSocket from thrift.protocol import TBinaryProtocol
from hbase import Hbase from hbase.ttypes import *
transport = TSocket.TSocket('master', 9090) transport = TTransport.TBufferedTransport(transport)
protocol = TBinaryProtocol.TBinaryProtocol(transport)
client = Hbase.Client(protocol)
transport.open()
table_name = 'tableName'
scan = TScan()
id = client.scannerOpenWithScan(table_name,scan,None) result = client.scannerGetList(id,10)
for l in result: print "=========" print "the row is "+ l.row for k,v in l.columns.items(): print '\t'.join([k,v.value])
欢迎关注公众号

评论
登录后参与技术讨论,分享你的经验与见解。
登录 / 注册暂无评论