Spring-SpringAOP的使用

文章目录
前言
AOP(Aspect Oriented Programming)即面向切面编程。定义一个通用功能,然后通过声明的方式来指定这个功能什么时候用,什么地方用。考虑一个场景:给到一个项目,在接口层编写了大量的Controller,可以将这些Controller进行如下示意。
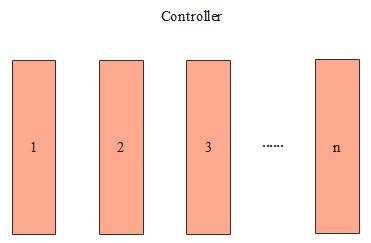
此时需要对所有Controller中的接口的访问次数进行统计,最直接的方法,就是在每个Controller中进行统计,示意如下。

由于统计的逻辑在每个Controller中都需要写一次,存在大量重复代码,并且后续修改起来很不方便,所以可以考虑将统计的逻辑单独提取到一个类中,示意如下。
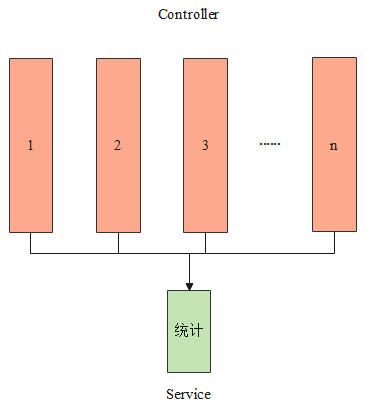
上述结构已经可以达到以少量代码进行所有Controller中的接口的访问次数的统计,但是如果Controller过多,在每个Controller中都需要引入实现统计功能的类,以及后续添加新的Controller时,也需要在新的Controller中引入统计功能的类,所以尽管上述的结构可以实现功能,但是操作起来还是不便并且容易出错。如果将统计的功能放在切面中并将切面织入每个Controller中,那么可以以更少的代码并以更优雅的方式来实现接口访问次数的统计,示意如下。

定义好的切面会织入当前已经存在的Controller中以及后续添加的Controller中,极大减少了重复代码,并且统计接口的访问次数的功能和Controller高度解耦。通常,切面多用于性能统计,日志记录,异常处理,安全处理等。
本篇文章将结合读书时的一篇学习笔记,对Spring中的AOP的概念和使用进行学习和讨论,最后会使用切面来完成对所有Controller中的接口的访问次数统计的实现。
Spring版本:5.3.2
Springboot版本:2.4.1
正文
一. AOP的基础概念
在AOP中,存在着如下的概念。
- 通知(
Advice); - 切点(
Pointcut); - 连接点(
JoinPoint); - 切面(
Aspect); - 织入(
Weaving)。
下面将分别对上述概念进行解释。
1. 连接点
连接点最通俗的含义就是切面可以作用的地方,再说通俗一点,就是应用程序提供给切面插入的地方,下面的表格上给出了一些常见的连接点,结合表格可以加深对连接点的理解。注意:横线划掉的部分是AspectJ支持但SpringAOP不支持的连接点。
| 连接点 | 说明 | 补充解释 |
|---|---|---|
| method execute | 方法执行,即方法执行时这个方法就是一个连接点。 | 和方法调用连接点不同,方法执行连接点是聚焦于某个方法执行,此时这个方法是一个连接点,方法执行连接点也是SpringAOP主要的连接点。 |
AspectJ支持但SpringAOP不支持。 | ||
SpringAOP无法支持切面作用于构造方法,这和SpringAOP是基于动态代理的实现有关。 | ||
AspectJ支持但SpringAOP不支持 | ||
AspectJ支持但SpringAOP不支持 |
除了上述表格列举的连接点外,还有其余的连接点诸如handler(异常处理)和static initialization(类初始化)等,但是这些连接点中,只有method execute是SpeingAOP支持的,这和SpringAOP的底层实现有关,所以现在就忘掉上述的被横线划掉的连接点吧,专注于method execute。
2. 切点
切点是连接点的集合,声明一个切点就确定了一堆连接点,即确定了应用程序中切面可以插入的地方的集合。在SpringAOP中,是使用的AspectJ的切点表达式来定义的切点,下面是一个示例。
@Pointcut("execution(* com.spring.aop..*.*(..))")
private void allMethodExecutePointcut() {}如果从来没有接触过AOP,那么上述的切点定义可能第一眼看过去会觉得比较复杂,下面将对切点的定义进行逐帧的解读。
首先看下图。
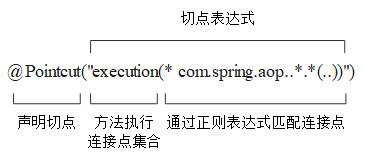
@Pointcut注解表示在声明切点,可以先看一下@Pointcut注解的定义,如下所示。
@Retention(RetentionPolicy.RUNTIME)
@Target(ElementType.METHOD)
public @interface Pointcut {

    // 切点表达式
    String value() default "";

    // 参数名字相关
    String argNames() default "";

}暂时不讨论argNames(),所以使用@Pointcut注解声明切点时需要提供切点表达式。在SpringAOP中,切点表达式主要是基于execution和@annotation编写,必要时还会搭配within,上述示例是使用的execution,所以先说明execution的语法,首先明确一个概念:SpringAOP的切点表达式就是为了匹配方法,即最终的落脚点是方法。execution的语法可以由下图进行说明。

那么上述切点表达式就是匹配com.spring.aop包下的所有子包里所有类的所有方法,将这个切点表达式设置给@Pointcut注解声明出来的切点表示切面可以插入com.spring.aop包下的所有子包里所有类的所有方法。
下面再给出@annotation的语法,如下所示。

上述切点表达式就是匹配由@GetMapping注解修饰的所有方法。在SpringAOP中用得较多的还有使用within的切点表达式,within中可以指定类,指定的类中的所有方法都是匹配目标,下面用一个示例进行说明。
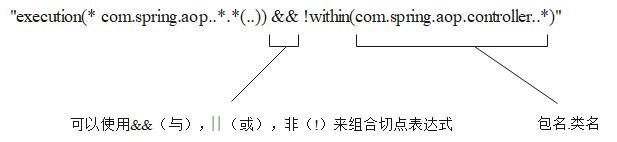
上述切点表达式就是匹配com.spring.aop包下的除开com.spring.aop.controller包及其子包的所有子包里所有类的所有方法。
3. 通知
通知就是定义切面需要做什么,什么时候做。通知的分类可以由下表进行说明(基于SpringAOP)。
| 通知 | 含义 |
|---|---|
前置通知(@Before) | 在目标方法执行前执行特定逻辑。 |
后置通知(@After) | 在目标方法执行后执行特定逻辑。 |
返回通知(@AfterReturning) | 在目标方法执行后,可以捕获目标方法的返回值并执行特定逻辑,比如对返回值进行修改。 |
异常通知(@AfterThrowing) | 在目标方法执行并抛出异常时执行特定逻辑。 |
环绕通知(@Around) | 能够获取到目标方法,并可以决定目标方法是否执行,同时可以在目标方法执行前和执行后执行特定逻辑。 |
通知的概念就先介绍到这里,下面介绍完切面的概念并结合例子,通知是啥也就一目了然。
4. 切面
切面就是通知 + 切点,即通知和切点共同定义了切面的全部内容:需要做什么,什么时候做,作用在哪里。下面以一个示例对SpringAOP的切面进行说明。
@Aspect
@Component
public class ExampleAspect {

    @Pointcut("execution(* com.spring.aop..*.*(..))")    // 作用在哪里
    private void allMethodExecutePointcut() {}

    @Before("allMethodExecutePointcut()")    // 什么时候做
    public void doBeforeMethodExecute(JoinPoint joinPoint) {
        ......
        // 需要做什么
    }

}注解@Aspect声明ExampleAspect为切面,注解@Component表明ExampleAspect需要由Spring容器管理。在ExampleAspect切面中,定义了一个切点并由allMethodExecutePointcut()作为标识符,然后由@Before注解修饰的doBeforeMethodExecute()方法就是一个前置通知,该前置通知作用的地方由allMethodExecutePointcut()切点确定。
在切面里的通知中,可以获取到JoinPoint即当前切面作用的连接点,通过连接点可以获取到连接点即目标方法的信息,JoinPoint类图如下所示。
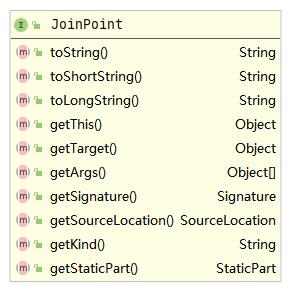
通过JoinPoint可以获取到方法名,方法参数以及方法所在类的信息。
5. 织入
织入表示把切面应用到连接点的过程。在目标的生命周期里,有多个时间点可以进行织入,详见下表。
| 时间点 | 说明 | 适用范围 |
|---|---|---|
| 编译期 | 切面在目标类编译时就织入。 | AspectJ |
| 类加载期 | 切面在目标类被加载到JVM时织入。 | AspectJ |
| 运行期 | 切面在应用程序运行的某个时刻织入,织入切面时,会为目标对象创建动态代理对象。 | SpringAOP |
6. SpringAOP与AspectJ的联系
AspectJ是一个面向切面的框架,AspectJ定义了AOP语法。
SpringAOP是Spring基于动态代理的AOP框架,纯Java语言实现,Spring框架支持四种类型的AOP,详见下表。
| 概述 | 说明 | 分类 |
|---|---|---|
SpringAOP | Spring的经典AOP,笨重且复杂。 | SpringAOP |
SpringAOP | ||
AspectJ注解驱动的切面 | Spring借鉴AspectJ切面提供的注解驱动的AOP,本质上还是Spring基于动态代理的AOP,但是编程模型与AspectJ注解驱动的切面完全一样。 | SpringAOP |
注入式AspectJ切面 | 使用AspectJ框架来实现AOP功能,在AOP需求的功能超过了简单的方法拦截调用时,就需要使用AspectJ来编写切面。 | AspectJ |
(上表中横线划掉的部分为一般不使用的AOP)尽管SpringAOP的编程模型和AspectJ的编程模型保持一致,但是底层实现上,SpringAOP是基于动态代理,那么SpringAOP的作用范围就局限在了方法的拦截调用上,而AspectJ有专门的编译器,可以操作字节码,所以使得AspectJ能够作用的范围更广,实现的功能更强。下表是一个SpringAOP与AspectJ的直观对比。
| 对比项 | SpringAOP | AspectJ |
|---|---|---|
| 实现 | Java语言实现 | Java语言的扩展实现 |
| 编译器 | 无需求 | 需要AspectJ编译器 |
| 功能性 | 不强,对AOP的支持仅局限于方法的拦截和调用 | 强 |
| 作用对象 | 只能作用在Spring容器管理的bean上 | 所有对象上 |
| 速度 | 慢 | 快 |
二. 示例演示-@Before
最好的理解方法就是动手实验,从本小节开始,将以Springboot搭建的工程为基础,以最简单的例子进行SpringAOP的最直观的演示。新建Maven项目,POM文件配置如下所示。
<?xml version="1.0" encoding="UTF-8"?>
<project xmlns="http://maven.apache.org/POM/4.0.0"
         xmlns:xsi="http://www.w3.org/2001/XMLSchema-instance"
         xsi:schemaLocation="http://maven.apache.org/POM/4.0.0 http://maven.apache.org/xsd/maven-4.0.0.xsd">
    <modelVersion>4.0.0</modelVersion>

    <parent>
        <groupId>org.springframework.boot</groupId>
        <artifactId>spring-boot-starter-parent</artifactId>
        <version>2.4.1</version>
        <relativePath/>
    </parent>

    <groupId>com.spring.aop</groupId>
    <artifactId>spring-aop</artifactId>
    <version>1.0-SNAPSHOT</version>

    <dependencies>
        <dependency>
            <groupId>org.springframework.boot</groupId>
            <artifactId>spring-boot-starter-web</artifactId>
        </dependency>
        <dependency>
            <groupId>org.springframework.boot</groupId>
            <artifactId>spring-boot-starter-aop</artifactId>
        </dependency>

        <dependency>
            <groupId>org.projectlombok</groupId>
            <artifactId>lombok</artifactId>
            <optional>true</optional>
        </dependency>
    </dependencies>

</project>先编写一个HelloController,如下所示。
@Slf4j
@RestController
public class HelloController {

    public static final String HELLO_WORLD = "Hello World";

    @RequestMapping(value = "/aop/v1/sayhello", method = RequestMethod.GET)
    public ResponseEntity<String> sayHelloV1(HttpServletRequest request) {
        log.info("interface /aop/v1/sayhello execute.");
        return new ResponseEntity<>(HELLO_WORLD, HttpStatus.CREATED);
    }

}HelloController中提供了一个获取Hello World的GET接口。然后编写一个日志打印切面LogAspect,如下所示。
@Slf4j
@Aspect
@Component
public class LogAspect {

    @Pointcut("execution(* com.spring.aop..*.*(..))")
    private void allMethodExecutePointcut() {}

    @Before("allMethodExecutePointcut()")
    public void logBeforeMethodExecute(JoinPoint joinPoint) {
        Signature signature = joinPoint.getSignature();
        String declaringTypeName = signature.getDeclaringTypeName();
        String methodName = signature.getName();
        log.info(declaringTypeName + "." + methodName + " execute.");
    }

}LogAspect切面做的事情就是在com.spring.aop包下所有子包的所有类中的方法执行前,打印本次执行的方法的方法名和方法所在类的全限定名。
整体工程的目录结构如下所示。

现在启动Springboot,并使用rest工具调用/aop/v1/sayhello接口,日志打印如下。

可见LogAspect中的logBeforeMethodExecute()通知在HelloController的sayHelloV1()方法执行前执行了。
现在进行一点修改,新建一个HelloService,如下所示。
@Slf4j
@Service
public class HelloService {

    public String sayHello() {
        log.info("method com.spring.aop.service.HelloService.sayHello execute.");
        return HelloController.HELLO_WORLD;
    }

}修改HelloController,如下所示。
@Slf4j
@RestController
public class HelloController {

    @Autowired
    private HelloService helloService;

    public static final String HELLO_WORLD = "Hello World";

    @RequestMapping(value = "/aop/v1/sayhello", method = RequestMethod.GET)
    public ResponseEntity<String> sayHelloV1(HttpServletRequest request) {
        log.info("interface /aop/v1/sayhello execute.");
        return new ResponseEntity<>(HELLO_WORLD, HttpStatus.CREATED);
    }

    @RequestMapping(value = "/aop/v2/sayhello", method = RequestMethod.GET)
    public ResponseEntity<String> sayHelloV2(HttpServletRequest request) {
        log.info("interface /aop/v2/sayhello execute.");
        return new ResponseEntity<>(helloService.sayHello(), HttpStatus.CREATED);
    }

}
整体工程的目录结构变更如下。
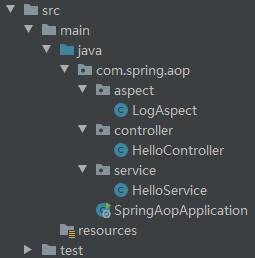
现在启动Springboot,并使用rest工具调用/aop/v2/sayhello接口,日志打印如下。

因为HelloController的sayHelloV2()方法与HelloService的sayHello()方法均在LogAspect切面中的logBeforeMethodExecute()通知的作用范围内,所以两个方法执行前,logBeforeMethodExecute()通知均执行了。现在对LogAspect进行修改,以使得logBeforeMethodExecute()通知的作用范围不包含com.spring.aop.service包下所有子包的所有类中的方法,如下所示。
@Slf4j
@Aspect
@Component
public class LogAspect {

    @Pointcut("execution(* com.spring.aop..*.*(..)) && !within(com.spring.aop.service..*)")
    private void allMethodExecutePointcut() {}

    @Before("allMethodExecutePointcut()")
    public void logBeforeMethodExecute(JoinPoint joinPoint) {
        Signature signature = joinPoint.getSignature();
        String declaringTypeName = signature.getDeclaringTypeName();
        String methodName = signature.getName();
        log.info(declaringTypeName + "." + methodName + " execute.");
    }

}现在启动Springboot,并使用rest工具调用/aop/v2/sayhello接口,日志打印如下。

如上所示,执行结果符合预期,LogAspect切面中的logBeforeMethodExecute()通知不再作用于HelloService的方法。
三. 示例演示-@After
沿用第二小节中的工程继续演示。修改HelloController,如下所示。
@Slf4j
@RestController
public class HelloController {

    @Autowired
    private HelloService helloService;

    public static final String HELLO_WORLD = "Hello World";

    @RequestMapping(value = "/aop/v1/sayhello", method = RequestMethod.GET)
    public ResponseEntity<String> sayHelloV1(HttpServletRequest request) {
        log.info("interface /aop/v1/sayhello execute.");
        return new ResponseEntity<>(HELLO_WORLD, HttpStatus.CREATED);
    }

    @RequestMapping(value = "/aop/v2/sayhello", method = RequestMethod.GET)
    public ResponseEntity<String> sayHelloV2(HttpServletRequest request) {
        log.info("interface /aop/v2/sayhello execute.");
        return new ResponseEntity<>(helloService.sayHello(), HttpStatus.CREATED);
    }

    @GetMapping(value = "/aop/v3/sayhello")
    public ResponseEntity<String> sayHelloV3(HttpServletRequest request) {
        log.info("interface /aop/v3/sayhello execute.");
        return new ResponseEntity<>(HELLO_WORLD, HttpStatus.CREATED);
    }

}即添加了一个由@GetMapping注解修饰的接口。修改LogAspect,如下所示。
@Slf4j
@Aspect
@Component
public class LogAspect {

    @Pointcut("execution(* com.spring.aop..*.*(..)) && !within(com.spring.aop.service..*)")
    private void allMethodExecutePointcut() {}

    @Pointcut("@annotation(org.springframework.web.bind.annotation.GetMapping)")
    private void allGetMappingPointcut() {}

    @Before("allMethodExecutePointcut()")
    public void logBeforeMethodExecute(JoinPoint joinPoint) {
        Signature signature = joinPoint.getSignature();
        String declaringTypeName = signature.getDeclaringTypeName();
        String methodName = signature.getName();
        log.info(declaringTypeName + "." + methodName + " execute.");
    }

    @After("allGetMappingPointcut()")
    public void logAfterGetMappingExecute(JoinPoint joinPoint) {
        Signature signature = joinPoint.getSignature();
        String declaringTypeName = signature.getDeclaringTypeName();
        String methodName = signature.getName();
        log.info(declaringTypeName + "." + methodName + " execute.");
    }

}上述LogAspect中,增加了allGetMappingPointcut()切点,其作用范围是全部由@GetMapping注解修饰的方法,然后增加了logAfterGetMappingExecute()通知,其逻辑是在目标方法执行后打印信息。
现在启动Springboot,并使用rest工具调用/aop/v3/sayhello接口,日志打印如下。

可见LogAspect中的logAfterGetMappingExecute()通知在HelloController的sayHelloV3()方法执行后执行了。
四. 示例演示-@AfterReturning
沿用第三小节中的工程,但是将LogAspect切面注释掉。新建一个类HelloWorld,如下所示。
@Data
public class HelloWorld {

    private LocalDateTime dateTime;

}修改HelloService,如下所示。
@Slf4j
@Service
public class HelloService {

    public String sayHello() {
        log.info("method com.spring.aop.service.HelloService.sayHello execute.");
        return HelloController.HELLO_WORLD;
    }

    public HelloWorld getHelloWorld() {
        log.info("method com.spring.aop.service.HelloService.getHelloWorld execute.");
        return new HelloWorld();
    }

}新增一个切面HelloWorldAspect,如下所示。
@Slf4j
@Aspect
@Component
public class HelloWorldAspect {

    @Pointcut("execution(* com.spring.aop.service.HelloService.getHelloWorld(..))")
    private void getHelloWorldPointcut() {}

    @AfterReturning(pointcut = "getHelloWorldPointcut()", returning = "result")
    public void assembleHelloWorld(JoinPoint joinPoint, Object result) {
        HelloWorld helloWorld = (HelloWorld) result;
        helloWorld.setDateTime(LocalDateTime.now());
    }

}HelloWorldAspect切面中的getHelloWorldPointcut()切点精确匹配到HelloService的getHelloWorld()方法,然后assembleHelloWorld()通知会在getHelloWorld()方法执行完返回HelloWorld后捕获到这个返回值对象,并丰富其dateTime字段。
修改HelloController,如下所示。
@Slf4j
@RestController
public class HelloController {

    @Autowired
    private HelloService helloService;

    public static final String HELLO_WORLD = "Hello World";

    @RequestMapping(value = "/aop/v1/sayhello", method = RequestMethod.GET)
    public ResponseEntity<String> sayHelloV1(HttpServletRequest request) {
        log.info("interface /aop/v1/sayhello execute.");
        return new ResponseEntity<>(HELLO_WORLD, HttpStatus.CREATED);
    }

    @RequestMapping(value = "/aop/v2/sayhello", method = RequestMethod.GET)
    public ResponseEntity<String> sayHelloV2(HttpServletRequest request) {
        log.info("interface /aop/v2/sayhello execute.");
        return new ResponseEntity<>(helloService.sayHello(), HttpStatus.CREATED);
    }

    @GetMapping(value = "/aop/v3/sayhello")
    public ResponseEntity<String> sayHelloV3(HttpServletRequest request) {
        log.info("interface /aop/v3/sayhello execute.");
        return new ResponseEntity<>(HELLO_WORLD, HttpStatus.CREATED);
    }

    @GetMapping(value = "/aop/v4/sayhello")
    public ResponseEntity<HelloWorld> sayHelloV4(HttpServletRequest request) {
        log.info("interface /aop/v4/sayhello execute.");
        return new ResponseEntity<>(helloService.getHelloWorld(), HttpStatus.CREATED);
    }

}
整体工程的目录结构变更如下。
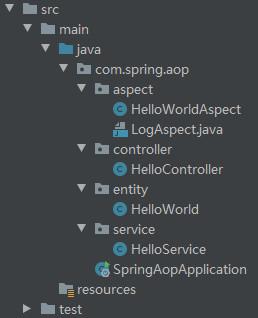
现在启动Springboot,并使用rest工具调用/aop/v4/sayhello接口,返回结果如下所示。

如上所示,尽管在HelloService的getHelloWorld()方法中没有为创建的HelloWorld设置dateTime字段,但是HelloWorldAspect切面的assembleHelloWorld()通知捕获到了getHelloWorld()方法的返回值并丰富了dateTime字段。
五. 示例演示-@AfterThrowing
沿用第四小节中的工程。首先在HelloService中添加一个只要调用就会抛出运行时异常的方法,如下所示。
@Slf4j
@Service
public class HelloService {

    public String sayHello() {
        log.info("method com.spring.aop.service.HelloService.sayHello execute.");
        return HelloController.HELLO_WORLD;
    }

    public HelloWorld getHelloWorld() {
        log.info("method com.spring.aop.service.HelloService.getHelloWorld execute.");
        return new HelloWorld();
    }

    public String sayHelloButThrowException() {
        log.info("method com.spring.aop.service.HelloService.sayHelloButThrowException execute.");
        throw new RuntimeException("Exception was thrown.");
    }

}修改HelloWorldAspect切面,如下所示。
@Slf4j
@Aspect
@Component
public class HelloWorldAspect {

    @Pointcut("execution(* com.spring.aop.service.HelloService.getHelloWorld(..))")
    private void getHelloWorldPointcut() {}

    @Pointcut("execution(* com.spring.aop.service.HelloService.sayHelloButThrowException(..))")
    private void throwExceptionPointcut() {}

    @AfterReturning(pointcut = "getHelloWorldPointcut()", returning = "result")
    public void assembleHelloWorld(JoinPoint joinPoint, Object result) {
        HelloWorld helloWorld = (HelloWorld) result;
        helloWorld.setDateTime(LocalDateTime.now());
    }

    @AfterThrowing(pointcut = "throwExceptionPointcut()", throwing = "e")
    public void logExceptionInfo(JoinPoint joinPoint, Throwable e) {
        log.info(e.getMessage());
    }

}HelloWorldAspect切面新增了一个精确匹配到HelloService的sayHelloButThrowException()方法的切点,并且还新增了一个logExceptionInfo()通知,其会在sayHelloButThrowException()方法抛出异常时执行,执行逻辑是打印异常信息。
修改HelloController,如下所示。
@Slf4j
@RestController
public class HelloController {

    @Autowired
    private HelloService helloService;

    public static final String HELLO_WORLD = "Hello World";

    @RequestMapping(value = "/aop/v1/sayhello", method = RequestMethod.GET)
    public ResponseEntity<String> sayHelloV1(HttpServletRequest request) {
        log.info("interface /aop/v1/sayhello execute.");
        return new ResponseEntity<>(HELLO_WORLD, HttpStatus.CREATED);
    }

    @RequestMapping(value = "/aop/v2/sayhello", method = RequestMethod.GET)
    public ResponseEntity<String> sayHelloV2(HttpServletRequest request) {
        log.info("interface /aop/v2/sayhello execute.");
        return new ResponseEntity<>(helloService.sayHello(), HttpStatus.CREATED);
    }

    @GetMapping(value = "/aop/v3/sayhello")
    public ResponseEntity<String> sayHelloV3(HttpServletRequest request) {
        log.info("interface /aop/v3/sayhello execute.");
        return new ResponseEntity<>(HELLO_WORLD, HttpStatus.CREATED);
    }

    @GetMapping(value = "/aop/v4/sayhello")
    public ResponseEntity<HelloWorld> sayHelloV4(HttpServletRequest request) {
        log.info("interface /aop/v4/sayhello execute.");
        return new ResponseEntity<>(helloService.getHelloWorld(), HttpStatus.CREATED);
    }

    @GetMapping(value = "/aop/v5/sayhello")
    public ResponseEntity<String> sayHelloV5(HttpServletRequest request) {
        log.info("interface /aop/v5/sayhello execute.");
        return new ResponseEntity<>(helloService.sayHelloButThrowException(), HttpStatus.CREATED);
    }

}现在启动Springboot,并使用rest工具调用/aop/v5/sayhello接口,日志打印如下。

如上所示,HelloWorldAspect切面的logExceptionInfo()通知在HelloService的sayHelloButThrowException()方法抛出异常后执行了。
六. 示例演示-@Around
沿用第五小节中的工程,注释掉HelloWorldAspect切面。首先自定义一个注解,如下所示。
@Target(ElementType.METHOD)
@Retention(RetentionPolicy.RUNTIME)
@Documented
public @interface ShieldExecute {
}顾名思义,期望所有由@ShieldExecute注解修饰的方法会被屏蔽掉即不执行。
然后修改HelloService,如下所示。
@Slf4j
@Service
public class HelloService {

    public String sayHello() {
        log.info("method com.spring.aop.service.HelloService.sayHello execute.");
        return HelloController.HELLO_WORLD;
    }

    public HelloWorld getHelloWorld() {
        log.info("method com.spring.aop.service.HelloService.getHelloWorld execute.");
        return new HelloWorld();
    }

    public String sayHelloButThrowException() {
        log.info("method com.spring.aop.service.HelloService.sayHelloButThrowException execute.");
        throw new RuntimeException("Exception was thrown.");
    }

    @ShieldExecute
    public void justSayHello() {
        log.info(HelloController.HELLO_WORLD);
    }

}在HelloService中添加了一个由@ShieldExecute注解修饰的justSayHello()方法,justSayHello()方法原本的逻辑就是仅仅打印一句Hello World。
添加一个切面ShieldAspect,如下所示。
@Slf4j
@Aspect
@Component
public class ShieldAspect {

    @Pointcut("@annotation(com.spring.aop.annotation.ShieldExecute)")
    private void shieldMethodPointcut() {}

    @Around("shieldMethodPointcut()")
    public Object shieldMethod(ProceedingJoinPoint joinPoint) throws Throwable {
        return null;
    }

}在ShieldAspect切面中添加了一个匹配所有由@ShieldExecute注解修饰的方法的切点shieldMethodPointcut(),然后定义了一个通知shieldMethod(),其会抑制shieldMethodPointcut()切点匹配到的方法的执行,如果方法有返回值,则固定返回null。
修改HelloController,如下所示。
@Slf4j
@RestController
public class HelloController {

    @Autowired
    private HelloService helloService;

    public static final String HELLO_WORLD = "Hello World";

    @RequestMapping(value = "/aop/v1/sayhello", method = RequestMethod.GET)
    public ResponseEntity<String> sayHelloV1(HttpServletRequest request) {
        log.info("interface /aop/v1/sayhello execute.");
        return new ResponseEntity<>(HELLO_WORLD, HttpStatus.CREATED);
    }

    @RequestMapping(value = "/aop/v2/sayhello", method = RequestMethod.GET)
    public ResponseEntity<String> sayHelloV2(HttpServletRequest request) {
        log.info("interface /aop/v2/sayhello execute.");
        return new ResponseEntity<>(helloService.sayHello(), HttpStatus.CREATED);
    }

    @GetMapping(value = "/aop/v3/sayhello")
    public ResponseEntity<String> sayHelloV3(HttpServletRequest request) {
        log.info("interface /aop/v3/sayhello execute.");
        return new ResponseEntity<>(HELLO_WORLD, HttpStatus.CREATED);
    }

    @GetMapping(value = "/aop/v4/sayhello")
    public ResponseEntity<HelloWorld> sayHelloV4(HttpServletRequest request) {
        log.info("interface /aop/v4/sayhello execute.");
        return new ResponseEntity<>(helloService.getHelloWorld(), HttpStatus.CREATED);
    }

    @GetMapping(value = "/aop/v5/sayhello")
    public ResponseEntity<String> sayHelloV5(HttpServletRequest request) {
        log.info("interface /aop/v5/sayhello execute.");
        return new ResponseEntity<>(helloService.sayHelloButThrowException(), HttpStatus.CREATED);
    }

    @GetMapping(value = "/aop/v6/sayhello")
    public ResponseEntity<String> sayHelloV6(HttpServletRequest request) {
        log.info("interface /aop/v6/sayhello execute.");
        helloService.justSayHello();
        return new ResponseEntity<>(HELLO_WORLD, HttpStatus.CREATED);
    }

}
整体工程的目录结构变更如下。
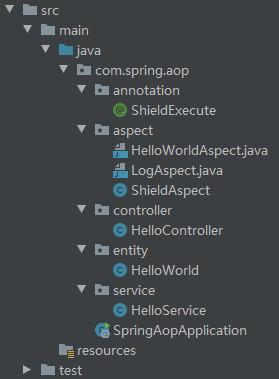
现在启动Springboot,并使用rest工具调用/aop/v6/sayhello接口,日志打印如下。

如上所示,抑制了HelloService的justSayHello()方法的执行。
根据ShieldAspect切面的实现可知,shieldMethod()环绕通知方法的第一个形参是ProceedingJoinPoint接口,其继承于JoinPoint,类图如下所示。
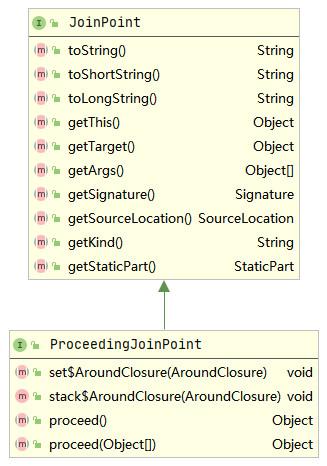
ProceedingJoinPoint接口的最重要的方法为proceed(),该方法的官方说明如下。
Proceed with the next advice or target method invocation.
即ProceedingJoinPoint的proceed()方法调用后,如果有其它的通知则执行其它的通知的逻辑,如果没有则执行目标方法。因此,只要不调用proceed()方法,就可以做到抑制目标方法的执行。相应的,环绕通知基于ProceedingJoinPoint的proceed()方法,可以完全决定在目标方法执行前后执行什么逻辑,以及完全决定目标方法是否执行,在什么情况下执行。
再自定义一个注解,如下所示。
@Target(ElementType.METHOD)
@Retention(RetentionPolicy.RUNTIME)
@Documented
public @interface EnhanceExecute {
}即期望所有由@EnhanceExecute注解修饰的方法在执行时可以实现一些增强的功能。现在编写一个EnhanceAspect切面,如下所示。
@Slf4j
@Aspect
@Component
public class EnhanceAspect {

    @Pointcut("@annotation(com.spring.aop.annotation.EnhanceExecute)")
    private void enhanceMethodPointcut() {}

    @Around("enhanceMethodPointcut()")
    public Object enhanceMethod(ProceedingJoinPoint joinPoint) throws Throwable {
        log.info("enhance before method execute.");
        Object proceed = joinPoint.proceed();
        log.info("enhance after method execute.");
        return proceed;
    }

}EnhanceAspect切面的enhanceMethod()通知会在所有由@EnhanceExecute注解修饰的方法执行前和执行后打印一些日志。现在为HelloService添加一个方法并由@EnhanceExecute注解修饰,如下所示。
@Slf4j
@Service
public class HelloService {

    public String sayHello() {
        log.info("method com.spring.aop.service.HelloService.sayHello execute.");
        return HelloController.HELLO_WORLD;
    }

    public HelloWorld getHelloWorld() {
        log.info("method com.spring.aop.service.HelloService.getHelloWorld execute.");
        return new HelloWorld();
    }

    public String sayHelloButThrowException() {
        log.info("method com.spring.aop.service.HelloService.sayHelloButThrowException execute.");
        throw new RuntimeException("Exception was thrown.");
    }

    @ShieldExecute
    public void justSayHello() {
        log.info(HelloController.HELLO_WORLD);
    }

    @EnhanceExecute
    public void continueSayHello() {
        log.info(HelloController.HELLO_WORLD);
    }

}修改HelloController,如下所示。
@Slf4j
@RestController
public class HelloController {

    @Autowired
    private HelloService helloService;

    public static final String HELLO_WORLD = "Hello World";

    @RequestMapping(value = "/aop/v1/sayhello", method = RequestMethod.GET)
    public ResponseEntity<String> sayHelloV1(HttpServletRequest request) {
        log.info("interface /aop/v1/sayhello execute.");
        return new ResponseEntity<>(HELLO_WORLD, HttpStatus.CREATED);
    }

    @RequestMapping(value = "/aop/v2/sayhello", method = RequestMethod.GET)
    public ResponseEntity<String> sayHelloV2(HttpServletRequest request) {
        log.info("interface /aop/v2/sayhello execute.");
        return new ResponseEntity<>(helloService.sayHello(), HttpStatus.CREATED);
    }

    @GetMapping(value = "/aop/v3/sayhello")
    public ResponseEntity<String> sayHelloV3(HttpServletRequest request) {
        log.info("interface /aop/v3/sayhello execute.");
        return new ResponseEntity<>(HELLO_WORLD, HttpStatus.CREATED);
    }

    @GetMapping(value = "/aop/v4/sayhello")
    public ResponseEntity<HelloWorld> sayHelloV4(HttpServletRequest request) {
        log.info("interface /aop/v4/sayhello execute.");
        return new ResponseEntity<>(helloService.getHelloWorld(), HttpStatus.CREATED);
    }

    @GetMapping(value = "/aop/v5/sayhello")
    public ResponseEntity<String> sayHelloV5(HttpServletRequest request) {
        log.info("interface /aop/v5/sayhello execute.");
        return new ResponseEntity<>(helloService.sayHelloButThrowException(), HttpStatus.CREATED);
    }

    @GetMapping(value = "/aop/v6/sayhello")
    public ResponseEntity<String> sayHelloV6(HttpServletRequest request) {
        log.info("interface /aop/v6/sayhello execute.");
        helloService.justSayHello();
        return new ResponseEntity<>(HELLO_WORLD, HttpStatus.CREATED);
    }

    @GetMapping(value = "/aop/v7/sayhello")
    public ResponseEntity<String> sayHelloV7(HttpServletRequest request) {
        log.info("interface /aop/v7/sayhello execute.");
        helloService.continueSayHello();
        return new ResponseEntity<>(HELLO_WORLD, HttpStatus.CREATED);
    }

}
整体工程的目录结构变更如下。
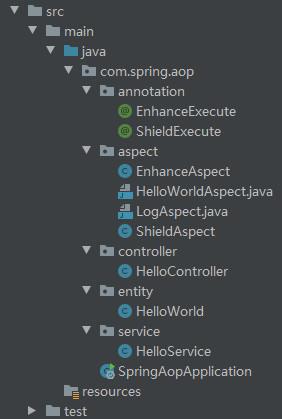
现在启动Springboot,并使用rest工具调用/aop/v7/sayhello接口,日志打印如下。

七. 统计接口访问次数实战
沿用第六小节的工程,注释掉ShieldAspect和EnhanceAspect切面。新增一个统计接口CountApi,如下所示。
public interface CountApi<T> {

    void count(T t);

}编写VisitCountService实现CountApi接口,如下所示。
@Slf4j
@Service
public class VisitCountService implements CountApi<HttpServletRequest> {

    private final Lock lock = new ReentrantLock();

    private final Map<String, Integer> countMap
            = new ConcurrentHashMap<>();

    @Override
    public void count(HttpServletRequest request) {
        lock.lock();
        try {
            String requestURI = request.getRequestURI();
            countMap.merge(requestURI, 1, Integer::sum);
            log.info(requestURI + " count is = " + countMap.get(requestURI));
        } finally {
            lock.unlock();
        }
    }

}现在编写一个切面VisitCountAspect,如下所示。
@Slf4j
@Aspect
@Component
public class VisitCountAspect {

    @Autowired
    private CountApi<HttpServletRequest> visitCountService;

    @Pointcut("execution(* com.spring.aop.controller..*.*(..))")
    private void allControllerMethodPointcut() {}

    @Before("allControllerMethodPointcut()")
    public void countVisit() {
        RequestAttributes attributes = RequestContextHolder.getRequestAttributes();
        if (attributes != null) {
            HttpServletRequest request = ((ServletRequestAttributes) attributes).getRequest();
            visitCountService.count(request);
        } else {
            log.warn("No request found.");
        }
    }

}
整体工程的目录结构变更如下。
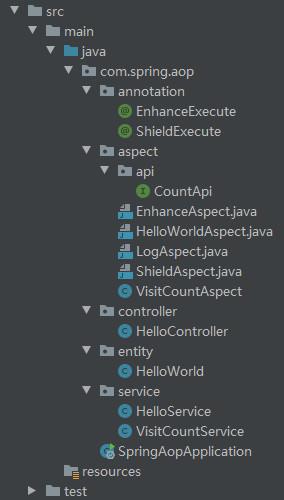
现在启动Springboot,并使用rest工具分别调用/aop/v1/sayhello接口和/aop/v3/sayhello接口三次,日志打印如下。

如上所示,可以成功统计每个接口的访问次数。
总结
SpringAOP主要关注于方法,实现对方法的拦截和调用。通过切点表达式定义出来的切点,可以精确或模糊的匹配到连接点即目标方法,再通过通知与切点组合就可以确定在哪些方法的哪些阶段执行哪些逻辑。
最后,深究切面的各种概念不如实际搭建一个工程编写一个切面,使用过切面后,理解就会变得逐渐深刻。
评论
登录后参与技术讨论,分享你的经验与见解。
登录 / 注册暂无评论