[源码向] 以小白视角构建react库

文章目录
build your own react
写在前边
- 创作本篇博客的初衷是,在浏览社区时发现了https://pomb.us/build-your-own-react/这篇宝藏文章,该博主基于react16之后的fiber架构实现了一套react的简易版本,非常有助于理解react工作原理。但是苦于只有英文版本,且偏向理论。
- 本着提升自我、贡献社区的理念。在此记录下学习历程,并尽自己微薄之力对重点部分(结合自己理解)进行翻译整理。希望对大家有所帮助。
- 内容比较多,所以篇幅会较分散,大家也可以主要看自己需要的部分。我会努力更新的!
零、准备工作
创建项目(自己命名),下载文件包
$ mkdir xxx
$ cd xxx
$ yarn init -y / npm init -y
$ yarn add react react-dom
建立如下目录结构
- src/
 - myReact/
  - index.js
 - index.html
 - main.jsx
初始化文件内容
//index.html
<!DOCTYPE html>
<html lang="en">
    <head>
        <meta charset="utf-8" />
        <meta name="viewport" content="width=device-width, initial-scale=1" />
        <title>React App</title>
    </head>
    <body>
        <div id="root"></div>
        <script src="main.jsx"></script>
    </body>
</html>


// main.jsx
import React from "./React/index";
import React from "react";
import ReactDom from "react-dom";
const App = () => {
    return <div title="oliver">Hello</div>;
};
ReactDom.render(<App />, document.getElementById("root"));

// myReact/index.js
export default {}
安装 parcel 用于打包和热更新
$ yarn add parcel-bundler
一、createElement的功能
功不可没的babel
// main.jsx
const element = (
  <div id="foo">
    <a>Hello</a>
    <span />
  </div>
)经过babel转译后的效果(使用plugin-transform-react-jsx插件,https://www.babeljs.cn/docs/babel-plugin-transform-react-jsx#both-runtimes):
const element = React.createElement(
  "div",    //type
  { id: "foo" },    //config
  React.createElement("a", null, "bar"),    //...children
  React.createElement("span")
)- babel的
plugin-transform-react-jsx做的事情很简单: 使用React.createElement函数来从处理.jsx文件中的jsx语法。 - 这也就是为什么在.jsx文件中必须
import React from "react"的原因啦,否则插件会找不到React对象的!
配置babel
tips:笔者本来也打算使用 plugin-transform-react-jsx 插件,但是在调试中遇到了问题。查找后才知道最新版本的插件已经不再是由 <h1>Hello World</h1> 到 React.createElement('h1', null, 'Hello world') 的简单转换了(具体见https://zh-hans.reactjs.org/blog/2020/09/22/introducing-the-new-jsx-transform.html),故退而求其次选择了功能类似的 transform-jsx
$ touch .babelrc
$ yarn add babel@transform-jsx
// .babelrc
{
"presets": ["es2015"],
"plugins": [
[
"transform-jsx",
{
"function": "OllyReact.createElement",
"useVariables": true
}
]
]
}$ parcel src/index.html此时页面中可以看到Hello字样,说明我们配置成功了!
动手实现createElement
transform-jsx 插件会将参数封装在一个对象中,传入createElement。
// myReact/index.js
export function createElement(args) {
  const { elementName, attributes, children } = args;
  return {
    type:elementName,
    props: {
      ...attributes,
      children
    }
  };
}
考虑到children中还可能包含基本类型如string,number。为了简化操作我们将这样的children统一使用 TEXT_ELEMENT 包裹。
// myReact/index.js
export function createElement(type, config, ...children) {
  return {
    type,
    props: {
      ...attributes,
      children: children.map((child) =>
                typeof child === "object" ? child : createTextElement(child)
            ),
    }
  };
}
function createTextElement(text) {
  return {
    type: "TEXT_ELEMENT",
    props: {
      nodeValue: text,
      children: [],
    },
  }
}
export default { createElement }
React并不会像此处这样处理基本类型节点,但我们这里这样做:因为这样可以简化我们的代码。毕竟这是一篇以功能而非细节为主的文章。
看看效果
首先为我们自己的库起个名字吧!
//.babelrc
{
    "presets": ["es2015"],
    "plugins": [
        [
            "@babel/plugin-transform-react-jsx",
            {
                "runtime": "automatic",
                "importSource": "OllyReact"
            }
        ]
    ]
}
引入时就使用自己写的名字吧!
// main.jsx
import OllyReact from "./myReact/index";
import ReactDom from "react-dom"
const element = (
    <div style="background: salmon">
        <h1>Hello World</h1>
        <h2 style="text-align:right">—Oliver</h2>
    </div>
);
ReactDom.render(element, document.getElementById("root"));此时页面上已经出现了Hello , 这证明我们的React.createElement已经基本实现了React的功能。
二、Render功能
接下来编写render函数。
目前我们只关注向DOM中添加内容。修改和删除功能将在后续添加。
// React/index.js
export function render(element, container) {}
export default {
  //...省略
  render
};
细节实现
注意:
本小节每一步内容主要参考思路即可,详细的逻辑顺序会在底部汇总。
首先使用对应的元素类型创建新DOM节点,并把该DOM节点加入股container中
const dom = document.createElement(element.type)
container.appendChild(dom)
然后递归地为每个child JSX元素执行相同的操作
  element.props.children.forEach(child =>
    render(child, dom)
  )
考虑到TEXT节点需要特殊处理
const dom =
    element.type == "TEXT_ELEMENT"
      ? document.createTextNode("")
      : document.createElement(element.type)
最后将元素的props分配给真实DOM节点
Object.keys(element.props)
        .filter(key => key !== "children")    // children属性要除去。
        .forEach(name => {
          dom[name] = element.props[name];
        });
汇总:
export function render(element, container) {
  const dom = element.type === "TEXT_ELEMENT"
    ? document.createTextNode("")
    : document.createElement(element.type);
  Object.keys(element.props)
        .filter(key => key !== "children")
        .forEach(name => {
          dom[name] = element.props[name];
        });
  element.props.children.forEach(child =>
    render(child, dom)
  );
  container.appendChild(dom);
}
看看效果
// main.jsx
import OllyReact from "./myReact/index";
const element = (
    <div style="background: salmon">
        <h1>Hello World</h1>
        <h2 style="text-align:right">—Oliver</h2>
    </div>
);
OllyReact.render(element, document.getElementById("root"));
此时看到我们的render函数也可以正常工作了!
小结
就是这样!现在,我们有了一个可以将JSX呈现到DOM的库(虽然它只支持原生DOM标签且不支持更新 QAQ)。
三、concurrent mode 并发模式
实际上,以上的递归调用是存在问题的。
- 这样的调用方式,一旦开始渲染,就不会停止,直到我们渲染了完整的元素树。如果元素树很大,则可能会阻塞主线程太长时间。
- 即使浏览器需要执行诸如处理用户输入等高优先级的工作,也必须等待渲染完成。
因此React16的concurrent模式实现了一种异步可中断的工作方式。它将把工作分解成几个小单元,完成每个单元后,如果需要执行其他任何操作,则让浏览器中断渲染。
workLoop
let nextUnitOfWork = null

function workLoop(deadline) {
  let shouldYield = false
  while (nextUnitOfWork && !shouldYield) {
    nextUnitOfWork = performUnitOfWork(
      nextUnitOfWork
    )
    shouldYield = deadline.timeRemaining() < 1
  }
  requestIdleCallback(workLoop)
}

requestIdleCallback(workLoop)

function performUnitOfWork(nextUnitOfWork) {
  // todo
}- 我们用
requestIdleCallback来做一个循环。可以将其requestIdleCallback视为一种异步任务,浏览器将在主线程空闲时运行回调,而不是告诉我们何时运行。 requestIdleCallback还为我们提供了截止日期参数。我们可以使用它来检查浏览器需要再次控制之前有多少时间。- 要开始使用循环,我们需要设置第一个工作单元,然后编写一个
performUnitOfWork函数。要求它不仅执行当前工作单元,并且要返回下一个工作单元。
四、Fiber
为了组织工作单元的结构,我们需要一棵 Fiber 树。
Fiber的功能
- 静态数据结构(虚拟dom)
- 作为架构:连接父、子、兄弟节点
- 作为工作单元
Fiber Tree组织形式
- 在render中创建一个
rootFiber节点,并将它作为第一个nextUnitOfWork(a instance of Fiber)传入 performUnitOfWork接受nextUnitOfWork作为参数并做三件事:- 将对应的fiber节点添加到DOM
- 创建该fiber节点的子fiber节点
- 选中下个工作单元
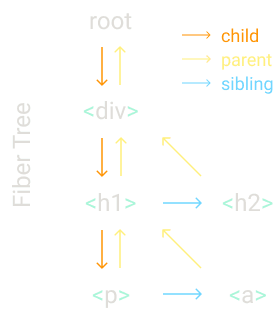
这样的数据结构的目的就在于更方便地找到下个工作单元:
- 当前Fiber的工作执行完毕后,如果
fiber.child!==null,则fiber.child节点将是下一个工作单元。 - 当前Fiber没有子节点,则
fiber.sibling!==null的情况下,fiber.sibling节点将是下一个工作单元。 - 当前Fiber节点
fiber.child===null && fiber.sibiling===null的情况下,fiber.parent节点的sibling节点将是下一个工作单元。 - 回到rootFiber证明完成了render工作。
重构代码
// 将render方法中创建DOM元素的逻辑抽离出来
function createDom(fiber) {
  const dom =
    fiber.type == "TEXT_ELEMENT"
      ? document.createTextNode("")
      : document.createElement(fiber.type)
  const isProperty = key => key !== "children"
  Object.keys(fiber.props)
    .filter(isProperty)
    .forEach(name => {
      dom[name] = fiber.props[name]
    })
  return dom
}

// 在render节点中初始化rootFiber根节点
export function render(element, container) {
    nextUnitOfWork = {  //rootFiber
    dom: container,
    props: {
      children: [element]
    },
  }
}

function workLoop() {...}
function performUnitOfWork(){
    //todo
}
requestIdleCallback(workLoop)改造完成后然后,当浏览器准备就绪时,它将调用我们workLoop,我们将开始在根目录上工作。
performUnitOfWork
功能1
function performUnitOfWork() {
  //******** 功能1:创建dom ********
  if (!fiber.dom) {  //为fiber节点绑定dom
    fiber.dom = createDom(fiber);
  }
  if (fiber.parent) {   //若存在父节点,则挂载到父节点下
    fiber.parent.dom.appendChild(fiber.dom);
  }
}
功能2
function performUnitOfWork() {
  ...
  //******** 功能2:为jsx元素的children创建fiber节点并连接 ********
  const elements = fiber.props.children;
  let index = 0;
  let prevSibling = null;

  while (index < elements.length) {
    const element = elements[index];
    const newFiber = {
      type: element.type,
      props: element.props,
      parent: fiber,
      dom: null,
    };
    if (index === 0) {  //第一个子fiber为children
      fiber.child = newFiber;
    } else {  //其他子fiber依次用sibling作连接
      prevSibling.sibling = newFiber;
    }

    prevSibling = newFiber;
    index++;
  }
}
功能3
function performUnitOfWork() {
  ...
  //******** 功能3:返回下一个工作单元 ********
  if (fiber.child) return fiber.child;  //子节点存在,则返回子节点
  let nextFiber = fiber;
  while (nextFiber) {   //子节点不存在则查找兄弟节点 or 父节点的兄弟节点
    if (nextFiber.sibling) {
      return nextFiber.sibling;
    }
    nextFiber = nextFiber.parent;
  }
}
五、render阶段 & commit阶段
这里我们还有一个问题。
由于每次在处理fiber时,都会创建DOM并插入一个新节点。并且fiber架构下的渲染是可打断的。这就造成了用户有可能看到不完整的UI。这不是我们想要的。
因此我们需要删除插入dom的操作。
function performUnitOfWork(fiber) {
  if (!fiber.dom) {
    fiber.dom = createDom(fiber)
  }
  // if (fiber.parent) {
  //  fiber.parent.dom.appendChild(fiber.dom)
  // }
  const elements = fiber.props.children
}
相反地,我们追踪 Fiber Tree 的根节点,称之为wipRoot
function render(element, container) {
  wipRoot = {
    dom: container,
    props: {
      children: [element],
    },
  }
  nextUnitOfWork = wipRoot
}
在 workLoop 完成后(不存在 nextUnitOfWork ),则使用 commitRoot 向 renderer 提交整棵 Fiber 树。
function workLoop() {
    ...
    if (!nextUnitOfWork && wipRoot) {
        commitRoot()
      }
    ...
}
使用commitWork来处理每一个工作单元
function commitRoot() {
  commitWork(wipRoot.child)
  wipRoot = null
}

function commitWork(fiber) {
  if (!fiber) {
    return
  }
  const domParent = fiber.parent.dom
  domParent.appendChild(fiber.dom)
  commitWork(fiber.child)
  commitWork(fiber.sibling)
}
六、Reconcilation 协调
到现在为止我们只实现了添加DOM,那么如何更新或删除呢?
这就是我们现在要做的:对比在render函数中接收的Fiber树与上一次提交的Fiber树的差异。
currentRoot
所以我们需要一个指针,指向上一次的Fiber树,不如称之为 currentRoot。
let currentRoot = null
function commitRoot() {
  commitWork(wipRoot.child)
  currentRoot = wipRoot
  wipRoot = null
}
alternate
在每个fiber节点数上,增加一个alternate属性,指向旧的fiber节点。
function render(element, container) {
  wipRoot = {
    dom: container,
    props: {
      children: [element],
    },
    alternate: currentRoot,
  }
  nextUnitOfWork = wipRoot
}
reconcileChildren
从performUnitOfWork中提取创建 Fiber 节点的代码,抽离成 reconcileChildren 方法。
在此方法中,我们将新jsx元素与旧Fiber节点进行 diff。
function reconcileChildren(fiber, elements) {
  let index = 0;
  let prevSibling = null;

  while (index < elements.length) {
    const element = elements[index];
    const newFiber = {
      type: element.type,
      props: element.props,
      parent: fiber,
      dom: null,
    };
    if (index === 0) {  //第一个子fiber为children
      fiber.child = newFiber;
    } else {  //其他子fiber依次用sibling作连接
      prevSibling.sibling = newFiber;
    }

    prevSibling = newFiber;
    index++;
  }
}
接下来是diff的详细过程,这里不再赘述。
七、函数组件支持
目标:
import OllyReact from "./myReact/index";

const App = () => {
  const element = (
    <div style="background: salmon">
      <h1>Hello World</h1>
      <h2 style="text-align:right">—Oliver</h2>
    </div>
  );
  return element;
};
OllyReact.render(<App/>, document.getElementById("root"));
函数组件与原生组件的主要区别:
Fiber节点上Fiber.dom为nullchildren需要执行函数组件才能得到,而不是直接从props里获取
函数组件的特殊处理
function performUnitOfWork() {
      const isFunctionComponent =
      fiber.type instanceof Function
      if (isFunctionComponent) {
        updateFunctionComponent(fiber)
      } else {
        updateHostComponent(fiber)
      }
      ...
}

function updateFunctionComponent(fiber) {
  const children = [fiber.type(fiber.props)];    // 通过执行函数组件,获得jsx元素
  reconcileChildren(fiber, children);
}

function updateHostComponent(fiber) {
  if (!fiber.dom) {
    fiber.dom = createDom(fiber);
  }
  reconcileChildren(fiber, fiber.props.children);
}

function commitWork() {
    ...
    let domParentFiber = fiber.parent;  //向上遍历,直到找到带有fiber.dom的父Fiber
    while (!domParentFiber.dom) {
      domParentFiber = domParentFiber.parent;
    }
    const domParent = domParentFiber.dom
}

function commitDeletion(fiber, domParent) { //在删除节点时,我们还需要继续操作,直到找到带有DOM节点的子节点为止。
  if (fiber.dom) {
    domParent.removeChild(fiber.dom);
  } else {
    commitDeletion(fiber.child, domParent);
  }
}
八、Hooks
经典的计数器
function Counter() {
  const [state, setState] = Didact.useState(1)
  return (
    <h1 onClick={() => setState(c => c + 1)}>
      Count: {state}
    </h1>
  )
}
const element = <Counter />
为Hook增加一些全局变量
let wipFiber = null
let hookIndex = null    //hooks下标

function updateFunctionComponent(fiber) {
  wipFiber = fiber
  hookIndex = 0
  wipFiber.hooks = []
  const children = [fiber.type(fiber.props)]
  reconcileChildren(fiber, children)
}
评论
登录后参与技术讨论,分享你的经验与见解。
登录 / 注册暂无评论