Django网站如何整合google账号登录

文章目录
要让用户在我们的django网站上用google账号登录,该功能可以通过django-allauth包实现。
如果没有安装可以通过以下命令安装:
pip install django-allauth配置
配置在django-allauth的官方文档已经写得很详细,参考这里:
https://django-allauth.readth...
在google APIs中创建证书
现在我们去 google developer console,
在左边的侧边栏,找到APIs & Services:
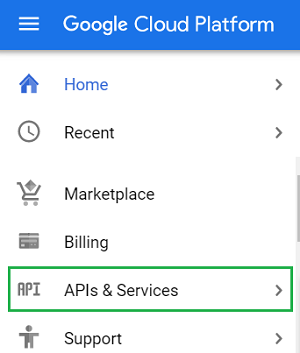
点击Credentials (证书)选项然后我们来到证书的页面: 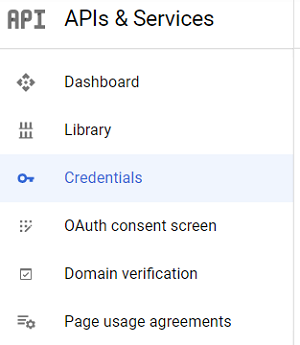
在该页的顶部,点击CREATE CREDENTIALS,并选择OAuth client ID创建证书: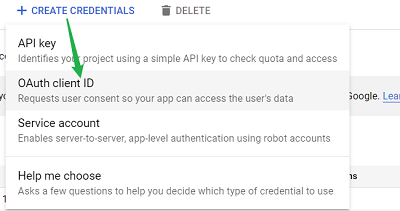
这里需要填写一个表单,有三个选项
- Name:
stdworkflow(该名字用于在控制面板中识别证书,不会对终端用户显示) - Authorized JavaScript origins:
https://stdworkflow.com(替换成你的域名) - Authorized redirect URIs:
https://stdworkflow.com/accounts/google/login/callback/(替换成你的域名,格式是一样的)
保存,完成。这时google会自动为你生成一个Client ID 和 Client secret.
将Client ID 和 Client secret 写入数据库
方法1: GUI手动添加
在我们的数据库中,django-allauth会为我们创建几个带有 socialaccount_前缀的表,我们需要修改其中的两个:
socialaccount_socialappsocialaccount_socialapp_sites
socialaccount_socialapp
| id | provider | name | client_id | secret | key |
|---|---|---|---|---|---|
| YOUR_CLIENT_ID | YOUR_CLENT_SECRET |
id: 不用填,由数据库自动生成(在后面socialaccount_socialapp_sites表中用得到)provider: Googlename: Googleclient_id: 前面在 APIs & Services中自动生成的 client_idsecret:前面在 APIs & Services中自动生成的client_secretkey: 不填
socialaccount_socialapp_sites
| id | socialapp_id | site_id |
|---|---|---|
| 1 (如果是第一个网站) | 1 |
id:不填,还是由数据库自动生成socialapp_id: 前面在socialaccount_socialapp 表中自动生成的pk/id(本例为1)site_id: 1 (通常)
现在,所有的配置都完成了,访问你的登陆页面,就会发现django-allauth自动添加了一个google的选项,点击可以通过google账号进行注册和登陆了。
方法2: 命令行的方式写入数据库
下面是一个完整的例子,可以参考分别将上面的数据写入 socialaccount_socialapp 和 socialaccount_socialapp_sites两个表:
[user@localhost]$ mysql -u root -p
Enter password:

mysql> use DATABASENAME; # repalce "DATABASENAME" with your database name
Reading table information for completion of table and column names
You can turn off this feature to get a quicker startup with -A

Database changed
mysql> insert into socialaccount_socialapp values (1, 'Google', 'Google', 'YOUR_CLIENT_ID', 'YOUR_CLENT_SECRET', '');
Query OK, 1 row affected (0.01 sec)

mysql>
mysql> insert into socialaccount_socialapp_sites values (1, 1, 1);
Query OK, 1 row affected (0.01 sec)

mysql> exit
Bye
评论
登录后参与技术讨论,分享你的经验与见解。
登录 / 注册暂无评论