30.SpringSecurity-使用JWT替换默认令牌

文章目录
前言
上一节我们已经讲解了token的基本配置,包括过期时间,密匙等。这一节主要讲解使用JWT替换默认的Token配置。
内容
1.JWT(Json Web Token)特点
JWT的全称是Json Web Token;Json开放的Token标准。 JWT的特点:
- 自包含:我们之前读取Spring-Security-oauth代码时候,在DefaultTokenServices里面创建令牌的时候:使用的是默认用UUID生成的Token

最后返回给接口的串是无意义的字符串,本身并不包含任何有意义信息,信息是单独存起来的,就像: 
当你用令牌去访问的时候,我们还需要根据这个令牌从存储redis里面读取出来信息,然后知道用户信息。这种令牌机制存在的特点会依赖一个存储。一旦存储出现问题,redis或者数据库挂掉了的话,你这个存储就毫无用处了。因为这个令牌本身不包含任何信息的。而JWT他的特点是自包含,这个令牌本身里面是有信息的。你拿到这个令牌之后,直接解析令牌就可以知道用户信息。而不需要从存储里面去读取任何信息。
- 密签:有人认为我这边jwt Token里面发送出去的信息被别人破解了,是不是就没有什么安全性了,首先,你放到token里面的东西应该不是业务关键的东西。你不能把用户密码放到token里面去,其次:你发出去的令牌可以用你指定的秘钥进行签名的,这里要强调他是签名,而不是加密。所谓的签名是防止别人去串改。你发出去的信息别人改动里面的信息时候你是可以知道的。jwt是一个标准,你发出去的信息是按照这个标准生成的。所有人都是可以看到里面的信息的。这也说明了我们不能把业务敏感信息放到token里面的原因。
- 可扩展:因为信息自包含,所以里面的信息你是可以自定义,可扩展的。
2.JWT(Json Web Token)替换到默认的token
我们在app工程的TokenStoreConfig里面配置我们的JWT。 我们不是加一个静态方法而是加一个静态类:JwtTokenConfig。我们需要在里面配置一系列bean。 Token存储bean。Jwt令牌Token转换bean
@Configuration
public class TokenStoreConfig {
    @Autowired
    private RedisConnectionFactory redisConnectionFactory;

    @Bean
    public TokenStore redisTokenStore(){
      return new RedisTokenStore(redisConnectionFactory);
    }

    @Configuration
    public static class JwtTokenConfig{

        @Autowired
        private SecurityProperties securityProperties;

        /**
         * 只负责token存储,不管token生成
         * @return
         */
        @Bean
        public TokenStore jwtTokenStore(){
          return new JwtTokenStore(jwtAccessTokenConverter());
        }

        /**
         * 负责token生成过程中的处理的
         * JwtAccessTokenConverter功能可以进行密签,就是进行签名。
         * @return
         */
        @Bean
        public JwtAccessTokenConverter jwtAccessTokenConverter(){
            JwtAccessTokenConverter accessTokenConverter = new JwtAccessTokenConverter();
            //1.设置签名秘钥
            accessTokenConverter.setSigningKey(securityProperties.getOauth2().getJwtSigningKey());
            return accessTokenConverter;
        }
    }
}
我们将秘钥配置放到:properties文件里面。
public class OAuth2Properties {
    /**
     * jwt密签,加密时候使用这个密签,解密时候也是使用这个密签
     * 自己一定要保存好,别人一旦知道你的秘钥,就可以签发你的jwt令牌,就可以随意进入你系统
     */
    private String jwtSigningKey = "yxm";

    private OAuth2ClientProperties[] clients = {};//默认空数组

    public OAuth2ClientProperties[] getClients() {
        return clients;
    }

    public void setClients(OAuth2ClientProperties[] clients) {
        this.clients = clients;
    }

    public String getJwtSigningKey() {
        return jwtSigningKey;
    }

    public void setJwtSigningKey(String jwtSigningKey) {
        this.jwtSigningKey = jwtSigningKey;
    }
}
3.TokenStore选取
从上面可以知道我们的tokenStore配置了两个,那么我们如何告诉系统,我们想用JwtTokenStore呢?所以我们就需要外加一些配置。
@Configuration
public class TokenStoreConfig {
    @Autowired
    private RedisConnectionFactory redisConnectionFactory;

    @Bean
    @ConditionalOnProperty(prefix = "yxm.security.oauth2",name = "storeType",havingValue = "redis")
    public TokenStore redisTokenStore(){
      return new RedisTokenStore(redisConnectionFactory);
    }

    @Configuration
    /**
     * 前缀(prefix):代表的是以"."隔开的配置文件中,最后一个点前面的所有字符串。
     * name:代表的是以"."隔开的配置文件中,最后一个点后面的字符串。
     */
    @ConditionalOnProperty(prefix = "yxm.security.oauth2",name = "storeType",havingValue = "jwt",matchIfMissing = true)
    public static class JwtTokenConfig{

        @Autowired
        private SecurityProperties securityProperties;

        /**
         * 只负责token存储,不管token生成
         * @return
         */
        @Bean
        public TokenStore jwtTokenStore(){
          return new JwtTokenStore(jwtAccessTokenConverter());
        }

        /**
         * 负责token生成过程中的处理的
         * JwtAccessTokenConverter功能可以进行密签,就是进行签名。
         * @return
         */
        @Bean
        public JwtAccessTokenConverter jwtAccessTokenConverter(){
            JwtAccessTokenConverter accessTokenConverter = new JwtAccessTokenConverter();
            //1.设置签名秘钥
            accessTokenConverter.setSigningKey(securityProperties.getOauth2().getJwtSigningKey());
            return accessTokenConverter;
        }
    }
}- 前缀(prefix):代表的是以"."隔开的配置文件中,最后一个点前面的所有字符串。
- name:代表的是以"."隔开的配置文件中,最后一个点后面的字符串。
- matchIfMissing=true:说明假如我们没有配置:yxm.security.oauth2.storeType 那么默认会启用此注解修饰的配置。
- 整体含义:当属性配置文件中:yxm.security.oauth2.storeType的值是:jwt时候;jwt配置就会生效。
4.MyAuthorizationServerConfig中endpoints配置
因为我们在TokenStoreConfig多配置了一个bean,所以我们需要将其加入到认证服务器配置上去。
@Configuration
@EnableAuthorizationServer
public class MyAuthorizationServerConfig extends AuthorizationServerConfigurerAdapter {
    @Autowired
    private AuthenticationManager authenticationManager;

    @Autowired
    private UserDetailsService userDetailsService;

    @Autowired
    private SecurityProperties securityProperties;

    @Autowired
    private TokenStore redisTokenStore;

    @Autowired(required = false) //因为这个类在JwtTokenConfig有效情况下才有效
    private JwtAccessTokenConverter jwtAccessTokenConverter;

    @Override
    public void configure(AuthorizationServerEndpointsConfigurer endpoints) throws Exception {
        /**
         * 系统端点配置:endpoints
         * 1.使用我们自己的授权管理器(AuthenticationManager)和自定义的用户详情服务(UserDetailsService)
         */
         endpoints.tokenStore(redisTokenStore)
                 .authenticationManager(authenticationManager)
                 .userDetailsService(userDetailsService);

         if(jwtAccessTokenConverter != null){
             endpoints.accessTokenConverter(jwtAccessTokenConverter);
         }
    }

    @Override
    public void configure(ClientDetailsServiceConfigurer clients) throws Exception {
        /**
         * 系统第三方客户端配置:
         * 所谓的客户端就是有哪些应用会访问我们的系统,
         * 我们的认证服务器会决定给哪些第三方应用client去发送令牌。
         * 如果这个配置后我们之前配置文件中配置的clientId和clientSecret将不会起作用了
         */
        //目前我们的应用场景是在我们的app和我们的前端;我们不允许第三方来注册,所以用内存
       /* clients.inMemory().withClient("yxm")
                .secret("yxmsecret")
                .accessTokenValiditySeconds(7200)//发出去的令牌,有效期是多少? 这里设置为2小时
                .authorizedGrantTypes("refresh_token","password")//针对当前应用客户端:yxm,所能支持的授权模式是哪些?之前设置有4种类加上刷新总共5种:这里只支持配置的:"refresh_token","password"。
                .scopes("all","read","write")//发出去的权限有哪些?之前前端请求携带了scoope,此配置的scope用来指定前端发送scope的值必须在配置的里面或者不携带scope;默认为此处配置的scope
                .and()
                .withClient("startshineye")
                .secret("startshineyesecret")
                .accessTokenValiditySeconds(3600)
                .authorizedGrantTypes("password")
                .scopes("read");*/
        InMemoryClientDetailsServiceBuilder builder = clients.inMemory();
        if(ArrayUtils.isNotEmpty(securityProperties.getOauth2().getClients())) {//判断我们的配置是否为空
            for (OAuth2ClientProperties client:securityProperties.getOauth2().getClients()){
                builder.withClient(client.getClientId())
                        .secret(client.getClientSecret())
                        .accessTokenValiditySeconds(client.getAccessTokenValiditySeconds())
                        .authorizedGrantTypes("refresh_token", "authorization_code", "password")
                        .scopes("all");
            }
        }
    }
}
5.测试
5.1 获取JwtAccessToken
我们使用password测试: 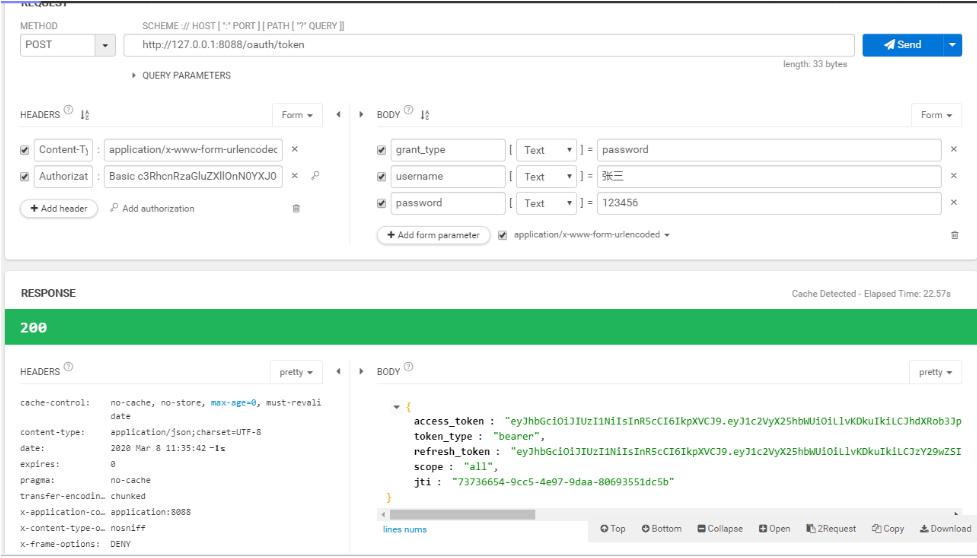
{
"access_token": "eyJhbGciOiJIUzI1NiIsInR5cCI6IkpXVCJ9.eyJ1c2VyX25hbWUiOiLlvKDkuIkiLCJhdXRob3JpdGllcyI6WyJhZG1pbiIsIlJPTEVfVVNFUiJdLCJqdGkiOiI3MzczNjY1NC05Y2M1LTRlOTctOWRhYS04MDY5MzU1MWRjNWIiLCJjbGllbnRfaWQiOiJzdGFydHNoaW5leWUiLCJzY29wZSI6WyJhbGwiXX0.WlBgeBkU5giUQWeDZqAAMF8i-8DrvqvdT7TglwsBzsE",
"token_type": "bearer",
"refresh_token": "eyJhbGciOiJIUzI1NiIsInR5cCI6IkpXVCJ9.eyJ1c2VyX25hbWUiOiLlvKDkuIkiLCJzY29wZSI6WyJhbGwiXSwiYXRpIjoiNzM3MzY2NTQtOWNjNS00ZTk3LTlkYWEtODA2OTM1NTFkYzViIiwiZXhwIjoxNTg2MjMwNTQyLCJhdXRob3JpdGllcyI6WyJhZG1pbiIsIlJPTEVfVVNFUiJdLCJqdGkiOiJjNGM4MDlmYi0zNjFkLTRkNzYtOGU5Zi1hOTY5ZGI2MmVlOGIiLCJjbGllbnRfaWQiOiJzdGFydHNoaW5leWUifQ.VrrLpj24xLefgYd6j1ALfCRAghBoVHEfkKBMQb2veO8",
"scope": "all",
"jti": "73736654-9cc5-4e97-9daa-80693551dc5b"
}
之前我们说过,jwtToken是包含信息的:
我们进入网站:https://jwt.io/输入我们的jwtAccessToken
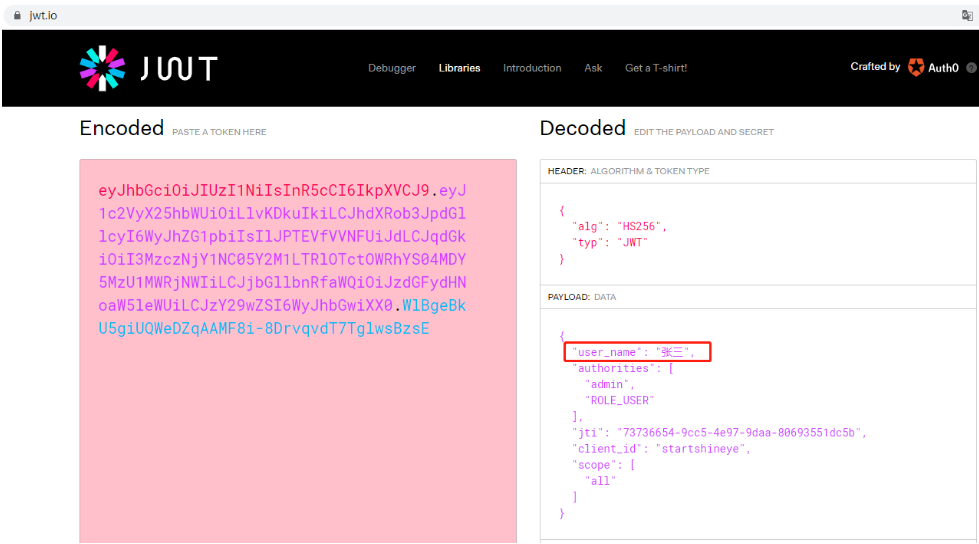
5.2 使用获取到的JwtAccessToken去请求接口
我们用户的me接口如下:
@GetMapping("/me")
public Object me(@AuthenticationPrincipal UserDetails user){
 return user;
}
curl -i -X GET \
-H "Authorization:bearer eyJhbGciOiJIUzI1NiIsInR5cCI6IkpXVCJ9.eyJleHAiOjE1ODM2NDcwNTEsInVzZXJfbmFtZSI6IuW8oOS4iSIsImF1dGhvcml0aWVzIjpbImFkbWluIiwiUk9MRV9VU0VSIl0sImp0aSI6IjI5OGJhZDdkLThjZmUtNDIyZC1hZTg2LTgzN2U3Nzk2MjNmNiIsImNsaWVudF9pZCI6Inl4bSIsInNjb3BlIjpbImFsbCJdfQ.wPKwjJzT-EJ6BAZOSaAQwBBFBZKwrkmT2ymbkp_mdLA" \
'http://127.0.0.1:8088/user/me'请求示例: 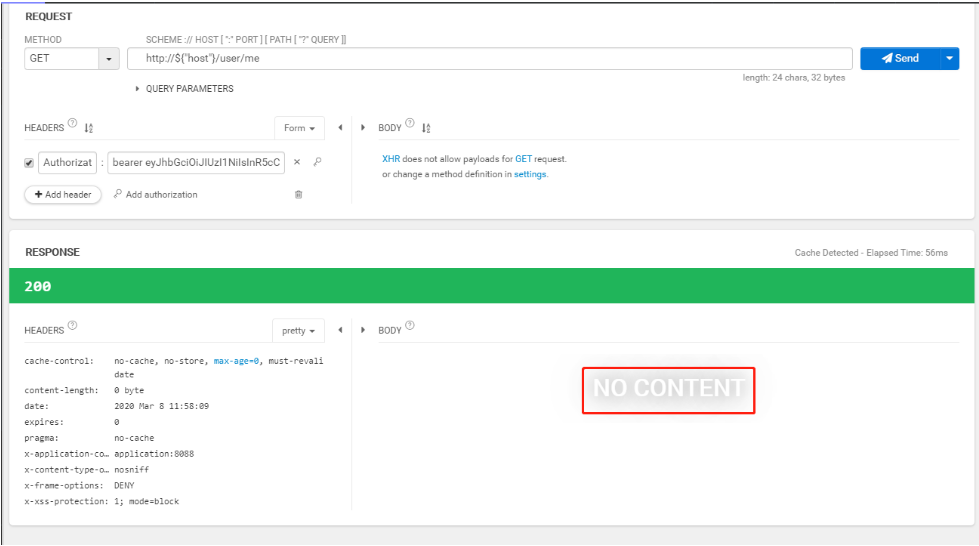
我们发现返回的是NO CONTENT
分析:
@GetMapping("/me")
public Object me(@AuthenticationPrincipal UserDetails user){
    return user;
}
现在的Authentication对象里面的Principal并不是一个UserDetails,而是一个字符串 所以获取不到值
我们修改:
@GetMapping("/me")
public Object me(Authentication user){
    return user;
}
我们再次请求:获取的结果为:
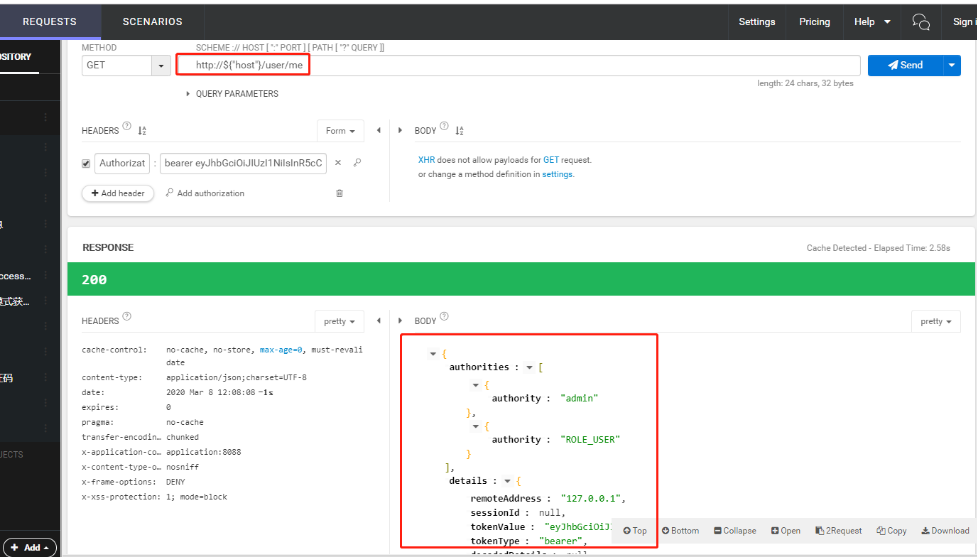
我们发现返回的Authentication并不是按照我们之前在jwt.io里面解码成的payload:
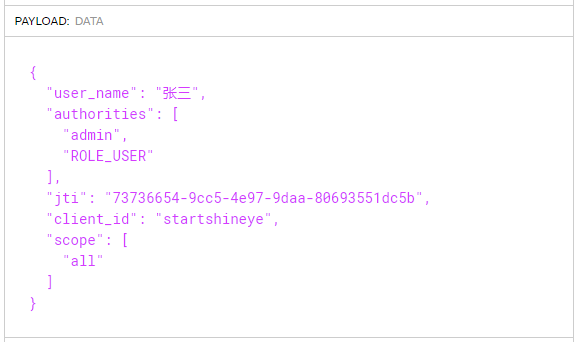
6.JwtToken-可扩展
针对于JwtToken-可扩展,我们在TokenStoreConfig下的JwtTokenConfig配置TokenEnhancer
他是一个接口,我们需要自己实现。
public class MyJwtTokenEnhancer implements TokenEnhancer {

    @Override
    public OAuth2AccessToken enhance(OAuth2AccessToken accessToken, OAuth2Authentication authentication) {
        Map<String,Object> info = new HashMap<>();
        info.put("company","alibaba");
        /**
         * 往accessToken里面添加额外信息
         */
        ((DefaultOAuth2AccessToken)accessToken).setAdditionalInformation(info);
        return accessToken;
    }
}
写完上面类之后,我们把它配置到Spring容器里面。注解: @ConditionalOnMissingBean(name="jwtTokenEnhancer")//业务系统自己可以添加一个:jwtTokenEnhancer来覆盖此定义的增强器。
@Configuration
public class TokenStoreConfig {
    @Autowired
    private RedisConnectionFactory redisConnectionFactory;

    @Bean
    @ConditionalOnProperty(prefix = "yxm.security.oauth2",name = "storeType",havingValue = "redis")
    public TokenStore redisTokenStore(){
      return new RedisTokenStore(redisConnectionFactory);
    }

    @Configuration
    /**
     * 前缀(prefix):代表的是以"."隔开的配置文件中,最后一个点前面的所有字符串。
     * name:代表的是以"."隔开的配置文件中,最后一个点后面的字符串。
     */
    @ConditionalOnProperty(prefix = "yxm.security.oauth2",name = "storeType",havingValue = "jwt",matchIfMissing = true)
    public static class JwtTokenConfig{

        @Autowired
        private SecurityProperties securityProperties;

        /**
         * 只负责token存储,不管token生成
         * @return
         */
        @Bean
        public TokenStore jwtTokenStore(){
          return new JwtTokenStore(jwtAccessTokenConverter());
        }

        /**
         * 负责token生成过程中的处理的
         * JwtAccessTokenConverter功能可以进行密签,就是进行签名。
         * @return
         */
        @Bean
        public JwtAccessTokenConverter jwtAccessTokenConverter(){
            JwtAccessTokenConverter accessTokenConverter = new JwtAccessTokenConverter();
            //1.设置签名秘钥
            accessTokenConverter.setSigningKey(securityProperties.getOauth2().getJwtSigningKey());
            return accessTokenConverter;
        }

        @Bean
        @ConditionalOnMissingBean(name="jwtTokenEnhancer")//业务系统自己可以添加一个:jwtTokenEnhancer来覆盖
        public TokenEnhancer jwtTokenEnhancer(){
          return new MyJwtTokenEnhancer();
        }
    }
}
7.将增强器配置到认证服务器中
- 由于我们之前通过DefaultTokenService创建的AccessToken默认是通过UUID来创建的,并且主框架没有给我们提供共有的(public)创建accessToken方法。
- 创建的默认方法: private OAuth2AccessToken createAccessToken(OAuth2Authentication authentication, OAuth2RefreshToken refreshToken),所以我们只能在endpoints里面配置增强器。
- 我们只需要配置endpoints
@Configuration
@EnableAuthorizationServer
public class MyAuthorizationServerConfig extends AuthorizationServerConfigurerAdapter {
    @Autowired
    private AuthenticationManager authenticationManager;

    @Autowired
    private UserDetailsService userDetailsService;

    @Autowired
    private SecurityProperties securityProperties;

    @Autowired
    private TokenStore redisTokenStore;

    @Autowired(required = false) //因为这个类在JwtTokenConfig有效情况下才有效
    private JwtAccessTokenConverter jwtAccessTokenConverter;

    @Autowired(required = false)
    private TokenEnhancer jwtTokenEnhancer;

    @Override
    public void configure(AuthorizationServerEndpointsConfigurer endpoints) throws Exception {
        /**
         * 系统端点配置:endpoints
         * 1.使用我们自己的授权管理器(AuthenticationManager)和自定义的用户详情服务(UserDetailsService)
         */
         endpoints.tokenStore(redisTokenStore)
                 .authenticationManager(authenticationManager)
                 .userDetailsService(userDetailsService);

         if(jwtAccessTokenConverter != null && jwtTokenEnhancer != null){
             /**
              * 1.由于我们之前通过DefaultTokenService创建的AccessToken默认是通过UUID来创建的,并且主框架没有给我们提供共有的创建accessToken方法
              * 2.创建的默认方法: private OAuth2AccessToken createAccessToken(OAuth2Authentication authentication, OAuth2RefreshToken refreshToken),
              * 所以我们智能在endpoints里面配置增强器。
              * 3.为了满足1,2;我们需要创建增强器链,来将jwtAccessTokenConverter和jwtTokenEnhancer连接起来。
              */
             TokenEnhancerChain enhancerChain = new TokenEnhancerChain();
              List<TokenEnhancer> enhancers = new ArrayList<>();
             enhancers.add(jwtTokenEnhancer);
             enhancers.add(jwtAccessTokenConverter);
             endpoints
                     .tokenEnhancer(enhancerChain)
                     .accessTokenConverter(jwtAccessTokenConverter);
         }
    }
我们再次启动下服务:
然后访问获取accessToken: 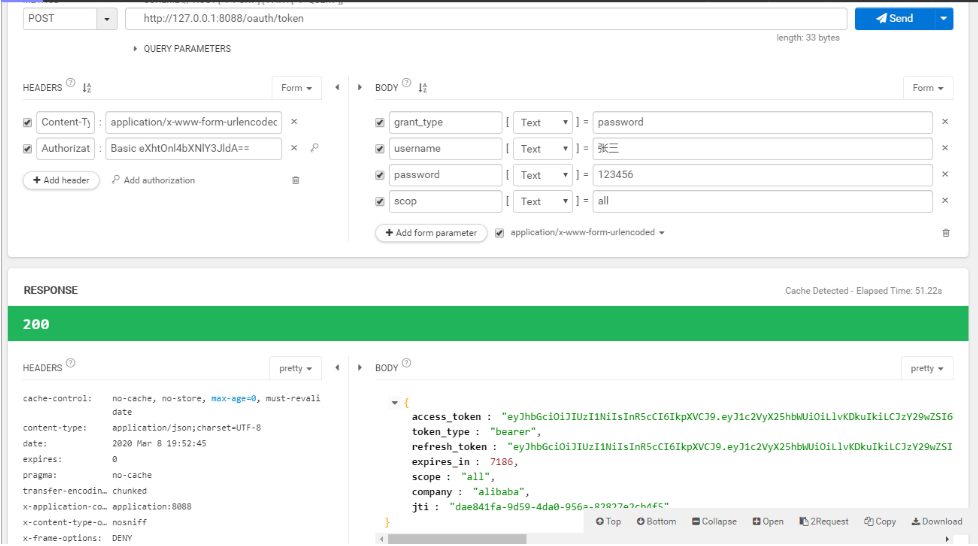
然后我们拿着access_token去jwt.io网站去查找:
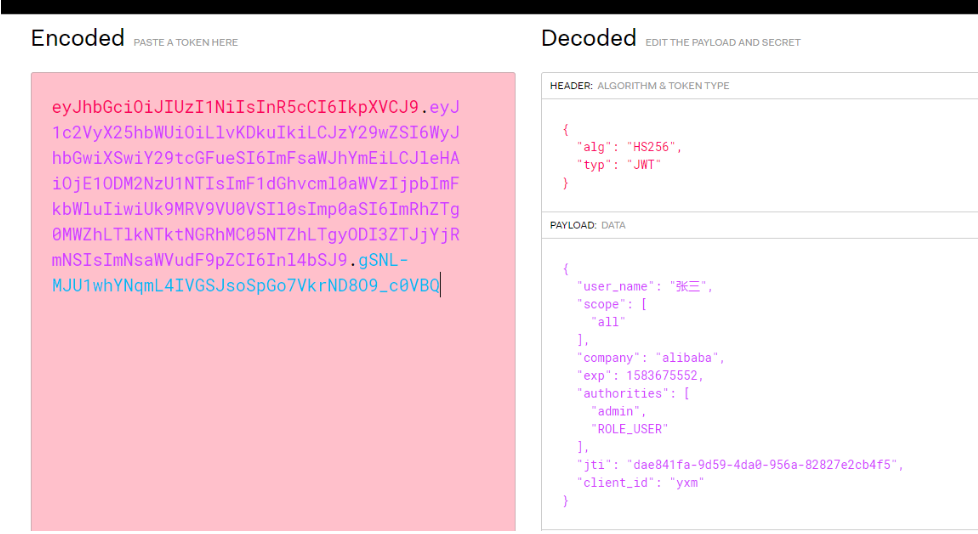
eyJhbGciOiJIUzI1NiIsInR5cCI6IkpXVCJ9.eyJ1c2VyX25hbWUiOiLlvKDkuIkiLCJzY29wZSI6WyJhbGwiXSwiY29tcGFueSI6ImFsaWJhYmEiLCJleHAiOjE1ODM2NzU1NTIsImF1dGhvcml0aWVzIjpbImFkbWluIiwiUk9MRV9VU0VSIl0sImp0aSI6ImRhZTg0MWZhLTlkNTktNGRhMC05NTZhLTgyODI3ZTJjYjRmNSIsImNsaWVudF9pZCI6Inl4bSJ9.gSNL-MJU1whYNqmL4IVGSJsoSpGo7VkrND8O9_c0VBQ然后我们携带我们的access_token去获取Authentication信息。 
我们可以发现:返回的Authentication数据字段里面没有company信息,原因是因为:我们的增强是在Authentication生成之后进行的增强、Spring只会管理JwtToken标准的形式,不会改变你自定义的数据格式。如果需要自定义我们的数据格式,我们需要:在Authentication里面单独添加信息。
8.解析JwtToken,将数据封装到Authentication返回
做这个事情的时候,我们需要添加一个依赖;就是之前https://jwt.io/对应的网站包依赖
- 添加依赖(spring-security-demo)
<!--添加JWT依赖-->
<dependency>
    <groupId>io.jsonwebtoken</groupId>
    <artifactId>jjwt</artifactId>
    <version>0.7.0</version>
</dependency>- 解密验签:我们在解密验签时候使用下面utf-8形式:
//2.解密获取用户信息
Claims claims = Jwts.parser().setSigningKey(securityProperties.getOauth2().getJwtSigningKey().getBytes("UTF-8")).parseClaimsJws(token).getBody();
原因是因为Jwts设置SigningKey默认不是utf-8的格式
而我们在JwtAccessTokenConverter的时候是使用utf-8格式的。
@Bean
public JwtAccessTokenConverter jwtAccessTokenConverter(){
    JwtAccessTokenConverter accessTokenConverter = new JwtAccessTokenConverter();
    //1.设置签名秘钥-----默认是按照utf-8格式的
    accessTokenConverter.setSigningKey(securityProperties.getOauth2().getJwtSigningKey());
    return accessTokenConverter;
}
我们重启服务尝试一下:
先获取令牌:

根据令牌我们获取用户信息: 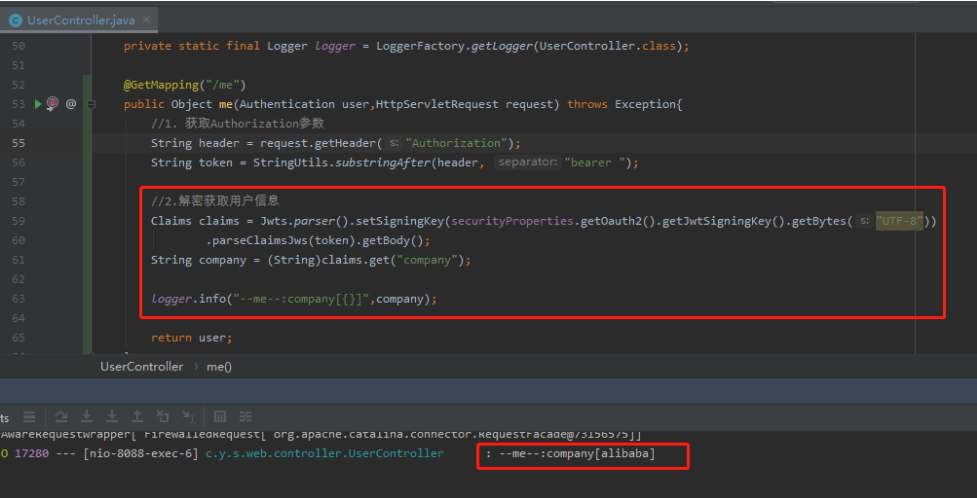
9.令牌刷新
从expires_in": 7199我们知道令牌的失效时间是:接近2小时,一旦在2小时之后访问时候,用户访问将会失效。我们不能让用户总是登录,重新获取令牌。
我们获取令牌时候,会返回一个refresh_token
- 我们先获取token
- 根据我们获取的token为参数获取refresh_token
curl -i -X POST \
   -H "Content-Type:application/x-www-form-urlencoded" \
   -H "Authorization:Basic eXhtOnl4bXNlY3JldA==" \
   -d "grant_type=refresh_token" \
   -d "refresh_token=eyJhbGciOiJIUzI1NiIsInR5cCI6IkpXVCJ9.eyJ1c2VyX25hbWUiOiLlvKDkuIkiLCJzY29wZSI6WyJhbGwiXSwiYXRpIjoiZDU5Yzk1ZWYtZTVlNC00ZDhhLWI1MDUtNWM2ZjMwYmRiOGEwIiwiY29tcGFueSI6ImFsaWJhYmEiLCJleHAiOjE1ODYyNjg5MDcsImF1dGhvcml0aWVzIjpbImFkbWluIiwiUk9MRV9VU0VSIl0sImp0aSI6IjE5YjlmODZjLWJkZDItNGRjNi04NzkzLWVlYTRhYWZlMzFhOSIsImNsaWVudF9pZCI6Inl4bSJ9.PZyZ-2S3JfJwJdAb2dL4orIuFc0Mjc9v-9QqZx7jPN8" \
   -d "scop=all" \
 'http://127.0.0.1:8088/oauth/token'
此时我们就会再次获取到对应有效时间为2小时的token 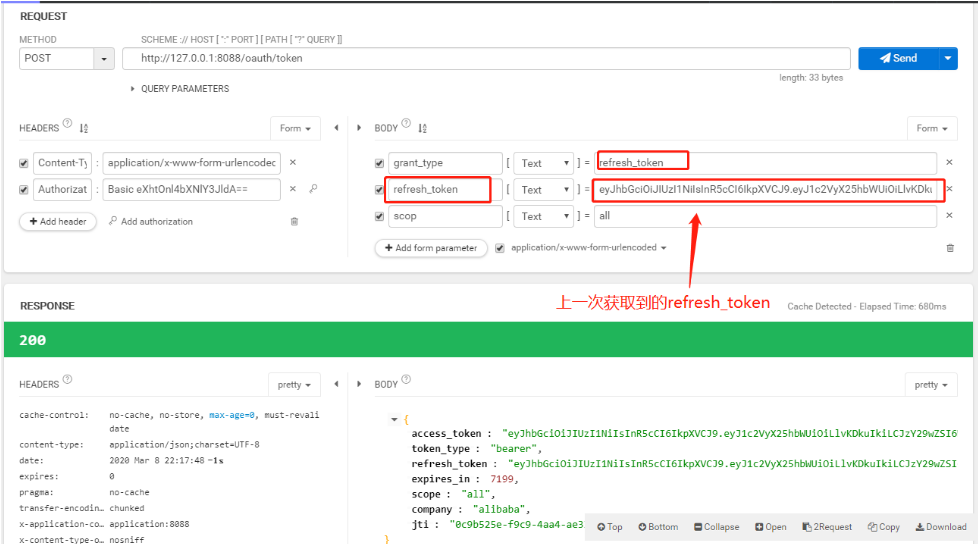
评论
登录后参与技术讨论,分享你的经验与见解。
登录 / 注册暂无评论