分享一波第三方登录的案例
我这里使用支付宝登录(其他的基本一样)
步骤
1.导入依赖
<?xml version="1.0" encoding="UTF-8"?>
<project xmlns="http://maven.apache.org/POM/4.0.0" xmlns:xsi="http://www.w3.org/2001/XMLSchema-instance"
         xsi:schemaLocation="http://maven.apache.org/POM/4.0.0 https://maven.apache.org/xsd/maven-4.0.0.xsd">
    <modelVersion>4.0.0</modelVersion>
    <parent>
        <groupId>org.springframework.boot</groupId>
        <artifactId>spring-boot-starter-parent</artifactId>
        <version>2.3.1.RELEASE</version>
        <relativePath/> <!-- lookup parent from repository -->
    </parent>
    <groupId>com.huacheng</groupId>
    <artifactId>demo</artifactId>
    <version>0.0.1-SNAPSHOT</version>
    <name>demo</name>
    <description>Demo project for Spring Boot</description>

    <properties>
        <java.version>1.8</java.version>
    </properties>

    <dependencies>
        <dependency>
            <groupId>org.springframework.boot</groupId>
            <artifactId>spring-boot-starter-web</artifactId>
        </dependency>

        <dependency>
            <groupId>org.projectlombok</groupId>
            <artifactId>lombok</artifactId>
            <optional>true</optional>
        </dependency>
        <dependency>
            <groupId>org.springframework.boot</groupId>
            <artifactId>spring-boot-starter-test</artifactId>
            <scope>test</scope>
        </dependency>

        <!--第三方登录工具包-->
        <dependency>
            <groupId>me.zhyd.oauth</groupId>
            <artifactId>JustAuth</artifactId>
            <version>1.15.6</version>
        </dependency>

        <!--支付宝SDK-->
        <dependency>
            <groupId>com.alipay.sdk</groupId>
            <artifactId>alipay-sdk-java</artifactId>
            <version>3.7.4.ALL</version>
        </dependency>
    </dependencies>


</project>
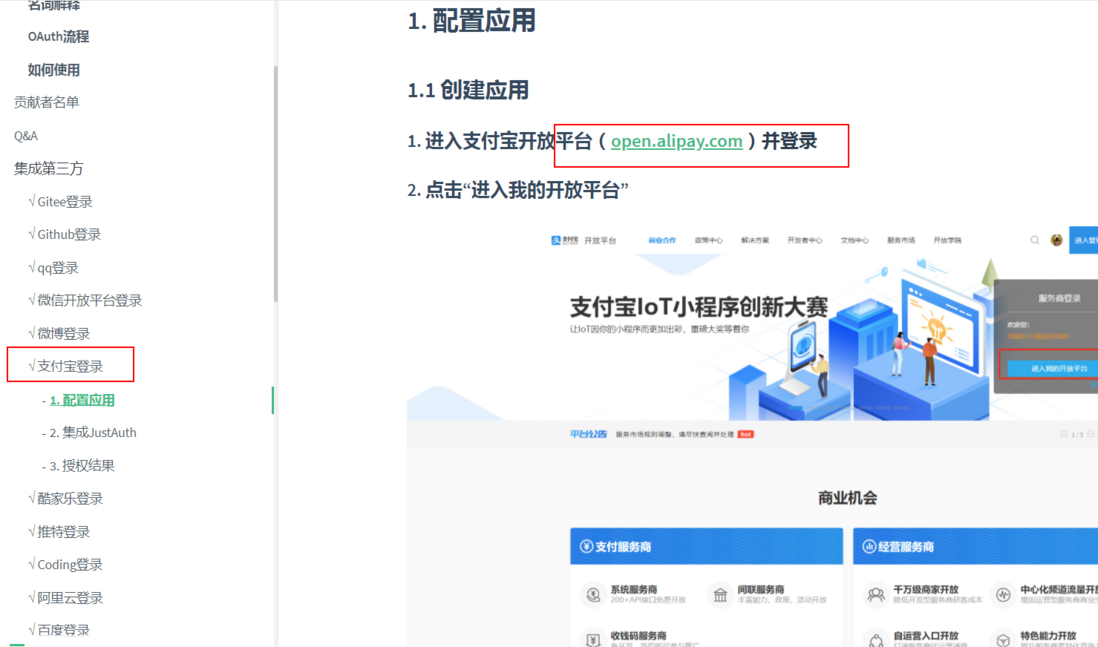
2.去文档看《支付宝登录》(截图如下),按着步骤来,可能有点复杂,耐心点,我就是傻瓜式搞的
主要记录下这四个东西
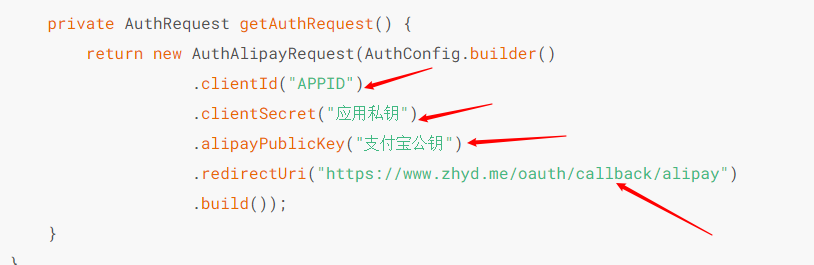
3.新建一个配置类去放那四个东西(这一步可省略,我装逼就写了,没有可以直接复制来就得了)
package com.huacheng.config;


import lombok.Data;
import org.springframework.boot.context.properties.ConfigurationProperties;

@Data
@ConfigurationProperties(prefix = "hc.oa")
public class AuthAlipayProperties {

    private String clientId;
    private String clientSecret;
    private String alipayPublicKey;
    private String redirectUri;
}
4.application.yml配置文件内容
server:
  port: 8443


hc:
  oa:
    #APPID
    clientId: 你申请的APPID
    #应用私钥
    clientSecret: 你申请的应用私钥
    #支付宝公钥
    alipayPublicKey: 你申请的支付宝公钥

    #授权回调地址(我随便写了个地址)
    redirectUri: https://www.jianshu.com/
5.在启动类引入配置类
@EnableConfigurationProperties({AuthAlipayProperties.class})
6.控制器测试
package com.huacheng.controller;


import com.huacheng.config.AuthAlipayProperties;
import me.zhyd.oauth.config.AuthConfig;
import me.zhyd.oauth.model.AuthCallback;
import me.zhyd.oauth.request.AuthAlipayRequest;
import me.zhyd.oauth.request.AuthRequest;
import me.zhyd.oauth.utils.AuthStateUtils;
import org.springframework.beans.factory.annotation.Autowired;
import org.springframework.web.bind.annotation.RequestMapping;
import org.springframework.web.bind.annotation.RestController;

import javax.servlet.http.HttpServletResponse;
import java.io.IOException;

@RestController
@RequestMapping("/oauth")
public class AuthAlipayController {

    //配置文件
    @Autowired
    private AuthAlipayProperties prop;

    @RequestMapping("/render")
    public void renderAuth(HttpServletResponse response) throws IOException {
        AuthRequest authRequest = getAuthRequest();
        response.sendRedirect(authRequest.authorize(AuthStateUtils.createState()));
    }

    @RequestMapping("/callback")
    public Object login(AuthCallback callback) {
        AuthRequest authRequest = getAuthRequest();
        return authRequest.login(callback);
    }

    private AuthRequest getAuthRequest() {
        return new AuthAlipayRequest(AuthConfig.builder()
                .clientId(prop.getClientId())
                .clientSecret(prop.getClientSecret())
                .alipayPublicKey(prop.getAlipayPublicKey())
                .redirectUri(prop.getRedirectUri())
                .build());
    }
}
7.浏览器访问地址

评论
登录后参与技术讨论,分享你的经验与见解。
登录 / 注册暂无评论