步步向前之vue

文章目录
疑难杂症
全局使用axios
结合
vue-axios使用import axios from 'axios' import VueAxios from 'vue-axios' Vue.use(VueAxios,axios); getNewsList(){ this.axios.get('api/getNewsList').then((response)=>{ this.newsList=response.data.data; }).catch((response)=>{ console.log(response); }) },axios 改写为 Vue 的原型属性
首先在主入口文件
main.js中引用,之后挂在vue的原型链上import axios from 'axios' Vue.prototype.$ajax= axios在组件中使用
   this.$ajax.get('api/getNewsList').then((response)=>{
           this.newsList=response.data.data;
         }).catch((response)=>{
           console.log(response);
         })
结合
Vuex的action在
vuex的仓库文件store.js中引用,使用action添加方法import Vue from 'Vue' import Vuex from 'vuex' import axios from 'axios' Vue.use(Vuex) const store = new Vuex.Store({ // 定义状态 state: { user: { name: 'xiaoming' } }, actions: { // 封装一个 ajax 方法 login (context) { axios({ method: 'post', url: '/user', data: context.state.user }) } } }) export default store在组件中发送请求的时候,需要使用
this.$store.dispatchmethods: { submitForm () { this.$store.dispatch('login') } }
Vue中的图片资源的引入
css、template中的图片静态路径可正常写入,webpack可正常打包js即放在script中的图片路径必须使用require引入,否则webpack打包时将无法识别这些资源,包括template中v-bind或:绑定的值,例如:data () { return { slides: { src: require('../assets/slideShow/pic1.jpg'), //require title: 'xxx1', href: 'detail/analysis' } } }
设置props默认值报错
父子组件的值的传递在vue中很常用到,设置props的默认值时会遇到以下错误:
props: {
    selections: {
      type: Array,
      default: [{
        label: 'test',
        value: 0
      }]
    }
}报错: Props with type Object/Array must use a factory function to return the defaut value
翻译过来就是 对象或数组的属性默认值必须以一个工厂函数返回
也就是类似组件中data声明一样
data () {
    return {
    }
}
以上属性值应修改为:
props: {
    selections: {
      type: Array,
      default () {
        return [{
          label: 'test',
          value: 0
        }]
      }
    }
  }
使用事件抛出一个值$event 实现子组件向父组件传值
有的时候用一个事件来抛出一个特定的值是非常有用的。例如我们可能想让 <blog-post> 组件决定它的文本要放大多少。这时可以使用 $emit 的第二个参数来提供这个值:
<button v-on:click="$emit('enlarge-text', 0.1)">
  Enlarge text
</button>
然后当在父级组件监听这个事件的时候,我们可以通过 $event 访问到被抛出的这个值:
<blog-post
  ...
  v-on:enlarge-text="postFontSize += $event"
></blog-post>
或者,如果这个事件处理函数是一个方法:
<blog-post
  ...
  v-on:enlarge-text="onEnlargeText"
></blog-post>
那么这个值将会作为第一个参数传入这个方法:
methods: {
  onEnlargeText: function (enlargeAmount) {
    this.postFontSize += enlargeAmount
  }
}
问题来了,当你需要在事件处理函数中既要传入子组件抛出的值,又想再传入其他参数呢?
<blog-post
      ...
      v-on:enlarge-text="onEnlargeText(index, $event)"
    ></blog-post>
$event能代替一个参数,如果是子组件多个参数呢?
用aruments接收,这样得到一个数组,逐个取即可,或者在emit时就以数组或对象传递就好
vue项目根目录下index.html引入公共样式如reset.css注意事项
index.html不能引入src里的文件,src里文件的会用webpack打包。webpack在开发时把static的文件复制到电脑内存里,打包时会复制到static目录下,因此建议非要在页面头部引入的话可以放在static目录下,或者可以选择在main.js使用import导入
例如:
<link rel="stylesheet" type="text/css" href="./static/reset.css">或者
// main.js
import './common/style/reset.css'
vue各个生命周期该干什么
beforecreate: 可以在这加个loading事件created:在这结束loading,还做一些初始化,data已渲染,也可以在这里发送请求获取页面初始数据,实现函数自执行mounted: 在这发起axios请求,拿回数据,配合路由钩子做一些事情beforeDestory:destoryed:当前组件已被删除,清空相关内容
附生命周期图:
Vue中使用less给元素添加背景图片出现的问题
按照less官方文档,url应当如下使用:
URLs
// Variables
@images: "../img";

// Usage
body {
  color: #444;
  background: url("@{images}/white-sand.png");
}故而有了根据屏幕分辨率设置背景图片代码
.bg-image(@url) {
  background-image: url('@{url}@2x.png');
  @media (-webkit-min-device-pixel-ratio: 3),(min-device-pixel-ratio: 3){
    background-image: url('@{url}@3x.png');
  }
} // 报错报错 找不到路径的这里要使用“~”符号来告诉less引号里面的内容不需要编译。
正确代码:
.bg-image(@url) {
    background-image:~"url('@{url}@2x.png')";
    @media (-webkit-min-device-pixel-ratio: 3), (min-device-pixel-ratio: 3) {
        background-image: ~"url('@{url}@3x.png')";
    }
}
如果组件里用使用计时器
// 在组件销毁时(即切换组件或关闭页面),
// 调用destroyed方法清除计时器
destroyed(){
  clearTimeout(this.timer)
}
向子组件传递props值为Array或Object时的默认值设置
不能直接设置为[]或{},最好应设置为一个函数,比如:
{
  type: Object,
  default () {
    return {}
  }
vue 侦听器 watch 检查 对象键值的变化
先来看官方教程对watch的示例应用:
 watch: {
    firstName: function (val) {
      this.fullName = val + ' ' + this.lastName
    },
    lastName: function (val) {
      this.fullName = this.firstName + ' ' + val
    }
  }
但是如果监听的是data中的对象类型的值,直接用就不妥了。
受现代 JavaScript 的限制 (以及废弃 Object.observe),Vue 不能检测到对象属性的添加或删除。由于 Vue 会在初始化实例时对属性执行 getter/setter 转化过程,所以属性必须在 data 对象上存在才能让 Vue 转换它,这样才能让它是响应的。
sell: {
//事件函数名称必须是`handler`!!!
      handler(val) {
        if (Number(this.availSymbol)) {
          this.sellQuanPro = Math.round(val.quantity / this.availSymbol * 100) > 100 ? 100 : Math.round(val.quantity / this.availSymbol * 100);
        }
      },
      deep: true, //深度递归查看对象
      immediate: true, //开始时便加载一次该函数
},事件函数名称必须是handler!!!这样监听了对象所有键值,性能开销大,解决方案:用字符串
如下:
'sell.price': {
      handler(val) {
        console.log('TCL: handler -> val', val); //这里`val`是`sell.price`而不是`sell`
      }
    }
安装配置问题
部分参考可能会因时效性、版本等不适用,希望大家灵活参考使用。
vue改造多页面应用配置注意问题(踩了神坑...)
首先修改webpack配置,文章很多,主要参考这篇链接vue多页面开发
不想移步的童鞋来:
在
util.js里面尾部直接加入/* 这里是添加的部分 ---------------------------- 开始 */ // glob是webpack安装时依赖的一个第三方模块,还模块允许你使用 *等符号, 例如lib/*.js就是获取lib文件夹下的所有js后缀名的文件 var glob = require('glob') // 页面模板 var HtmlWebpackPlugin = require('html-webpack-plugin') // 取得相应的页面路径,因为之前的配置,所以是src文件夹下的pages文件夹 var PAGE_PATH = path.resolve(__dirname, '../src/pages') // 用于做相应的merge处理 var merge = require('webpack-merge') //多入口配置 // 通过glob模块读取pages文件夹下的所有对应文件夹下的js后缀文件,如果该文件存在 // 那么就作为入口处理 exports.entries = function () { var entryFiles = glob.sync(PAGE_PATH + '/*/*.js') var map = {} entryFiles.forEach((filePath) => { var filename = filePath.substring(filePath.lastIndexOf('\/') + 1, filePath.lastIndexOf('.')) map[filename] = filePath }) return map } //多页面输出配置 // 与上面的多页面入口配置相同,读取pages文件夹下的对应的html后缀文件,然后放入数组中 exports.htmlPlugin = function () { let entryHtml = glob.sync(PAGE_PATH + '/*/*.html') let arr = [] entryHtml.forEach((filePath) => { let filename = filePath.substring(filePath.lastIndexOf('\/') + 1, filePath.lastIndexOf('.')) let conf = { // 模板来源 template: filePath, // 文件名称 filename: filename + '.html', // 页面模板需要加对应的js脚本,如果不加这行则每个页面都会引入所有的js脚本 chunks: ['manifest', 'vendor', filename], inject: true } if (process.env.NODE_ENV === 'production') { conf = merge(conf, { minify: { removeComments: true, collapseWhitespace: true, removeAttributeQuotes: true }, chunksSortMode: 'dependency' }) } arr.push(new HtmlWebpackPlugin(conf)) }) return arr } /* 这里是添加的部分 ---------------------------- 结束 */webpack.base.conf.js文件/* 修改部分 ---------------- 开始 */ entry: utils.entries(), /* 修改部分 ---------------- 结束 */webpack.dev.conf.js文件/* 注释这个区域的文件 ------------- 开始 */ // new HtmlWebpackPlugin({ // filename: 'index.html', // template: 'index.html', // inject: true // }), /* 注释这个区域的文件 ------------- 结束 */ new FriendlyErrorsPlugin() //**注意我在新版本生成的这里是保存static目录的东西不用在意** new CopyWebpackPlugin([{ from: path.resolve(__dirname, '../static'), to: config.dev.assetsSubDirectory, ignore: ['.*'] }]) /* 添加 .concat(utils.htmlPlugin()) ------------------ */ ].concat(utils.htmlPlugin())webpack.prod.conf.js文件/* 注释这个区域的内容 ---------------------- 开始 */ // new HtmlWebpackPlugin({ // filename: config.build.index, // template: 'index.html', // inject: true, // minify: { // removeComments: true, // collapseWhitespace: true, // removeAttributeQuotes: true // // more options: // // https://github.com/kangax/html-minifier#options-quick-reference // }, // // necessary to consistently work with multiple chunks via CommonsChunkPlugin // chunksSortMode: 'dependency' // }), /* 注释这个区域的内容 ---------------------- 结束 */ // copy custom static assets new CopyWebpackPlugin([ { from: path.resolve(__dirname, '../static'), to: config.build.assetsSubDirectory, ignore: ['.*'] } ]) /* 该位置添加 .concat(utils.htmlPlugin()) ------------------- */ ].concat(utils.htmlPlugin())改造目录
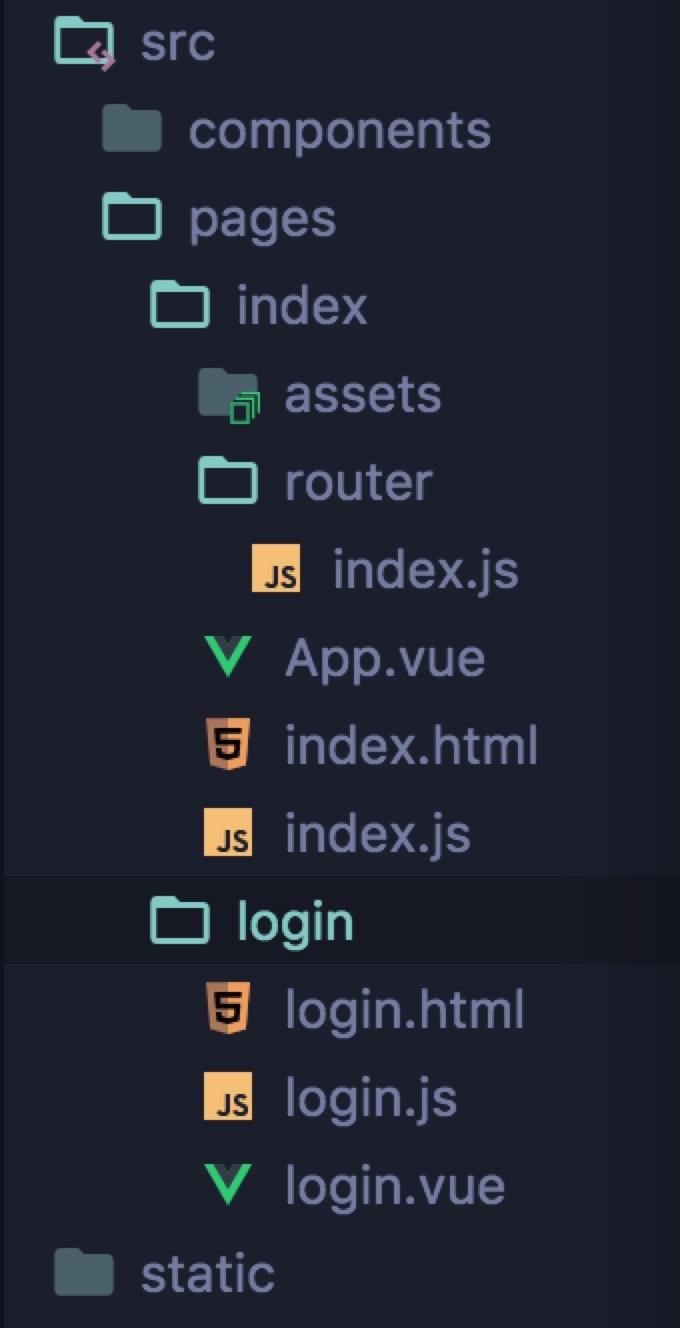
值得注意的是:这里的
js一定要和html名称一样,我因为这个不一样,卡了好久,在别的地方有说必须是App.vue的,这个如图,我没用,测试界面正常显示,但是我把默认main.js直接移动到文件夹里时,index.html一直是空白页,把main.js改为index.js正常,如果有问题我还会探究改正访问方式
- http://localhost:8080/login.html
- http://localhost:8080/index.html
修改
config目录下的assetsPublicPath路径的问题相信很多人都查过
npm run build后空白页的问题然后修改assetsPublicPath的值/为./,然而这里改的话,所有页面都会无法获取,cannot get,此处困扰我三天,一度令我觉得自己不适合这行,适合喝西北风,本来就新手学vue,也没什么资源,这里解决了,但build后的问题呢,未完待续,先调好开发效果,步步为营吧
关于新版vue-cli安装json-server在build文件里没生成出dev-server文件
新版的vue-cli取消了dev-server.js和dev-client.js 改用webpack.dev.conf.js代替,所以 配置本地访问在webpack.dev.conf.js里配置即可
打开webpack.dev.conf.js,(在build目录下),
在const portfinder = require(‘portfinder’)后添加以下两行代码
const appData = require('./db.json')//加载本地数据文件
const seller = appData.seller//获取对应的本地数据,
添加完以上代码继续在此文件里面向下查找devServer:{ }
在这个对象里添加配置,(不要删除或覆盖以前默认配置的值)
before(app) {
  app.get('/api/seller', (req, res) => {
    res.json({
      errno:0,
      data: seller
    })
  })
},每更改过webpack.dev.conf.js这个文件或者db.json文件,记得重新npm run dev
express启动数据服务模拟post请求
* `config`目录下的`index.js`,修改`dev`中的`proxyTable`为:

            proxyTable: {
                '/api/': 'http://localhost:3000/'
                }
*  `build`目录下`webpack.dev.conf.js`文件增加
            // express配置server
            var express = require('express')
            var apiServer = express()
            var bodyParser = require('body-parser')
            apiServer.use(bodyParser.urlencoded({ extended: true }))
            apiServer.use(bodyParser.json())
            var apiRouter = express.Router()
            var fs = require('fs')
            //apiName是你请求的方法/数据集合 不要动
            apiRouter.route('/:apiName') //接口路径
            .all(function (req, res) {
                fs.readFile('./data.json', 'utf8', function (err, data) {  //读取接口文件
                    console.log(err)
                    if (err) throw err
                    var data = JSON.parse(data)
                    if (data[req.params.apiName]) {
                        res.json(data[req.params.apiName])
                    } else {
                        res.send('no such api name')
                    }
                })
            })
            apiServer.use('/api', apiRouter);
            apiServer.listen(3000, function (err) {

            if (err) {
                console.log(err)
                return
            }
            console.log('Listening at http://localhost:' + 3000 + '\n')
            })
*  修改build目录下webpack.dev.conf.js文件中的devServer,增加:
            // Invalid Host header问题修复
            disableHostCheck: true
测试地址:`http://localhost:8080/apiPost/getNewsList`
这里的请求get和post都适用
vue项目localhost可以访问,IP地址替换后无法访问的问题
vue生成的项目启动地址默认在http://localhost:8080/#,但若将开发移动端则需在手机上测试效果,以前总是知道hbulider有本地外置服务器手机扫码可以访问项目,Vue则需修改根目录下/config/index.js:
host: '0.0.0.0', // can be overwritten by process.env.HOST
便可支持ip访问地址,手机在同局域网下就可以预览了
Vue的click事件防抖和节流处理
函数防抖
定义:多次触发事件后,事件处理函数只执行一次,并且是在触发操作结束时执行。
在vue中对click添加防抖处理
const on = Vue.prototype.$on
// 防抖处理
Vue.prototype.$on = function (event, func) {
    let timer
    let newFunc = func
    if (event === 'click') {
        newFunc = function () {
            clearTimeout(timer)
            timer = setTimeout(function () {
                func.apply(this, arguments)
            }, 500)
        }
    }
    on.call(this, event, newFunc)
}
函数节流
定义:触发函数事件后,短时间间隔内无法连续调用,只有上一次函数执行后,过了规定的时间间隔,才能进行下一次的函数调用。
在vue中对click添加节流处理
const on = Vue.prototype.$on

// 节流
Vue.prototype.$on = function (event, func) {
    let previous = 0
    let newFunc = func
    if (event === 'click') {
        newFunc = function () {
            const now = new Date().getTime()
            if (previous + 1000 <= now) {
                func.apply(this, arguments)
                previous = now
            }
        }
    }
    on.call(this, event, newFunc)
}
未完待续
评论
登录后参与技术讨论,分享你的经验与见解。
登录 / 注册暂无评论