Vue3.x 新特性总结

文章目录

Vue3.x 官网
注:新版vue3的setup语法糖更为简洁,详见 Vue3 script setup 语法糖,超爽体验一、Composition API 简介
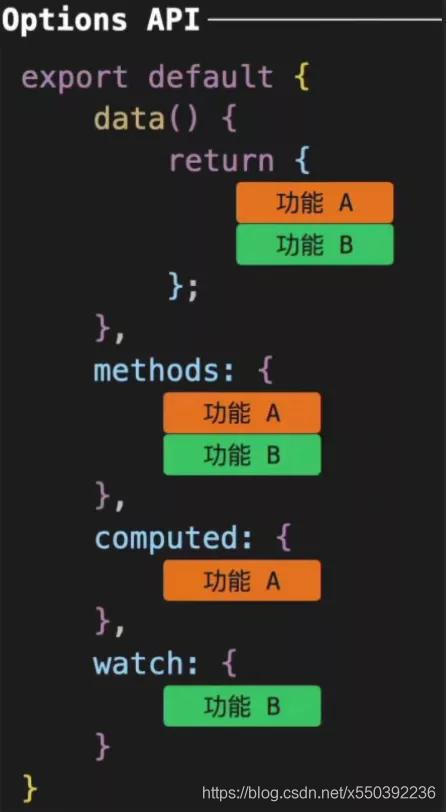
Vue2 时的方式在代码很少的时候,逻辑结构还是蛮清晰的,但是随着组件功能越来越多,代码量越来越大,整体内容全部放在其中肯定会显得臃肿。因为每个功能模块的代码会散落分布在各个位置,让整个项目的内容难以阅读和维护。如下图:
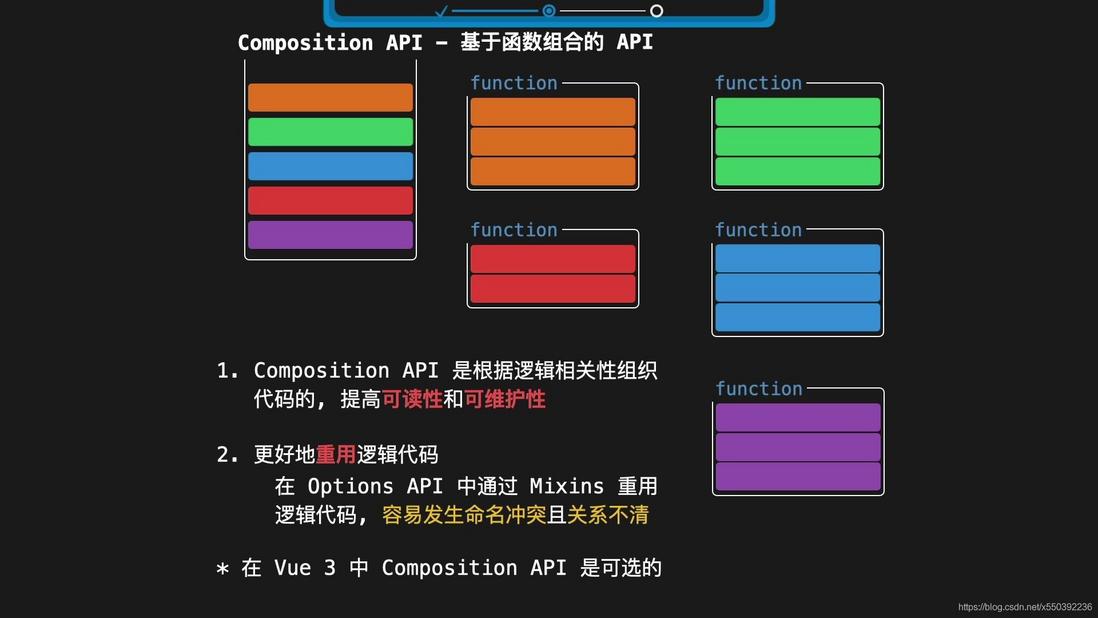
而到了 Vue3,它会根据逻辑功能来进行组织,把同一个功能的不同代码都放在一起,或者把它们单独拿出来放在一个函数中,所以 Composition API 又被称为基于函数组合的API:
1. setup 函数
setup 函数是 Vue3 中新增的函数,它是我们在编写组件时,使用 Composition API 的入口。
同时它也是 Vue3 中新增的一个生命周期函数,会在 beforeCreate 之前调用。因为此时组件的 data 和 methods 还没有初始化,因此在 setup 中是不能使用 this 的。所以 Vue 为了避免我们错误的使用,它直接将 setup 函数中的 this 修改成了undefined。并且,我们只能同步使用setup函数,不能用async将其设为异步。
setup 函数接收两个参数 props和 context, 语法为:setup(props,context){}
props
props 里面包含父组件传递给子组件的所有数据。在子组件中使用 props 进行接收。
props 是响应式的, 当传入新的 props 时,会及时被更新。
由于是响应式的, 所以不可以使用 ES6 解构,解构会消除它的响应式。
父组件:
<template>
    <!-- 父组件向子组件传递数据 -->
    <Sub :name="name" :age="age" />
</template>

<script>
import { ref } from 'vue'
import Sub from './Sub.vue'
export default {
    setup () {
        const name = ref('张三');
        const age = ref(20)

        return { name, age }
    },
    components: { Sub },
}
</script>
子组件(Sub.vue):
<template>
    <div>{{name}}{{age}}</div>
</template>

<script>
export default {
    props: {
        name: String,
        age: Number
    },
    mounted () {
        // vue2.x 的写法
        console.log(this.name); // 张三
        console.log(this.age); // 20
    },
    setup (props) {
        // vue3.x 的写法
        console.log(props.name); // 张三
        console.log(props.age); // 20

        // let { name ,age } = props;  // 不能直接解构
        let { name, age } = toRefs(props);
        console.log(name.value, age.value); // 张三 20
    }
}
</script>
context
context 里面包含 attrs, slots, emit 等数据方法:
attrs:获取组件上的属性slots:获取 slot 插槽的节点emit:emit 方法(子组件向父组件传递数据)
父组件:
<template>
    <Sub subData="some other data" @subClick='subClick'>parent</Sub>
</template>

<script>
import Sub from './Sub.vue'
export default {
    setup () {

        function subClick (e) {
            console.log(e); // 接收子组件传递过来的数据
        }

        return { subClick }
    },
    components: { Sub },
}
</script>
子组件(Sub.vue):
<template>
    <!-- 父组件向子组件传递数据 -->
    <div @click="handleClick">Child</div>
</template>

<script>
export default {
    mounted () {
        // vue2.x 获取组件上的属性
        console.log(this.$attrs.subData);  // 'some other data'

        // vue2.x 获取slot插槽的节点
        console.log(this.$slots);

    },
    methods: {
        // vue2.x emit方法(子组件向父组件传递数据)
        handleClick () {
            this.$emit('subClick', 'vue2.x - this is subData')
        },
    },
    setup (props, context) {
        let { attrs, slots, emit } = context;

        // vue3.x 获取组件上的属性
        console.log(attrs.subData);  // 'some other data'

        // vue3.x 获取slot插槽的节点
        console.log(slots.default());

        // vue3.x emit方法(子组件向父组件传递数据)
        function handleClick () {
            emit('subClick', 'vue3.x - this is subData');
        }

        return { handleClick }
    }
}
</script>
2. 生命周期
setup 函数是 Vue3 中新增的一个生命周期函数
- setup 函数会在
beforeCreate之前调用,因为此时组件的data和methods还没有初始化,因此在 setup 中是不能使用this的。 - 所以 Vue 为了避免我们错误的使用,它直接将 setup 函数中的
this修改成了undefined。 - setup函数,只能是同步的不能是异步的
| Vue2.x (Option API) | Vue3.x (Composition API) |
|---|---|
| beforeCreate | setup |
| created | setup |
| beforeMount | onBeforeMount |
| mounted | onMounted |
| beforeUpdate | onBeforeUpdate |
| updated | onUpdated |
| beforeDestroy | onBeforeUnmount |
| destroyed | onUnmounted |
| activated | onActivated |
| deactivated | onDeactivated |
| errorCaptured | onErrorCaptured |
| - - | onRenderTracked |
| - - | onRenderTriggered |
初始化加载顺序:
setup => beforeCreate => created => onBeforeMount => onMounted
<script>
import { onBeforeMount, onMounted, onBeforeUpdate, onUpdated, onBeforeUnmount, onUnmounted, onRenderTracked, onRenderTriggered } from 'vue'
export default {
    setup () {
        console.log('setup');

        // 生命周期钩子(没有beforeCreate和created)
        onBeforeMount(() => { console.log('onBeforeMount'); })
        onMounted(() => { console.log('onMounted'); })
        onBeforeUpdate(() => { console.log('onBeforeUpdate'); })
        onUpdated(() => { console.log('onUpdated'); })
        onBeforeUnmount(() => { console.log('onBeforeUnmount'); })
        onUnmounted(() => { console.log('onUnmounted'); })

        // 新增的debug钩子  生产环境中会被忽略
        onRenderTracked(() => { console.log('onRenderTracked'); }) // 每次渲染后重新收集响应式依赖,在onMounted前触发,页面更新后也会触发
        onRenderTriggered(() => { console.log('onRenderTriggered'); }) // 每次触发页面重新渲染时的自动执行,在onBeforeUpdate之前触发
    },
    beforeCreate () {
        console.log('beforeCreate');
    },
    created () {
        console.log('created');
    }
}
</script>
3. 返回值
setup 函数中返回一个对象,可以在模板中直接访问该对象中的属性和方法。
<template>
    <div @click="handleClick">{{name1}} - {{name2}}</div>
</template>

<script>
import { ref, provide } from 'vue'
export default {
    setup () {
        const name1 = ref('张三');

        return {
            name1,
            name2: 'zhangsan',
            handleClick () {
                console.log(name1.value); // 张三
                console.log(this.name2); // zhangsan
            }
        }
    }
}
</script>
4. ref 与 reactive
创建一个响应式数据
- ref:任意类型(建议基本类型)数据的响应式引用(设置、获取值时需要加
.value)。
ref 的本质是拷贝,修改数据是不会影响到原始数据。 - reactive:只能是复杂类型数据的响应式引用
<template>
    <ul>
        <li>ref 基本类型:{{name1}}</li>
        <li>ref 复杂类型:{{name2.name}}</li>
        <li>reactive 复杂类型:{{name3.name}}</li>
    </ul>
</template>

<script>
import { ref, reactive } from 'vue'
export default {
    setup () {
        let nameStr = '张三';
        let name1 = ref(nameStr); // ref为基本数据类型添加响应式状态
        setTimeout(() => {
            name1.value = 'zhangsan';

            console.log(name1.value); // 'zhangsan'
            console.log(nameStr); // '张三'  =>  不会影响到原始数据
        }, 1000)


        let nameObj2 = { name: '张三' };
        let name2 = ref(nameObj2); // ref为复杂数据类型添加响应式状态(不建议)
        setTimeout(() => {
            // 设置值需要加.value
            name2.value.name = 'zhangsan';

            console.log(name2.value.name); // 'zhangsan'  =>  获取值需要加.value
            console.log(nameObj2); // {name: "zhangsan"}  =>  会影响到原始数据
        }, 2000)


        let nameObj3 = { name: '张三' };
        const name3 = reactive(nameObj3);// reactive只能为复杂数据类型添加响应式状态
        setTimeout(() => {
            name3.name = 'zhangsan';

            console.log(name3.name); // 'zhangsan'
            console.log(nameObj3); // {name: "zhangsan"}  =>  会影响到原始数据
        }, 3000)


        return { name1, name2, name3 }
    }
}
</script>
5. toRef 与 toRefs
也可以创建一个响应式数据
- toRef:用来给抽离响应式对象中的某一个属性,并把该属性包裹成 ref 对象,使其和原对象产生链接。
toRef 的本质是引用,修改响应式数据会影响原始数据。 - toRefs:用来把响应式对象转换成普通对象,把对象中的每一个属性,包裹成 ref 对象。
toRefs 就是 toRef 的升级版,只是toRefs 是把响应式对象进行转换,其余的特性和 toRef 无二
<template>
    <ul>
        <li>{{name1}}</li>
        <li>{{name2.name.value}}</li>
        <li>{{name}}</li>
    </ul>
</template>

<script>
import { toRef, toRefs, reactive } from 'vue'
export default {
    setup () {
        let nameObj1 = reactive({ name: '张三' });
        let name1 = toRef(nameObj1, 'name');
        let age1 = toRef(nameObj1, 'age '); // age不存在
        setTimeout(() => {
            name1.value = 'zhangsan';
            age1.value = 20; // 即便age不存在也能正常响应式赋值
        }, 1000)


        let nameObj2 = reactive({ name: '张三' });
        let age2 = toRef(nameObj3, 'age '); // age不存在
        let name2 = toRefs(nameObj2);
        setTimeout(() => {
            name2.name.value = 'zhangsan';
            age2.value = 20; // age不存在,赋值无反应
        }, 2000)


        let nameObj3 = reactive({ name: '张三' });
        setTimeout(() => {
            nameObj3.name = 'zhangsan';
        }, 3000)
        let { name } = toRefs(nameObj3); // 解构后仍需保持响应式(重要)

        return { name1, name2, name }
    }
}
</script>
6. readonly 只读属性
表示响应式对象不可修改
<template>
    <ul>
        <li>{{nameObj.name}}</li>
    </ul>
</template>

<script>
import { reactive, readonly } from 'vue'
export default {
    setup () {
        let nameObj = reactive({ name: '张三' });
        let readonlyObj = readonly(nameObj); // 对nameObj响应式对象设置成只读,不可修改

        setTimeout(() => {
            readonlyObj.name = 'zhangsan'; // 无法设置属性  =>  Set operation on key "name" failed: target is readonly. Proxy {name: "张三"}
        }, 1000)

        return { nameObj }
    }
}
</script>
7. method方法
<template>
  <!-- 调用方法 -->
  <button @click='changeName'>按钮</button>
</template>

<script setup>
import { reactive } from 'vue'
export default {
    setup () {
        const state = reactive({ name: '张三' });

        // 声明method方法
        const changeName = () => {
            state.name = 'zhangsan';
        }

        return { state , changeName }
    }
}
</script>
8. computed 计算属性
<template>
    <div>
        <button @click="add">+</button>
        <p>{{addCount}}</p>
    </div>
</template>

<script>
import { ref, computed } from 'vue'
export default {
    setup () {
        const num = ref(0);
        const add = () => {
            num.value++
        }
        // 计算属性
        const addCount = computed(() => {
            return num.value * 2;
        })
        return { add, addCount }
    }
}
</script>
9. watch 与 watchEffect 监听属性
watch函数:
用来侦听特定的数据源,并在回调函数中执行副作用。
默认情况是惰性的,也就是说仅在侦听的源数据变更时才执行回调。watchEffect函数:
1.立即执行、立即监听(immediate)
2.自动会感知代码依赖(自动收集依赖),不需要传递监听的内容(不需要像watch一样手动传入依赖)
3.无法获得变化前的值(oldVal)
<template>
    <div>
        <p>{{name}}</p>
        <p>{{nameObj.name}}</p>
    </div>
</template>

<script>
import { ref, reactive, watch, watchEffect } from 'vue'
export default {
    setup () {

        // 一、监听基本类型
        const name = ref('张三');
        setTimeout(() => {
            name.value = '李四';
        }, 1000);

        watch(name, (newVal, oldVal) => {
            console.log(newVal, oldVal);
        }, { immediate: true }) // 立即执行


        // 二、监听复杂类型
        const nameObj = reactive({ name: 'zhangsan' })
        setTimeout(() => {
            nameObj.name = 'lisi';
        }, 2000);

        // 1.复杂数据无法直接监听、惰性
        watch(() => nameObj, (newVal, oldVal) => {
            console.log(newVal, oldVal); // 不会触发
        })

        // 2.需要深度监听、不惰性
        watch(() => nameObj, (newVal, oldVal) => {
            console.log(newVal, oldVal); // newVal、oldVal具有响应式
        }, {
            deep: true, // 深度监听
            immediate: true, // 立即监听
        })

        // 3.也可以直接监听对象的属性
        watch(() => nameObj.name, (newVal, oldVal) => {
            console.log(newVal, oldVal);
        })


        // 三、同时监听多个对象
        watch([() => nameObj.name, () => nameObj.lastName], ([newName, newLastName], [oldName, oldLastName]) => {
            console.log(newName, oldName, newLastName, oldLastName);
        })


        const stop = watchEffect(() => {
            console.log(name);
            console.log(nameObj.name);
        })

        // 3秒后停止监听
        setTimeout(()=>{
            stop();
        },3000)


        return { name, nameObj }
    }
}
</script>
二、获取DOM节点
<template>
    <input type="text" value="张三" ref="hello">
</template>

<script>
import { ref, onMounted } from 'vue'
export default {
    setup () {
        const hello = ref(null); // 获取组件中ref="hello"的真实dom元素

        onMounted(() => {
            console.log(hello.value); // <input type="text">
            console.log(hello.value.value); // 张三
        })

        return { hello }
    }
}
</script>
三、provide 与 inject
父组件向子组件传递数据与方法
父组件:
<template>
    <Sub />
</template>

<script>
import { ref, provide } from 'vue'
import Sub from './Sub.vue'
export default {
    setup () {
        const name = ref('张三');

        // provide(别名, 要传递的数据和方法)
        provide('myName', name)
        provide('handleClick', () => {
            name.value = 'zhangsan';
        })

    },
    components: { Sub },
}
</script>
子组件(Sub.vue):
<template>
    <div @click="handleClick">{{name}}</div>
</template>

<script>
import { inject } from 'vue'
export default {
    setup () {
        //调用 inject 方法,通过指定的别名,接收到父级共享的数据和方法
        const name = inject('myName');
        const handleClick = inject('handleClick');

        return { name, handleClick }
    }
}
</script>
四、Teleport 传送门
Teleport 翻译过来是传送的意思,就像是哆啦 A 梦中的 「任意门」 ,任意门的作用就是可以将人瞬间传送到另一个地方。
举例:
我们希望 Dialog 渲染的 dom 和顶层组件是兄弟节点关系, 在 App.vue 文件中定义一个供挂载的元素:
<template>
    <router-view />
    <div id="model"></div> <!-- 挂载点 -->
</template>
定义一个 Dialog 组件 Dialog.vue , 留意 to 属性, 与上面的 id选择器 一致:
<template>
    <teleport to="#model">
        <!-- 挂载内容 -->
        <div>title</div>
        <div>I'am a Dialog.</div>
    </teleport>
</template>
DOM 渲染效果如下:
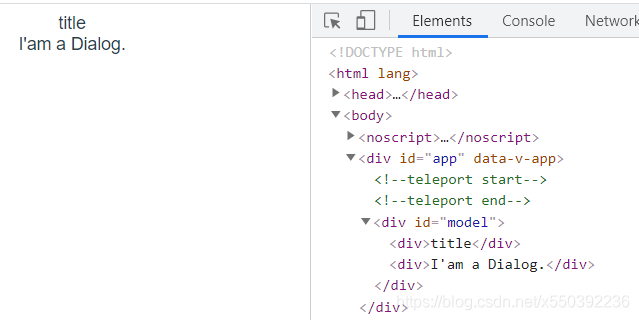
我们使用 teleport 组件,通过 to 属性,指定该组件渲染的位置在 App.vue 中,但是 Dialog 又是完全由 Dialog.vue 组件控制。
五、Suspense
Suspense组件用于在等待某个异步组件解析时显示后备内容。
在 Vue2.x 中经常遇到这样的场景:
<template>
<div>
    <div v-if="!loading">
        <!-- 异步渲染 -->
        ...
    </div>
    <div v-if="loading">
        加载中...
    </div>
</div>
</template>
在异步数据没加载前,一般我们都会提供一个加载中( loading )的动画,当数据返回时配合 v-if 来控制数据显示。
现在 Vue3.x 新出的内置组件 Suspense , 它提供两个template slot, 刚开始会渲染一个 fallback 状态下的内容, 直到到达某个条件后才会渲染 default 状态的正式内容, 通过使用 Suspense 组件进行展示异步渲染就更加的简单。
<Suspense>
      <template #default>
              <!-- 异步渲染 -->
               ...
      </template>
      <template #fallback>
          <div>
              Loading...
          </div>
      </template>
</Suspense>
Suspense 组件 只是一个带插槽的组件,只是它的插槽指定了 default 和 fallback 两种状态。
六、碎片化节点 Fragment
在 Vue2.x 中, template 中只允许有一个根节点:
<template>
    <div>
        <span></span>
        <span></span>
    </div>
</template>
但是在 Vue3.x 中,可以有多个根元素,也可以有把文本作为根元素
<template>
    <span></span>
    <span></span>
</template>
七、插槽与作用域插槽
1. 插槽
父组件:
<template>
    <Child>
        <!-- Vue2.x写法
        <div slot="parent">
            <div>父组件</div>
        </div>
         -->
        <template v-slot:parent>
            <div>父组件</div>
        </template>
    </Child>
</template>子组件(Child.vue):
<template>
    <slot name='parent'>子组件</slot>
</template>
2. 作用域插槽
父组件:
<template>
    <Child>
        <!-- <template slot="content" slot-scope="scoped">  -->
        <template v-slot:content="scoped">
            <div>{{scoped.myName}}</div>
        </template>
    </Child>
</template>
子组件:
<template>
    <slot name="content" :myName="myName"></slot>
</template>

<script>

import { ref } from 'vue'
export default {
    setup () {

        let myName = ref("猫老板的豆")

        return { myName }
    },
}
</script>
评论
登录后参与技术讨论,分享你的经验与见解。
登录 / 注册暂无评论