Docker安装LNMP-ubuntu18.04+nginx1.14+mysql5.7+php7.3

文章目录
Docker镜像准备
拉取ubuntu18.04镜像
docker pull ubuntu18.04启动ubuntu容器
docker run -it --name="php7.3" --privileged=true ubuntu:18.04 /bin/bashubuntu更换阿里云源
备份源
mv /etc/apt/sources.list /etc/apt/sources.list.bak更换源
    echo -e "deb http://mirrors.aliyun.com/ubuntu/ bionic main restricted universe \n
    deb http://mirrors.aliyun.com/ubuntu/ bionic-security main restricted universe multiverse \n
    deb http://mirrors.aliyun.com/ubuntu/ bionic-updates main restricted universe multiverse \n
    deb http://mirrors.aliyun.com/ubuntu/ bionic-proposed main restricted universe multiverse \n
    deb http://mirrors.aliyun.com/ubuntu/ bionic-backports main restricted universe multiverse \n
    deb-src http://mirrors.aliyun.com/ubuntu/ bionic main restricted universe multiverse \n
    deb-src http://mirrors.aliyun.com/ubuntu/ bionic-security main restricted universe multiverse \n
    deb-src http://mirrors.aliyun.com/ubuntu/ bionic-updates main restricted universe multiverse \n
    deb-src http://mirrors.aliyun.com/ubuntu/ bionic-proposed main restricted universe multiverse \n
    deb-src http://mirrors.aliyun.com/ubuntu/ bionic-backports main restricted universe multiverse" >> /etc/apt/sources.list
更新源
apt-get update安装常用的软件
软件安装过程中遇到:Do you want to continue? [Y/n]统一输入y然后回车
vim(必须,且必须会使用下面四个命令)
apt-get install -y vim需要掌握的vim命令
打开文件:vim 文件名
输入内容:打开文件后直接按i
退出编辑状态:按esc
关闭并保存文件:先退出编辑状态,然后按shift+:输入wq然后回车
curl(可选)
apt-get install -y curl安装wget(可选)
apt-get install -y wget安装niginx1.14.0
安装niginx
apt-get install -y nginx启动nginx
service nginx start配置nginx
创建配置目录
mkdir -p /data/nginx/conf创建存放网站代码目录
mkdir -p /data/nginx/code给目录添加权限
chown :www-data -R /data/nginx修改nginx配置,将创建的配置目录加载到配置中
vim /etc/nginx/nginx.conf在http配置中添加 include /data/nginx/conf/*;

测试添加一个网站
创建配置文件
vim /data/nginx/conf/test.net添加内容,保存退出
server {
    listen 80;
    server_name test.net;
    index index.html index.htm;
    root /data/nginx/code/test.net;

    location / {
        try_files $uri $uri/ =404;
    }

    location ~ /\.ht {
        deny all;
    }
}
创建代码文件
mkdir  /data/nginx/code/test.net
vim /data/nginx/code/test.net/index.html
添加内容,保存退出
<html>
    <head>
        <title>test.com</title>
    </head>
    <body>
        test build web success!
    </body>
</html>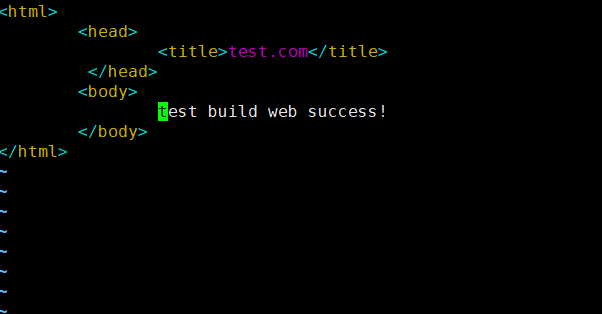
重启nginx
service nginx restart修改本机hosts
vim /etc/hosts在文件末尾添加 127.0.0.1 test.net ,保存退出

测试访问
#此操作需要安装curl
curl test.net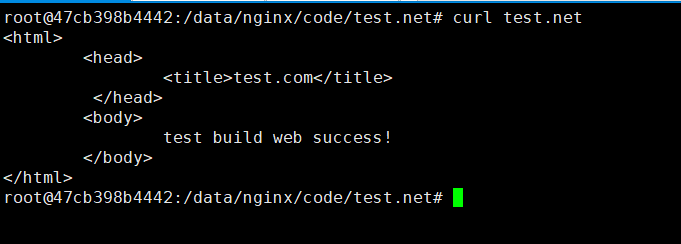
至此nginx安装完成
安装PHP7.3
添加PPA源支持
apt-get install software-properties-common源添加php
add-apt-repository ppa:ondrej/php更新源
apt-get update安装PHP
安装php7.3
apt-get install php7.3-fpm选择时区步骤一:输入6 + 回车

选择时区步骤二:输入70 + 回车

安装php扩展
当前命令安装了全部扩展,可以按需安装
apt-get install php7.3-bz2 php7.3-curl php7.3-fileinfo php7.3-gd php7.3-gettext php7.3-gmp php7.3-intl php7.3-imap php7.3-interbase php7.3-ldap php7.3-mbstring php7.3-exif php7.3-mysqli php7.3-odbc php7.3-pgsql php7.3-shmop php7.3-snmp php7.3-soap php7.3-sockets php7.3-sqlite3 php7.3-tidy php7.3-xmlrpc php7.3-xsl php7.3-redis php7.3-pdo验证PHP是否安装成功
php -v
可以输入php -m 查看已安装扩展
安装mysql5.7
安装mysql
apt-get install mysql-server-5.7启动mysql服务
service mysql start查看mysql账户密码
cat /etc/mysql/debian.cnf使用账号密码登陆
mysql -h localhost -u debian-sys-maint -p修改root密码
use mysql;
update user set authentication_string=PASSWORD("root") where user='root';
update user set plugin="mysql_native_password";
flush privileges;
修改数据库编码格式
vim /etc/mysql/mysql.conf.d/mysqld.cnf
#在文件末尾添加
character_set_server=utf8
collation_server=utf8_general_ci
vim /etc/mysql/my.cnf
#在文件末尾添加
[mysql]
default-character-set=utf8重启mysql服务
service mysql restart开启远程访问
#连接mysql
mysql -u root -p
#选择数据库
use mysql;
#开启远程授权
GRANT ALL PRIVILEGES ON *.* TO 'root'@'%' IDENTIFIED BY 'root' WITH GRANT OPTION;
#刷新权限
FLUSH PRIVILEGES;
#退出
exit
修改配置文件
vim /etc/mysql/mysql.conf.d
#将bind-address注释掉
#重启mysql
service mysql restart启动报错No directory, logging in with HOME=/
usermod -d /var/lib/mysql/ mysql

ln -s /var/lib/mysql/mysql.sock /tmp/mysql.sock

chown -R mysql:mysql /var/lib/mysql
解决时间戳格式报错
vim /etc/mysql/mysql.conf.d/mysqld.cnf在文件末尾添加
sql_mode=ONLY_FULL_GROUP_BY,STRICT_TRANS_TABLES,ERROR_FOR_DIVISION_BY_ZERO,NO_AUTO_CREATE_USER,NO_ENGINE_SUBSTITUTIONnginx添加php支持
启动php-fpm
service php7.3-fpm starttest.net站点的nginx配置修改
server {
    listen 80;
    server_name test.net;
    index index.php index.html index.htm;
    root /data/nginx/code/test.net;

    location / {
        try_files $uri $uri/ =404;
    }

    location ~ \.php$ {
        fastcgi_split_path_info ^(.+\.php)(/.+)$;
        #主要代码
        fastcgi_pass unix:/var/run/php/php7.3-fpm.sock;
        fastcgi_index index.php;
        include fastcgi_params;
        fastcgi_param SCRIPT_FILENAME $document_root$fastcgi_script_name;
    }

    location ~ /\.ht {
        deny all;
    }
}
站点添加php文件
vim /data/nginx/code/test.net/index.php文件内容
<?php
    phpinfo();
安装composer(可选)
#下载安装文件
php -r "copy('https://getcomposer.org/installer', 'composer-setup.php');"

#验证安装文件
php -r "if (hash_file('sha384', 'composer-setup.php') === '756890a4488ce9024fc62c56153228907f1545c228516cbf63f885e036d37e9a59d27d63f46af1d4d07ee0f76181c7d3') { echo 'Installer verified'; } else { echo 'Installer corrupt'; unlink('composer-setup.php'); } echo PHP_EOL;"

#下载composer
php composer-setup.php --install-dir=/usr/local/bin --filename=composer

#删除安装文件
php -r "unlink('/usr/local/bin/composer-setup.php');"验证composer:composer -v
安装git(可选)
apt-get install git安装nodejs(可选)
#...
curl -sL https://deb.nodesource.com/setup_14.x | bash -
#更新源
apt-get update
#安装nodejs
apt-get install -y nodejs
安装redis6.2(可选)
安装
#添加源
add-apt-repository ppa:redislabs/redis
#更新源
apt-get update
#安装
apt-get install redis
启动
service redis-server start连接redis
redis-cliredis开启远程访问
vim /etc/redis/redis.conf注释掉bind行,在行头添加#
protected-mode 修改为no
评论
登录后参与技术讨论,分享你的经验与见解。
登录 / 注册暂无评论