Android 入门 | Fragment

文章目录
当今是移动设备发展非常迅速的时代,不仅手机已经称为了生活必需品,而且平板也变得越来越普及。平板和手机最大的区别就在于屏幕的大小:一般手机屏幕的大小在 3 英寸到 6 英寸之间,平板屏幕的大小在 7 英寸到 10 英寸之间。屏幕大小差距过大有可能会让同样的界面在视觉效果上有较大的差异,比如一些界面在手机上看起来非常美观,但在平板上看起来可能会有控件被过分拉长、元素之间空隙过大等情况。
对于一名专业的 Android 开发人员而言,能够兼顾手机和平板的开发是我们极可能要左到的事情。Android 3.0 版本开始引入了 Fragment 的概念,它可以让界面在平板上更好地展示,下面我们就一起来学习一下。
1.Fragment 是什么
Fragment 是一种可以嵌入在 Android 当中的 UI 片段,它能让程序更加合理和充分地利用大屏幕的空间,因而在平板上应用得非常广泛。Fragment 和 Activity 非常像,同样可以包含布局,同样都有自己的生命周期。你甚至可以将 Fragment 理解成一个迷你型的 Activity,虽然这个迷你型的 Activity 有可能和普通的 Activity 是一样大的。
2.Fragment 的使用方法
2.1 Fragment 的简单用法
在 Activity 中添加两个 Fragment,并让这两个 Fragment 平分 Activity 的空间。
left_fragment.xml
`<?xml version="1.0" encoding="utf-8"?>
<LinearLayout xmlns:android="http://schemas.android.com/apk/res/android"
android:layout\_width="match\_parent"
android:layout\_height="match\_parent"
android:orientation="vertical">

<Button
    android:id="@+id/button"
    android:layout\_width="wrap\_content"
    android:layout\_height="wrap\_content"
    android:layout\_gravity="center\_horizontal"
    android:text="Button" />
</LinearLayout>`
right_fragment
`<?xml version="1.0" encoding="utf-8"?>
<LinearLayout xmlns:android="http://schemas.android.com/apk/res/android"
android:layout\_width="match\_parent"
android:layout\_height="match\_parent"
android:background="#0f0"
android:orientation="vertical">

<TextView
    android:layout\_width="wrap\_content"
    android:layout\_height="wrap\_content"
    android:layout\_gravity="center\_horizontal"
    android:textSize="24sp"
    android:text="This is right fragment"/>
</LinearLayout>`
创建 LeftFragment
`package com.example.fragmenttest
import android.os.Bundle
import android.view.LayoutInflater
import android.view.View
import android.view.ViewGroup
import androidx.fragment.app.Fragment
class LeftFragment : Fragment() {
override fun onCreateView(
    inflater: LayoutInflater,
    container: ViewGroup?,
    savedInstanceState: Bundle?
): View? {
    return inflater.inflate(R.layout.left\_fragment, container, false)
}
}`
这里需要继承 Fragment 类,并重写 onCreateView 方法,这里需要注意的是:要继承 androidx 包中的 Fragment。然后通过 inflater 加载布局文件。
创建 RightFragment
`package com.example.fragmenttest
import android.os.Bundle
import android.view.LayoutInflater
import android.view.View
import android.view.ViewGroup
import androidx.fragment.app.Fragment
class RightFragment : Fragment() {
override fun onCreateView(
    inflater: LayoutInflater,
    container: ViewGroup?,
    savedInstanceState: Bundle?
): View? {
    return inflater.inflate(R.layout.right\_fragment, container, false)
}
}
`
修改 activity_main.xml
`<?xml version="1.0" encoding="utf-8"?>
<LinearLayout xmlns:android="http://schemas.android.com/apk/res/android"
xmlns:app="http://schemas.android.com/apk/res-auto"
xmlns:tools="http://schemas.android.com/tools"
android:layout\_width="match\_parent"
android:layout\_height="match\_parent"
tools:context=".MainActivity">

<fragment
    android:id="@+id/leftFrag"
    android:layout\_width="0dp"
    android:layout\_height="match\_parent"
    android:layout\_weight="1"
    android:name="com.example.fragmenttest.LeftFragment"/>

<fragment
    android:id="@+id/rightFrag"
    android:layout\_width="0dp"
    android:layout\_height="match\_parent"
    android:layout\_weight="1"
    android:name="com.example.fragmenttest.RightFragment"/>
</LinearLayout>
`
在这里添加两个 fragment 平分屏幕的空间。
注意:添加 fragment 时需要通过 name 属性显式的指定要添加的 Fragment 类。
2.2 动态添加 Fragment
在上一节中,你已经学会了在布局文件中添加 Fragment 的方法,不过 Fragment 真正的强大之处在于,它可以在程序运行时动态地添加到 Activity 中。根据具体情况来动态地添加 Fragment,你就可以将程序界面定制的更加多样化。
创建 another_right_fragment.xml
`<?xml version="1.0" encoding="utf-8"?>
<LinearLayout xmlns:android="http://schemas.android.com/apk/res/android"
android:layout\_width="match\_parent"
android:layout\_height="match\_parent"
android:orientation="vertical"
android:background="#ff0">

<TextView
    android:layout\_width="wrap\_content"
    android:layout\_height="wrap\_content"
    android:layout\_gravity="center\_horizontal"
    android:textSize="24sp"
    android:text="This is another right fragment" />
</LinearLayout>
`
创建 AnotherRightFragment
`
package com.example.fragmenttest
import android.os.Bundle
import android.view.LayoutInflater
import android.view.View
import android.view.ViewGroup
import androidx.fragment.app.Fragment
class AnotherRightFragment : Fragment() {
override fun onCreateView(
    inflater: LayoutInflater,
    container: ViewGroup?,
    savedInstanceState: Bundle?
): View? {
    return inflater.inflate(R.layout.another\_right\_fragment, container, false)
}
}`
修改 activity_main.xml
`<?xml version="1.0" encoding="utf-8"?>
<LinearLayout xmlns:android="http://schemas.android.com/apk/res/android"
xmlns:app="http://schemas.android.com/apk/res-auto"
xmlns:tools="http://schemas.android.com/tools"
android:layout\_width="match\_parent"
android:layout\_height="match\_parent"
tools:context=".MainActivity">

<fragment
    android:id="@+id/leftFrag"
    android:layout\_width="0dp"
    android:layout\_height="match\_parent"
    android:layout\_weight="1"
    android:name="com.example.fragmenttest.LeftFragment"/>

<FrameLayout
    android:id="@+id/rightLayout"
    android:layout\_width="0dp"
    android:layout\_height="match\_parent"
    android:layout\_weight="1">
</FrameLayout>
</LinearLayout>`
将右侧的 fragment 替换成 FrameLayout,该布局会默认将所有控件都摆放在布局的左上角。
修改 MainActivity
`
package com.example.fragmenttest
import androidx.appcompat.app.AppCompatActivity
import android.os.Bundle
import androidx.fragment.app.Fragment
import kotlinx.android.synthetic.main.left_fragment.*
class MainActivity : AppCompatActivity() {
override fun onCreate(savedInstanceState: Bundle?) {
    super.onCreate(savedInstanceState)
    setContentView(R.layout.activity\_main)
    button.setOnClickListener {
        replaceFragment(AnotherRightFragment())
    }
    replaceFragment(RightFragment())
}

/\*\*
 \* 动态的替换 fragment
 \*/
private fun replaceFragment(fragment: Fragment) {
    // 获取 fragmentManager
    val fragmentManager = supportFragmentManager
    // 开启事务
    val transaction = fragmentManager.beginTransaction()
    // 将传递过来的 fragment
    transaction.replace(R.id.rightLayout, fragment)
    // 提交事务
    transaction.commit()
}
}`
实现返回栈功能
`/**
* 动态的替换 fragment
*/
private fun replaceFragment(fragment: Fragment) {
// 获取 fragmentManager
val fragmentManager = supportFragmentManager
// 开启事务
val transaction = fragmentManager.beginTransaction()
// 将传递过来的 fragment
transaction.replace(R.id.rightLayout, fragment)
// 将事务添加到返回栈
transaction.addToBackStack(null)
// 提交事务
transaction.commit()
}
`
如果以之前的方式实现的话点击了返回按钮后就会直接退出应用程序,如果使用上面的方式就可以将事务添加到返回栈中。
2.3 Fragment 与 Activity 之间的交互
2.3.1 在 Activity 中获取 Fragment
虽然 Fragment 是嵌入在 Activity 中显示的,可是它们的关系并没有那么亲密,实际上 Fragment 和 Activity 是各自存在于一个独立的类中的,它们之间并没有那么明显的方式来直接进行交互。
为了方便 Fragment 和 Activity 之间进行交互,FragmentManager 提供了一个类似于 findViewById() 的方法,专门用于从布局文件中获取 Fragment 的实例:val fragment = supportFragmentManager.findFragmentById(R.id.leftFrag) as LeftFragmentfindFragmentById() 方法可以在 Activity 中得到相应的 Fragment 的实例,然后就能轻松地调用 Fragment 的方法了。
另外,类似于 findViewById() 方法,Kotlin 的安卓扩展插件也对 findFragmentById() 进行了扩展,允许我们直接使用布局文件中定义的 Fragment id 名称来自动获取相应的 Fragment 实例:val fragment = leftFrag as LeftFragment
2.3.2 在 Fragment 中获取 Activity
在每个 Fragment 中都可以通过调用 getActivity() 方法来得到和当前 Fragment 关联的 Activity 实例。
`if (activity != null) {
val mainActivity = activity as MainActivity}`
除此之外,当 Fragment 中需要使用 Context 对象时,也可以使用 getActivity() 方法,因为获取到的 Activity 本身就是一个 Context 对象。
2.3.3 Fragment 与 Fragment 之间进行通信
Fragment 与 Fragment 之间进行通信的思路很简单,只需要使用当前 Fragment 获取与它相关联的 Activity,再通过这个 Activity 去获取另外一个 Fragment 实例,这便实现了 Fragment 与 Fragmnet 之间的通信。
2.4 Fragment 的生命周期
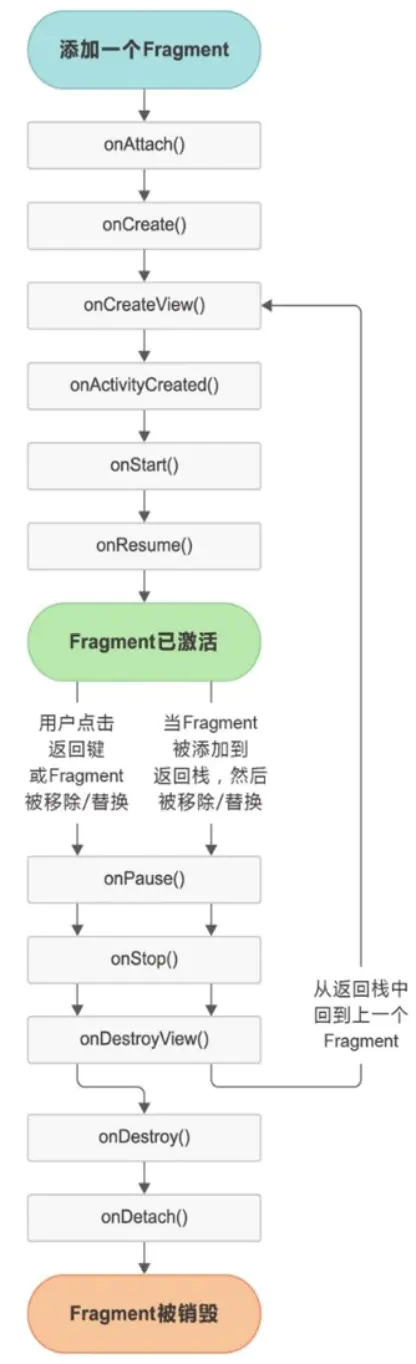
Activity 的生命周期包括 运行状态、暂停状态、停止状态、销毁状态。Fragment 的生命周期与之非常类似,每个 Fragment 在其生命周期内也可能会经历这几种状态。
- 运行状态
当一个 Fragment 所关联的 Activity 正处于运行状态时,该 Fragment 也处于运行状态。
- 暂停状态
当一个 Activity 进入暂停状态时(由于另一个未占满屏幕的 Activity 被添加到了栈顶),与它相关联的 Fragment 就会进入暂停状态。
- 停止状态
当一个 Activity 进入停止状态时,与它相关联的 Fragment 就会进入停止状态,或者通过调用 FragmentTransaction 的 remove() 、replace() 方法将 Fragment 从 Activity 中移除,但在事务提交之前调用 addToBackStack() 方法,这时的 Fragment 也会进入停止状态。总的来说,进入停止状态的 Fragment 对用户来说是完全不可见的,有可能会被系统回收。
- 销毁状态
Fragment 总是依附于 Activity 而存在,因此当 Activity 被销毁时,与它相关联的 Fragment 就会进入销毁状态。或者通过调用 FragmentTransaction 的 remove()、replace() 方法将 Fragment 从 Activity 中移除,但在事务提交之前并没有调用 addToBackStack() 方法,这时的 Fragment 也会进入销毁状态。
Fragment 在 Activity 的基础之上又增加了几个回调方法:
- onAttack():当 Fragment 和 Activity 建立关联时 调用。
- onCreateView():为 Fragment 加载布局时 调用。
- onActivityCreated():确保与 Fragment 相关联的 Activity 已经创建完毕时调用。
- onDestroyView():当与 Fragment 关联的视图被移除时调用。
- onDetach():当 Fragment 和 Activity 解除关联时调用。
2.4.1 体验 Fragment 的生命周期
`package com.example.fragmenttest
import android.content.Context
import android.os.Bundle
import android.util.Log
import android.view.LayoutInflater
import android.view.View
import android.view.ViewGroup
import androidx.fragment.app.Fragment
class RightFragment : Fragment() {`
companion object {
    const val TAG = "RightActivity"
}

override fun onAttach(context: Context) {
    super.onAttach(context)
    Log.d(TAG, "onAttach: ")
}

override fun onCreate(savedInstanceState: Bundle?) {
    super.onCreate(savedInstanceState)
    Log.d(TAG, "onCreate: ")
}

override fun onCreateView(
    inflater: LayoutInflater,
    container: ViewGroup?,
    savedInstanceState: Bundle?
): View? {
    Log.d(TAG, "onCreateView: ")
    return inflater.inflate(R.layout.right\_fragment, container, false)
}

override fun onActivityCreated(savedInstanceState: Bundle?) {
    super.onActivityCreated(savedInstanceState)
    Log.d(TAG, "onActivityCreated: ")
}

override fun onStart() {
    super.onStart()
    Log.d(TAG, "onStart: ")
}

override fun onResume() {
    super.onResume()
    Log.d(TAG, "onResume: ")
}

override fun onPause() {
    super.onPause()
    Log.d(TAG, "onPause: ")
}

override fun onStop() {
    super.onStop()
    Log.d(TAG, "onStop: ")
}

override fun onDestroyView() {
    super.onDestroyView()
    Log.d(TAG, "onDestroyView: ")
}

override fun onDestroy() {
    super.onDestroy()
    Log.d(TAG, "onDestroy: ")
}

override fun onDetach() {
    super.onDetach()
    Log.d(TAG, "onDetach: ")
}
}
当应用启动后,会在控制台打印: 
当点击按钮后,RightFragment 会被替换,这时控制台会打印:
注意:如果替换的时候没有调用 addToBackStack() 方法,此时 RightFragment 就会进入销毁状态,onDestroy()、onDetach() 就会被执行。
点击 Back 按钮后:
再次点击 Back 按钮: 
值得一提的是,在 Fragment 中可以通过 onSaveInstanceState() 方法来保存数据,因为进入停止状态的 Fragment 有可能在系统内存不足的时候被回收,保存下来的数据在 onCreate()、onCreateView() 和 onActivityCreated() 这3个方法中都可以重新得到,它们都包含一个 Bundle 类型的 savedInstanceState 参数。
2.5 动态加载布局的技巧
虽然动态添加 Fragment 的功能很强大,可以解决很多实际开发中的问题,但是它毕竟只是在一个布局文件中进行一些添加和替换操作。如果程序能够根据设备的分辨率或屏幕大小,在运行时决定加载哪个布局,那我们可以发会的空间就更多了。
2.5.1 使用限定符
修改 activity_main.xml
<?xml version="1.0" encoding="utf-8"?>
<LinearLayout xmlns:android="http://schemas.android.com/apk/res/android"
xmlns:app="http://schemas.android.com/apk/res-auto"
xmlns:tools="http://schemas.android.com/tools"
android:layout\_width="match\_parent"
android:layout\_height="match\_parent"
tools:context=".MainActivity">

<fragment
    android:id="@+id/leftFrag"
    android:layout\_width="match\_parent"
    android:layout\_height="match\_parent"
    android:name="com.example.fragmenttest.LeftFragment"/>
</LinearLayout>
在 res 下新建 layout-large 文件夹,在里面创建一个 activity_main.xml
<?xml version="1.0" encoding="utf-8"?>
<LinearLayout xmlns:android="http://schemas.android.com/apk/res/android"
android:layout\_width="match\_parent"
android:layout\_height="match\_parent">

<fragment
    android:layout\_width="0dp"
    android:layout\_height="match\_parent"
    android:layout\_weight="1"
    android:name="com.example.fragmenttest.LeftFragment"/>

<fragment
    android:layout\_width="0dp"
    android:layout\_height="match\_parent"
    android:layout\_weight="3"
    android:name="com.example.fragmenttest.RightFragment"/>
</LinearLayout>
可以看到,layout/activity_main 布局只包含了一个 Fragment,即单页模式,
而layout-large/activity_main 布局则包含两个 Fragment,即双页模式,其中 large 就是限定符。屏幕被识别为 large 的设备就会自动加载 layout-large 下的布局,小屏幕的设备则还是会加载 layout 文件夹下的布局。
注释掉 replaceFragment() 中的代码。
运行效果:
平板模拟器
手机模拟器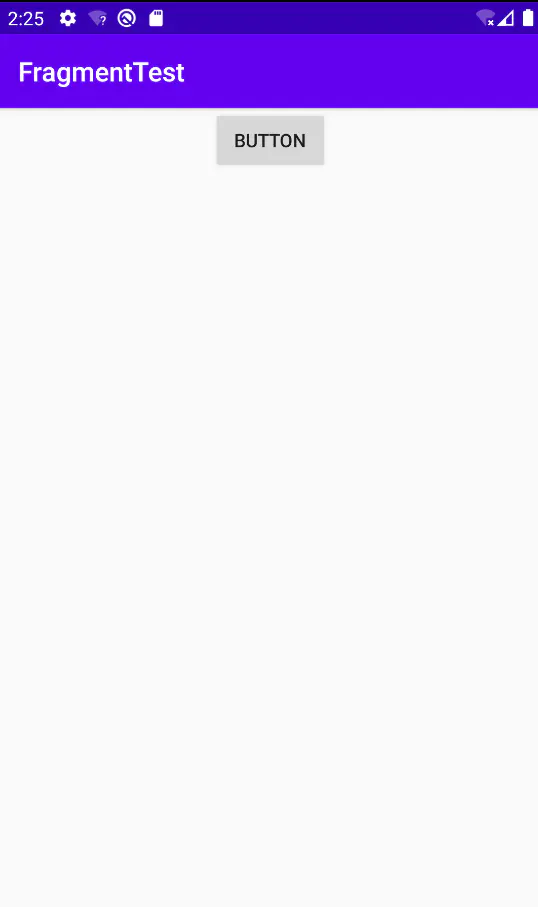
Android 中常见的限定符

2.5.3 使用最小宽度限定符
在前面我们成功的使用了 large 限定符解决了单页双页的判断问题,不过很快又有一个新的问题出现了,large 到底是指多大呢?有时候我们可以更加灵活的为不同设备加载布局,不管它们是不是被系统认定为 large,这时就可以使用最小宽度限定符(smallest-width qualifer)。
最小宽度限定符允许我们对屏幕的宽度指定一个最小值(以 dp 为单位),然后以这个最小值为临界点,屏幕大于这个值就会加载一个布局,屏幕小于这个值就会加载另一个布局。
在 res 目录下创建 layout-sw600dp 文件夹,里面创建 activity_main.xml
<?xml version="1.0" encoding="utf-8"?>
<LinearLayout xmlns:android="http://schemas.android.com/apk/res/android"
android:layout\_width="match\_parent"
android:layout\_height="match\_parent">

<fragment
    android:id="@+id/leftFrag"
    android:layout\_width="0dp"
    android:layout\_height="match\_parent"
    android:layout\_weight="1"
    android:name="com.example.fragmenttest.LeftFragment"/>

<fragment
    android:id="@+id/rightFrag"
    android:layout\_width="0dp"
    android:layout\_height="match\_parent"
    android:layout\_weight="3"
    android:name="com.example.fragmenttest.RightFragment"/>
</LinearLayout>
如果屏幕大于 600dp 就会加载 layout-sw600dp/activity_main.xml,
屏幕小于 600dp 就会加载 layout/activity_main.xml 布局。
一点题外话:
我们有《Android学习、面试;文档、视频资源免费获取》,可复制链接后用石墨文档 App 或小程序打开链接或者私信我资料领取。
https://shimo.im/docs/TG8PDh9...
评论
登录后参与技术讨论,分享你的经验与见解。
登录 / 注册暂无评论