记-更改el-table源码,使用el-scrollbar滚动

文章目录
在项目使用中,甲方要求页面里滚动条不要用浏览器自带的,要用美观的插件。其中在使用element-ui的el-table时犯了难,因为el-table默认就是使用浏览器的滚动条,然后各种百度搜怎么整,一般网上的都是改滚动条样式,这个只有webkit内核浏览器支持,兼容性不好,后本人想到直接改el-table源码,使用element-ui自己的滚动条组件el-scrollbar,以下是更改具体内容:
1、从github上clone element-ui源码到本地
2、找到packages/table/src/table.vue,插入以下代码
    // 导入el-scrollbar组件
   import ElScrollbar from 'element-ui/packages/scrollbar';
   // 获取浏览器滚动条宽度方法
   import scrollbarWidth from 'element-ui/src/utils/scrollbar-width';
   {
   components: {
        ...
      ElScrollbar
    },
    computed: {
        ...
        bodyWrapperScrollbar() {
            return this.$refs.bodyWrapperScrollbar.wrap;
      },
    // 这个方法是当el-table设置max-height时,el-scroll height:100%失效,导致el-scroll-wrap的margin-right失效,所以给el-scroll设置height为max-height的高度
          bodyScrollHeight() {
            const { headerHeight = 0, footerHeight = 0} = this.layout;
            if (this.maxHeight) {
              const maxHeight = parseHeight(this.maxHeight);
              if (typeof maxHeight === 'number') {
                return {
                  'height': (maxHeight - footerHeight - (this.showHeader ? headerHeight : 0)) + 'px'
                };
              }
            }
            return {height: '100%'};
          },
          // 这个方法就用到了scrollbarWidth,当el-table设置height为固定高度时,el-scroll-wrap的100%和固定高度一样,导致margin-bottom失效,这里直接把el-scroll-wrap的高度算好,是el-table固定高度加上滚动条宽度
          bodyScrollWrapHeight() {
            const { headerHeight = 0, bodyHeight, footerHeight = 0} = this.layout;
            if (this.height) {
              return {
                height: bodyHeight ? bodyHeight + scrollbarWidth() + 'px' : ''
              };
            } else if (this.maxHeight) {
              const maxHeight = parseHeight(this.maxHeight);
              if (typeof maxHeight === 'number') {
                return {
                  'height': (maxHeight - footerHeight - (this.showHeader ? headerHeight : 0) + scrollbarWidth()) + 'px'
                };
              }
            }
            return {};
          }
        },
     methods: {
        bindEvents() {
        ...
        // 监听scrollbar滚动事件
        this.bodyWrapperScrollbar.addEventListener('scroll', this.syncPostion, {passive: true});
      },

      unbindEvents() {
        ...
        // 解除监听
        this.bodyWrapperScrollbar.removeEventListener('scroll', this.syncPostion, {passive: true});
      },
      syncPostion: throttle(20, function() {
        // 把原来的注释掉,这句是用来根据table-body滑动滚动条时获取滚动信息,用来同步表头滚动的
        // const { scrollLeft, scrollTop, offsetWidth, scrollWidth } = this.bodyWrapper;
        // 使用scrollbar的滚动信息
        const { scrollLeft, scrollTop, offsetWidth, scrollWidth } = this.bodyWrapperScrollbar;
      }),
      // 空数组时高度计算下
      emptyBlockStyle() {
        const { bodyHeight, appendHeight} = this.layout;
        if (this.data && this.data.length) return null;
        // let height = '100%';
        let height = bodyHeight + 'px';
        if (this.layout.appendHeight) {
          // height = `calc(100% - ${this.layout.appendHeight}px)`;
          height = bodyHeight - appendHeight + 'px';
        }
        return {
          width: this.bodyWidth,
          height
        };
      },

    }
template里
    <div
      ref="bodyWrapper"
      class="el-table__body-wrapper"
      :class="[layout.scrollX ? `is-scrolling-${scrollPosition}` : 'is-scrolling-none']"
      :style="[bodyHeight]">
      <!-- 在table-body中增加el-scrollbar-->
      <el-scrollbar :style="[bodyScrollHeight]" :wrap-style="[bodyScrollWrapHeight]" ref="bodyWrapperScrollbar">
        <table-body
          :context="context"
          :store="store"
          :stripe="stripe"
          :row-class-name="rowClassName"
          :row-style="rowStyle"
          :highlight="highlightCurrentRow"
          :style="{
           width: bodyWidth
        }"
        >
        </table-body>


      <div
        v-if="!data || data.length === 0"
        class="el-table__empty-block"
        ref="emptyBlock"
        :style="emptyBlockStyle"
      >
        <span class="el-table__empty-text">
          <slot name="empty">{{ emptyText || t('el.table.emptyText') }}</slot>
        </span>
      </div>
      <div
        v-if="$slots.append"
        class="el-table__append-wrapper"
        ref="appendWrapper"
      >
        <slot name="append"></slot>
      </div>
      </el-scrollbar>
    </div>
3、找到table-body.js
    // 竖向滚动条位置原来是根据各个浏览器滚动条宽度来的,改成插件滚动条宽度
    // import scrollbarWidth from 'element-ui/src/utils/scrollbar-width';
    this.gutterWidth = 10;
    // this.gutterWidth = scrollbarWidth();
    computed: {
        // 这里原来是直接return this.$parent,因为加了el-scrollbar,所以得判断下
        table() {
          let el = null;
          if (this.$parent.table || this.$parent.layout) {
            el = this.$parent;
          } else {
            el = this.$parent.$parent;
          }
          return el;
        },
    }
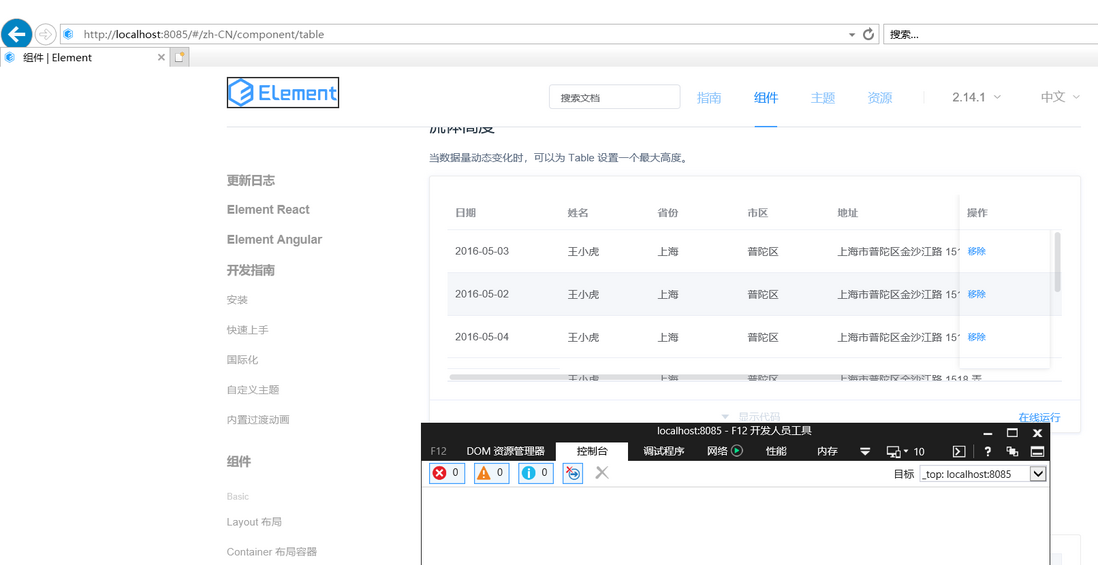
4、下面来看看效果,兼容IE10


评论
登录后参与技术讨论,分享你的经验与见解。
登录 / 注册暂无评论