SpringMVC第二天

文章目录
一、response

1搭建环境
2返回值是string类型

3响应之返回值是void类型
/**
 * 是void
 * 请求转发一次请求,不用编写项目的名称
 */
@RequestMapping("/testVoid")
public void testVoid(HttpServletRequest request, HttpServletResponse response) throws Exception {
    System.out.println("testVoid方法执行了...");
    // 编写请求转发的程序
    // request.getRequestDispatcher("/WEB-INF/pages/success.jsp").forward(request,response);

    // 重定向 不能跳转到pages里边的代码
    // response.sendRedirect(request.getContextPath()+"/index.jsp");

    // 设置中文乱码
    response.setCharacterEncoding("UTF-8");
    response.setContentType("text/html;charset=UTF-8");

    // 直接会进行响应
    response.getWriter().print("你好");

    return;//必须得加return 否则404
}
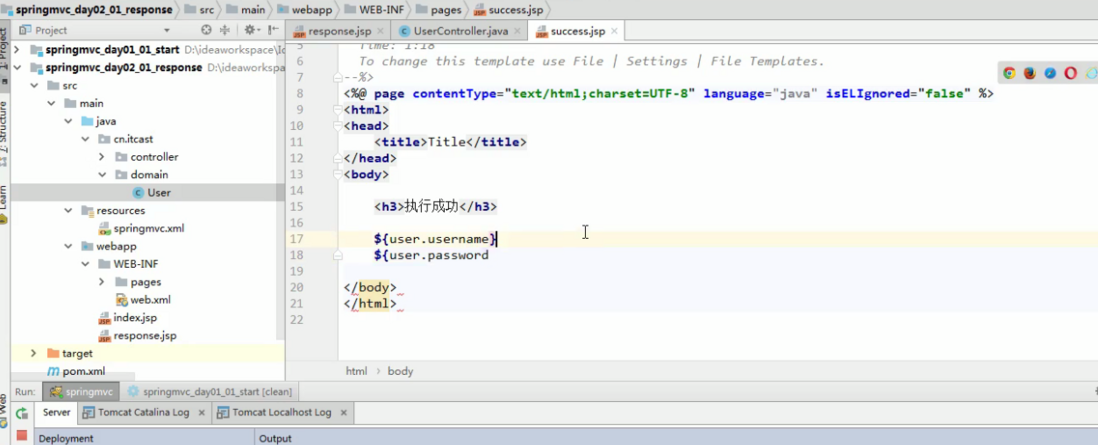
4 响应之返回值是ModelAndView类型
/**
 * 返回ModelAndView
 * @return
 */
@RequestMapping("/testModelAndView")
public ModelAndView testModelAndView(){
    // 创建ModelAndView对象
    ModelAndView mv = new ModelAndView();
    System.out.println("testModelAndView方法执行了...");
    // 模拟从数据库中查询出User对象
    User user = new User();
    user.setUsername("小凤");
    user.setPassword("456");
    user.setAge(30);

    // 把user对象存储到mv对象中,也会把user对象存入到request对象
    mv.addObject("user",user);

    // 跳转到哪个页面
    mv.setViewName("success");

    return mv;
}
5 响应之使用forward和redirect进行页面跳转
/**
 * 使用关键字的方式进行转发或者重定向
 * 用不了视图解析器
 * @return
 */
@RequestMapping("/testForwardOrRedirect")
public String testForwardOrRedirect(){
    System.out.println("testForwardOrRedirect方法执行了...");

    // 请求的转发
    // return "forward:/WEB-INF/pages/success.jsp";

    // 重定向
    return "redirect:/index.jsp";
}
6 响应json数据之过滤静态资源
springmvc.xml
<!--前端控制器,哪些静态资源不拦截-->
<mvc:resources location="/css/" mapping="/css/**"/>
<mvc:resources location="/images/" mapping="/images/**"/>
<mvc:resources location="/js/" mapping="/js/**"/>
7 响应json数据之发送ajax的请求
response.jsp
<%--
Created by IntelliJ IDEA.
User: Administrator
Date: 2018/5/1
Time: 1:16
To change this template use File | Settings | File Templates.
--%>
<%@ page contentType="text/html;charset=UTF-8" language="java" %>
<html>
<head>
<title>Title</title>

<script src="js/jquery.min.js"></script>

<script>
    // 页面加载,绑定单击事件
    $(function(){
        $("#btn").click(function(){
            // alert("hello btn");
            // 发送ajax请求
            $.ajax({
                // 编写json格式,设置属性和值
                url:"user/testAjax",
                contentType:"application/json;charset=UTF-8",
                data:'{"username":"hehe","password":"123","age":30}',
                dataType:"json",
                type:"post",
                success:function(data){
                    // data服务器端响应的json的数据,进行解析
                    alert(data);
                    alert(data.username);
                    alert(data.password);
                    alert(data.age);
                }
            });

        });
    });

</script>
</head>
<body>
<a href="user/testString" >testString</a>

<br/>

<a href="user/testVoid" >testVoid</a>

<br/>

<a href="user/testModelAndView" >testModelAndView</a>

<br/>

<a href="user/testForwardOrRedirect" >testForwardOrRedirect</a>

<br/>

<button id="btn">发送ajax的请求</button>
</body>
</html>
8 响应json数据之响应json格式数据
/**
 * 模拟异步请求响应
 */
@RequestMapping("/testAjax")
public @ResponseBody User testAjax(@RequestBody User user){
    System.out.println("testAjax方法执行了...");
    // 客户端发送ajax的请求,传的是json字符串,后端把json字符串封装到user对象中
    System.out.println(user);
    // 做响应,模拟查询数据库
    user.setUsername("haha");
    user.setAge(40);
    // 做响应
    return user;
}
二、文件上传及其原理
1原理分析和搭建环境
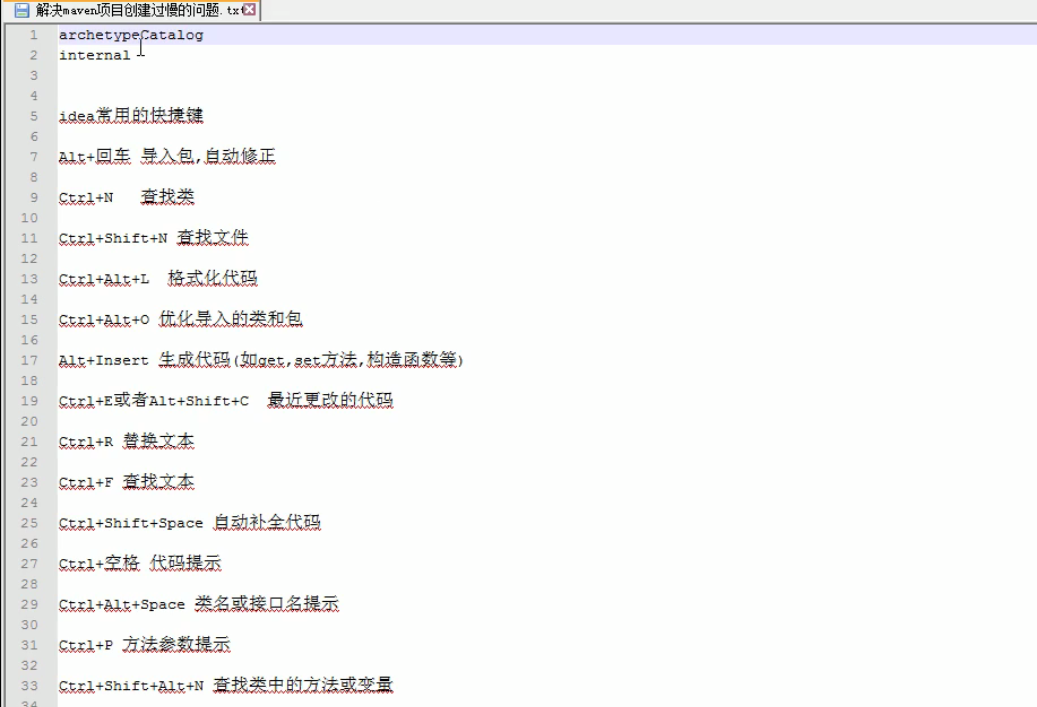
防止联网要下载很多东西
这样的话可以跳过联网下载的过程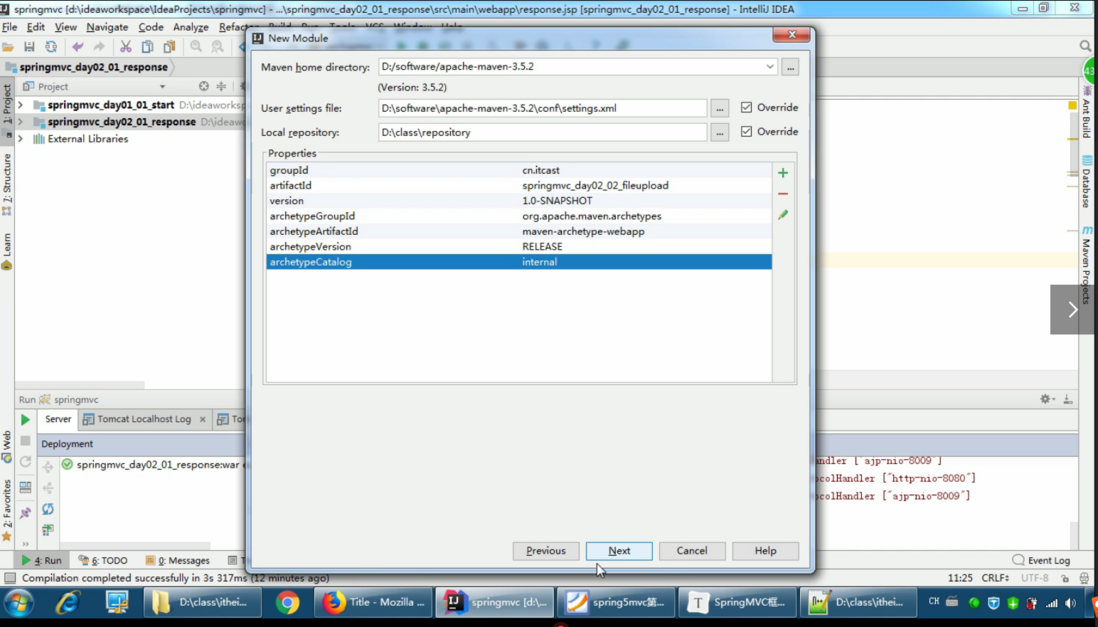
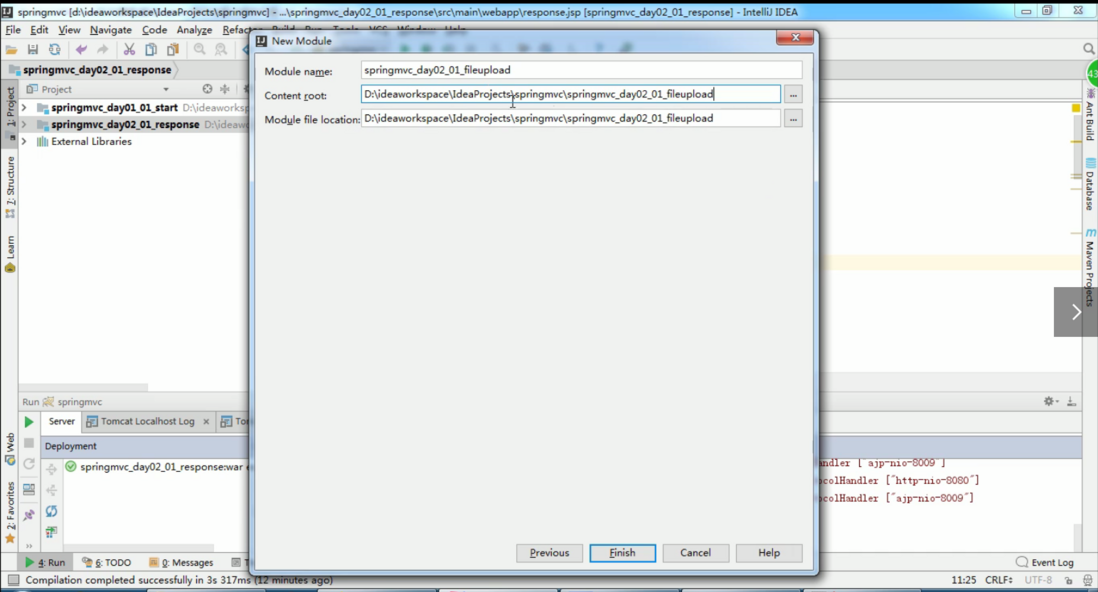
借助第三方组件上传
传统的这种方式不能配置文件解析器
/**
 * 文件上传
 * @return
 */
@RequestMapping("/fileupload1")
public String fileuoload1(HttpServletRequest request) throws Exception {
    System.out.println("文件上传...");

    // 使用fileupload组件完成文件上传
    // 上传的位置
    String path = request.getSession().getServletContext().getRealPath("/uploads/");
    // 判断,该路径是否存在
    File file = new File(path);
    if(!file.exists()){
        // 创建该文件夹
        file.mkdirs();
    }

    // 解析request对象,获取上传文件项
    DiskFileItemFactory factory = new DiskFileItemFactory();
    ServletFileUpload upload = new ServletFileUpload(factory);
    // 解析request
    List<FileItem> items = upload.parseRequest(request);
    // 遍历
    for(FileItem item:items){
        // 进行判断,当前item对象是否是上传文件项
        if(item.isFormField()){
            // 说明普通表单向
        }else{
            // 说明上传文件项
            // 获取上传文件的名称
            String filename = item.getName();
            // 把文件的名称设置唯一值,uuid
            String uuid = UUID.randomUUID().toString().replace("-", "");
            filename = uuid+"_"+filename;
            // 完成文件上传
            item.write(new File(path,filename));
            // 删除临时文件
            item.delete();
        }
    }

    return "success";
}
index.jsp的修改
<form action="/user/fileupload1" method="post" enctype="multipart/form-data">
    选择文件:<input type="file" name="upload" /><br/>
    <input type="submit" value="上传" />
</form>
spring mvc的方式上传
文件解析器返回对象绑定到上传方法的upload对象上去
这个文件解析器的id不能改变
方法
/**
 * 文件上传
 * @return
 */
@RequestMapping("/fileupload1")
public String fileuoload1(HttpServletRequest request) throws Exception {
    System.out.println("文件上传...");

    // 使用fileupload组件完成文件上传
    // 上传的位置
    String path = request.getSession().getServletContext().getRealPath("/uploads/");
    // 判断,该路径是否存在
    File file = new File(path);
    if(!file.exists()){
        // 创建该文件夹
        file.mkdirs();
    }

    // 解析request对象,获取上传文件项
    DiskFileItemFactory factory = new DiskFileItemFactory();
    ServletFileUpload upload = new ServletFileUpload(factory);
    // 解析request
    List<FileItem> items = upload.parseRequest(request);
    // 遍历
    for(FileItem item:items){
        // 进行判断,当前item对象是否是上传文件项
        if(item.isFormField()){
            // 说明普通表单向
        }else{
            // 说明上传文件项
            // 获取上传文件的名称
            String filename = item.getName();
            // 把文件的名称设置唯一值,uuid
            String uuid = UUID.randomUUID().toString().replace("-", "");
            filename = uuid+"_"+filename;
            // 完成文件上传
            item.write(new File(path,filename));
            // 删除临时文件
            item.delete();
        }
    }

    return "success";
}
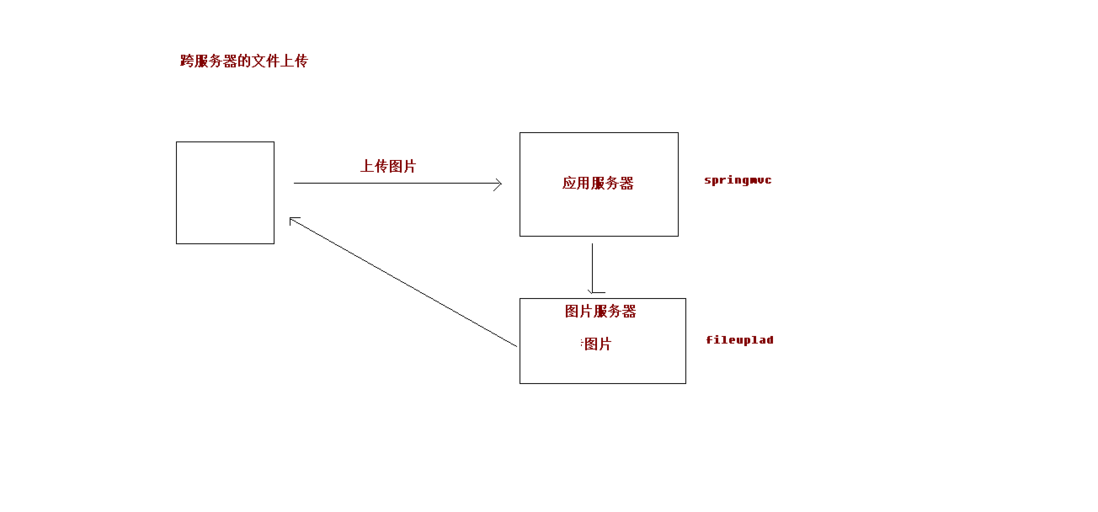
上传到其他服务器
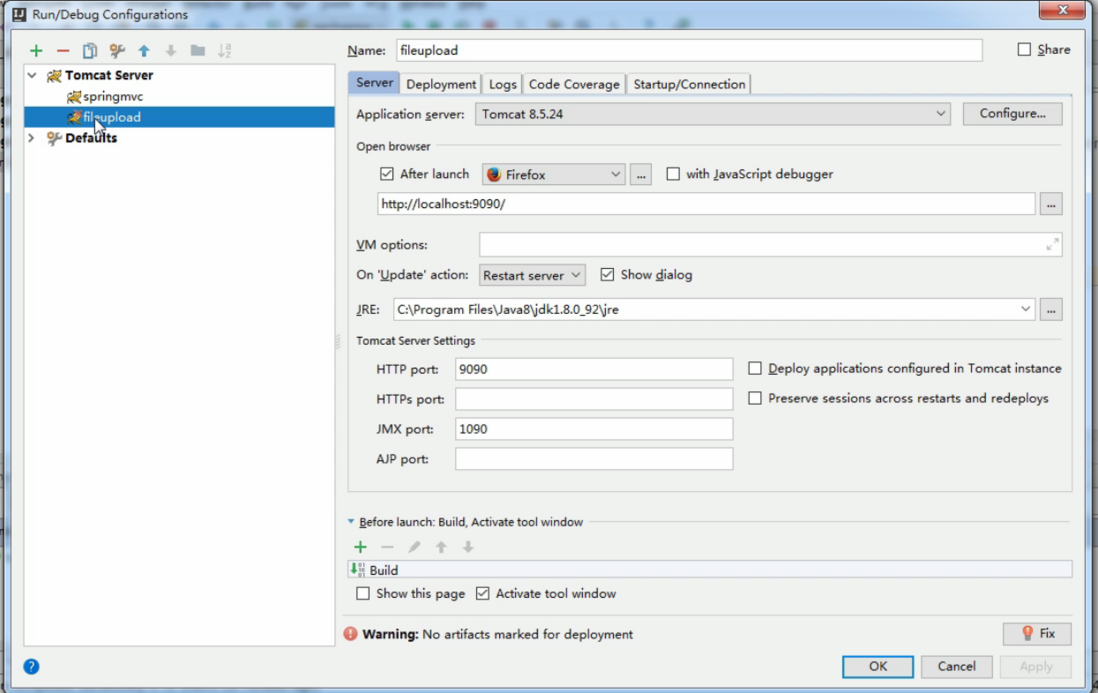
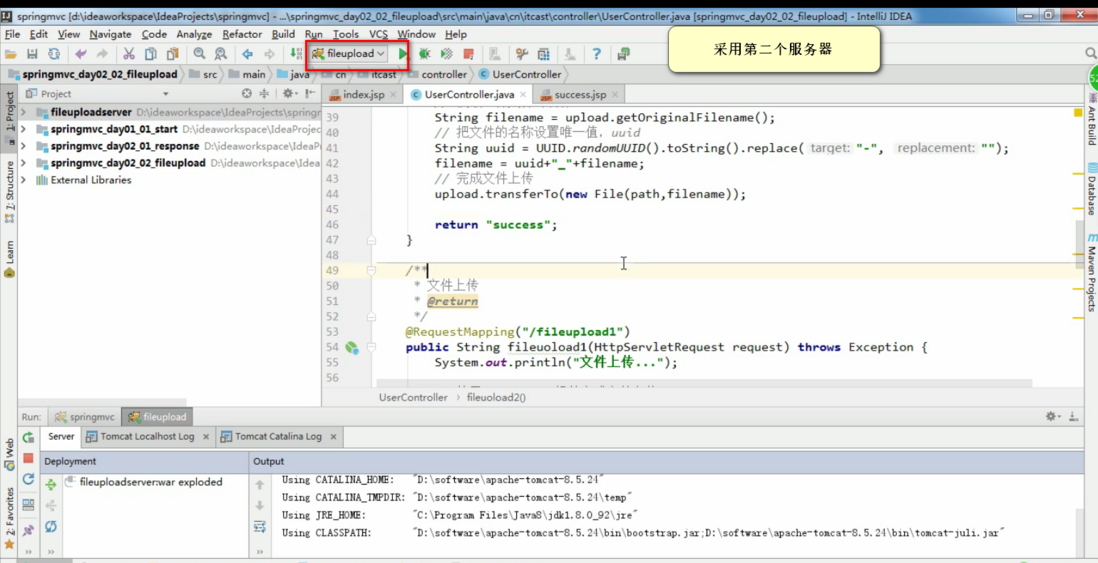
需要跑两个tomcat服务器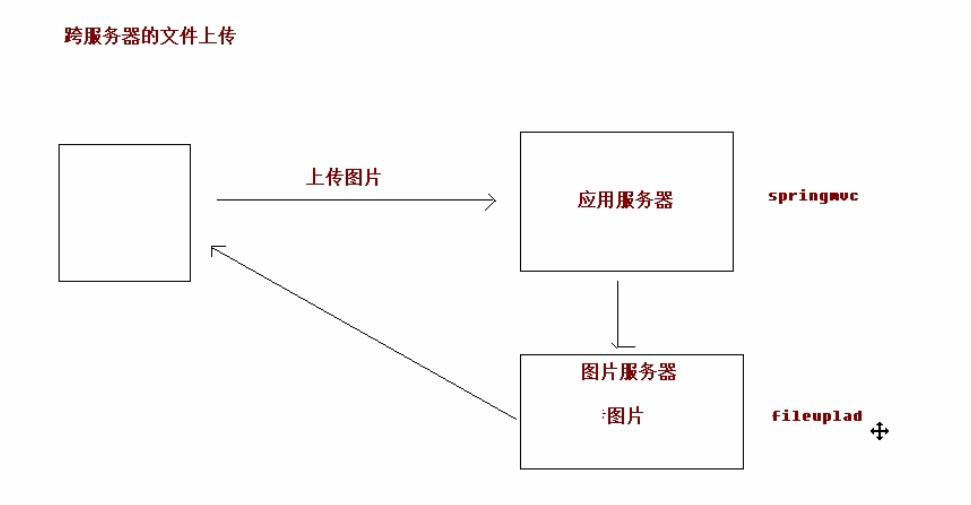
3上传到其他服务器
方法的代码
/**
 * 跨服务器文件上传
 * @return
 */
@RequestMapping("/fileupload3")
public String fileuoload3(MultipartFile upload) throws Exception {
    System.out.println("跨服务器文件上传...");

    // 定义上传文件服务器路径
    String path = "http://localhost:9090/uploads/";

    // 说明上传文件项
    // 获取上传文件的名称
    String filename = upload.getOriginalFilename();
    // 把文件的名称设置唯一值,uuid
    String uuid = UUID.randomUUID().toString().replace("-", "");
    filename = uuid+"_"+filename;

    // 创建客户端的对象
    Client client = Client.create();

    // 和图片服务器进行连接
    WebResource webResource = client.resource(path + filename);

    // 上传文件
    webResource.put(upload.getBytes());

    return "success";
}
jsp中的代码
<h3>跨服务器文件上传</h3>

<form action="/user/fileupload3" method="post" enctype="multipart/form-data">
    选择文件:<input type="file" name="upload" /><br/>
    <input type="submit" value="上传" />
</form>
需要下边的jar包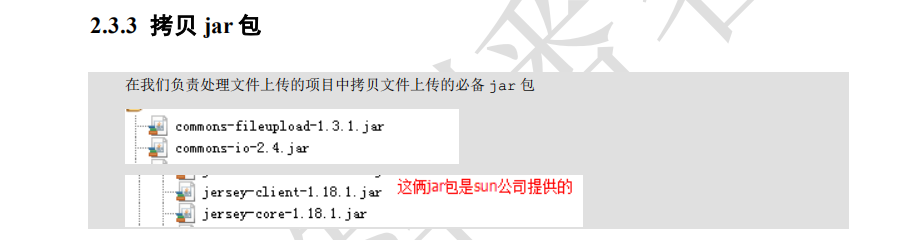

<dependency>
  <groupId>com.sun.jersey</groupId>
  <artifactId>jersey-core</artifactId>
  <version>1.18.1</version>
</dependency>
<dependency>
  <groupId>com.sun.jersey</groupId>
  <artifactId>jersey-client</artifactId>
  <version>1.18.1</version>
</dependency>
启动两个服务器
跨服务器上传遇到的错误409表示必须在创建存在上传文件的uploads文件夹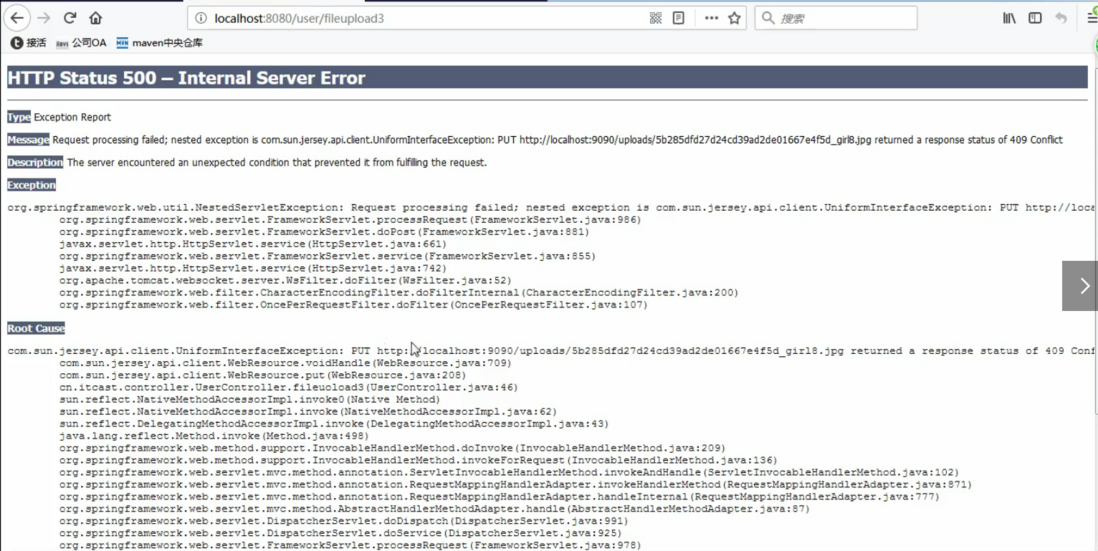

403没权限表示tomcat没有写入的权限
在tomcat的conf的web.xml中加入
<init-param>
<param-name>readonly</param-name>
<param-value>false</param-value>
</init-param>
且文件服务器的wepapp下创建uploads文件夹
三、异常处理和拦截器
练习目录
3-1异常处理
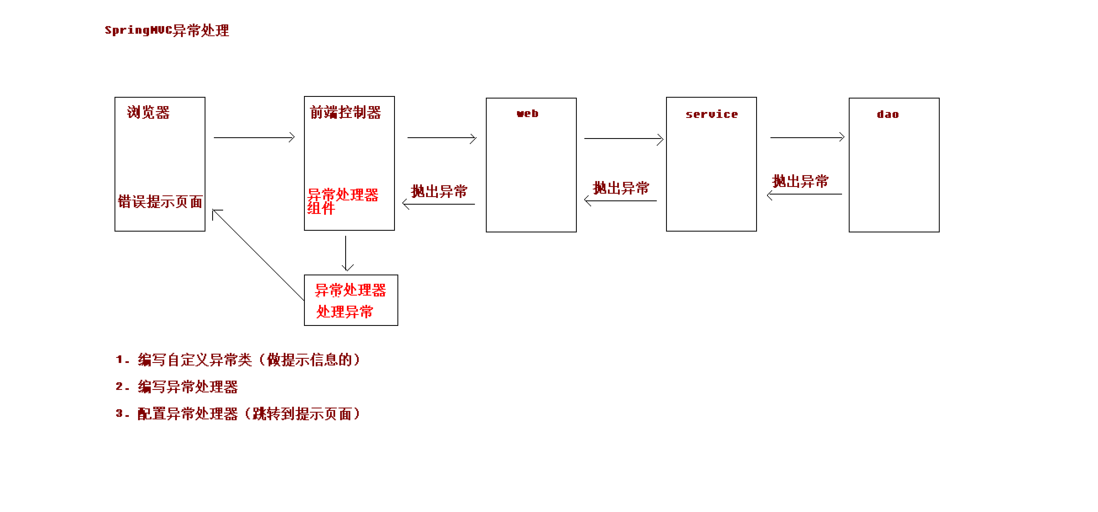
目录
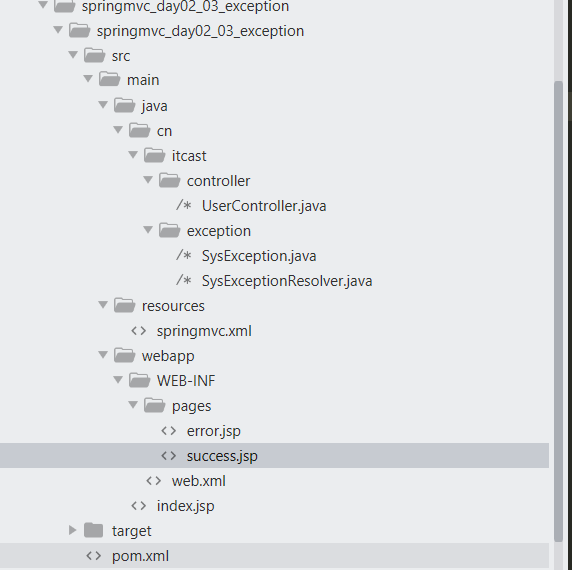
具体文件
UserController.java
package cn.itcast.controller;
import cn.itcast.exception.SysException;
import org.springframework.stereotype.Controller;
import org.springframework.web.bind.annotation.RequestMapping;
@Controller
@RequestMapping("/user")
public class UserController {
@RequestMapping("/testException")
public String testException() throws SysException{
    System.out.println("testException执行了...");

    try {
        // 模拟异常
        int a = 10/0;
    } catch (Exception e) {
        // 打印异常信息
        e.printStackTrace();
        // 抛出自定义异常信息
        throw new SysException("查询所有用户出现错误了...");
    }


    return "success";
}
}
SysException.java
package cn.itcast.exception;
/**
- 自定义异常类
*/
public class SysException extends Exception{
// 存储提示信息的
private String message;

public String getMessage() {
    return message;
}

public void setMessage(String message) {
    this.message = message;
}

public SysException(String message) {
    this.message = message;
}
}
SysExceptionResolver.java
package cn.itcast.exception;
import org.springframework.web.servlet.HandlerExceptionResolver;
import org.springframework.web.servlet.ModelAndView;
import javax.servlet.http.HttpServletRequest;
import javax.servlet.http.HttpServletResponse;
/**
- 异常处理器
*/
public class SysExceptionResolver implements HandlerExceptionResolver{
/**
 * 处理异常业务逻辑
 * @param request
 * @param response
 * @param handler
 * @param ex
 * @return
 */
public ModelAndView resolveException(HttpServletRequest request, HttpServletResponse response, Object handler, Exception ex) {
    // 获取到异常对象
    SysException e = null;
    if(ex instanceof SysException){
        e = (SysException)ex;
    }else{
        e = new SysException("系统正在维护....");
    }
    // 创建ModelAndView对象
    ModelAndView mv = new ModelAndView();
    mv.addObject("errorMsg",e.getMessage());
    mv.setViewName("error");
    return mv;
}
}
springmvc.xml
<?xml version="1.0" encoding="UTF-8"?>
<beans xmlns="http://www.springframework.org/schema/beans"
   xmlns:mvc="http://www.springframework.org/schema/mvc"
   xmlns:context="http://www.springframework.org/schema/context"
   xmlns:xsi="http://www.w3.org/2001/XMLSchema-instance"
   xsi:schemaLocation="
    http://www.springframework.org/schema/beans
    http://www.springframework.org/schema/beans/spring-beans.xsd
    http://www.springframework.org/schema/mvc
    http://www.springframework.org/schema/mvc/spring-mvc.xsd
    http://www.springframework.org/schema/context
    http://www.springframework.org/schema/context/spring-context.xsd">

<!-- 开启注解扫描 -->
<context:component-scan base-package="cn.itcast"/>

<!-- 视图解析器对象 -->
<bean id="internalResourceViewResolver" class="org.springframework.web.servlet.view.InternalResourceViewResolver">
    <property name="prefix" value="/WEB-INF/pages/"/>
    <property name="suffix" value=".jsp"/>
</bean>

<!--前端控制器,哪些静态资源不拦截-->
<mvc:resources location="/css/" mapping="/css/**"/>
<mvc:resources location="/images/" mapping="/images/**"/>
<mvc:resources location="/js/" mapping="/js/**"/>

<!--配置异常处理器-->
<bean id="sysExceptionResolver" class="cn.itcast.exception.SysExceptionResolver"/>

<!-- 开启SpringMVC框架注解的支持 -->
<mvc:annotation-driven />
</beans>
webapp/pages/error.jsp
<%--
Created by IntelliJ IDEA.
User: Administrator
Date: 2018/5/5
Time: 22:28
To change this template use File | Settings | File Templates.
--%>
<%@ page contentType="text/html;charset=UTF-8" language="java" isELIgnored="false" %>
<html>
<head>
<title>Title</title></head>
<body>
${errorMsg}
</body>
</html>
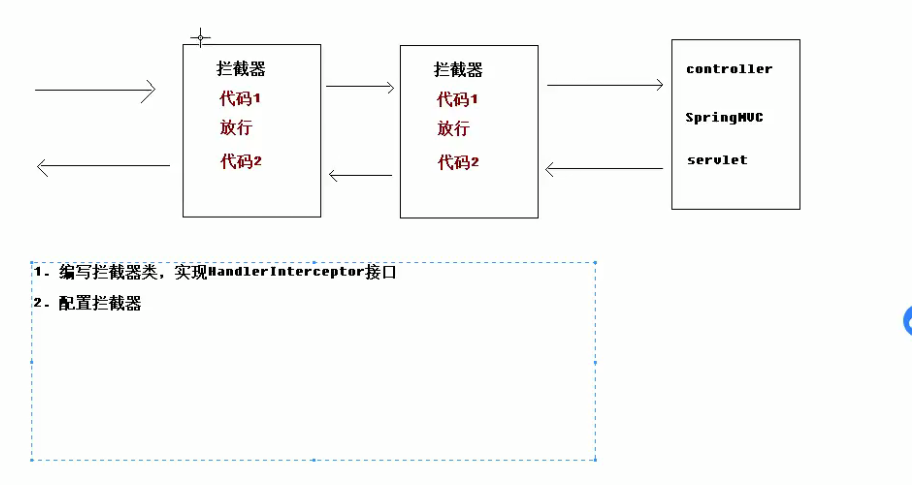
3-2拦截器

sprigmvc配置文件
<?xml version="1.0" encoding="UTF-8"?>
<beans xmlns="http://www.springframework.org/schema/beans"
   xmlns:mvc="http://www.springframework.org/schema/mvc"
   xmlns:context="http://www.springframework.org/schema/context"
   xmlns:xsi="http://www.w3.org/2001/XMLSchema-instance"
   xsi:schemaLocation="
    http://www.springframework.org/schema/beans
    http://www.springframework.org/schema/beans/spring-beans.xsd
    http://www.springframework.org/schema/mvc
    http://www.springframework.org/schema/mvc/spring-mvc.xsd
    http://www.springframework.org/schema/context
    http://www.springframework.org/schema/context/spring-context.xsd">

<!-- 开启注解扫描 -->
<context:component-scan base-package="cn.itcast"/>

<!-- 视图解析器对象 -->
<bean id="internalResourceViewResolver" class="org.springframework.web.servlet.view.InternalResourceViewResolver">
    <property name="prefix" value="/WEB-INF/pages/"/>
    <property name="suffix" value=".jsp"/>
</bean>

<!--前端控制器,哪些静态资源不拦截-->
<mvc:resources location="/css/" mapping="/css/**"/>
<mvc:resources location="/images/" mapping="/images/**"/>
<mvc:resources location="/js/" mapping="/js/**"/>

<!--配置拦截器-->
<mvc:interceptors>
    <!--配置拦截器-->
    <mvc:interceptor>
        <!--要拦截的具体的方法-->
        <mvc:mapping path="/user/*"/>
        <!--不要拦截的方法
        <mvc:exclude-mapping path=""/>
        -->
        <!--配置拦截器对象-->
        <bean class="cn.itcast.controller.cn.itcast.interceptor.MyInterceptor1" />
    </mvc:interceptor>

    <!--配置第二个拦截器-->
    <mvc:interceptor>
        <!--要拦截的具体的方法-->
        <mvc:mapping path="/**"/>
        <!--不要拦截的方法
        <mvc:exclude-mapping path=""/>
        -->
        <!--配置拦截器对象-->
        <bean class="cn.itcast.controller.cn.itcast.interceptor.MyInterceptor2" />
    </mvc:interceptor>
</mvc:interceptors>

<!-- 开启SpringMVC框架注解的支持 -->
<mvc:annotation-driven />
</beans>
拦截器类1
MyInterceptor1.java
package cn.itcast.controller.cn.itcast.interceptor;
import org.springframework.web.servlet.HandlerInterceptor;
import org.springframework.web.servlet.ModelAndView;
import javax.servlet.http.HttpServletRequest;
import javax.servlet.http.HttpServletResponse;
/**
- 自定义拦截器
*/
public class MyInterceptor1 implements HandlerInterceptor{
/**
 * 预处理,controller方法执行前
 * return true 放行,执行下一个拦截器,如果没有,执行controller中的方法
 * return false不放行
 * @param request
 * @param response
 * @param handler
 * @return
 * @throws Exception
 */
public boolean preHandle(HttpServletRequest request, HttpServletResponse response, Object handler) throws Exception {
    System.out.println("MyInterceptor1执行了...前1111");
    // request.getRequestDispatcher("/WEB-INF/pages/error.jsp").forward(request,response);
    //return false;跳转页面
    return true;
}

/**
 * 后处理方法,controller方法执行后,success.jsp执行之前
 * @param request
 * @param response
 * @param handler
 * @param modelAndView
 * @throws Exception
 */
public void postHandle(HttpServletRequest request, HttpServletResponse response, Object handler, ModelAndView modelAndView) throws Exception {
    System.out.println("MyInterceptor1执行了...后1111");
    // request.getRequestDispatcher("/WEB-INF/pages/error.jsp").forward(request,response);
    //return false;跳转页面
}

/**
 * success.jsp页面执行后,该方法会执行
 * @param request
 * @param response
 * @param handler
 * @param ex
 * @throws Exception
 */
public void afterCompletion(HttpServletRequest request, HttpServletResponse response, Object handler, Exception ex) throws Exception {
    System.out.println("MyInterceptor1执行了...最后1111");
}
}
拦截器类2
package cn.itcast.controller.cn.itcast.interceptor;
import org.springframework.web.servlet.HandlerInterceptor;
import org.springframework.web.servlet.ModelAndView;
import javax.servlet.http.HttpServletRequest;
import javax.servlet.http.HttpServletResponse;
/**
- 自定义拦截器
*/
public class MyInterceptor2 implements HandlerInterceptor{
/**
 * 预处理,controller方法执行前
 * return true 放行,执行下一个拦截器,如果没有,执行controller中的方法
 * return false不放行
 * @param request
 * @param response
 * @param handler
 * @return
 * @throws Exception
 */
public boolean preHandle(HttpServletRequest request, HttpServletResponse response, Object handler) throws Exception {
    System.out.println("MyInterceptor1执行了...前2222");
    // request.getRequestDispatcher("/WEB-INF/pages/error.jsp").forward(request,response);
    return true;
}

/**
 * 后处理方法,controller方法执行后,success.jsp执行之前
 * @param request
 * @param response
 * @param handler
 * @param modelAndView
 * @throws Exception
 */
public void postHandle(HttpServletRequest request, HttpServletResponse response, Object handler, ModelAndView modelAndView) throws Exception {
    System.out.println("MyInterceptor1执行了...后2222");
    // request.getRequestDispatcher("/WEB-INF/pages/error.jsp").forward(request,response);
}

/**
 * success.jsp页面执行后,该方法会执行
 * @param request
 * @param response
 * @param handler
 * @param ex
 * @throws Exception
 */
public void afterCompletion(HttpServletRequest request, HttpServletResponse response, Object handler, Exception ex) throws Exception {
    System.out.println("MyInterceptor1执行了...最后2222");
}
}
success.jsp
<%--
Created by IntelliJ IDEA.
User: Administrator
Date: 2018/5/5
Time: 22:11
To change this template use File | Settings | File Templates.
--%>
<%@ page contentType="text/html;charset=UTF-8" language="java" %>
<html>
<head>
<title>Title</title></head>
<body>
<h3>执行成功</h3>

<% System.out.println("success.jsp执行了..."); %>
</body>
</html>
UserController.java
package cn.itcast.controller;
import org.springframework.stereotype.Controller;
import org.springframework.web.bind.annotation.RequestMapping;
@Controller
@RequestMapping("/user")
public class UserController {
@RequestMapping("/testInterceptor")
public String testInterceptor(){
    System.out.println("testInterceptor执行了...");
    return "success";
}
}
结果
如果有两个拦截器的情况下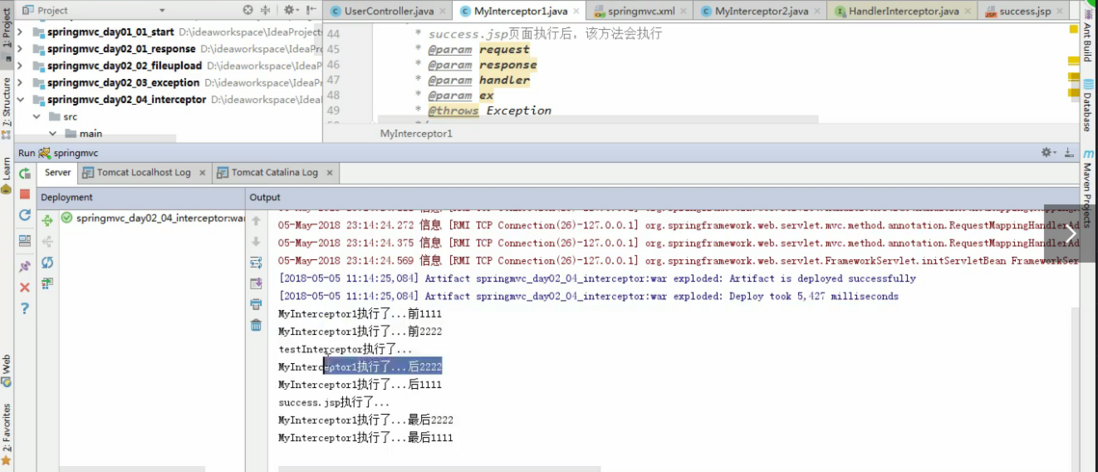
评论
登录后参与技术讨论,分享你的经验与见解。
登录 / 注册暂无评论