vscode插件开发之Swagger生成Ts

文章目录
vscode插件开发之Swagger生成Ts
当后端同学给到我们Swagger接口文档的时候,是不是在为要写接口类型烦恼,为了偷懒,那么就any吧。any一时爽,同事泪两行。为了高质量的偷懒,来开发个插件leizl.swagger-generate-ts。
日常案例
- 摆在我们前面的有一份接口平台地址和我们需要用到的接口名称。日常开发中我们一般需要做以下事情。
- 类型声明文件d.ts
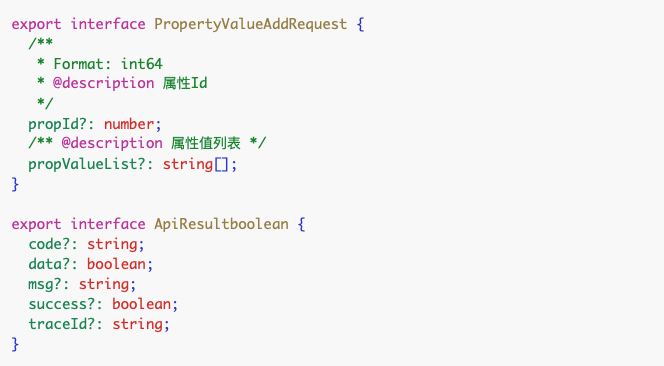
- 写一份service请求代码
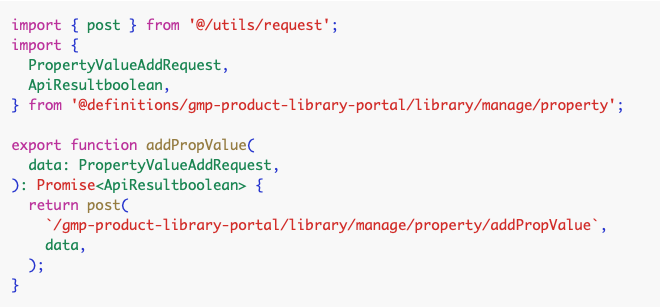
- 相信大家对这个过程挺熟悉的,又爱又恼。爱的是代码提示有了,补全功能很棒。恼的是写类型声明怎么这么烦,得一个一个复制粘贴过来,简直是效率杀手。本文的目的就是让这个过程自动化,爱不释手。
如何开发一个vscode插件
解决思路
flowchart LR
id1[(OpenApiJson)]-->|openapiTS解析|DefinitionsAst-->|遍历组装| TsFileAst --> |print| File- 从接口平台可以拿到一个openApiJson的请求,返回的是标准的openApi的Json格式,可参考https://editor.swagger.io 导出的Json。
- 通过openapi-typescript,将openApiJson解析成Typescript types。可参考 https://github.com/drwpow/ope...
- Ts Types 内容解析成 Ast,这里我定义为 DefinitionsAst。用到了recast,也可以用babel,recast可以帮我保留了注释的节点,所以就用了它。
- 有了这些前置准备,我们接下来就简单了,只需要遍历我们的DefinitionsAst,找到我们需要的接口RequestDto和ResponseDto,再去组装出我们新的FileAst(类型和Service),写入文件。组装Ast的核心api: recast.types.builders
- 源代码地址:https://github.com/leizelong/...
插件效果展示
Cmd+,打开用户设置,搜索swagger-generate-ts.openApiJsonUrlOptions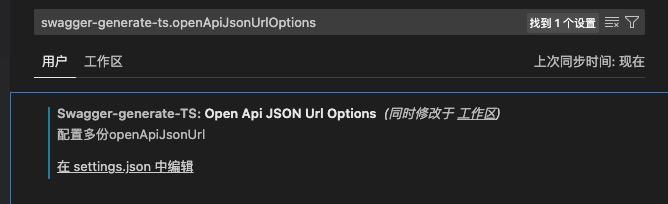
配置项格式 value 是一个标准的openApiJson的get请求
[ { "label": "admin", "value": "http://xxx/admin/v2/api-docs" }, { "label": "gmp-product-library-portal", "value": "http://xxx/gmp-product-library-portal/v2/api-docs" }, ]Cmp+shift+Pand typingSwaggerGenerateTs:生成Ts声明和Service请求.

- 生成的文件

回归到vscode插件开发。(重点讲述与Webview的交互)
- 可以看到我们的插件中用到了webView与vscode通信交互。官方文档关于WebView的文档内容举的列子太简单了,一个html模板。作为一个有理想的切图仔,肯定是不可能回归到原生js,jQuery之类的,怎么也得Vue、React一把梭。
vscode 提供的加载webView Api
import * as vscode from 'vscode';

export function activate(context: vscode.ExtensionContext) {
context.subscriptions.push(
  vscode.commands.registerCommand('catCoding.start', () => {
    // 创建和显示webview
    const panel = vscode.window.createWebviewPanel(
      'catCoding',
      'Cat Coding',
      vscode.ViewColumn.One,
      {}
    );

    // 设置HTML内容
    panel.webview.html = getWebviewContent();
  })
);
}

function getWebviewContent() {
return
  `
      <!DOCTYPE html>
      <html lang="en">
      <head>
          <meta charset="UTF-8">
          <meta name="viewport" content="width=device-width, initial-scale=1.0">
          <title>Cat Coding</title>
      </head>
      <body>
          <img src="https://media.giphy.com/media/JIX9t2j0ZTN9S/giphy.gif" width="300" />
      </body>
      </html>
  `;
}
Api也很简单嘛,不就是加载一个html模板字符串嘛,我来人造出来不就可以了。可以看到这个html和我们工程化项目构建出的index.html一模一样。那么开始移花接木
- 打包构建的index.html,这里我把根目录替换为
$root,方便后面的替换路径。
<!DOCTYPE html> <html lang="en"> <head> <meta charset="utf-8" /> <meta name="viewport" content="width=device-width,initial-scale=1" /> <meta name="theme-color" content="#000000" /> <meta name="description" content="Web site created using create-react-app" /> <title>React App</title> <script defer="defer" src="/$root/static/js/main.e3b97742.js"></script> <link href="/$root/static/css/main.9e304a5a.css" rel="stylesheet" /> </head> <body> <noscript>You need to enable JavaScript to run this app.</noscript> <div id="root"></div> </body> </html>- 打包构建的index.html,这里我把根目录替换为
- 我们的html文件有引入.css和.js文件,这些都是本地资源,vscode的webView对文件访问有限制,得用特殊的方法。
const baseUri = panel.webview.asWebviewUri(rootPath);这段代码必须要,否则无法读取文件,踩坑出来的,文档上没有写。
  // 加载React项目web-app构建的html文件。
  async function loadLocalHtml() {
    const htmlPath = path.resolve(extensionPath, "web-app/build/index.html");
    const webAppHtml = await fs.promises.readFile(htmlPath, {
      encoding: "utf-8",
    });
    //
    const rootPath = vscode.Uri.file(path.join(extensionPath, "web-app/build"));
    const baseUri = panel.webview.asWebviewUri(rootPath);
    panel.webview.html = webAppHtml.replace(/\/\$root/g, baseUri.toString());
  }
至此,加载WebView和我们的React工程化打通已完成一大半。剩下的就是Vscode和WebView两者之间的通信了。官方文档中有介绍,不过多阐述。注意点:是通过message事件名来传递消息的,要注意在开发模式下也会对message事件有消息推送,我们打个标识,代表是来着vscode的消息源。
useEffect(() => {
  function onMessage(event: { data: VsCodeMessage }) {
    const data = event.data; // The JSON data our extension sent
    if (data.source !== "vscode") return;
    console.log("vscode => message", data);
  }
  window.addEventListener("message", onMessage);
  return () => {
    window.removeEventListener("message", onMessage);
  };
}, []);
我们会发现,我们每次debug插件的时候想要更新webView的内容,都需要去build构建一下html,比较耗费时间。下一个阶段就是优化打通 webView的本地开发模式。也很简单粗暴,直接去下载localhost的html。css,js静态资源是通过http访问的,就没那么多限制。
async function loadRemoteHtml() { const { data: html } = await axios.get("http://localhost:3000"); panel.webview.html = html.replace( /\/\$root/g, "http://localhost:3000/$root", ); }- 这里还有一个细节问题就是,我没有找到哪个环境变量或者api可以表明是不是处于dev模式。我取了个巧,在本地写了个.config.json, 写入
{"debug": true},然后在.vscodeignore文件中忽略它,这样的话,发布之后的插件就读不到这个配置,就认为是生产模式了。
- 这里还有一个细节问题就是,我没有找到哪个环境变量或者api可以表明是不是处于dev模式。我取了个巧,在本地写了个.config.json, 写入
End
- 欢迎大家下载使用插件
leizl.swagger-generate-ts,觉得好用点个赞,一键三连。觉得不好用的地方,提个issue或者留言,好用的插件需要大家的批评与指点。 - 源码:https://github.com/leizelong/...
评论
登录后参与技术讨论,分享你的经验与见解。
登录 / 注册暂无评论