之前在SpringBoot项目中一直使用的是SpringFox提供的Swagger库,上了下官网发现已经有接近两年没出新版本了!前几天升级了SpringBoot 2.6.x 版本,发现这个库的兼容性也越来越不好了,有的常用注解属性被废弃了居然都没提供替代!无意中发现了另一款Swagger库SpringDoc,试用了一下非常不错,推荐给大家!SpringBoot实战电商项目mall(50k+star)地址:https://github.com/macrozheng/mall
SpringDoc简介
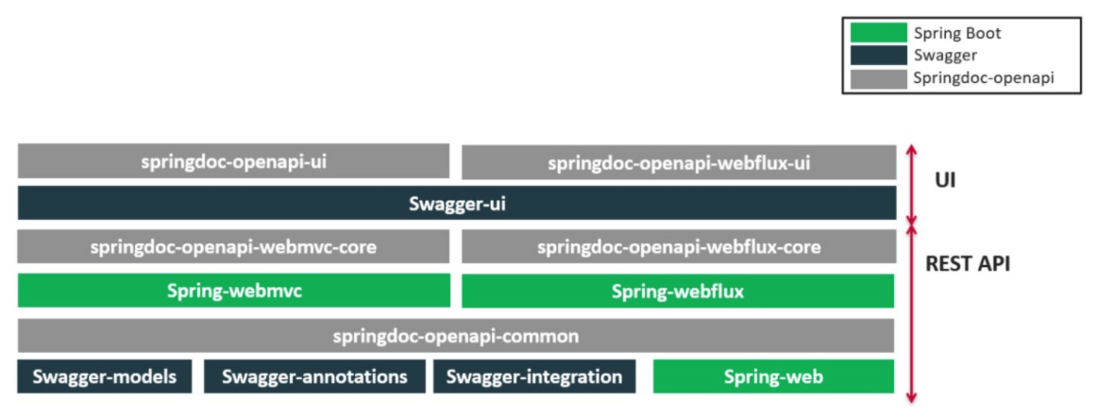
SpringDoc是一款可以结合SpringBoot使用的API文档生成工具,基于OpenAPI 3,目前在Github上已有1.7K+Star,更新发版还是挺勤快的,是一款更好用的Swagger库!值得一提的是SpringDoc不仅支持Spring WebMvc项目,还可以支持Spring WebFlux项目,甚至Spring Rest和Spring Native项目,总之非常强大,下面是一张SpringDoc的架构图。
使用
接下来我们介绍下SpringDoc的使用,使用的是之前集成SpringFox的mall-tiny-swagger项目,我将把它改造成使用SpringDoc。集成
首先我们得集成SpringDoc,在pom.xml中添加它的依赖即可,开箱即用,无需任何配置。<!--springdoc 官方Starter-->
<dependency>
<groupId>org.springdoc</groupId>
<artifactId>springdoc-openapi-ui</artifactId>
<version>1.6.6</version>
</dependency>从SpringFox迁移
- 我们先来看下经常使用的Swagger注解,看看SpringFox的和SpringDoc的有啥区别,毕竟对比已学过的技术能该快掌握新技术;
| SpringFox | SpringDoc |
|---|---|
| @Api | @Tag |
| @ApiIgnore | @Parameter(hidden = true) or @Operation(hidden = true) or @Hidden |
| @ApiImplicitParam | @Parameter |
| @ApiImplicitParams | @Parameters |
| @ApiModel | @Schema |
| @ApiModelProperty | @Schema |
| @ApiOperation(value = "foo", notes = "bar") | @Operation(summary = "foo", description = "bar") |
| @ApiParam | @Parameter |
| @ApiResponse(code = 404, message = "foo") | ApiResponse(responseCode = "404", description = "foo") |
- 接下来我们对之前Controller中使用的注解进行改造,对照上表即可,之前在
@Api注解中被废弃了好久又没有替代的description属性终于被支持了!
/**
 * 品牌管理Controller
 * Created by macro on 2019/4/19.
 */
@Tag(name = "PmsBrandController", description = "商品品牌管理")
@Controller
@RequestMapping("/brand")
public class PmsBrandController {
    @Autowired
    private PmsBrandService brandService;

    private static final Logger LOGGER = LoggerFactory.getLogger(PmsBrandController.class);

    @Operation(summary = "获取所有品牌列表",description = "需要登录后访问")
    @RequestMapping(value = "listAll", method = RequestMethod.GET)
    @ResponseBody
    public CommonResult<List<PmsBrand>> getBrandList() {
        return CommonResult.success(brandService.listAllBrand());
    }

    @Operation(summary = "添加品牌")
    @RequestMapping(value = "/create", method = RequestMethod.POST)
    @ResponseBody
    @PreAuthorize("hasRole('ADMIN')")
    public CommonResult createBrand(@RequestBody PmsBrand pmsBrand) {
        CommonResult commonResult;
        int count = brandService.createBrand(pmsBrand);
        if (count == 1) {
            commonResult = CommonResult.success(pmsBrand);
            LOGGER.debug("createBrand success:{}", pmsBrand);
        } else {
            commonResult = CommonResult.failed("操作失败");
            LOGGER.debug("createBrand failed:{}", pmsBrand);
        }
        return commonResult;
    }

    @Operation(summary = "更新指定id品牌信息")
    @RequestMapping(value = "/update/{id}", method = RequestMethod.POST)
    @ResponseBody
    @PreAuthorize("hasRole('ADMIN')")
    public CommonResult updateBrand(@PathVariable("id") Long id, @RequestBody PmsBrand pmsBrandDto, BindingResult result) {
        CommonResult commonResult;
        int count = brandService.updateBrand(id, pmsBrandDto);
        if (count == 1) {
            commonResult = CommonResult.success(pmsBrandDto);
            LOGGER.debug("updateBrand success:{}", pmsBrandDto);
        } else {
            commonResult = CommonResult.failed("操作失败");
            LOGGER.debug("updateBrand failed:{}", pmsBrandDto);
        }
        return commonResult;
    }

    @Operation(summary = "删除指定id的品牌")
    @RequestMapping(value = "/delete/{id}", method = RequestMethod.GET)
    @ResponseBody
    @PreAuthorize("hasRole('ADMIN')")
    public CommonResult deleteBrand(@PathVariable("id") Long id) {
        int count = brandService.deleteBrand(id);
        if (count == 1) {
            LOGGER.debug("deleteBrand success :id={}", id);
            return CommonResult.success(null);
        } else {
            LOGGER.debug("deleteBrand failed :id={}", id);
            return CommonResult.failed("操作失败");
        }
    }

    @Operation(summary = "分页查询品牌列表")
    @RequestMapping(value = "/list", method = RequestMethod.GET)
    @ResponseBody
    @PreAuthorize("hasRole('ADMIN')")
    public CommonResult<CommonPage<PmsBrand>> listBrand(@RequestParam(value = "pageNum", defaultValue = "1")
                                                        @Parameter(description = "页码") Integer pageNum,
                                                        @RequestParam(value = "pageSize", defaultValue = "3")
                                                        @Parameter(description = "每页数量") Integer pageSize) {
        List<PmsBrand> brandList = brandService.listBrand(pageNum, pageSize);
        return CommonResult.success(CommonPage.restPage(brandList));
    }

    @Operation(summary = "获取指定id的品牌详情")
    @RequestMapping(value = "/{id}", method = RequestMethod.GET)
    @ResponseBody
    @PreAuthorize("hasRole('ADMIN')")
    public CommonResult<PmsBrand> brand(@PathVariable("id") Long id) {
        return CommonResult.success(brandService.getBrand(id));
    }
}- 接下来进行SpringDoc的配置,使用
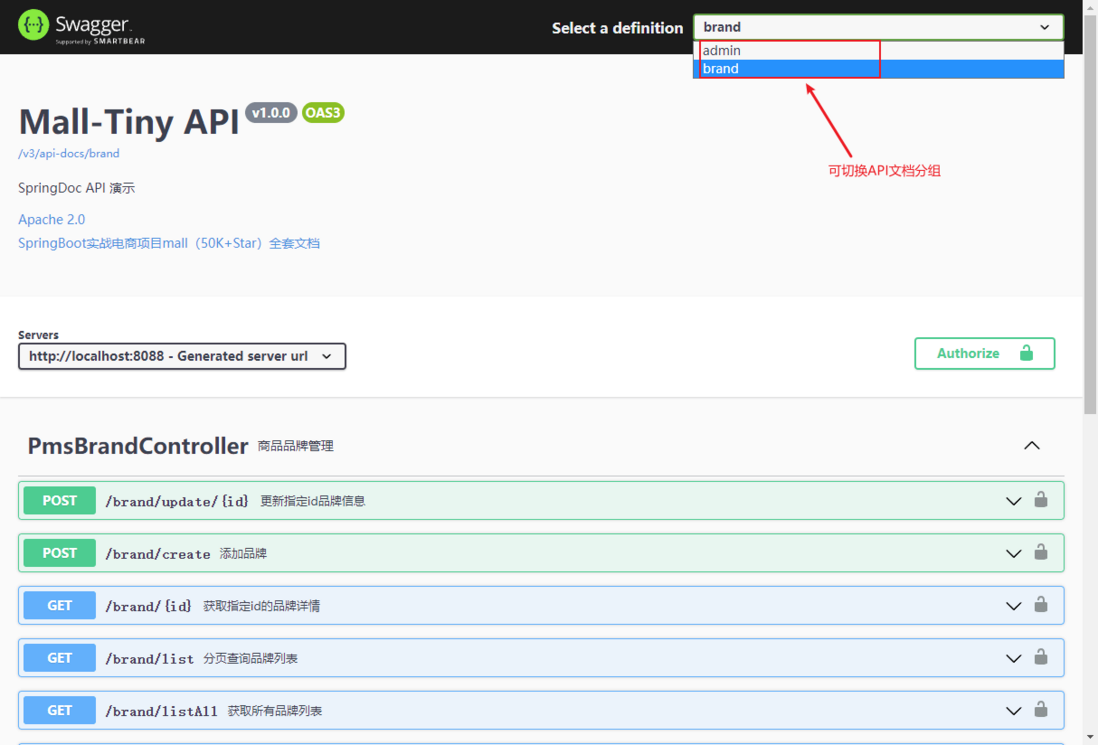
OpenAPI来配置基础的文档信息,通过GroupedOpenApi配置分组的API文档,SpringDoc支持直接使用接口路径进行配置。
/**
 * SpringDoc API文档相关配置
 * Created by macro on 2022/3/4.
 */
@Configuration
public class SpringDocConfig {
    @Bean
    public OpenAPI mallTinyOpenAPI() {
        return new OpenAPI()
                .info(new Info().title("Mall-Tiny API")
                        .description("SpringDoc API 演示")
                        .version("v1.0.0")
                        .license(new License().name("Apache 2.0").url("https://github.com/macrozheng/mall-learning")))
                .externalDocs(new ExternalDocumentation()
                        .description("SpringBoot实战电商项目mall(50K+Star)全套文档")
                        .url("http://www.macrozheng.com"));
    }

    @Bean
    public GroupedOpenApi publicApi() {
        return GroupedOpenApi.builder()
                .group("brand")
                .pathsToMatch("/brand/**")
                .build();
    }

    @Bean
    public GroupedOpenApi adminApi() {
        return GroupedOpenApi.builder()
                .group("admin")
                .pathsToMatch("/admin/**")
                .build();
    }
}
结合SpringSecurity使用
- 由于我们的项目集成了SpringSecurity,需要通过JWT认证头进行访问,我们还需配置好SpringDoc的白名单路径,主要是Swagger的资源路径;
/**
 * SpringSecurity的配置
 * Created by macro on 2018/4/26.
 */
@Configuration
@EnableWebSecurity
@EnableGlobalMethodSecurity(prePostEnabled = true)
public class SecurityConfig extends WebSecurityConfigurerAdapter {

    @Override
    protected void configure(HttpSecurity httpSecurity) throws Exception {
        httpSecurity.csrf()// 由于使用的是JWT,我们这里不需要csrf
                .disable()
                .sessionManagement()// 基于token,所以不需要session
                .sessionCreationPolicy(SessionCreationPolicy.STATELESS)
                .and()
                .authorizeRequests()
                .antMatchers(HttpMethod.GET, // Swagger的资源路径需要允许访问
                        "/",
                        "/swagger-ui.html",
                        "/swagger-ui/",
                        "/*.html",
                        "/favicon.ico",
                        "/**/*.html",
                        "/**/*.css",
                        "/**/*.js",
                        "/swagger-resources/**",
                        "/v3/api-docs/**"
                )
                .permitAll()
                .antMatchers("/admin/login")// 对登录注册要允许匿名访问
                .permitAll()
                .antMatchers(HttpMethod.OPTIONS)//跨域请求会先进行一次options请求
                .permitAll()
                .anyRequest()// 除上面外的所有请求全部需要鉴权认证
                .authenticated();

    }

}- 然后在
OpenAPI对象中通过addSecurityItem方法和SecurityScheme对象,启用基于JWT的认证功能。
/**
 * SpringDoc API文档相关配置
 * Created by macro on 2022/3/4.
 */
@Configuration
public class SpringDocConfig {
    private static final String SECURITY_SCHEME_NAME = "BearerAuth";
    @Bean
    public OpenAPI mallTinyOpenAPI() {
        return new OpenAPI()
                .info(new Info().title("Mall-Tiny API")
                        .description("SpringDoc API 演示")
                        .version("v1.0.0")
                        .license(new License().name("Apache 2.0").url("https://github.com/macrozheng/mall-learning")))
                .externalDocs(new ExternalDocumentation()
                        .description("SpringBoot实战电商项目mall(50K+Star)全套文档")
                        .url("http://www.macrozheng.com"))
                .addSecurityItem(new SecurityRequirement().addList(SECURITY_SCHEME_NAME))
                .components(new Components()
                                .addSecuritySchemes(SECURITY_SCHEME_NAME,
                                        new SecurityScheme()
                                                .name(SECURITY_SCHEME_NAME)
                                                .type(SecurityScheme.Type.HTTP)
                                                .scheme("bearer")
                                                .bearerFormat("JWT")));
    }
}
测试
- 接下来启动项目就可以访问Swagger界面了,访问地址:http://localhost:8088/swagger...
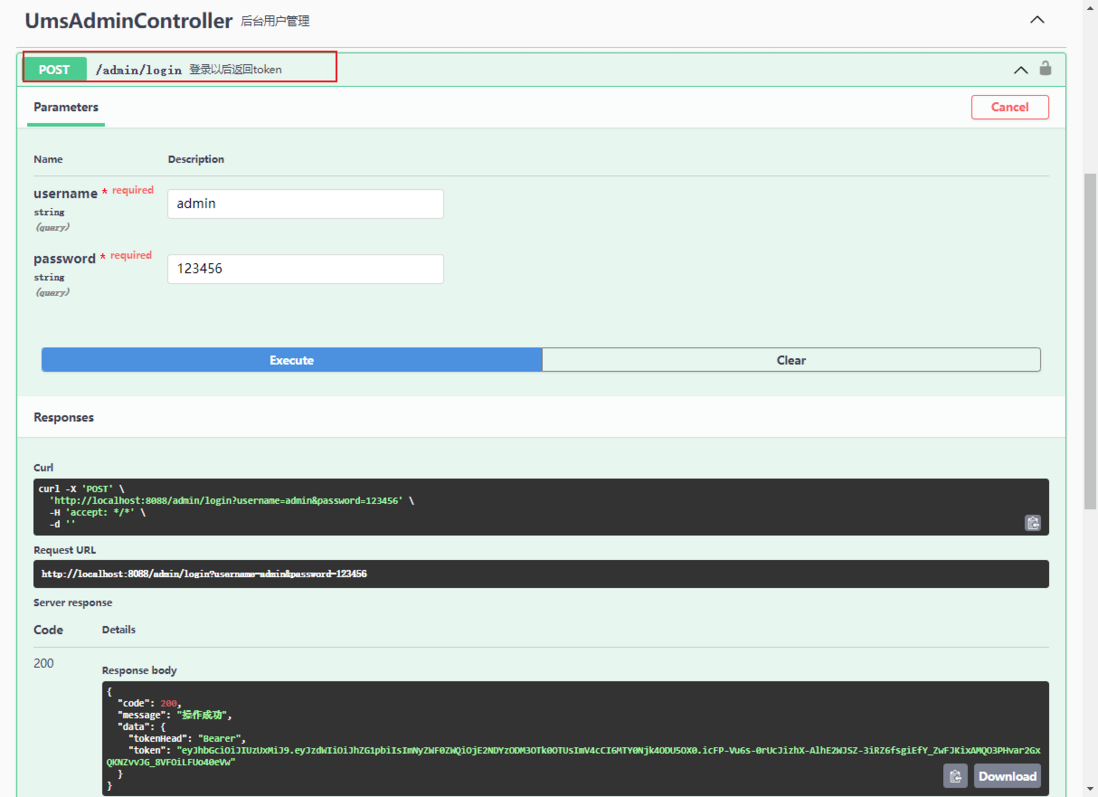
- 我们先通过登录接口进行登录,可以发现这个版本的Swagger返回结果是支持高亮显示的,版本明显比SpringFox来的新;
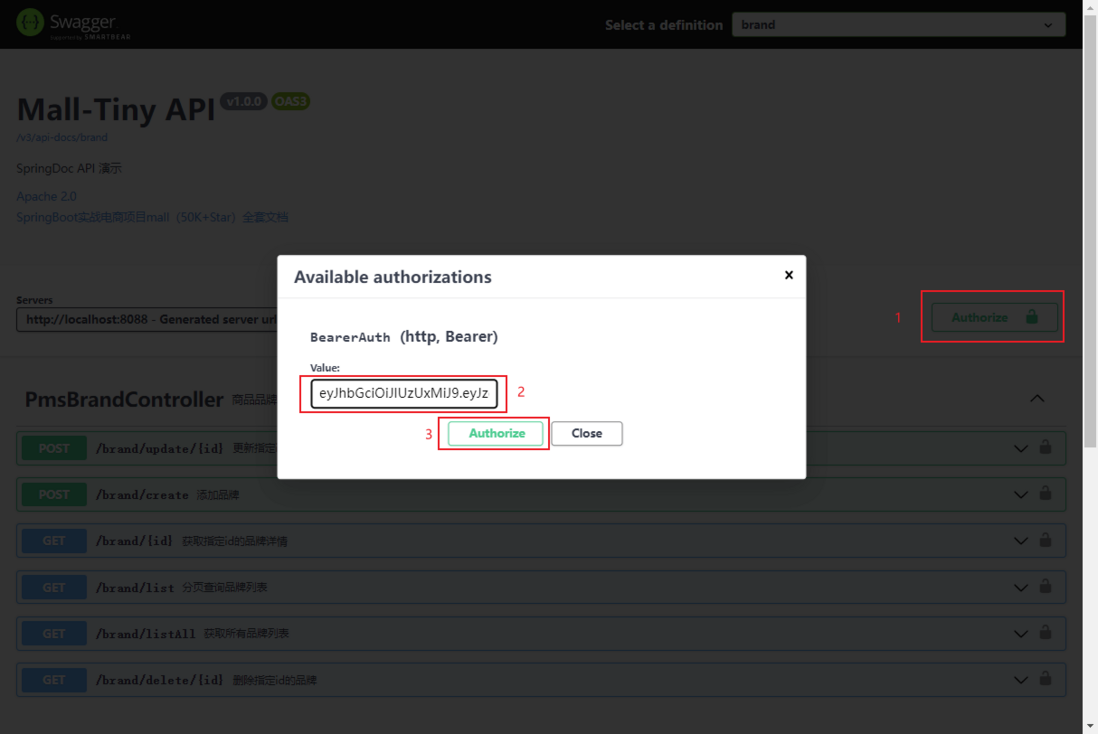
- 然后通过认证按钮输入获取到的认证头信息,注意这里不用加
bearer前缀;
- 之后我们就可以愉快地访问需要登录认证的接口了;
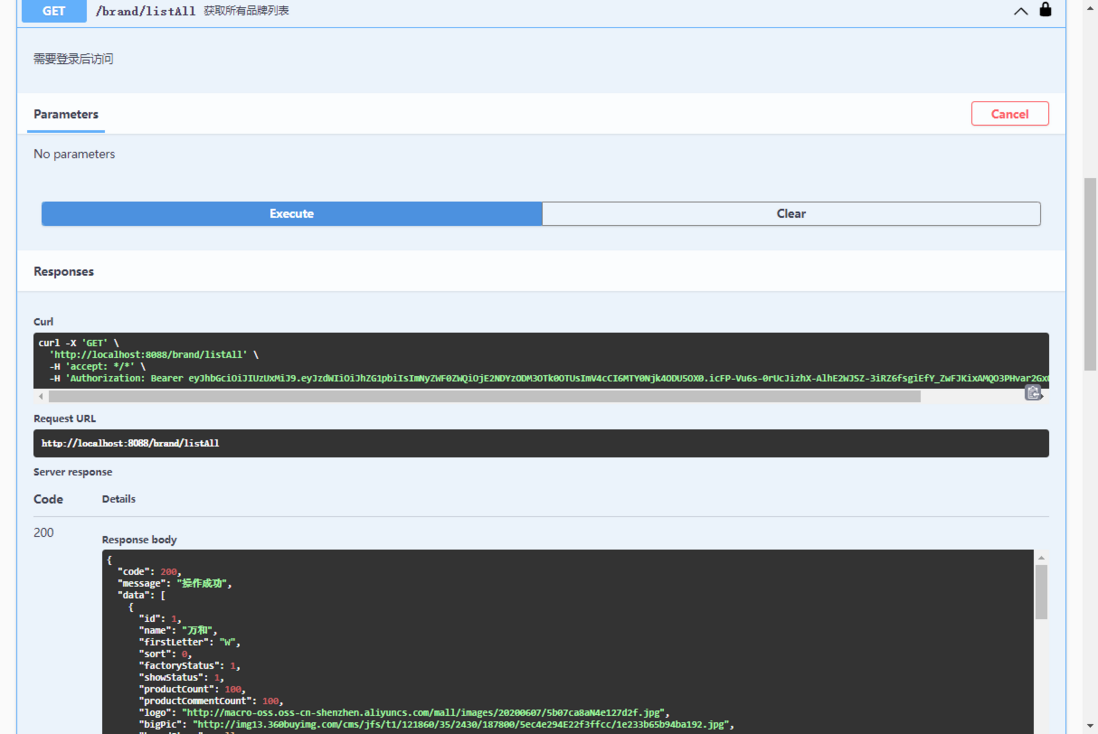
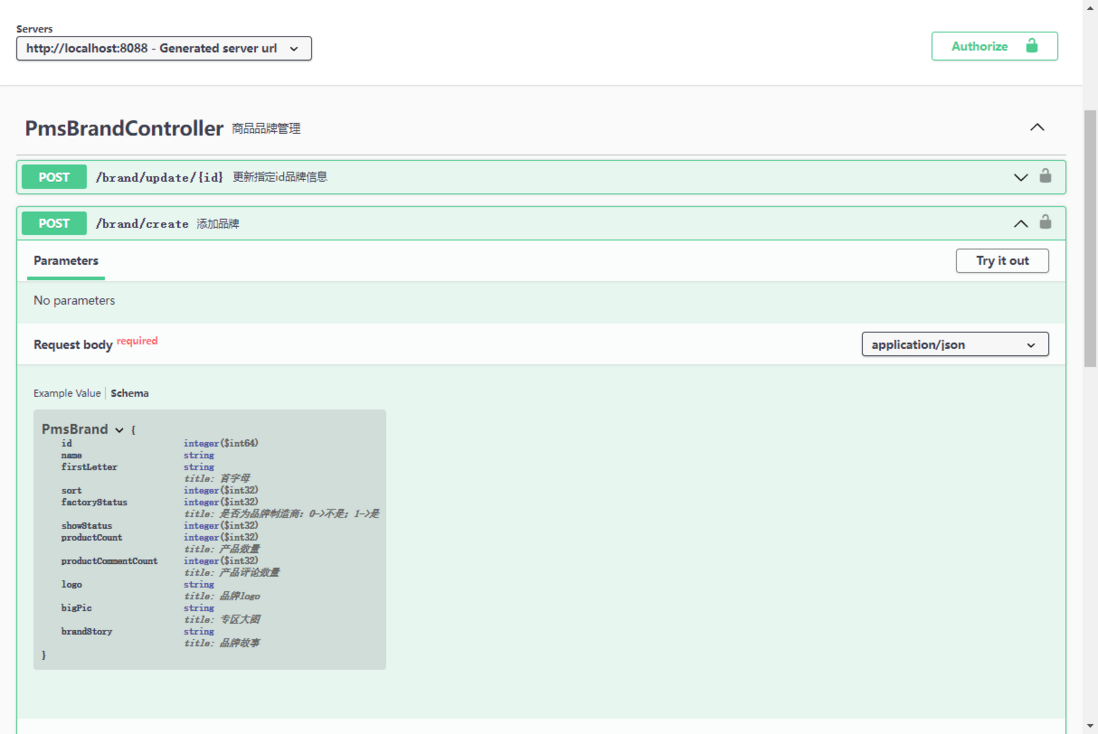
- 看一眼请求参数的文档说明,还是熟悉的Swagger样式!
常用配置
SpringDoc还有一些常用的配置可以了解下,更多配置可以参考官方文档。
springdoc:
  swagger-ui:
    # 修改Swagger UI路径
    path: /swagger-ui.html
    # 开启Swagger UI界面
    enabled: true
  api-docs:
    # 修改api-docs路径
    path: /v3/api-docs
    # 开启api-docs
    enabled: true
  # 配置需要生成接口文档的扫描包
  packages-to-scan: com.macro.mall.tiny.controller
  # 配置需要生成接口文档的接口路径
  paths-to-match: /brand/**,/admin/**
总结
在SpringFox的Swagger库好久不出新版的情况下,迁移到SpringDoc确实是一个更好的选择。今天体验了一把SpringDoc,确实很好用,和之前熟悉的用法差不多,学习成本极低。而且SpringDoc能支持WebFlux之类的项目,功能也更加强大,使用SpringFox有点卡手的朋友可以迁移到它试试!
如果你想了解更多SpringBoot实战技巧的话,可以试试这个带全套教程的实战项目(50K+Star):https://github.com/macrozheng/mall


