1. 前言
你好,我是若川,微信搜索「若川视野」关注我,专注前端技术分享,一个愿景是帮助5年内前端开阔视野走向前列的公众号。欢迎加我微信
ruochuan12,长期交流学习。这是
学习源码整体架构系列之 launch-editor 源码(第九篇)。学习源码整体架构系列文章(有哪些必看的JS库):jQuery、underscore、lodash、sentry、vuex、axios、koa、redux。整体架构这词语好像有点大,姑且就算是源码整体结构吧,主要就是学习是代码整体结构,不深究其他不是主线的具体函数的实现。本篇文章学习的是实际仓库的代码。下一篇应该是《学习 Vuex 4 源码整体架构,深入理解其原理及provide/inject原理》。本文仓库地址:
git clone https://github.com/lxchuan12/open-in-editor.git,本文最佳阅读方式,克隆仓库自己动手调试,容易吸收消化。要是有人说到怎么读源码,正在读文章的你能推荐我的源码系列文章,那真是无以为报啊。
我的文章尽量写得让想看源码又不知道怎么看的读者能看懂。我都是推荐使用搭建环境断点调试源码学习,哪里不会点哪里,边调试边看,而不是硬看。正所谓:授人与鱼不如授人予渔。
阅读本文后你将学到:
- 如何解决该功能报错问题
- 如何调试学习源码
launch-editor-middleware、launch-editor等实现原理
1.1 短时间找不到页面对应源文件的场景
不知道你们有没有碰到这样的场景,打开你自己(或者你同事)开发的页面,却短时间难以找到对应的源文件。
这时你可能会想要是能有点击页面按钮自动用编辑器打开对应文件的功能,那该多好啊。
而vue-devtools提供了这样的功能,也许你不知道。我觉得很大一部分人都不知道,因为感觉很多人都不常用vue-devtools。

你也许会问,我不用vue,我用react有没有类似功能啊,有啊,请看react-dev-inspector。你可能还会问,支持哪些编辑器呀,主流的 vscode、webstorm、atom、sublime 等都支持,更多可以看这个列表 Supported editors。
本文就是根据学习尤大写的 launch-editor 源码,本着知其然,知其所以然的宗旨,探究 vue-devtools「在编辑器中打开组件」功能实现原理。
1.2 一句话简述其原理
code path/to/file一句话简述原理:利用nodejs中的child_process,执行了类似code path/to/file命令,于是对应编辑器就打开了相应的文件,而对应的编辑器则是通过在进程中执行ps x(Window则用Get-Process)命令来查找的,当然也可以自己指定编辑器。
1.3 打开编辑器无法打开组件的报错解决方法
而你真正用这个功能时,你可能碰到报错,说不能打开这个文件。
Could not open App.vue in the editor.

To specify an editor, specify the EDITOR env variable or add "editor" field to your Vue project config.
这里说明下写这篇文章时用的是Windows电脑,VSCode编辑器,在Ubuntu子系统下使用的终端工具。同时推荐我的文章使用 ohmyzsh 打造 windows、ubuntu、mac 系统高效终端命令行工具,用过的都说好。
解决办法也简单,就是这句英文的意思。
1.3.1 方法一:先确保在终端能用命令打开你使用的编辑器,文中以VSCode为例
如果你的命令行本身就不能运行code等命令打开编辑器,那肯定是报错的。这时需要把VSCode注入到命令行终端中。
注入方法也简单。我的交流群里有小伙伴提供了mac电脑的截图。
mac 电脑在 VSCode command + shift + p,Windows 则是 ctrl + shift + p。然后输入shell,选择安装code。如下图:
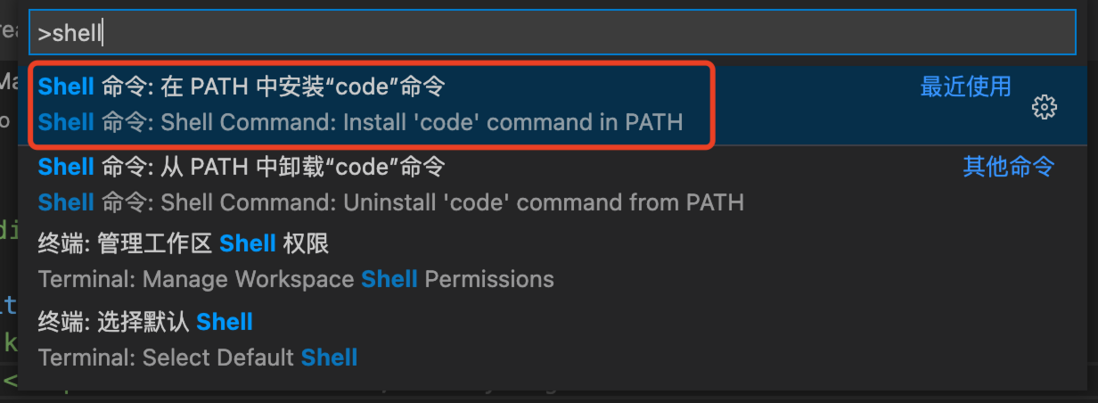
这样就能在终端中打开VSCode的了。
如果能在终端打开使用命令编辑器能打开,但实际上还是报错,那么大概率是没有识别到你的编辑器。
那么可以通过方法二设置指定编辑器。
1.3.2 方法二:具体说明编辑器,在环境变量中说明指定编辑器
在vue项目的根目录下,对应本文则是:vue3-project,添加.env.delelopment文件,其内容是EDITOR=code。这里重点说明下,我的 vue-cli 版本是4.5.12,好像在vue-cli 3.5及以上版本才支持自定义EDITOR这样的环境变量。
# .env.development
# 当然,我的命令行终端已经有了code这个命令。
EDITOR=code不用指定编辑器的对应路径(c/Users/lxchu/AppData/Local/Programs/Microsoft VS Code/bin/code),因为会报错。为什么会报错,因为我看了源码且试过。因为会被根据空格截断,变成c/Users/lxchu/AppData/Local/Programs/Microsoft,当然就报错了。
也有可能你的编辑器路径有中文路径导致报错,可以在环境变量中添加你的编辑器路径。
如果你通过以上方法,还没解决报错问题。欢迎留言,或者加我微信 ruochuan12 交流。毕竟电脑环境不一,很难保证所有人都能正常执行,但我们知道了其原理,就很容易解决问题。
接下来我们从源码角度探究「在编辑器中打开组件」功能的实现原理。
2. vue-devtools Open component in editor 文档
探究原理之前,先来看看vue-devtools官方文档。
Open component in editor
To enable this feature, follow this guide.
这篇指南中写了在Vue CLI 3中是开箱即用。
Vue CLI 3 supports this feature out-of-the-box when running vue-cli-service serve.也详细写了如何在Webpack下使用。
# 1. Import the package:
var openInEditor = require('launch-editor-middleware')
# 2. In the devServer option, register the /__open-in-editor HTTP route:
devServer: {
  before (app) {
    app.use('/__open-in-editor', openInEditor())
  }
}
# 3. The editor to launch is guessed. You can also specify the editor app with the editor option. See the supported editors list.
# 用哪个编辑器打开会自动猜测。你也可以具体指明编辑器。这里显示更多的支持编辑器列表
openInEditor('code')
# 4. You can now click on the name of the component in the Component inspector pane (if the devtools knows about its file source, a tooltip will appear).
# 如果`vue-devtools`开发者工具有提示点击的组件的显示具体路径,那么你可以在编辑器打开。同时也写了如何在Node.js中使用等。
Node.js
You can use the launch-editor package to setup an HTTP route with the/__open-in-editorpath. It will receive file as an URL variable.
查看更多可以看这篇指南。
3. 环境准备工作
熟悉我的读者,都知道我都是推荐调试看源码的,正所谓:哪里不会点哪里。而且调试一般都写得很详细,是希望能帮助到一部分人知道如何看源码。于是我特意新建一个仓库open-in-editor git clone https://github.com/lxchuan12/open-in-editor.git,便于大家克隆学习。
安装vue-cli
npm install -g @vue/cli
# OR
yarn global add @vue/cli
node -V
# v14.16.0
vue -V
# @vue/cli 4.5.12
vue create vue3-project
# 这里选择的是vue3、vue2也是一样的。
# Please pick a preset: Default (Vue 3 Preview) ([Vue 3] babel, eslint)
npm install
# OR
yarn install这里同时说明下我的vscode版本。
code -v
1.55.2前文提到的Vue CLI 3中开箱即用和Webpack使用方法。
vue3-project/package.json中有一个debug按钮。
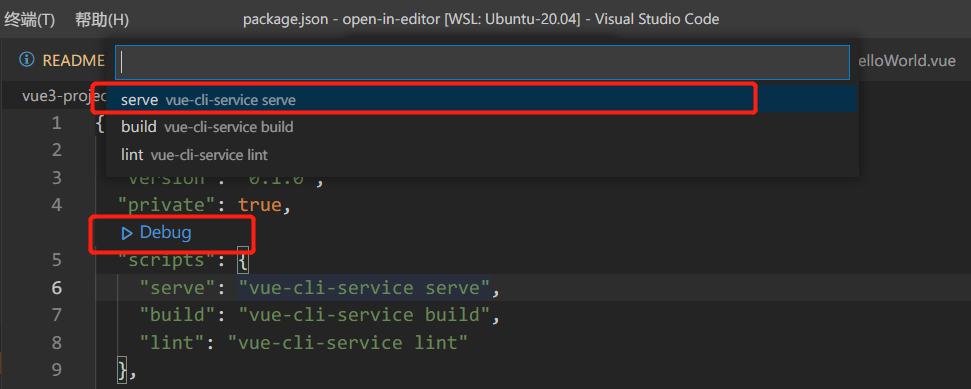
选择第一项,serve vue-cli-service serve。
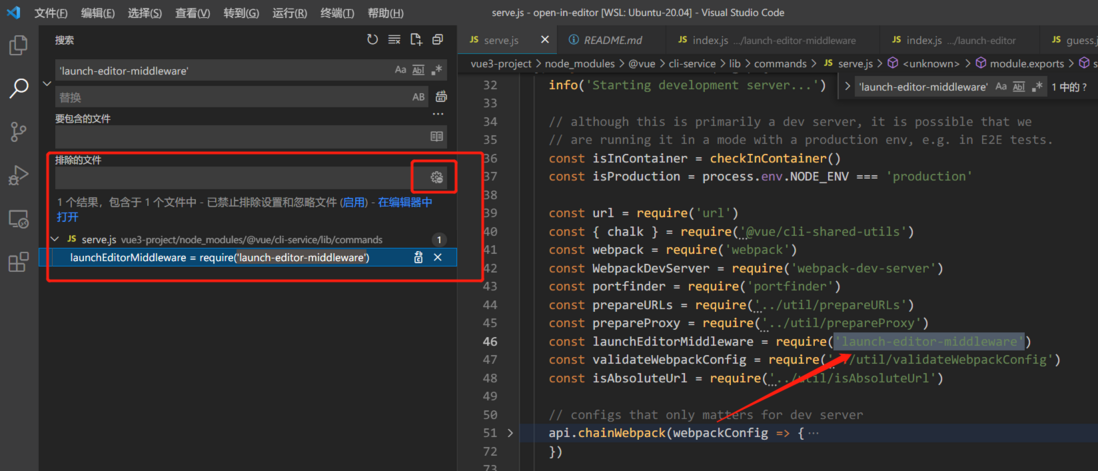
我们来搜索下'launch-editor-middleware'这个中间件,一般来说搜索不到node_modules下的文件,需要设置下。当然也有个简单做法。就是「排除的文件」右侧旁边有个设置图标「使用“排查设置”与“忽略文件”」,点击下。
其他的就不赘述了。可以看这篇知乎回答:vscode怎么设置可以搜索包含node_modules中的文件?
这时就搜到了vue3-project/node_modules/@vue/cli-service/lib/commands/serve.js中有使用这个中间件。
如下图所示:
4. vue-devtools 开箱即用具体源码实现
接着我们来看Vue CLI 3中开箱即用具体源码实现。
// vue3-project/node_modules/@vue/cli-service/lib/commands/serve.js
// 46行
const launchEditorMiddleware = require('launch-editor-middleware')
// 192行
before (app, server) {
    // launch editor support.
    // this works with vue-devtools & @vue/cli-overlay
    app.use('/__open-in-editor', launchEditorMiddleware(() => console.log(
        `To specify an editor, specify the EDITOR env variable or ` +
        `add "editor" field to your Vue project config.\n`
    )))
    // 省略若干代码...
}点击vue-devtools中的时,会有一个请求,http://localhost:8080/__open-in-editor?file=src/App.vue,不出意外就会打开该组件啦。

接着我们在launchEditorMiddleware的具体实现。
5. launch-editor-middleware
看源码时,先看调试截图。
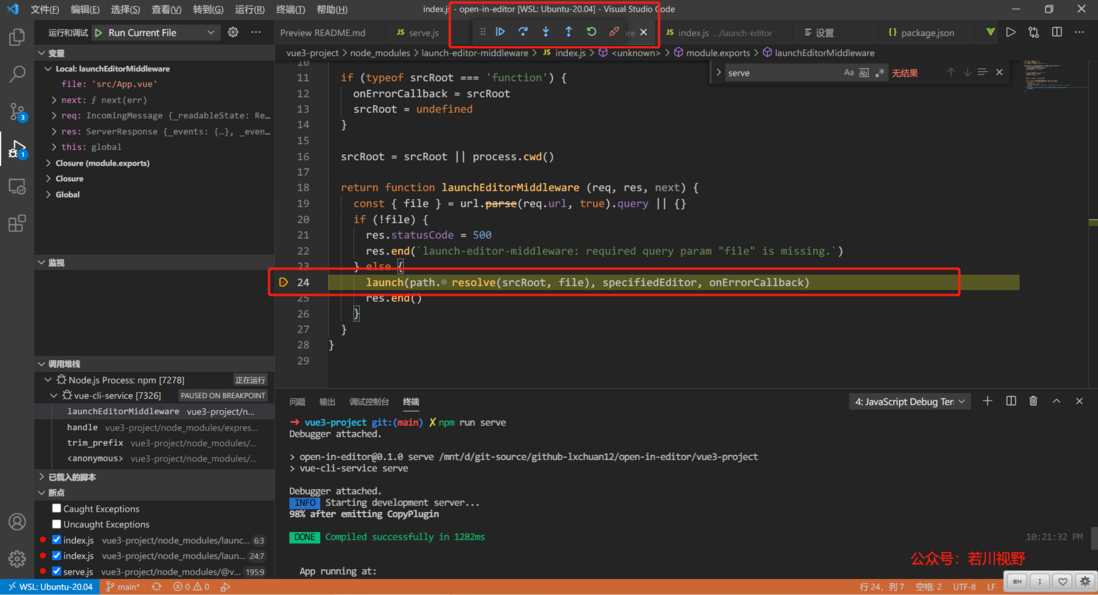
在launch-editor-middleware中间件中作用在于最终是调用 launch-editor 打开文件。
// vue3-project/node_modules/launch-editor-middleware/index.js
const url = require('url')
const path = require('path')
const launch = require('launch-editor')

module.exports = (specifiedEditor, srcRoot, onErrorCallback) => {
  // specifiedEditor => 这里传递过来的则是 () => console.log() 函数
  // 所以和 onErrorCallback 切换下,把它赋值给错误回调函数
  if (typeof specifiedEditor === 'function') {
    onErrorCallback = specifiedEditor
    specifiedEditor = undefined
  }

  // 如果第二个参数是函数,同样把它赋值给错误回调函数
  // 这里传递过来的是undefined
  if (typeof srcRoot === 'function') {
    onErrorCallback = srcRoot
    srcRoot = undefined
  }

  // srcRoot 是传递过来的参数,或者当前node进程的目录
  srcRoot = srcRoot || process.cwd()

  // 最后返回一个函数, express 中间件
  return function launchEditorMiddleware (req, res, next) {
    // 省略 ...
  }
}上一段中,这种切换参数的写法,在很多源码中都很常见。为的是方便用户调用时传参。虽然是多个参数,但可以传一个或者两个。
可以根据情况打上断点。比如这里我会在launch(path.resolve(srcRoot, file), specifiedEditor, onErrorCallback)打断点。
// vue3-project/node_modules/launch-editor-middleware/index.js
module.exports = (specifiedEditor, srcRoot, onErrorCallback) => {
  // 省略上半部分
  return function launchEditorMiddleware (req, res, next) {
    // 根据请求解析出file路径
    const { file } = url.parse(req.url, true).query || {}
    // 如果没有文件路径,则报错
    if (!file) {
      res.statusCode = 500
      res.end(`launch-editor-middleware: required query param "file" is missing.`)
    } else {
      // 否则拼接路径,用launch打开。
      launch(path.resolve(srcRoot, file), specifiedEditor, onErrorCallback)
      res.end()
    }
  }
}
6. launch-editor
跟着断点来看,走到了launchEditor函数。
// vue3-project/node_modules/launch-editor/index.js
function launchEditor (file, specifiedEditor, onErrorCallback) {
  // 解析出文件路径和行号列号等信息
  const parsed = parseFile(file)
  let { fileName } = parsed
  const { lineNumber, columnNumber } = parsed

  // 判断文件是否存在,不存在,直接返回。
  if (!fs.existsSync(fileName)) {
    return
  }
  // 所以和 onErrorCallback 切换下,把它赋值给错误回调函数
  if (typeof specifiedEditor === 'function') {
    onErrorCallback = specifiedEditor
    specifiedEditor = undefined
  }
  // 包裹一层函数
  onErrorCallback = wrapErrorCallback(onErrorCallback)

  // 猜测当前进程运行的是哪个编辑器
  const [editor, ...args] = guessEditor(specifiedEditor)
  if (!editor) {
    onErrorCallback(fileName, null)
    return
  }
  // 省略剩余部分,后文再讲述...
}
6.1 wrapErrorCallback 包裹错误函数回调
onErrorCallback = wrapErrorCallback(onErrorCallback)这段的代码,就是传递错误回调函数,wrapErrorCallback 返回给一个新的函数,wrapErrorCallback 执行时,再去执行 onErrorCallback(cb)。
我相信读者朋友能看懂,我单独拿出来讲述,主要是因为这种包裹函数的形式在很多源码里都很常见。
这里也就是文章开头终端错误图Could not open App.vue in the editor.输出的代码位置。
// vue3-project/node_modules/launch-editor/index.js
function wrapErrorCallback (cb) {
  return (fileName, errorMessage) => {
    console.log()
    console.log(
      chalk.red('Could not open ' + path.basename(fileName) + ' in the editor.')
    )
    if (errorMessage) {
      if (errorMessage[errorMessage.length - 1] !== '.') {
        errorMessage += '.'
      }
      console.log(
        chalk.red('The editor process exited with an error: ' + errorMessage)
      )
    }
    console.log()
    if (cb) cb(fileName, errorMessage)
  }
}
6.2 guessEditor 猜测当前正在使用的编辑器
这个函数主要做了如下四件事情:
- 如果具体指明了编辑器,则解析下返回。
- 找出当前进程中哪一个编辑器正在运行。
macOS和Linux用ps x命令windows则用Get-Process命令 - 如果都没找到就用
process.env.VISUAL或者process.env.EDITOR。这就是为啥开头错误提示可以使用环境变量指定编辑器的原因。 - 最后还是没有找到就返回
[null],则会报错。
const [editor, ...args] = guessEditor(specifiedEditor)
if (!editor) {
    onErrorCallback(fileName, null)
    return
}
// vue3-project/node_modules/launch-editor/guess.js
const shellQuote = require('shell-quote')
const childProcess = require('child_process')
module.exports = function guessEditor (specifiedEditor) {
// 如果指定了编辑器,则解析一下,这里没有传入。如果自己指定了路径。
// 比如 c/Users/lxchu/AppData/Local/Programs/Microsoft VS Code/bin/code
// 会根据空格切割成 c/Users/lxchu/AppData/Local/Programs/Microsoft
if (specifiedEditor) {
return shellQuote.parse(specifiedEditor)
}
// We can find out which editor is currently running by:
// `ps x` on macOS and Linux
// `Get-Process` on Windows
try {
// 代码有删减
if (process.platform === 'darwin') {
const output = childProcess.execSync('ps x').toString()
// 省略
} else if (process.platform === 'win32') {
const output = childProcess
.execSync('powershell -Command "Get-Process | Select-Object Path"', {
stdio: ['pipe', 'pipe', 'ignore']
})
.toString()
// 省略
} else if (process.platform === 'linux') {
const output = childProcess
.execSync('ps x --no-heading -o comm --sort=comm')
.toString()
}
} catch (error) {
// Ignore...
}
// Last resort, use old skool env vars
if (process.env.VISUAL) {
return [process.env.VISUAL]
} else if (process.env.EDITOR) {
return [process.env.EDITOR]
}
return [null]
}看完了 guessEditor 函数,我们接着来看 launch-editor 剩余部分。
6.3 launch-editor 剩余部分
以下这段代码不用细看,调试的时候细看就行。
// vue3-project/node_modules/launch-editor/index.js
function launchEditor(){
  //  省略上部分...
  if (
    process.platform === 'linux' &&
    fileName.startsWith('/mnt/') &&
    /Microsoft/i.test(os.release())
  ) {
    // Assume WSL / "Bash on Ubuntu on Windows" is being used, and
    // that the file exists on the Windows file system.
    // `os.release()` is "4.4.0-43-Microsoft" in the current release
    // build of WSL, see: https://github.com/Microsoft/BashOnWindows/issues/423#issuecomment-221627364
    // When a Windows editor is specified, interop functionality can
    // handle the path translation, but only if a relative path is used.
    fileName = path.relative('', fileName)
  }

  if (lineNumber) {
    const extraArgs = getArgumentsForPosition(editor, fileName, lineNumber, columnNumber)
    args.push.apply(args, extraArgs)
  } else {
    args.push(fileName)
  }

  if (_childProcess && isTerminalEditor(editor)) {
    // There's an existing editor process already and it's attached
    // to the terminal, so go kill it. Otherwise two separate editor
    // instances attach to the stdin/stdout which gets confusing.
    _childProcess.kill('SIGKILL')
  }

  if (process.platform === 'win32') {
    // On Windows, launch the editor in a shell because spawn can only
    // launch .exe files.
    _childProcess = childProcess.spawn(
      'cmd.exe',
      ['/C', editor].concat(args),
      { stdio: 'inherit' }
    )
  } else {
    _childProcess = childProcess.spawn(editor, args, { stdio: 'inherit' })
  }
  _childProcess.on('exit', function (errorCode) {
    _childProcess = null

    if (errorCode) {
      onErrorCallback(fileName, '(code ' + errorCode + ')')
    }
  })

  _childProcess.on('error', function (error) {
    onErrorCallback(fileName, error.message)
  })
}这一大段中,主要的就是以下代码,用子进程模块。简单来说子进程模块有着执行命令的能力。
const childProcess = require('child_process')

if (process.platform === 'win32') {
    // On Windows, launch the editor in a shell because spawn can only
    // launch .exe files.
    _childProcess = childProcess.spawn(
        'cmd.exe',
        ['/C', editor].concat(args),
        { stdio: 'inherit' }
    )
    } else {
    _childProcess = childProcess.spawn(editor, args, { stdio: 'inherit' })
}行文至此,就基本接近尾声了。原理其实就是利用nodejs中的child_process,执行了类似code path/to/file命令。
7. 总结
这里总结一下:首先文章开头通过提出「短时间找不到页面对应源文件的场景」,并针对容易碰到的报错情况给出了解决方案。
其次,配置了环境跟着调试学习了vue-devtools中使用的尤大写的 yyx990803/launch-editor。
7.1 一句话简述其原理
我们回顾下开头的原理内容。
code path/to/file一句话简述原理:利用nodejs中的child_process,执行了类似code path/to/file命令,于是对应编辑器就打开了相应的文件,而对应的编辑器则是通过在进程中执行ps x(Window则用Get-Process)命令来查找的,当然也可以自己指定编辑器。
最后还能做什么呢。
可以再看看 umijs/launch-editor 和 react-dev-utils/launchEditor.js 。他们的代码几乎类似。
也可以利用Node.js做一些提高开发效率等工作,同时可以学习child_process等模块。
也不要禁锢自己的思维,把前端禁锢在页面中,应该把视野拓宽。
Node.js是我们前端人探索操作文件、操作网络等的好工具。
如果读者朋友发现有不妥或可改善之处,再或者哪里没写明白的地方,欢迎评论指出。另外觉得写得不错,对您有些许帮助,可以点赞、评论、转发分享,也是对我的一种支持,万分感谢。如果能关注我的前端公众号:「若川视野」,就更好啦。
关于
你好,我是若川,微信搜索「若川视野」关注我,专注前端技术分享,一个愿景是帮助5年内前端开阔视野走向前列的公众号。欢迎加我微信ruochuan12,长期交流学习。
主要有以下系列文章:学习源码整体架构系列、年度总结、JS基础系列
参考链接
yyx990803/launch-editor
umijs/launch-editor
vuejs/vue-devtools
vue-devtools open-in-editor.md
"Open in editor" button doesn't work in Win 10 with VSCode if installation path contains spaces
react-dev-utils/launchEditor.js


