前言
我们知道在项目开发中,后台开发权限认证是非常重要的,springboot 中常用熟悉的权限认证框架有,shiro,还有就是springboot 全家桶的 security当然他们各有各的好处,但是我比较喜欢springboot自带的权限认证框架
<!--springboot 权限认证-->
      <dependency>
          <groupId>org.springframework.boot</groupId>
          <artifactId>spring-boot-starter-security</artifactId>
      </dependency>
与springboot天然集成,功能强大
快速上手
主要实现 Spring Security 的安全认证,结合 RESTful API 的风格,使用无状态的环境。
主要实现是通过请求的 URL ,通过过滤器来做不同的授权策略操作,为该请求提供某个认证的方法,然后进行认证,授权成功返回授权实例信息,供服务调用。
基于Token的身份验证的过程如下:
用户通过用户名和密码发送请求。 程序验证。 程序返回一个签名的token 给客户端。 客户端储存token,并且每次用于每次发送请求。 服务端验证token并返回数据。 每一次请求都需要token,所以每次请求都会去验证用户身份,所以这里必须要使用缓存,
流程图
JWT JSON Web Token 验证流程图

添加Spring Security和JWT依赖项
       <!--springboot 权限认证-->
          <dependency>
              <groupId>org.springframework.boot</groupId>
              <artifactId>spring-boot-starter-security</artifactId>
          </dependency>
         <!--jwt 认证-->
         <dependency>
             <groupId>io.jsonwebtoken</groupId>
             <artifactId>jjwt</artifactId>
         </dependency>
生成JWT toke
因为要生成JWT toke 所以就写了一个工具类JwtTokenUtil
package cn.soboys.kmall.security.utils;

import io.jsonwebtoken.Claims;
import io.jsonwebtoken.Jwts;
import io.jsonwebtoken.SignatureAlgorithm;
import org.springframework.security.core.userdetails.UserDetails;
import org.springframework.stereotype.Component;

import java.io.Serializable;
import java.util.Date;
import java.util.HashMap;
import java.util.Map;
import java.util.function.Function;

/**
 * @author kenx
 * @version 1.0
 * @date 2021/8/5 22:28
 * @webSite https://www.soboys.cn/
 */
@Component
public class JwtTokenUtil implements Serializable {

    private static final long serialVersionUID = -2550185165626007488L;

    public static final long JWT_TOKEN_VALIDITY = 7*24*60*60;

    private String secret="TcUF7CC8T3txmfQ38pYsQ3KY";

    public String getUsernameFromToken(String token) {
        return getClaimFromToken(token, Claims::getSubject);
    }


    public String generateToken(String username) {
        Map<String, Object> claims = new HashMap<>();
        return doGenerateToken(claims, username);
    }

    public Boolean validateToken(String token, UserDetails userDetails) {
        final String username = getUsernameFromToken(token);
        return (username.equals(userDetails.getUsername()) && !isTokenExpired(token));
    }


    public <T> T getClaimFromToken(String token, Function<Claims, T> claimsResolver) {
        final Claims claims = getAllClaimsFromToken(token);
        return claimsResolver.apply(claims);
    }

    private Claims getAllClaimsFromToken(String token) {
        return Jwts.parser().setSigningKey(secret).parseClaimsJws(token).getBody();
    }


    private Boolean isTokenExpired(String token) {
        final Date expiration = getExpirationDateFromToken(token);
        return expiration.before(new Date());
    }

    public Date getExpirationDateFromToken(String token) {
        return getClaimFromToken(token, Claims::getExpiration);
    }

    private String doGenerateToken(Map<String, Object> claims, String subject) {
        return Jwts.builder().setClaims(claims).setSubject(subject).setIssuedAt(new Date(System.currentTimeMillis()))
                .setExpiration(new Date(System.currentTimeMillis() + JWT_TOKEN_VALIDITY*1000)).signWith(SignatureAlgorithm.HS512, secret).compact();
    }
}
注入数据源
这里我们使用数据库作为权限控制数据保存,所以就要注入数据源,进行权限认证
Spring Security提供了 UserDetailsService接口 用于用户身份认证,和UserDetails实体类,用于保存用户信息,(用户凭证,权限等)
看源码
package org.springframework.security.core.userdetails;

public interface UserDetailsService {
    UserDetails loadUserByUsername(String var1) throws UsernameNotFoundException;
}
package org.springframework.security.core.userdetails;
public interface UserDetails extends Serializable {
Collection<? extends GrantedAuthority> getAuthorities();
String getPassword();
String getUsername();
boolean isAccountNonExpired();
boolean isAccountNonLocked();
boolean isCredentialsNonExpired();
boolean isEnabled();
}所以我们分为两步走:
- 自己的
User实体类继承Spring SecurityUserDetails保存相关权限信息
package cn.soboys.kmall.security.entity;

import com.baomidou.mybatisplus.annotation.IdType;
import com.baomidou.mybatisplus.annotation.TableField;
import com.baomidou.mybatisplus.annotation.TableId;
import com.baomidou.mybatisplus.annotation.TableName;
import com.fasterxml.jackson.annotation.JsonIgnore;
import lombok.Data;
import lombok.EqualsAndHashCode;
import org.springframework.security.core.GrantedAuthority;
import org.springframework.security.core.authority.SimpleGrantedAuthority;
import org.springframework.security.core.userdetails.UserDetails;

import java.io.Serializable;
import java.time.LocalDateTime;
import java.util.*;

/**
 * <p>
 * 用户表
 * </p>
 *
 * @author kenx
 * @since 2021-08-06
 */
@Data
@EqualsAndHashCode(callSuper = false)
@TableName("t_user")
public class User implements Serializable, UserDetails {

    private static final long serialVersionUID = 1L;

    /**
     * 用户ID
     */
    @TableId(value = "USER_ID", type = IdType.AUTO)
    private Long userId;

    /**
     * 用户名
     */
    @TableField("USERNAME")
    private String username;

    /**
     * 密码
     */
    @TableField("PASSWORD")
    private String password;

    /**
     * 部门ID
     */
    @TableField("DEPT_ID")
    private Long deptId;

    /**
     * 邮箱
     */
    @TableField("EMAIL")
    private String email;

    /**
     * 联系电话
     */
    @TableField("MOBILE")
    private String mobile;

    /**
     * 状态 0锁定 1有效
     */
    @TableField("STATUS")
    private String status;

    /**
     * 创建时间
     */
    @TableField("CREATE_TIME")
    private Date createTime;

    /**
     * 修改时间
     */
    @TableField("MODIFY_TIME")
    private Date modifyTime;

    /**
     * 最近访问时间
     */
    @TableField("LAST_LOGIN_TIME")
    private Date lastLoginTime;

    /**
     * 性别 0男 1女 2保密
     */
    @TableField("SSEX")
    private String ssex;

    /**
     * 是否开启tab,0关闭 1开启
     */
    @TableField("IS_TAB")
    private String isTab;

    /**
     * 主题
     */
    @TableField("THEME")
    private String theme;

    /**
     * 头像
     */
    @TableField("AVATAR")
    private String avatar;

    /**
     * 描述
     */
    @TableField("DESCRIPTION")
    private String description;

    @TableField(exist = false)
    private List<Role> roles;


    @TableField(exist = false)
    private Set<String> perms;

    /**
     * 用户权限
     *
     * @return
     */
    /*@Override
    public Collection<? extends GrantedAuthority> getAuthorities() {
        List<GrantedAuthority> auths = new ArrayList<>();
        List<Role> roles = this.getRoles();
        for (Role role : roles) {
            auths.add(new SimpleGrantedAuthority(role.getRolePerms()));
        }
        return auths;
    }*/
    @Override
    @JsonIgnore
    public Collection<? extends GrantedAuthority> getAuthorities() {
        List<GrantedAuthority> auths = new ArrayList<>();
        Set<String> perms = this.getPerms();
        for (String perm : perms) {
            //这里perms值如果为空或空字符会报错
            auths.add(new SimpleGrantedAuthority(perm));
        }
        return auths;
    }

    @Override
    @JsonIgnore
    public boolean isAccountNonExpired() {
        return true;
    }

    @Override
    @JsonIgnore
    public boolean isAccountNonLocked() {
        return true;
    }

    @Override
    @JsonIgnore
    public boolean isCredentialsNonExpired() {
        return true;
    }

    @Override
    @JsonIgnore
    public boolean isEnabled() {
        return true;
    }
}
注意这里有一个问题 登录用户时,总提示 User account is locked
是因为用户实体类实现UserDetails这个接口时,我默认把所有抽象方法给自动实现了,而自动生成下面这四个方法,默认返回false,
    @Override
    public boolean isAccountNonExpired() {
        return false;
    }

    @Override
    public boolean isAccountNonLocked() {
        return false;
    }

    @Override
    public boolean isCredentialsNonExpired() {
        return false;
    }

    @Override
    public boolean isEnabled() {
        return false;
}问题原因就在这里,只要把它们的返回值改成true就行。
UserDetails 中几个字段的解释:
//返回验证用户密码,无法返回则NULL
String getPassword();
String getUsername();
账户是否过期,过期无法验证
boolean isAccountNonExpired();指定用户是否被锁定或者解锁,锁定的用户无法进行身份验证
boolean isAccountNonLocked();指示是否已过期的用户的凭据(密码),过期的凭据防止认证
boolean isCredentialsNonExpired();是否被禁用,禁用的用户不能身份验证
boolean isEnabled();- 实现接口中
loadUserByUsername方法注入数据验证就可以了
自己IUserService用户接口类继承Spring Security提供了 UserDetailsService接口
public interface IUserService  extends IService<User>, UserDetailsService {

    User getUserByUsername(String username);

   /* *//**
     * 获取用户所有权限
     *
     * @param username
     * @return
     *//*
    Set<String> getUserPerms(String username);*/

}
并且加以实现
@Service
@RequiredArgsConstructor
@Slf4j
public class UserServiceImpl extends ServiceImpl<UserMapper, User> implements IUserService {
    private final RoleMapper roleMapper;

    @Override
    public User getUserByUsername(String username) {
        return this.baseMapper.selectOne(new QueryWrapper<User>().lambda()
                .eq(User::getUsername, username));
    }


    /**
     * 对用户提供的用户详细信息进行身份验证时
     *
     * @param username
     * @return
     * @throws UsernameNotFoundException
     */
    @Override
    public UserDetails loadUserByUsername(String username) throws UsernameNotFoundException {
        User user = this.getUserByUsername(username);

        if (StrUtil.isBlankIfStr(user)) {
            throw new UsernameNotFoundException("User not found with username: " + username);
        }

        //获取用户角色信息
        List<Role> roles = roleMapper.findUserRolePermsByUserName(username);
        user.setRoles(roles);

        List<String> permList = this.baseMapper.findUserPerms(username);

        //java8 stream 便利
        Set<String> perms = permList.stream().filter(o->StrUtil.isNotBlank(o)).collect(Collectors.toSet());
        user.setPerms(perms);

        //用于添加用户的权限。只要把用户权限添加到authorities 就万事大吉。
        // List<SimpleGrantedAuthority> authorities = new ArrayList<>();


        //用于添加用户的权限。只要把用户权限添加到authorities 就万事大吉。
        /*for (Role role : roles) {
            authorities.add(new SimpleGrantedAuthority(role.getRolePerms()));
            log.info("loadUserByUsername: " + user);
        }*/
        //user.setAuthorities(authorities);//用于登录时 @AuthenticationPrincipal 标签取值
        return user;
    }


}自己实现loadUserByUsername从数据库中验证用户名密码,获取用户角色权限信息
拦截器配置
Spring Security的AuthenticationEntryPoint类,它拒绝每个未经身份验证的请求并发送错误代码401
package cn.soboys.kmall.security.config;

import cn.soboys.kmall.common.ret.Result;
import cn.soboys.kmall.common.ret.ResultCode;
import cn.soboys.kmall.common.ret.ResultResponse;
import cn.soboys.kmall.common.utils.ResponseUtil;
import org.springframework.security.core.AuthenticationException;
import org.springframework.security.web.AuthenticationEntryPoint;
import org.springframework.stereotype.Component;

import javax.servlet.ServletException;
import javax.servlet.http.HttpServletRequest;
import javax.servlet.http.HttpServletResponse;
import java.io.IOException;
import java.io.Serializable;

/**
 * @author kenx
 * @version 1.0
 * @date 2021/8/5 22:30
 * @webSite https://www.soboys.cn/
 * 此类继承Spring Security的AuthenticationEntryPoint类,
 * 并重写其commence。它拒绝每个未经身份验证的请求并发送错误代码401。
 */
@Component
public class JwtAuthenticationEntryPoint implements AuthenticationEntryPoint, Serializable {

    /**
     * 此类继承Spring Security的AuthenticationEntryPoint类,并重写其commence。
     * 它拒绝每个未经身份验证的请求并发送错误代码401
     *
     * @param httpServletRequest
     * @param httpServletResponse
     * @param e
     * @throws IOException
     * @throws ServletException
     */
    @Override
    public void commence(HttpServletRequest httpServletRequest, HttpServletResponse httpServletResponse, AuthenticationException e) throws IOException, ServletException {
        Result result = ResultResponse.failure(ResultCode.UNAUTHORIZED, "请先登录");
        ResponseUtil.responseJson(httpServletResponse, result);
    }
}
JwtRequestFilter任何请求都会执行此类检查请求是否具有有效的JWT令牌。如果它具有有效的JWT令牌,则它将在上下文中设置Authentication,以指定当前用户已通过身份验证。
package cn.soboys.kmall.security.config;

import cn.soboys.kmall.common.utils.ConstantFiledUtil;
import cn.soboys.kmall.security.service.IUserService;
import cn.soboys.kmall.security.utils.JwtTokenUtil;
import io.jsonwebtoken.ExpiredJwtException;
import lombok.extern.slf4j.Slf4j;
import org.springframework.security.authentication.UsernamePasswordAuthenticationToken;
import org.springframework.security.core.context.SecurityContextHolder;
import org.springframework.security.core.userdetails.UserDetails;
import org.springframework.security.web.authentication.WebAuthenticationDetailsSource;
import org.springframework.stereotype.Component;
import org.springframework.web.filter.OncePerRequestFilter;

import javax.servlet.FilterChain;
import javax.servlet.ServletException;
import javax.servlet.http.HttpServletRequest;
import javax.servlet.http.HttpServletResponse;
import java.io.IOException;

/**
 * @author kenx
 * @version 1.0
 * @date 2021/8/5 22:27
 * @webSite https://www.soboys.cn/
 * 任何请求都会执行此类
 * 检查请求是否具有有效的JWT令牌。如果它具有有效的JWT令牌,
 * 则它将在上下文中设置Authentication,以指定当前用户已通过身份验证。
 */
@Component
@Slf4j
public class JwtRequestFilter extends OncePerRequestFilter {

    //用户数据源
    private IUserService userService;
    //生成jwt 的token
    private  JwtTokenUtil jwtTokenUtil;

    public JwtRequestFilter(IUserService userService,JwtTokenUtil jwtTokenUtil) {
        this.userService = userService;
        this.jwtTokenUtil = jwtTokenUtil;
    }

    @Override
    protected void doFilterInternal(HttpServletRequest request, HttpServletResponse response, FilterChain filterChain) throws ServletException, IOException {
        final String requestTokenHeader = request.getHeader(ConstantFiledUtil.AUTHORIZATION_TOKEN);

        String username = null;
        String jwtToken = null;
        // JWT Token is in the form "Bearer token". Remove Bearer word and get only the Token
        if (requestTokenHeader != null && requestTokenHeader.startsWith("Bearer ")) {
            jwtToken = requestTokenHeader.substring(7);
            try {
                username = jwtTokenUtil.getUsernameFromToken(jwtToken);
            } catch (IllegalArgumentException e) {
                log.error("Unable to get JWT Token");
            } catch (ExpiredJwtException e) {
                log.error("JWT Token has expired");
            }
        } else {
            //logger.warn("JWT Token does not begin with Bearer String");
        }

        //Once we get the token validate it.
        if (username != null && SecurityContextHolder.getContext().getAuthentication() == null) {

            UserDetails userDetails = this.userService.loadUserByUsername(username);

            // if token is valid configure Spring Security to manually set authentication
            if (jwtTokenUtil.validateToken(jwtToken, userDetails)) {

                //保存用户信息和权限信息
                UsernamePasswordAuthenticationToken usernamePasswordAuthenticationToken = new UsernamePasswordAuthenticationToken(
                        userDetails, null, userDetails.getAuthorities());
                usernamePasswordAuthenticationToken
                        .setDetails(new WebAuthenticationDetailsSource().buildDetails(request));
                // After setting the Authentication in the context, we specify
                // that the current user is authenticated. So it passes the Spring Security Configurations successfully.
                SecurityContextHolder.getContext().setAuthentication(usernamePasswordAuthenticationToken);
            }
        }
        filterChain.doFilter(request, response);
    }
}
配置Spring Security 配置类SecurityConfig
自定义Spring Security的时候我们需要继承自WebSecurityConfigurerAdapter来完成,相关配置重写对应 方法
此处使用了 BCryptPasswordEncoder 密码加密
通过重写configure方法添加我们自定义的认证方式。
package cn.soboys.kmall.security.config;


import cn.soboys.kmall.security.service.IUserService;
import org.springframework.beans.factory.annotation.Autowired;
import org.springframework.context.annotation.Bean;
import org.springframework.context.annotation.Configuration;
import org.springframework.security.authentication.AuthenticationManager;
import org.springframework.security.config.annotation.authentication.builders.AuthenticationManagerBuilder;
import org.springframework.security.config.annotation.method.configuration.EnableGlobalMethodSecurity;
import org.springframework.security.config.annotation.web.builders.HttpSecurity;
import org.springframework.security.config.annotation.web.configuration.EnableWebSecurity;
import org.springframework.security.config.annotation.web.configuration.WebSecurityConfigurerAdapter;
import org.springframework.security.config.http.SessionCreationPolicy;
import org.springframework.security.crypto.bcrypt.BCryptPasswordEncoder;
import org.springframework.security.crypto.password.PasswordEncoder;
import org.springframework.security.web.authentication.UsernamePasswordAuthenticationFilter;

import java.util.Set;

/**
 * @author kenx
 * @version 1.0
 * @date 2021/8/6 17:27
 * @webSite https://www.soboys.cn/
 */
@EnableWebSecurity
@Configuration
@EnableGlobalMethodSecurity(prePostEnabled = true) // 控制权限注解
public class SecurityConfig extends WebSecurityConfigurerAdapter {

    private JwtAuthenticationEntryPoint jwtAuthenticationEntryPoint;
    private IUserService userService;
    private JwtRequestFilter jwtRequestFilter;


    public SecurityConfig(JwtAuthenticationEntryPoint jwtAuthenticationEntryPoint,
                          IUserService userService,
                          JwtRequestFilter jwtRequestFilter) {
        this.jwtAuthenticationEntryPoint = jwtAuthenticationEntryPoint;
        this.userService = userService;
        this.jwtRequestFilter = jwtRequestFilter;
    }


    /**
     * 1)HttpSecurity支持cors。
     * 2)默认会启用CRSF,此处因为没有使用thymeleaf模板(会自动注入_csrf参数),
     * 要先禁用csrf,否则登录时需要_csrf参数,而导致登录失败。
     * 3)antMatchers:匹配 "/" 路径,不需要权限即可访问,匹配 "/user" 及其以下所有路径,
     * 都需要 "USER" 权限
     * 4)配置登录地址和退出地址
     */
    @Override
    protected void configure(HttpSecurity http) throws Exception {
        // We don't need CSRF for this example
        http.csrf().disable()
                // dont authenticate this particular request
                .authorizeRequests().antMatchers("/", "/*.html", "/favicon.ico", "/css/**", "/js/**", "/fonts/**", "/layui/**", "/img/**",
                "/v3/api-docs/**", "/swagger-resources/**", "/webjars/**", "/pages/**", "/druid/**",
                "/statics/**", "/login", "/register").permitAll().
                // all other requests need to be authenticated
                        anyRequest().authenticated().and().
                // make sure we use stateless session; session won't be used to
                // store user's state.
                //覆盖默认登录
                        exceptionHandling().authenticationEntryPoint(jwtAuthenticationEntryPoint).and().sessionManagement()
                // 基于token,所以不需要session
                .sessionCreationPolicy(SessionCreationPolicy.STATELESS);


        // Add a filter to validate the tokens with every request
        http.addFilterBefore(jwtRequestFilter, UsernamePasswordAuthenticationFilter.class);
    }


    @Bean
    @Override
    public AuthenticationManager authenticationManagerBean() throws Exception {
        return super.authenticationManagerBean();
    }

    /**
     * 密码校验
     *
     * @param auth
     * @throws Exception
     */
    @Autowired
    public void configureGlobal(AuthenticationManagerBuilder auth) throws Exception {
        // configure AuthenticationManager so that it knows from where to load
        // user for matching credentials
        // Use BCryptPasswordEncoder
        auth.userDetailsService(userService).passwordEncoder(passwordEncoder());
    }

    /**
     * 密码加密验证
     *
     * @return
     */
    @Bean
    public PasswordEncoder passwordEncoder() {
        return new BCryptPasswordEncoder();
    }


}
具体应用
package cn.soboys.kmall.security.controller;

import cn.hutool.core.util.StrUtil;
import cn.soboys.kmall.common.exception.BusinessException;
import cn.soboys.kmall.common.ret.ResponseResult;
import cn.soboys.kmall.common.ret.Result;
import cn.soboys.kmall.common.ret.ResultResponse;
import cn.soboys.kmall.security.entity.User;
import cn.soboys.kmall.security.service.IUserService;
import cn.soboys.kmall.security.utils.EncryptPwdUtil;
import cn.soboys.kmall.security.utils.JwtTokenUtil;
import com.baomidou.mybatisplus.core.conditions.update.UpdateWrapper;
import io.swagger.annotations.*;
import lombok.RequiredArgsConstructor;
import lombok.SneakyThrows;
import org.springframework.security.authentication.AuthenticationManager;
import org.springframework.security.authentication.BadCredentialsException;
import org.springframework.security.authentication.DisabledException;
import org.springframework.security.authentication.UsernamePasswordAuthenticationToken;
import org.springframework.security.core.Authentication;
import org.springframework.security.core.userdetails.UserDetails;
import org.springframework.security.core.userdetails.UserDetailsService;
import org.springframework.validation.annotation.Validated;
import org.springframework.web.bind.annotation.PostMapping;
import org.springframework.web.bind.annotation.RequestParam;
import org.springframework.web.bind.annotation.RestController;

import javax.validation.constraints.NotBlank;
import javax.validation.constraints.NotEmpty;
import java.util.Date;
import java.util.Objects;

/**
 * @author kenx
 * @version 1.0
 * @date 2021/8/6 12:30
 * @webSite https://www.soboys.cn/
 */
@RestController
@ResponseResult
@Validated
@RequiredArgsConstructor
@Api(tags = "登录接口")
public class LoginController {
    private final IUserService userService;
    //认证管理,认证用户省份
    private final AuthenticationManager authenticationManager;
    private final JwtTokenUtil jwtTokenUtil;
    //自己数据源
    private final UserDetailsService jwtInMemoryUserDetailsService;


    @PostMapping("/login")
    @ApiOperation("用户登录")
    @SneakyThrows
    public Result login(@NotBlank @RequestParam String username,
                        @NotBlank @RequestParam String password) {


        Authentication authentication= this.authenticate(username, password);

        String user = authentication.getName();

        final String token = jwtTokenUtil.generateToken(user);
        //更新用户最后登录时间
        User u = new User();
        u.setLastLoginTime(new Date());
        userService.update(u, new UpdateWrapper<User>().lambda().eq(User::getUsername, username));
        return ResultResponse.success("Bearer " + token);
    }

    @PostMapping("/register")
    @ApiOperation("用户注册")
    public Result register(@NotEmpty @RequestParam String username, @NotEmpty @RequestParam String password) {
        User user = userService.getUserByUsername(username);

        if (!StrUtil.isBlankIfStr(user)) {
            throw new BusinessException("用户已存在");
        }
        User u = new User();
        u.setPassword(EncryptPwdUtil.encryptPassword(password));
        u.setUsername(username);
        u.setCreateTime(new Date());
        u.setModifyTime(new Date());
        u.setStatus("1");
        userService.save(u);
        return ResultResponse.success();

    }


    private Authentication authenticate(String username, String password) throws Exception {
        Authentication authentication = null;
        try {
            //security 认证用户身份
            authentication = authenticationManager.authenticate(new UsernamePasswordAuthenticationToken(username, password));
        } catch (DisabledException e) {
            throw new BusinessException("用户不存");
        } catch (BadCredentialsException e) {
            throw new BusinessException("用户名密码错误");
        }

        return authentication;
    }
}
深入了解
Spring Security 配置讲解
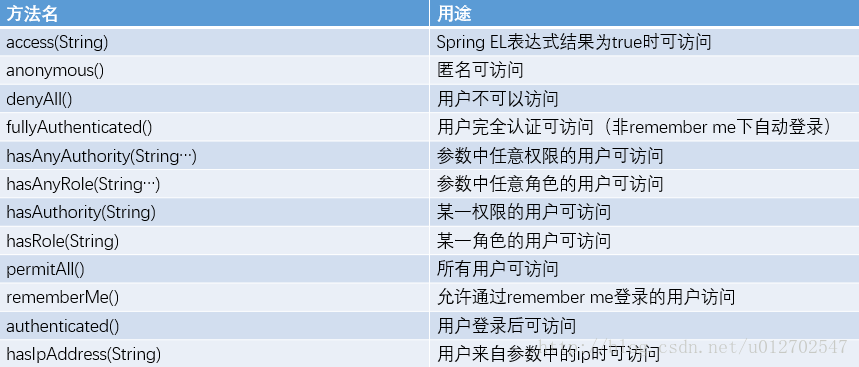
- @EnableWebSecurity 开启权限认证
- @EnableGlobalMethodSecurity(prePostEnabled = true) 开启权限注解认证
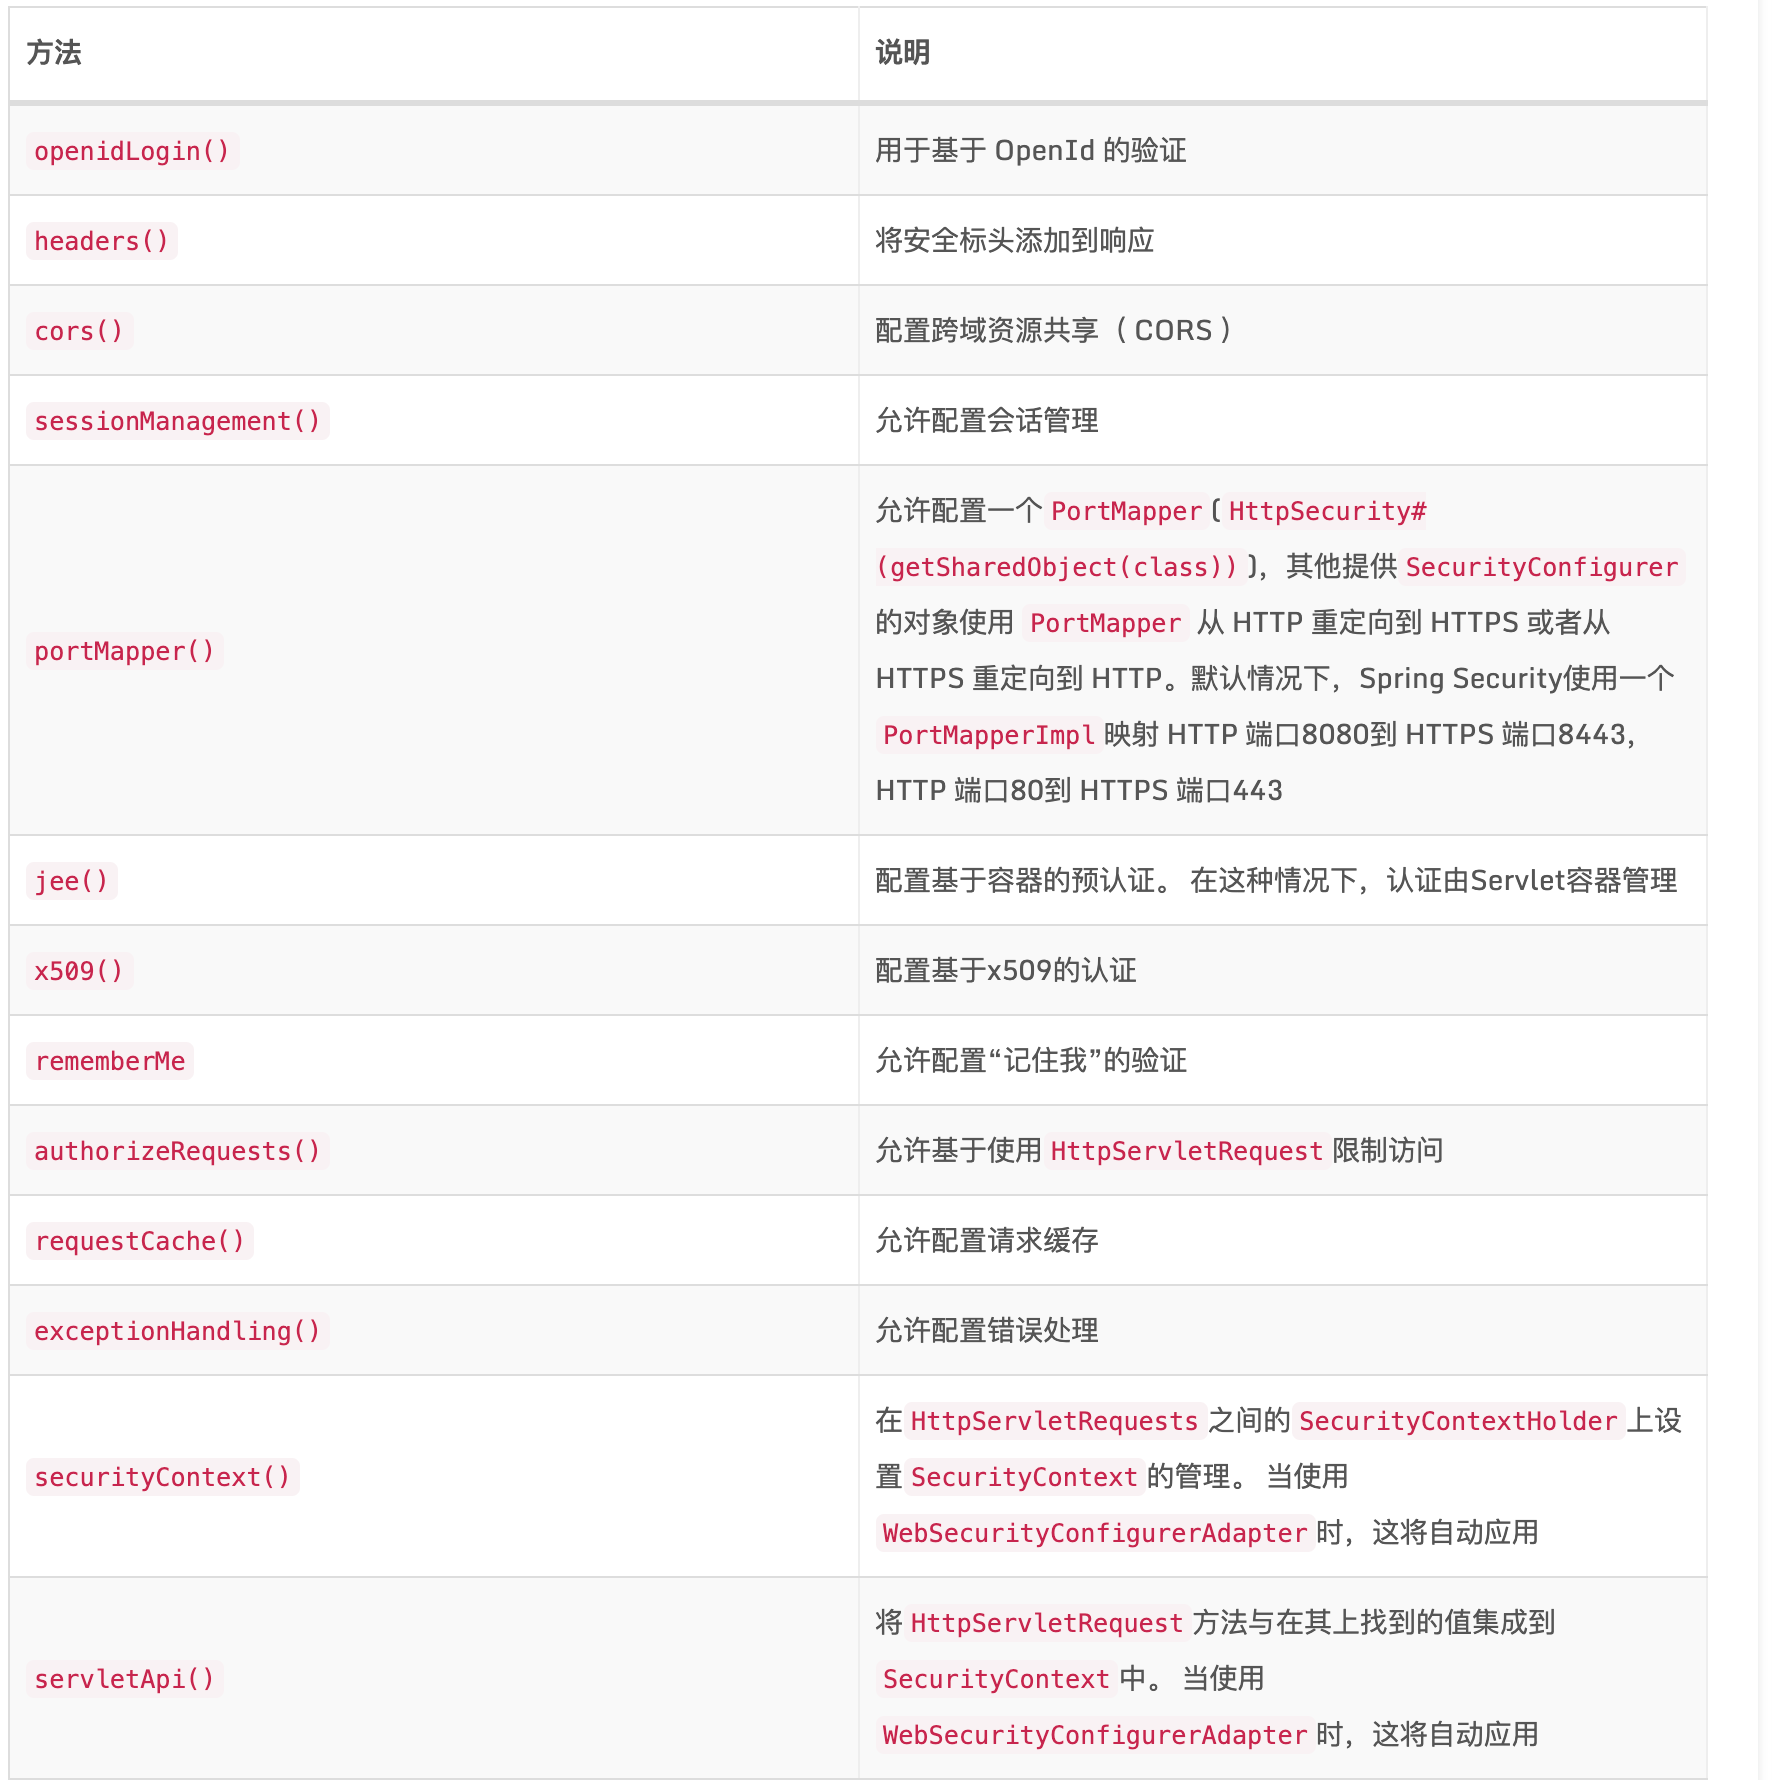
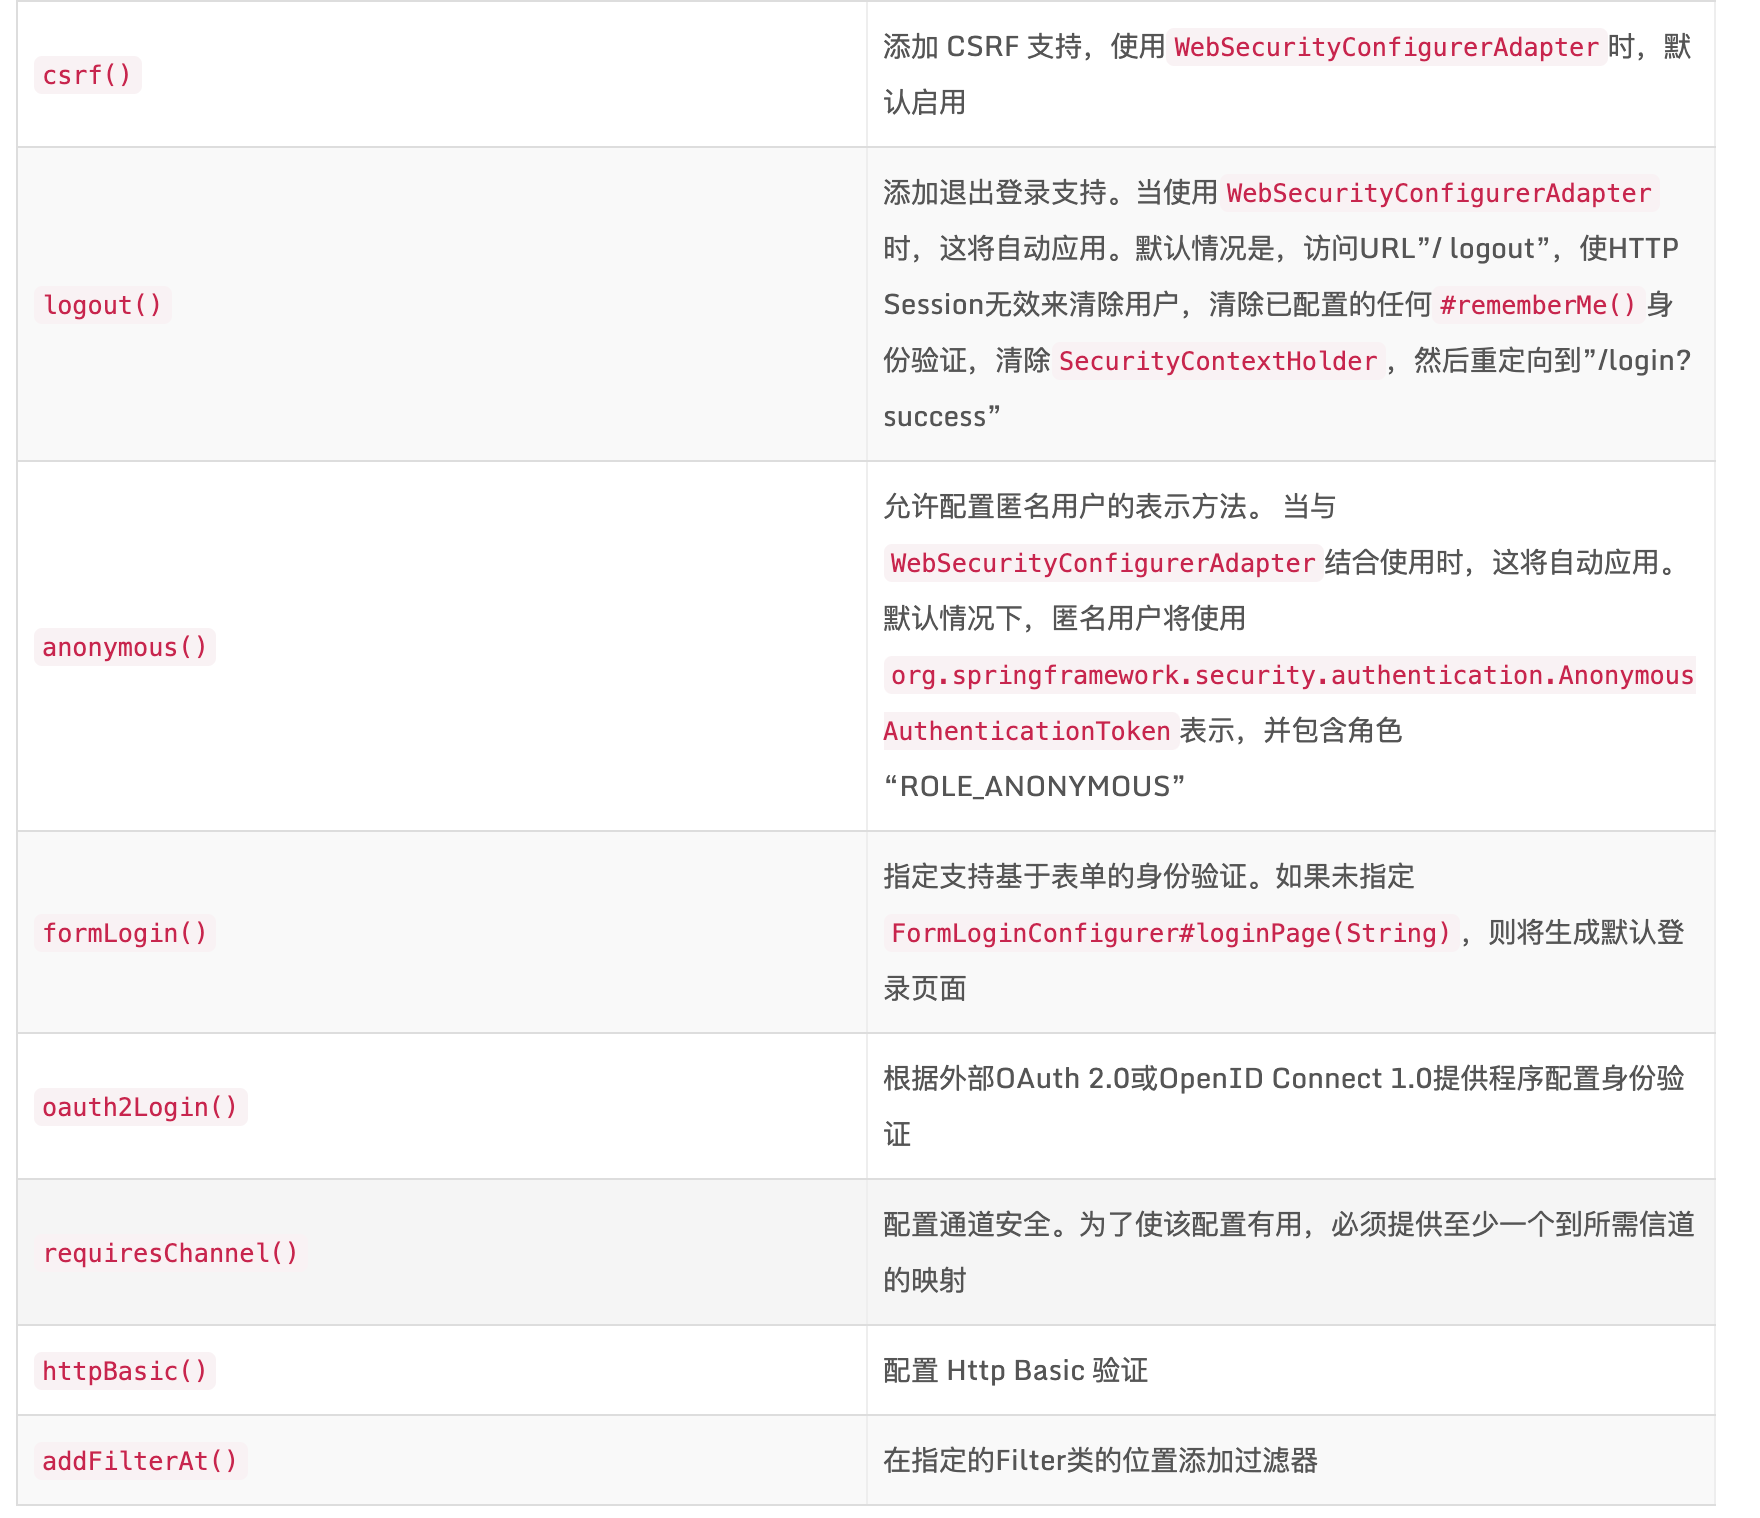
- configure 配置
    @Override
    protected void configure(HttpSecurity http) throws Exception {
        // We don't need CSRF for this example
        http.csrf().disable()
                // dont authenticate this particular request
                .authorizeRequests().antMatchers("/", "/*.html", "/favicon.ico", "/css/**", "/js/**", "/fonts/**", "/layui/**", "/img/**",
                "/v3/api-docs/**", "/swagger-resources/**", "/webjars/**", "/pages/**", "/druid/**",
                "/statics/**", "/login", "/register").permitAll().
                // all other requests need to be authenticated
                        anyRequest().authenticated().and().
                // make sure we use stateless session; session won't be used to
                // store user's state.
                //覆盖默认登录
                        exceptionHandling().authenticationEntryPoint(jwtAuthenticationEntryPoint).and().sessionManagement()
                // 基于token,所以不需要session
                .sessionCreationPolicy(SessionCreationPolicy.STATELESS);


        // Add a filter to validate the tokens with every request
        http.addFilterBefore(jwtRequestFilter, UsernamePasswordAuthenticationFilter.class);
    }


参考


