一:NIO简介
java.nio全称java non-blocking IO,是指jdk1.4 及以上版本提供的新的api(New IO非正式叫法) ,为所有的原始类型(boolean类型除外)提供缓存支持的数据容器,使用它可以提供非阻塞式的高伸缩性网络。
Java NIO 由以下三个核心部分组成:
Channels:通道
Buffers:缓冲区
Selectors:选择器
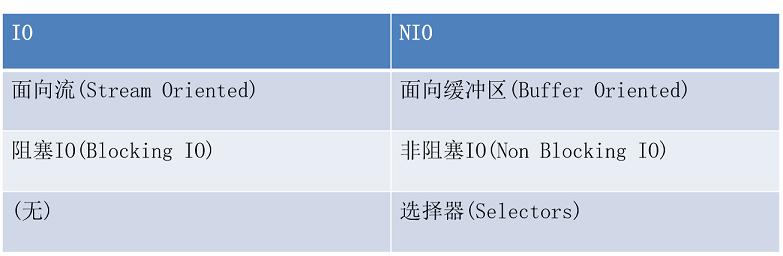
1.1 普通IO和NIO区别
二:Channel 和 Buffer
基本上,所有的 IO 在NIO 中都从一个Channel 开始。Channel 有点象流,但是和传统流不一样,传统流可以直接读取和写入数据,而通道只能通过缓冲区进行读写, 数据可以从Channel读到Buffer中,也可以从Buffer 写到Channel中。这里有个图示:
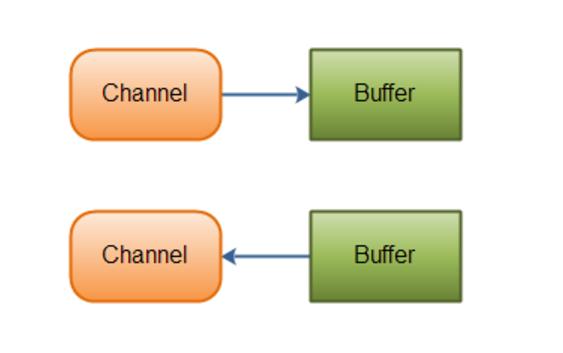
简单理解:Channel负责传输,Buffer负责存储。
JAVA NIO中的一些主要Channel的实现:
FileChannel
DatagramChannel
SocketChannel
ServerSocketChannel
Java NIO里关键的Buffer实现:
ByteBuffer
CharBuffer
DoubleBuffer
FloatBuffer
IntBuffer
LongBuffer
ShortBuffer
三:Selector
Selector允许单线程处理多个 Channel。如果你的应用打开了多个连接(通道),但每个连接的流量都很低,使用Selector就会很方便。例如,在一个聊天服务器中。
这是在一个单线程中使用一个Selector处理3个Channel的图示:
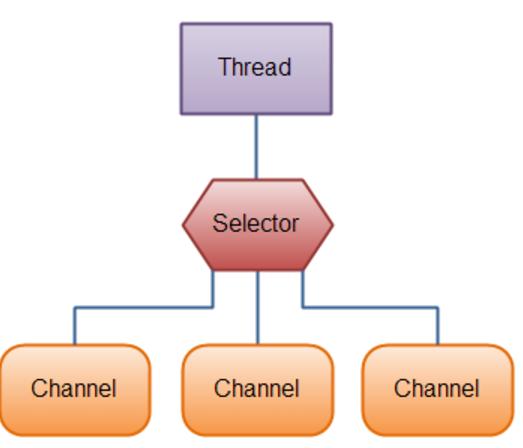
要使用Selector,得向Selector注册Channel,然后调用它的select()方法。这个方法会一直阻塞到某个注册的通道有事件就绪。一旦这个方法返回,线程就可以处理这些事件,常见事件有新连接进来,数据接收等。
四:Buffer的使用
Java NIO中的Buffer用于和NIO通道进行交互。如你所知,数据是从通道读入缓冲区,从缓冲区写入到通道中的。
缓冲区本质上是一块可以写入数据,然后可以从中读取数据的内存。这块内存被包装成NIO Buffer对象,并提供了一组方法,用来方便的访问该块内存。
4.1 Buffer的基本用法
使用Buffer读写数据一般遵循以下四个步骤:
写入数据到Buffer
调flip()方法
从Buffer中读取数据
调用clear()方法或者compact()方法
当向buffer写入数据时,buffer会记录下写了多少数据。一旦要读取数据,需要通过flip()方法将Buffer从写模式切换到读模式。在读模式下,可以读取之前写入到buffer的所有数据。
一旦读完了所有的数据,就需要清空缓冲区,让它可以再次被写入。有两种方式能清空缓冲区:调用clear()或compact()方法。clear()方法会清空整个缓冲区。compact()方法只会清除已经读过的数据。任何未读的数据都被移到缓冲区的起始处,新写入的数据将放到缓冲区未读数据的后面。
案例一:使用ByteBuffer
public static void main(String[] args) { //1创建缓冲区 ByteBuffer buffer=ByteBuffer.allocate(1024); //2向缓冲区中添加内容 buffer.put("helloworld".getBytes()); //3切换为读模式 buffer.flip(); //4获取单个字节 buffer.get(); //5获取多个字节 byte[] data=new byte[buffer.limit()]; buffer.get(data); System.out.println(new String(data)); //6清空缓冲区 buffer.clear(); }
4.2 Buffer的capacity,position和limit
缓冲区本质上是一块可以写入数据,然后可以从中读取数据的内存。这块内存被包装成NIO Buffer对象,并提供了一组方法,用来方便的访问该块内存。
为了理解Buffer的工作原理,需要熟悉它的三个属性:
capacity
position
limit
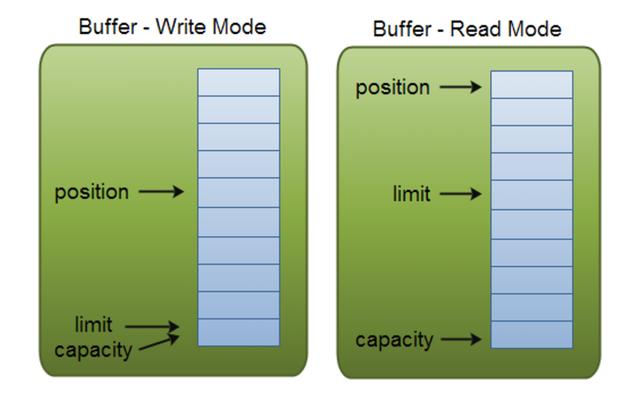
position和limit的含义取决于Buffer处在读模式还是写模式。不管Buffer处在什么模式,capacity的含义总是一样的。
这里有一个关于capacity,position和limit在读写模式中的说明。
capacity
作为一个内存块,Buffer有一个固定的大小值,也叫“capacity”.你只能往里写capacity个byte、long,char等类型。一旦Buffer满了,需要将其清空(通过读数据或者清除数据)才能继续写数据往里写数据。
position
当你写数据到Buffer中时,position表示当前的位置。初始的position值为0.当一个byte、long等数据写到Buffer后, position会向前移动到下一个可插入数据的Buffer单元。position最大可为capacity – 1.
当读取数据时,也是从某个特定位置读。当将Buffer从写模式切换到读模式,position会被重置为0. 当从Buffer的position处读取数据时,position向前移动到下一个可读的位置。
limit
在写模式下,Buffer的limit表示你最多能往Buffer里写多少数据。 写模式下,limit等于Buffer的capacity。
当切换Buffer到读模式时, limit表示你最多能读到多少数据。因此,当切换Buffer到读模式时,limit会被设置成写模式下的position值。换句话说,你能读到之前写入的所有数据(limit被设置成已写数据的数量,这个值在写模式下就是position)
Buffer的分配
要想获得一个Buffer对象首先要进行分配。 每一个Buffer类都有一个allocate方法。下面是一个分配48字节capacity的ByteBuffer的例子。
ByteBuffer buf = ByteBuffer.allocate(1024);//创建缓冲区,大小为1024个字节
向Buffer中写数据
写数据到Buffer有两种方式:
从Channel写到Buffer。后面案例使用
通过Buffer的put()方法写到Buffer里。
从Channel写到Buffer的例子
通过put方法写Buffer的例子:
buf.put(127);
put方法有很多版本,允许你以不同的方式把数据写入到Buffer中。例如, 写到一个指定的位置,或者把一个字节数组写入到Buffer。 更多Buffer实现的细节参考JavaDoc。
flip()方法
flip方法将Buffer从写模式切换到读模式。调用flip()方法会将position设回0,并将limit设置成之前position的值。
换句话说,position现在用于标记读的位置,limit表示之前写进了多少个byte、char等 —— 现在能读取多少个byte、char等。
从Buffer中读取数据
从Buffer中读取数据有两种方式:
从Buffer读取数据到Channel。后面案例使用
使用get()方法从Buffer中读取数据。
从Buffer读取数据到Channel的例子:
使用get()方法从Buffer中读取数据的例子
byte aByte = buf.get();
get方法有很多版本,允许你以不同的方式从Buffer中读取数据。例如,从指定position读取,或者从Buffer中读取数据到字节数组。更多Buffer实现的细节参考JavaDoc。
rewind()方法
Buffer.rewind()将position设回0,所以你可以重读Buffer中的所有数据。limit保持不变,仍然表示能从Buffer中读取多少个元素(byte、char等)。
clear()与compact()方法
一旦读完Buffer中的数据,需要让Buffer准备好再次被写入。可以通过clear()或compact()方法来完成。
如果调用的是clear()方法,position将被设回0,limit被设置成 capacity的值。换句话说,Buffer 被清空了。Buffer中的数据并未清除,只是这些标记告诉我们可以从哪里开始往Buffer里写数据。
如果Buffer中有一些未读的数据,调用clear()方法,数据将“被遗忘”,意味着不再有任何标记会告诉你哪些数据被读过,哪些还没有。
如果Buffer中仍有未读的数据,且后续还需要这些数据,但是此时想要先先写些数据,那么使用compact()方法。
compact()方法将所有未读的数据拷贝到Buffer起始处。然后将position设到最后一个未读元素正后面。limit属性依然像clear()方法一样,设置成capacity。现在Buffer准备好写数据了,但是不会覆盖未读的数据。
mark()与reset()方法
通过调用Buffer.mark()方法,可以标记Buffer中的一个特定position。之后可以通过调用Buffer.reset()方法恢复到这个position。例如:
buffer.mark(); //添加标记buffer.reset();//恢复到标记位置
五:FileChannel的使用
Java NIO中的FileChannel是一个连接到文件的通道。可以通过文件通道读写文件。
FileChannel无法设置为非阻塞模式,它总是运行在阻塞模式下。
5.1打开FileChannel
在使用FileChannel之前,必须先打开它。但是,我们无法直接打开一个FileChannel,需要通过使用一个InputStream、OutputStream或RandomAccessFile来获取一个FileChannel实例。下面是通过RandomAccessFile打开FileChannel的示例:
RandomAccessFile aFile = new RandomAccessFile("data/nio-data.txt", "rw"); FileChannel inChannel = aFile.getChannel();
5.2从FileChannel读取数据
调用多个read()方法之一从FileChannel中读取数据。如:
ByteBuffer buf = ByteBuffer.allocate(48);int bytesRead = inChannel.read(buf);
首先,分配一个Buffer。从FileChannel中读取的数据将被读到Buffer中。
然后,调用FileChannel.read()方法。该方法将数据从FileChannel读取到Buffer中。read()方法返回的int值表示了有多少字节被读到了Buffer中。如果返回-1,表示到了文件末尾。
5.3 向FileChannel写数据
使用FileChannel.write()方法向FileChannel写数据,该方法的参数是一个Buffer。如:
String newData = "New String to write to file..." + System.currentTimeMillis(); ByteBuffer buf = ByteBuffer.allocate(48); buf.clear(); buf.put(newData.getBytes()); buf.flip();while(buf.hasRemaining()) { channel.write(buf); }
注意FileChannel.write()是在while循环中调用的。因为无法保证write()方法一次能向FileChannel写入多少字节,因此需要重复调用write()方法,直到Buffer中已经没有尚未写入通道的字节。
5.4 关闭FileChannel
用完FileChannel后必须将其关闭。如:
channel.close();
六:案例
6.1写入文本文件
//1创建 FileOutputStreamFileOutputStream fos=new FileOutputStream("d:\out.txt"); //2获取通道 FileChannel outChannel = fos.getChannel(); //3创建缓冲区 ByteBuffer buffer=ByteBuffer.allocate(1024); //4向缓冲区中放入数据 buffer.put("hello world".getBytes()); //5写入 buffer.flip(); outChannel.write(buffer); //6关闭 outChannel.close(); System.out.println("写入完毕");
6.2读取文本文件
//1创建 FileInputStreamFileInputStream fis=new FileInputStream("d:\out.txt"); //2创建通道 FileChannel inChannel = fis.getChannel(); //3创建缓冲区 ByteBuffer buffer=ByteBuffer.allocate(1024); int len=inChannel.read(buffer); System.out.println(len); //4处理数据 buffer.flip(); String data=new String(buffer.array(),0,len); System.out.println(data); //5关闭 inChannel.close();
6.3复制图片
//1创建通道 FileChannel inChannel = FileChannel.open(Paths.get("d:\003.jpg"),StandardOpenOption.READ); FileChannel outChannel=FileChannel.open(Paths.get("d:\haha.jpg"),StandardOpenOption.WRITE, StandardOpenOption.CREATE); //2创建缓冲区 ByteBuffer buffer=ByteBuffer.allocateDirect(1024); int len=0; //3复制 while((len=inChannel.read(buffer))!=-1){ buffer.flip(); outChannel.write(buffer); buffer.clear(); } //4关闭 inChannel.close(); outChannel.close(); System.out.println("复制完毕");
6.4使用内存映射文件复制大文件
//1创建通道 FileChannel inChannel = new RandomAccessFile("d:\01.wav", "r").getChannel(); FileChannel outChannel=new RandomAccessFile("d:\02.wav", "rw").getChannel(); //2使用内存映射缓冲区 MappedByteBuffer map = inChannel.map(MapMode.READ_ONLY, 0,inChannel.size()); outChannel.write(map); //3关闭 inChannel.close(); outChannel.close(); System.out.println("复制完毕"); System.out.println(inChannel.getClass().toString());
注意:如果文件超过2G,需要分多个文件映射。
操作实例:
package nio;
import java.io.FileInputStream;
import java.io.FileNotFoundException;
import java.io.FileOutputStream;
import java.io.IOException;
import java.io.RandomAccessFile;
import java.nio.ByteBuffer;
import java.nio.MappedByteBuffer;
import java.nio.channels.FileChannel;
import java.nio.channels.FileChannel.MapMode;
import java.nio.file.Paths;
import java.nio.file.StandardOpenOption;
public class NioBufferTest {
public static void main(String[] args) throws IOException {
// byteBuffer();
// fileChannelRead();
fileChannelCopy();
// fileChannelCopyByMap();
}
//1.6G文件内存映射复制平均时间20秒
private static void fileChannelCopyByMap() throws IOException{
long time1=System.currentTimeMillis();
System.out.println("开始复制:"+time1);
//1创建通道
FileChannel fileChannelRead=new RandomAccessFile("F:\\视频教学\\爱一个人需要一万个理由,学习Nginx只需要一个.mp4", "r").getChannel();
FileChannel fileChannelWrite=new RandomAccessFile("F:\\视频教学\\copy1.mp4", "rw").getChannel();
//2使用内存映射缓冲区
MappedByteBuffer map = fileChannelRead.map(MapMode.READ_ONLY, 0,fileChannelRead.size());
fileChannelWrite.write(map);
fileChannelRead.close();
fileChannelWrite.close();
long time2=System.currentTimeMillis();
System.out.println("复制完毕"+time2);
System.out.println("用时"+(time2-time1)/1000+"秒");
}
private static void fileChannelCopy() throws IOException{
long time1=System.currentTimeMillis();
System.out.println("开始复制:"+time1);
FileChannel fileChannelRead =FileChannel.open(Paths.get("F:\\视频教学\\爱一个人需要一万个理由,学习Nginx只需要一个.mp4"), StandardOpenOption.READ);
FileChannel fileChannelWrite =FileChannel.open(Paths.get("F:\\视频教学\\copy1.mp4"), StandardOpenOption.WRITE,StandardOpenOption.CREATE);
ByteBuffer buffer=ByteBuffer.allocate(1024);
int len=0;
/*//1.6G文件复制平均时间11秒
while((len=fileChannelRead.read(buffer))!=-1){
buffer.flip();
fileChannelWrite.write(buffer);
buffer.clear();
}*/
//1.6G文件复制,平均三次用时21秒
MappedByteBuffer map = fileChannelRead.map(MapMode.READ_ONLY, 0,fileChannelRead.size());
fileChannelWrite.write(map);
fileChannelRead.close();
fileChannelWrite.close();
long time2=System.currentTimeMillis();
System.out.println("复制完毕"+time2);
System.out.println("用时"+(time2-time1)/1000+"秒");
}
private static void fileChannelRead() throws IOException {
FileInputStream fis=new FileInputStream("D://购车指南.txt");
FileChannel fileChannel=fis.getChannel();
ByteBuffer byteBuffer=ByteBuffer.allocate(17);
int len=fileChannel.read(byteBuffer);
System.out.println(len);
byteBuffer.flip();
String data=new String(byteBuffer.array(),0,len);
System.out.println(data);
fileChannel.close();
}
private static void fileChannelWrite() throws IOException{
FileOutputStream fileOutputStream=new FileOutputStream("D://购车指南.txt");
FileChannel fileChannel=fileOutputStream.getChannel();
ByteBuffer byteBuffer=ByteBuffer.allocate(48);
byteBuffer.put("guolizhi郭立志".getBytes());
byteBuffer.flip();
fileChannel.write(byteBuffer);
fileChannel.close();
System.out.println("写入完毕");
}
private static void byteBuffer(){
//1创建缓冲区
ByteBuffer buffer=ByteBuffer.allocate(1024);
//2向缓冲区中添加内容
buffer.put("helloworld".getBytes());
//3切换为读模式
buffer.flip();
//4获取多个字节
byte[] data=new byte[buffer.limit()];
buffer.get(data);
System.out.println(new String(data));
//6清空缓冲区
buffer.clear();
}
}