
NMS即non maximum suppression即非极大抑制,顾名思义就是抑制不是极大值的元素,搜索局部的极大值。在最近几年常见的物体检测算法(包括rcnn、sppnet、fast-rcnn、faster-rcnn等)中,最终都会从一张图片中找出很多个可能是物体的矩形框,然后为每个矩形框为做类别分类概率。本文来通过Pytorch实现NMS算法。
如果你在做计算机视觉(特别是目标检测),你肯定会听说过非极大值抑制(nms)。网上有很多不错的文章给出了适当的概述。简而言之,非最大抑制使用一些启发式方法减少了输出边界框的数量,例如交叉除以并集(iou)。
在PyTorch的文档中说:NMS 迭代地删除与另一个(得分较高)框的 IoU 大于 iou_threshold 的得分较低的框。
为了研究其如何工作,让我们加载一个图像并创建边界框
 from PIL import Image
 import torch
 import matplotlib.pyplot as plt
 import numpy as np

 # credit https://i0.wp.com/craffic.co.in/wp-content/uploads/2021/02/ai-remastered-rick-astley-never-gonna-give-you-up.jpg?w=1600&ssl=1
 img = Image.open("./samples/never-gonna-give-you-up.webp")
 img
我们手动创建 两个框,一个人脸,一个话筒
 original_bboxes = torch.tensor([
     # head
     [ 565, 73, 862, 373],
     # mic
     [807, 309, 865, 434]
 ]).float()

 w, h = img.size
 # we need them in range [0, 1]
 original_bboxes[...,0] /= h
 original_bboxes[...,1] /= w
 original_bboxes[...,2] /= h
 original_bboxes[...,3] /= w
这些bboxes 都是在[0,1]范围内的,虽然这不是必需的,但当有多个类时,这是非常有用的(我们稍后将看到为什么)。
 from torchvision.utils import draw_bounding_boxes
 from torchvision.transforms.functional import to_tensor
 from typing import List

 def plot_bboxes(img : Image.Image, bboxes: torch.Tensor, *args, **kwargs) -> plt.Figure:
     w, h = img.size
     # from [0, 1] to image size
     bboxes = bboxes.clone()
     bboxes[...,0] *= h
     bboxes[...,1] *= w
     bboxes[...,2] *= h
     bboxes[...,3] *= w
     fig = plt.figure()
     img_with_bboxes = draw_bounding_boxes((to_tensor(img) * 255).to(torch.uint8), bboxes, *args, **kwargs, width=4)
     return plt.imshow(img_with_bboxes.permute(1,2,0).numpy())

 plot_bboxes(img, original_bboxes, labels=["head", "mic"])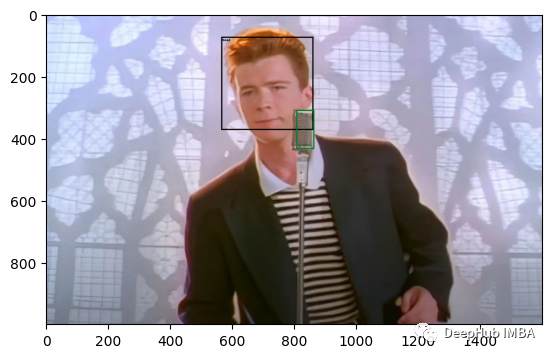
为了说明,我们添加一些重叠的框
 max_bboxes = 3
 scaling = torch.tensor([1, .96, .97, 1.02])
 shifting = torch.tensor([0, 0.001, 0.002, -0.002])

 # broadcasting magic (2, 1, 4) * (1, 3, 1)
 bboxes = (original_bboxes[:,None,:] * scaling[..., None] + shifting[..., None]).view(-1, 4)

 plot_bboxes(img, bboxes, colors=[*["yellow"] * 4, *["blue"] * 4], labels=[*["head"] * 4, *["mic"] * 4])
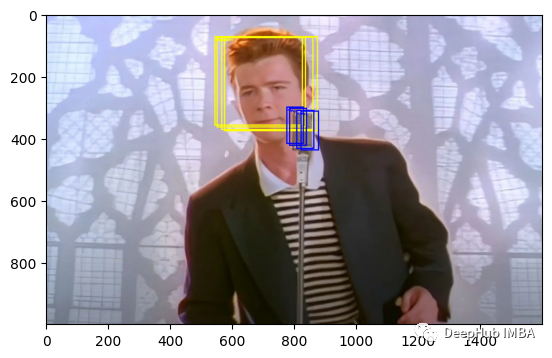
现在可以看到,有6个bboxes ,这里我们还需要定义一个分数,这通常由模型输出。
 scores = torch.tensor([
     0.98, 0.85, 0.5, 0.2, # for head
     1, 0.92, 0.3, 0.1 # for mic
 ])
我们标签的分类,0代表人脸,1代表麦克风
labels = torch.tensor([0,0,0,0,1,1,1,1])最后,让我们排列一下这些数据
 perm = torch.randperm(scores.shape[0])
 bboxes = bboxes[perm]
 scores = scores[perm]
 labels = labels[perm]
让我们看看结果
 plot_bboxes(img, bboxes,
             colors=["yellow" if el.item() == 0 else "blue" for el in labels],
             labels=["head" if el.item()  == 0 else "mic" for el in labels]
            )
好了,这样我们模拟了模型的输出了,下面进入正题。
NMS是通过迭代删除低分数重叠的边界框来工作的。步骤如下。
bboxes are sorted by score in decreasing order
init a vector keep with ones
for i in len(bboxes):
    # was suppressed
    if keep[i] == 0:
        continue
    # compare with all the others
    for j in len(bbox):
        if keep[j]:
            if (iou(bboxes[i], bboxes[j]) > iou_threshold):
                keep[j] = 0

return keep
我们的Pytorch实现,采用三个参数(这实际上是从pytorch的文档中复制和粘贴的):
- box (Tensor[N, 4])) – 用于执行 NMS 的框。它们应该是 (x1, y1, x2, y2) 格式,0 <= x1 < x2 和 0 <= y1 < y2。
- score (Tensor[N]) – 每个box 的得分
- iou_threshold (float) – 丢弃所有 IoU > iou_threshold 的框
- 返回值是非抑制边界框的索引
from torchvision.ops.boxes import box_iou

def nms(bboxes: torch.Tensor, scores: torch.Tensor, iou_threshold: float) -> torch.Tensor:
    order = torch.argsort(-scores)
    indices = torch.arange(bboxes.shape[0])
    keep = torch.ones_like(indices, dtype=torch.bool)
    for i in indices:
        if keep[i]:
            bbox = bboxes[order[i]]
            iou = box_iou(bbox[None,...],(bboxes[order[i + 1:]]) * keep[i + 1:][...,None])
            overlapped = torch.nonzero(iou > iou_threshold)
            keep[overlapped + i + 1] = 0
    return order[keep]
让我们详细说明下这个参数:
order = scores.argsort()根据分数得到排序的指标
indices = torch.arange(bboxes.shape[0])创建用于迭代bboxes的索引 indices
keep = torch.ones_like(indices, dtype=torch.bool)keep是用于判断一个bbox是否应该保留的向量,如果Keep [i] == 1,则bboxes[order[i]]不被抑制
for i in indices:
    ...
for循环遍历所有的box,如果当前box未被抑制,则keep[i] = 1
bbox = bboxes[order[i]]]来通过已排序的位置获取bbox
iou = box_iou(bbox[None,...], (bboxes[order[i + 1:]]) * keep[i + 1:][...,None])计算当前bbox和所有其他候选bbox之间的iou。这将把所有抑制框设置为零(因为keep将等于0)
(bboxes ...)[order[i + 1:]]在排序的顺序中与后面所有的框进行比较,因为需要跳过当前的框,所以这里是i+ 1,
overlapped = torch.nonzero(iou > iou_threshold)
keep[overlapped + i + 1] = 0
计算和选择iou大于iou_threshold的索引。
我们之前对bboxes进行了切片,(bboxes…)[i + 1:]),所以我们需要添加这些索引的偏移量,这就是后面+ i + 1的原因。
最后返回order[keep],这样映射回原始的box索引(未排序),这样一个简单的函数就执行完成了。
让我们看看结果
nms_indices = nms(bboxes, scores, .45)
plot_bboxes(img,
            bboxes[nms_indices],
            colors=["yellow" if el.item() == 0 else "blue" for el in labels[nms_indices]],
            labels=["head" if el.item()  == 0 else "mic" for el in labels[nms_indices]]
           )
因为有多个类,所以需要让nms在同一个类中计算iou。还记得上面我们提到的在[0,1]之间吗?可以给它们添加标签,把不同类的框区分开。
nms_indices = nms(bboxes + labels[..., None], scores, .45)
plot_bboxes(img,
            bboxes[nms_indices],
            colors=["yellow" if el.item() == 0 else "blue" for el in labels[nms_indices]],
            labels=["head" if el.item()  == 0 else "mic" for el in labels[nms_indices]]
           )
如果我们将阈值更改为0.1,就得到了下图

让我们对比下pytorch官方的实现:
from torchvision.ops.boxes import nms as torch_nms
nms_indices = torch_nms(bboxes + labels[..., None], scores, .45)
plot_bboxes(img,
            bboxes[nms_indices],
            colors=["yellow" if el.item() == 0 else "blue" for el in labels[nms_indices]],
            labels=["head" if el.item()  == 0 else "mic" for el in labels[nms_indices]]
           )
结果是一样的。然我们看看时间:
%%timeit
nms(bboxes + labels[..., None], scores, .45)
#534 µs ± 22.1 µs per loop (mean ± std. dev. of 7 runs, 1,000 loops each)

%%timeit
torch_nms(bboxes + labels[..., None], scores, .45)
#54.4 µs ± 3.29 µs per loop (mean ± std. dev. of 7 runs, 10,000 loops each)
我们的实现慢了大约10倍,哈,这个结果很正常,因为我们我们没有使用自定义的cpp内核!但是这并不代表我们的实现没有用,因为手写代码我们完全了解了NMS的工作原理,这是本文的真正意义,总之在这篇文章中我们看到了如何在PyTorch中实现非最大抑制,这对你了解目标检测的相关知识是非常有帮助的。
https://avoid.overfit.cn/post/1ffeb08f8ea4494cb992b0ad05db174b
作者:Francesco Zuppichini