目标:
1、在VirtualBox中安装CentOS
2、配置虚拟机网络,实现:
a.主机联网后,宿机能够通过主机上网
b.不管主机联网与否,主机都能SSH登录宿机,并且主宿机能互相传送文件
安装环境:
1、Win7 64bit 旗舰版
2、VirtualBox 4.3.6
3、CentOS 6.5 x86_64
1、安装VirtualBox虚拟机
安装完成后,在网络连接中多一个"VirtualBox Host-Only Network"(仅对设置Host_only模式的网络有用)。
打开VirtualBox,管理--全局设定--网络--仅主机(Host-Only)网络:
双击“VirtualBox Host-Only Ethernet Adapter”:
主机虚拟网络界面:
192.168.56.1
255.255.255.0
DHCP 服务器:
192.168.56.100
255.255.255.0
192.168.56.101
192.168.56.254
2、新建并设置CentOS虚拟机
新建虚拟机:
(1)宿机类型:Linux/Red Hat
(2)内存大小:1G
(3)创建磁盘:
大小:20G
选择动态分配始占用空间小,性能稍差;
选择固定大小占用空间较大,性能较好,推荐
(4)存储设置:
CD/DVD控制器中加入准备好的CentOS安装光盘
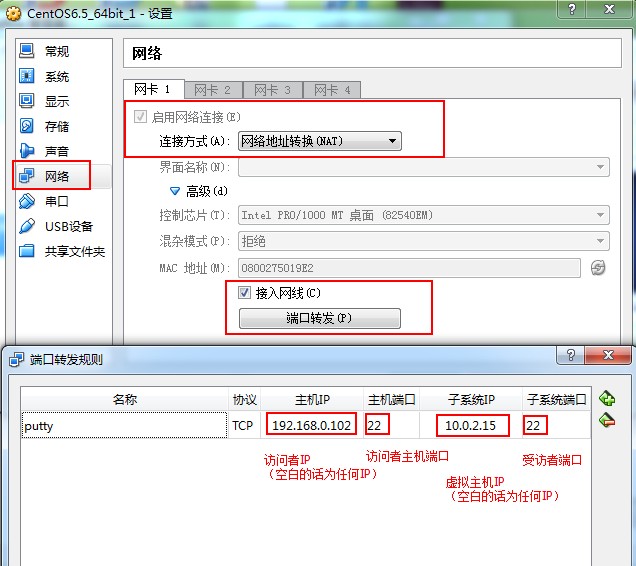
(5)网络设置:
宿机启动第一块网卡
网卡1:NAT
宿机(CemtOS)用这一网卡通过主机(Win7)上网(此时宿机可以访问主机),而主机不能访问宿机。
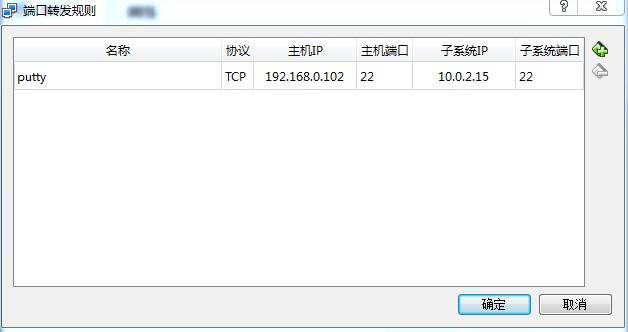
注意:可以通过网卡1中的“端口转发”设置主机访问宿机中的相应服务,端口转发规则设置具体如下:
3、安装CentOS
简要步骤介绍:
(1)语言:简体中文
(2)安装设备:基本存储设备
(3)主机名:为默认的localhost.localdomain(在没有真正域名前)
(4)网络配置:先忽略
(5)root用户的密码设置
(6)进行哪种类型的安装:使用自定义布局
(7)简单分区方案:/--18G swap--2G
(8)选择Desktop安装,且现在自定义
(9)将拨号网络、联网工具和Emacs勾选上
(10)开始安装进程直到结束
安装完成之后,只要主机可以上网,宿机的CentOS就可以使用NAT(网卡1)通过主机上网。
网卡1默认分配的IP如下:
eth0:IP:10.0.2.15
4、CentOS安装后网络配置(可选)
若需要配置网络****,可参考如下部分(不需要配置的话,直接进入第5部分。为了简单起见,此处我没有作网络配置):
(1)命令配置
1
2
3
# ifconfig eth0 192.168.56.102 netmask 255.255.255.0 //IP地址、子网掩码
# route add default gw 192.168.56.1 dev eth0 //网关
# hostname centos //计算机名
(2)文件配置
CentOS中的网络配置文件主要有以下几类:
1
2
3
4
5
6
7
8
9
10
# 指定某个网络接口的连接信息,每个网络设备对应一个这样的文件
/etc/sysconfig/network-scripts/ifcfg- <interface-name>
# 指定所有网络接口的路由和主机信息
/etc/sysconfig/network
# 类似 C:\Windows\System32\drivers\etc\hosts,用于无DNS下的机器名解析
/etc/hosts
# 指定DNS服务器的IP地址
/etc/resolv .conf
# 网络管理工具使用的配置文件存储目录,不要做手动修改
/etc/sysconfig/networking/
<1>修改IP地址
假设有2块网卡,要修改2块网卡(Host-Only,NAT)的网络设置:
进入/etc/sysconfig/network-scripts目录,修改两块网卡的ifcfg文件如下:
a. 修改ifcfg-eth0文件,配置Host-only网络:
1
2
3
4
5
6
7
8
9
10
11
12
13
14
15
16
17
18
19
20
21
# vim /etc/sysconfig/network-scripts/ifcfg-eth0:
# 第一块网卡
DEVICE=eth0
# 开机启动
ONBOOT= yes
# 启动协议,static/dhcp
BOOTPROTO=static
# 网卡设备的物理地址,默认,与VirtualBox网络设置界面一致
HWADDR=08:00:27:75:AD:13
# IP地址
IPADDR=192.168.56.102
# 掩码
NETMASK=255.255.255.0
# 网关
GATEWAY=192.168.56.1
# 配置DNS
DNS=192.168.56.1
# 设置了DNS指令后是否自动修改/etc/resolv.conf文件,启动协议为dhcp时此项默认yes
PEERDNS= yes
# 非root用户不能控制此设备
USERCTL=no
b. 修改ifcfg-eth1文件,配置NAT网络:
1
2
3
4
5
6
7
# vim /etc/sysconfig/network-scripts/ifcfg-eth1:
DEVICE=eth1
ONBOOT= yes
BOOTPROTO=dhcp
PEERDNS= yes
HWADDR=08:00:27:90:9B:08
USERCTL=no
<2>修改网关
修改对应网卡的网关的配置文件
1
2
3
4
5
6
7
# vi /etc/sysconfig/network
# 表示系统是否使用网络,一般设置为 yes。如果设为 no,则不能使用网络,而且很多系统服务程序将无法启动
NETWORKING= yes
# 设置本机的主机名,这里设置的主机名要和/etc/hosts 中设置的主机名对应
HOSTNAME=centos
# 设置本机连接的网关的IP地址。例如,网关为192.168.56.1
GATEWAY=192.168.56.1
<3>修改DNS
修改对应网卡的 DNS 的配置文件
1
2
3
4
5
# vi /etc/resolv.conf
# 域名服务器1
nameserver 202.101.224.68
# 域名服务器2
nameserver 202.101.224.69
<4>重新启动网络配置
1
2
3
# service network restart
或
# /etc/init.d/network restart
5、软件源配置
国内速度较快的常用更新源如下:
http://mirrors.163.com/centos/ 163-网易
http://mirrors.ta139.com/centos/ 中国移动通信(山东移动)
http://centos.ustc.edu.cn/centos/ 中国科学技术大学
http://mirror.neu.edu.cn/centos/ 东北大学
更新yum为网易的源:
1
2
# cd /etc/yum.repos.d/
# wget [http://mirrors.163.com/.help/CentOS6-Base-163.repo -O CentOS-Base.repo](https://www.oschina.net/action/GoToLink?url=http%3A%2F%2Fmirrors.163.com%2F.help%2FCentOS6-Base-163.repo%25C2%25A0-O%25C2%25A0CentOS-Base.repo)
更新系统中可以更新的软件:
1
# yum update
6、安装VBoxAdditions增强功能
在VirtualBox上安装好CentOS后,再将VBoxAdditions增强功能安装上,主要支持:虚拟机和主机之间共享文件以及无缝窗口和鼠标指针集成等。
(1)更新内核。CentOS 6.3对应的kernel默认为2.6.32-279.el6.i686:
1
2
# uname -r
2.6.32-431.1.2.0.1.el6.x86_64
安装增强功能需要kernel-devel包,必须保证kernel-devel和kernel版本的一致。查看软件源中kernel-devel的版本:
1
2
3
4
5
6
7
8
9
10
11
12
13
14
15
16
17
18
19
20
21
# yum info kernel-devel
Loaded plugins: fastestmirror, refresh-packagekit, security
Repository base is listed more than once in the configuration
Repository updates is listed more than once in the configuration
Repository extras is listed more than once in the configuration
Repository centosplus is listed more than once in the configuration
Repository contrib is listed more than once in the configuration
Loading mirror speeds from cached hostfile
Installed Packages
Name : kernel-devel
Arch : x86_64
Version : 2.6.32
Release : 431.1.2.0.1.el6
Size : 24 M
Repo : installed
From repo : updates
Summary : Development package for building kernel modules to match the
: kernel
URL : License : GPLv2
Description : This package provides kernel headers and makefiles sufficient to
: build modules against the kernel package.
若两者版本不一致,则必须升级kernel:
1
# yum update kernel
升级完后必须重启系统,新的kernel才能被使用。
(2)安装kernel-devel和gcc。
1
# yum install kernel-devel gcc gcc-c++
(3)安装增强功能。进入增强功能光盘根目录,执行Linux下的安装命令:
1
2
3
4
5
6
7
8
9
10
11
12
13
14
15
16
17
18
19
20
21
22
# cd /media/VBOXADDITIONS_4.3.6_91406
# ./VBoxLinuxAdditions.run
Verifying archive integrity... All good.
Uncompressing VirtualBox 4.3.6 Guest Additions for Linux............
VirtualBox Guest Additions installer
Removing installed version 4.3.6 of VirtualBox Guest Additions...
Copying additional installer modules ...
Installing additional modules ...
Removing existing VirtualBox non-DKMS kernel modules [确定]
Building the VirtualBox Guest Additions kernel modules
Building the main Guest Additions module [确定]
Building the shared folder support module [确定]
Building the OpenGL support module [失败]
(Look at /var/log/vboxadd-install .log to find out what went wrong)
Doing non-kernel setup of the Guest Additions [确定]
Installing the Window System drivers
Installing X.Org Server 1.13 modules [确定]
Setting up the Window System to use the Guest Additions [确定]
You may need to restart the hal service and the Window System (or just restart
the guest system) to enable the Guest Additions.
Installing graphics libraries and desktop services componen[确定]
解决Building the OpenGL support module FAILE的问题:
1
2
3
4
5
6
7
8
9
10
11
12
13
14
15
16
17
18
19
20
21
22
23
# cd /media/VBOXADDITIONS_4.3.6_91406
# export MAKE='/usr/bin/gmake -i'
# ./VBoxLinuxAdditions.run
Verifying archive integrity... All good.
Uncompressing VirtualBox 4.3.6 Guest Additions for Linux............
VirtualBox Guest Additions installer
Removing installed version 4.3.6 of VirtualBox Guest Additions...
Copying additional installer modules ...
Installing additional modules ...
Removing existing VirtualBox non-DKMS kernel modules [确定]
Building the VirtualBox Guest Additions kernel modules
Building the main Guest Additions module [确定]
Building the shared folder support module [确定]
Building the OpenGL support module [确定]
Doing non-kernel setup of the Guest Additions [确定]
You should restart your guest to make sure the new modules are actually used
Installing the Window System drivers
Installing X.Org Server 1.13 modules [确定]
Setting up the Window System to use the Guest Additions [确定]
You may need to restart the hal service and the Window System (or just restart
the guest system) to enable the Guest Additions.
Installing graphics libraries and desktop services componen[确定]
至此,增强功能已安装完成,共享文件、无缝窗口和鼠标指针继承等功能已经可以使用啦!
7、宿机重启系统,主机和宿机相互ping下
主机和宿机的网络配置:
主机(Win7)IP:192.168.0.102;网关:192.168.0.1;DNS:101.226.4.6,114.114.114.114
宿机(CentOS)IP:10.0.2.15
网卡1:NAT
端口转发规则:
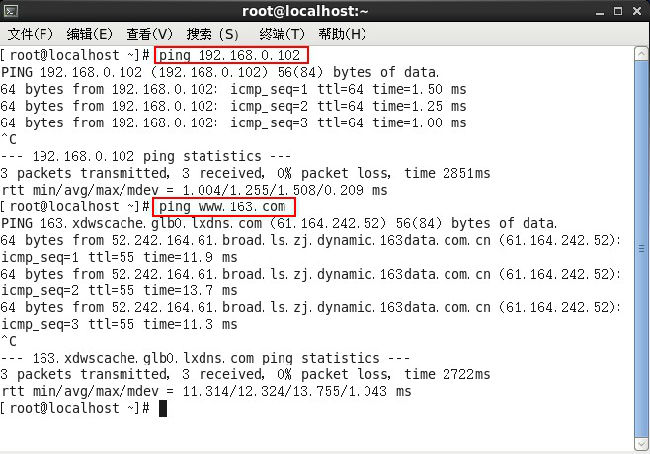
宿机--主机:ping 192.168.0.102 (通过)
宿机--网络:ping www.163.com (通过)
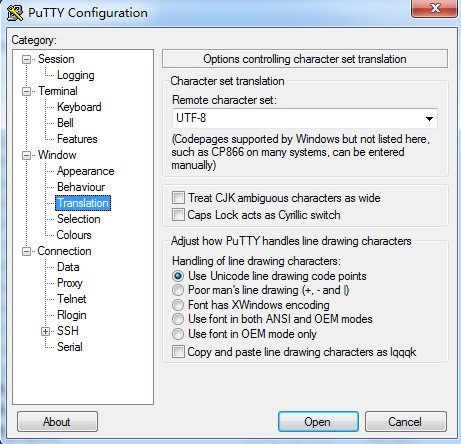
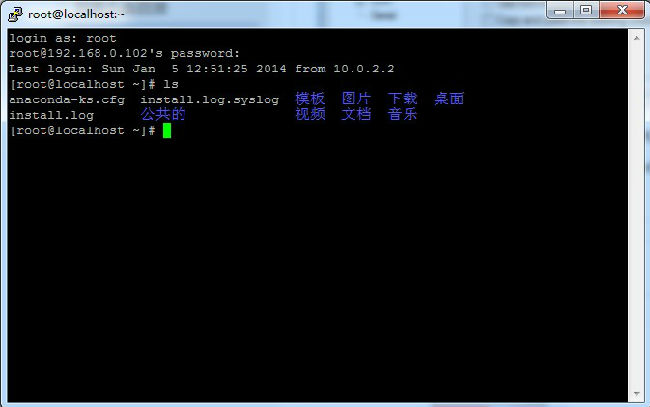
Win7上putty连接CentOS:
这里的Host Name也可填写为:localhost
这里设置为UTF-8,是为了避免CentOS中的中文目录为在putty上显示乱码。
点击左侧的Seesion回到最初的界面,单击“Save”将Session保存,然后单击“Open”:


