背景描述
在weex中,从.we过度到.vue的过程中,很难规避的就是事件派发机制当中,对BroadcastChannel的替换,按照官方的推荐采用vuex去更换,但是我在浏览一遍vuex的文档之后,绝的在weex使用有点麻烦,就去社区溜达了一圈,看看有没有小伙伴们找到更合适的方法。
在一阵交流之后,根据大伙的推荐,在.vue文件中,都是采用 weex提供的globalEvent来处理。
这次的踩坑记,也是这个文档带来。下面我就来记录一下,这次踩坑的历程。
踩坑过程
前期准备
按照文档的要求,在fireGlobalEvent的时候,需要各端实现,因此按照要求在Objective-C,添加以下方法:
/**
 发送全局事件

 @param eventName 事件名称
 @param params 事件参数
 */
- (void)postGlobalEvent:(NSString *)eventName params:(NSDictionary *)params {
    [weexInstance fireGlobalEvent:eventName params:params];
}并且暴露给weex使用: WX_EXPORT_METHOD(@selector(postGlobalEvent:params:))
准备好了这些,我就开始在.vue的文件中开始测试功能了。
Test One: 同一实例中,子组件发送,父组件监听
我是直接在我的项目中修改原先的代码的,下面的demo,也是我代码的一部分,项目中广场页面中,navigator组件上消息的触发按钮,换成调用刚刚native中扩展的postGlobalEvent方法, square-header.vue代码如下:
<template>
  <div :style="{ width: '750', height: navHeight, backgroundColor: 'rgba(255, 255, 255, ' + (opacity) + ')' }">
    <image src="https://static.toomao.com/weex-images/square/navigator3.png" class="nav-image" :style="{ opacity: opacity>0.8?0:(0.8-opacity) }"></image>

    <div class="nav-content" :style="{ marginTop: navHeight===128?40:0 }">
      <div :class="['nav-left', 'nav-left-' + (navigatorState)]" @click="scannerButtonClicked">
        <image :src="navigatorIcons[0]" :class="['nav-left-icon', 'nav-left-icon-' + (navigatorState)]" resize="contain"></image>
        <text :class="['nav-left-text', 'nav-left-text-' + (navigatorState)]">扫一扫</text>
      </div>
      <text :class="['nav-center', 'nav-center-' + (navigatorState)]" @click="searchTextClicked">{{tip.words ? tip.words : '请输入搜索内容'}}</text>

      <div :class="['nav-right', 'nav-right-' + (navigatorState)]" @click="infoButtonClicked">
        <image :src="navigatorIcons[1]" :class="['nav-right-icon', 'nav-right-icon-' + (navigatorState)]" resize="contain"></image>
        <text :class="['nav-right-text', 'nav-right-text-' + (navigatorState)]">消息</text>
      </div>
    </div>
  </div>
</template>

<script>
  const utils = weex.requireModule('utils');

  module.exports = {
    methods: {
      searchTextClicked() {
        console.log('~~~~~~~~globalEvent 已经发送了~~~~~~~~~~~~~~~~~');
        utils.postGlobalEvent('test1', { index: 'current index is 1'});
      },
    },
  };
</script>下面是square.vue的监听事件的代码:
<template>
  <div>
    <!-- navigator -->
    <square-header ref="square-header"></square-header>
  </div>
</template>

<script>
;
const utils = weex.requireModule('utils');

module.exports = {
  components: {
    squareHeader: require('../components/navigator/square-header.vue'),
  },
  created() {
    // 监听事件
    const globalEvent = weex.requireModule('globalEvent');
    globalEvent.addEventListener("test1", (e) => {
      // 事件回调
      console.log('~~~~~~~~test1~~~~~~~~~~~~~~~~~', e);
    });
  },
};</script>
测试结果
这样我就基本完成了,这个demo的所有工作,然后build,没有报错、最好run,打开这个页面,渲染成功,下面是我在点击搜索按钮,Xcode控制台的打印信息:
2017-06-22 10:47:53.338723 [fg128,128,128; <Weex>[log]WXJSCoreBridge.m:110, jsLog: ~~~~~~~~globalEvent 已经发送了~~~~~~~~~~~~~~~~~  [;
2017-06-22 10:48:15.584984  [fg128,128,128; <Weex>[log]WXJSCoreBridge.m:110, jsLog: ~~~~~~~~test1~~~~~~~~~~~~~~~~~ {"index":"current index is 1"}  [;
看到这结果,我表示心情还挺不错,因为还挺好用的,感觉一下子找到了好的方式去替换这些方法了。
就在我开心的劲头上,我继续开始了我实际方法的更换,首先第一个就是在登录成功后,要给多个页面(个人信息、权限相关的页面)发送通知,因此我开始了第二个测试,即在不同实例之间进行发送通知与监听。本以为信息十足的,结果出现的问题:
Test Two: 不同实例之间发送与接收
发送事件的实例:login.vue:
<template>
  <scroller style="width: 750px; height: 1334px;">
    <!-- bgImg、 back button -->
    <image :src="getterNativeImgSrc('navigator/login_bg')" style="width: 750px; height: 1334px; position: absolute; top: 0px; left: 0px;"></image>
    <image :src="getterNativeImgSrc('login/login_back')" style="width: 35px; height: 35px; position: absolute; top: 60px; left: 24px;" @click="backButtonClicked"></image>
    <!-- input -->
    <div class="userInfo">
      <div class="inputWrapper">
        <input type="text" name="username" class="input" ref="username" placeholder="请输入您的手机号码" maxlength="11" @input="oninput">
      </div>
      <div class="inputWrapper">
        <input class="input" :type="passwordType" name="password" ref="password" maxlength="20" placeholder="请输入密码" @input="oninput">
        <image style="width: 30px; height: 30px; background-color: #0ff;" :src="openEyes ? eyeSelected : eye" resize="contain" @click="eyeButtonClicked"></image>
      </div>
    </div>

    <!-- 登录按钮 -->
    <wxc-form :action="(apiBase) + '/1.1/login?username=' + (userName) + '&password=' + (password)" method="GET" ref="login" style="margin-top: 40px;">
      <text class="loginButton" @click="loginButtonClicked">登  录</text>
    </wxc-form>

    <!-- 注册  忘记密码 -->
    <div style="width: 750px; flex-direction: row; justify-content: space-between; padding: 24; margin-top: 20px;">
      <text style="font-size: 28px; color: #707070;" @click="signUpButtonClick">注册账号</text>
      <text style="font-size: 28px; color: #707070;" @click="forgotButtonClick">忘记密码</text>
    </div>

    <div v-if="isInstallWX" style="margin-top: 350px; flex-direction: column; justify-content: center; width: 750px; align-items: center;" @click="thirdLoginButtonClicked">
      <text style="font-size: 26px; color: #707070;">使用第三方登录</text>
      <image :src="getterNativeImgSrc('login/weixin')" style="margin-top: 20px; width: 60px; height: 60px;" resize="contain"></image>
    </div>
    <wxc-form :action="(apiBase) + '/1.1/loginByWechat?unionid=' + (thirdUserInfo.unionid)" method="GET" ref="third-login" style="margin-top: 60px;">
    </wxc-form>
    <tm-loading ref="tm-loading" inithide="true"></tm-loading>
  </scroller>
</template>

<script>
;


const navigator = weex.requireModule('navigator');
const utils = weex.requireModule('utils');
const storage = weex.requireModule('storage');

const { serverPath, getNativeResourcePath, navigatorPushWithPath, toast, errorDeals } = require('../util.js');

module.exports = {
  components: {
    wxcForm: require('components/wxc-form/wxc-form.vue'),
    tmLoading: require('../components/tm-loading.vue')
  },

  props: {
    apiBase: {
      default: serverPath()
    },
    userName: {
      default: ''
    },
    password: {
      default: ''
    },
    userInfo: {
      default: function () {
        return {};
      }
    },
    openEyes: {
      default: false
    },
    eye: {
      default: ''
    }, // 闭眼
    eyeSelected: {
      default: ''
    }, // 睁眼
    isInstallWX: {
      default: true
    },
    thirdUserInfo: {
      default: function () {
        return {};
      }
    }, // 微信用户信息
    loginButtonEnable: {
      default: true
    },
    passwordType: {
      default: 'password'
    }
  },
  created() {
    this.eye = getNativeResourcePath(this, 'login/login_eye');
    this.eyeSelected = getNativeResourcePath(this, 'login/login_eye_selected');
    if (weex.config.env.platform === 'iOS') {
      navigator.setNavBarHidden({ hidden: true }, () => {});
    }
    try {
      utils.weexInstalledWeChatClient(e => {
        this.isInstallWX = e.result;
      });
    } catch (e) {}
  },
  mounted() {
    this.$refs['tm-loading'].hide();
  },
  methods: {
    backButtonClicked() {
      navigator.pop({ animation: 'ture' }, () => {});
    },
    oninput(e) {
      const id = e.target.attr.name;
      if (id === 'username') {
        this.userName = e.target.attr.value;
      } else {
        this.password = e.target.attr.value;
      }
    },

    onchange(e) {},

    loginButtonClicked() {
      if (this.userName.length != 11) {
        toast('请输入正确的手机号码', 1);
        return;
      }
      if (this.password.length < 6 || this.password.length > 20) {
        toast('请输入6-20位密码', 1);
        return;
      }
      const form = this.$refs.login;
      form.headers = {
        'content-type': 'application/json'
      };
      if (!this.loginButtonEnable) return;
      this.loginButtonEnable = false;
      const that = this;
      this.$refs['tm-loading'].show();
      form.submit(res => {
        that.$refs['tm-loading'].hide();
        that.loginButtonEnable = true;
        if (res.ok) {
          const data = JSON.stringify(res.data);
          storage.setItem('userInfo', data, event => {
            console.log('~~~~~~~~登录成功  发送通知 ~~~~~~~~~~~~~~~~~');
            utils.postGlobalEvent('login-success', 'login succeed');
            // const Hulk = new BroadcastChannel('login-success');
            // Hulk.postMessage('login succeed');
            that.backButtonClicked();
          });
        } else {
          errorDeals(res);
        }
      });
    },
    // 第三方登录
    thirdLoginButtonClicked() {
      this.$refs['tm-loading'].show();
      try {
        utils.getWeChatUserInfo(e => {
          this.$refs['tm-loading'].hide();
          if (e.result === 'success') {
            this.thirdUserInfo = e.data;
            this.$renderThen(() => {
              this.requestThirdLoginUserInfo();
            });
          } else {
            toast('授权失败', 1);
          }
        });
      } catch (e) {}
    },
    // 第三方登录请求
    requestThirdLoginUserInfo() {
      const form = this.$refs['third-login'];
      const that = this;
      form.submit(res => {
        if (res.ok) {
          // 存储之前,先将对象序列化成存储字符串
          const data = JSON.stringify(res.data);
          storage.setItem('userInfo', data, event => {
            utils.postGlobalEvent('login-success', 'login succeed');
            // const Hulk = new BroadcastChannel('login-success');
            // Hulk.postMessage('login succeed');
            that.backButtonClicked();
          });
        } else {
          const data = res.data;
          if (res.status === 400 && data.code === 4105) {
            // 第一次登录  去绑定账号
            const userStr = JSON.stringify(this.thirdUserInfo);
            navigatorPushWithPath(`login/association-account.js?config=${encodeURIComponent(userStr)}`);
          }
        }
      });
    },
    // 注册
    signUpButtonClick() {
      navigatorPushWithPath('login/sign-up.js');
    },
    // 忘记密码
    forgotButtonClick() {
      navigatorPushWithPath('login/forgot-password.js');
    },
    eyeButtonClicked() {
      this.openEyes = !this.openEyes;
      this.passwordType = this.openEyes ? 'text' : 'password';
    },
    // 获取图片路径
    getterNativeImgSrc(src) {
      return getNativeResourcePath(this, src);
    }
  }
};</script>
在上面代码中,可以定位到loginButtonClicked()方法,这是登录按钮执行的方面,在这个方法请求成功后,我会调用 utils.postGlobalEvent('login-success', 'login succeed');方法,即发送一个全局事件的通知,名字叫做login-success;并在发送后返回到上一页面。
监听事件的实例: mine.vue
<template>
  <div style="background-color: #f4f4f4;" @viewappear="viewappear">
    <wxc-form :action="(baseAPI) + '/1.1/my/pageinfo'" method="GET" ref="loaderPage"></wxc-form>
    <list style="width: 750px; height: 1244">
      <cell>
        <mine-header ref="header"></mine-header>
      </cell>
      <cell>
        <mine-orders-toolbar ref="orders"></mine-orders-toolbar>
      </cell>
      <cell>
        <mine-more-tools></mine-more-tools>
      </cell>
    </list>

    <div class="navigator">
      <div class="content">
        <image src="https://pic.toomao.com/becb9c4ffda30defcda9b760b9478633bbdb7d22" style="width: 50px; height: 50px;" @click="settingButtonClicked"></image>
      </div>
    </div>
  </div>
</template>

<script>
;

const { getBaseAPI, asyncReady, navigatorPushWithPath } = require('../util.js');

module.exports = {
  components: {
    wxcForm: require('components/wxc-form/wxc-form.vue'),
    mineHeader: require('../components/mine/mine-header.vue'),
    mineOrdersToolbar: require('../components/mine/mine-orders-toolbar.vue'),
    mineMoreTools: require('../components/mine/mine-more-tools.vue'),
    tmNavpage: require('../components/navigator/tm-navpage.vue')
  },

  props: {
    baseAPI: {
      default: getBaseAPI()
    },
    userInfo: {
      default: function () {
        return {};
      }
    },
    data: {
      default: function () {
        return {};
      }
    }
  },
  created() {
    const globalEvent = weex.requireModule('globalEvent');
    console.log('~~~~~~~~addEventListener ~~~~~~~~~~~~~~~~~');
    globalEvent.addEventListener("login-success", (e) => {
      console.log('~~~~~~~~addEventListener CallBack~~~~~~~~~~~~~~~~~', e);
      this.receiveLoginSuccessedNotify();
    });
  },
  mounted: asyncReady(function () {
    if (this.userInfo.sessionToken) {
      this.requestPageInfo();
    }
  }),
  methods: {
    viewappear: asyncReady(function () {}),

    receiveLoginSuccessedNotify() {
      asyncReady(function () {
        if (this.userInfo.sessionToken) {
          this.requestPageInfo();
        }
      }).call(this);
    },
    settingButtonClicked() {
      navigatorPushWithPath('mine/setting/setting.js');
    },
    requestPageInfo() {
      const header = this.$refs.header;
      const oreders = this.$refs.orders;
      const pageLoader = this.$refs.loaderPage;
      pageLoader.headers = {
        'X-AVOSCloud-Session-Token': this.userInfo.sessionToken
      };
      pageLoader.submit(res => {
        if (res.ok) {
          this.data = res.data;
          header.setUpCardData(res.data);
          oreders.setUpOrderNumber(res.data.ordercnt);
        }
      });
    }
  }
};</script>

<style scoped>
  .wrapper {
    background-color: #eee;
  }
  .navigator {
    position: absolute;
    top: 0px;
    left: 0px;
    width: 750px;
    height: 128px;
    padding-top: 40px;
    /*background-color: #0f0;*/
  }
  .content {
    width: 750px;
    height: 88px;
    flex-direction: row;
    justify-content: space-between;
    align-items: center;
    /*background-color: #999;*/
    padding: 24;
  }
测试结果
测试过程:先在未登录的情况下,访问mine页面,然后点击个人信息进入到登录页面,登录成功后,发送通知,并返回到我的页面,正常情况下,我的页面会接收通知,并从本地获取新数据刷新UI的。但实际过程如下,可以注意我代码中的几个log:
2017-06-22 11:11:25.084999 [fg128,128,128; <Weex>[log]WXJSCoreBridge.m:110, jsLog: ~~~~~~~~addEventListener ~~~~~~~~~~~~~~~~~  [;
2017-06-22 11:12:42.884790 [fg128,128,128; <Weex>[log]WXJSCoreBridge.m:110, jsLog: WXC-FORM?: [object Object]  [;
2017-06-22 11:12:43.227708 [fg128,128,128; <Weex>[log]WXJSCoreBridge.m:110, jsLog: ~~~~~~~~登录成功  发送通知 ~~~~~~~~~~~~~~~~~  [;
上面结果可以看到,我监听了事件,并且也发送了事件,但是我没有收到事件的callBack。
为了探究一下,这个事件为啥没有接收到,我跟着native的代码,进入到 weex SDK去看看了具体实现。找到globalEvent在iOS的实现类WXGlobalEventModule,(在寻找这个module的时候,可以直接根据globalEvent在SDK里面搜索,这样比较快) 并获取addEventListener方法:
- (void)addEventListener:(NSString *)event callback:(WXModuleKeepAliveCallback)callback
{
    WXThreadSafeMutableArray * array = nil;
    if (_eventCallback[event]) {
        if (callback) {
            [_eventCallback[event] addObject:callback];
        }
    } else {
        array = [[WXThreadSafeMutableArray alloc] init];
        if (callback) {
            [array addObject:callback];
        }
        _eventCallback[event] = array;
        [[NSNotificationCenter defaultCenter] addObserver:self selector:@selector(fireGlobalEvent:) name:event object:nil];
    }
}可以看出在监听方法中,主要是使用了NSNotification添加了一个观察者,并且将每个evet对应的callBack都保存起来;因此找到接受通知的实现方法:fireGlobalEvent的实现如下:
- (void)fireGlobalEvent:(NSNotification *)notification
{
    NSDictionary * userInfo = notification.userInfo;
    NSString * userWeexInstanceId = userInfo[@"weexInstance"];
    /*
     1. The userWeexInstanceId param will be passed by globalEvent module notification.
     2. The notification is posted by native user using NotificationCenter, native user don't need care about what the userWeexInstanceId is. What you do is to addEventListener in weex file using globalEvent module, and then post notification anywhere.
     */
    WXSDKInstance * userWeexInstance = [WXSDKManager instanceForID:userWeexInstanceId];
     // In case that userInstanceId exists but instance has been dealloced
    if (!userWeexInstanceId || userWeexInstance == weexInstance) {

        for (WXModuleKeepAliveCallback callback in _eventCallback[notification.name]) {
            callback(userInfo[@"param"], true);
        }
    }
}在处理通知的方法中,可以发现在调用callback之前有两个判断!userWeexInstanceId || userWeexInstance == weexInstance, 要么这个实例id不存在,要么两个实例相同,看到这里似乎能明白刚刚为啥在login.vue页面中发送的事件在mine.vue的监听这没有收到回调了。
那么根据NSString * userWeexInstanceId = userInfo[@"weexInstance"];代码分析: 这个userWeexInstanceId是通知的userInfo里面设置的。为此我需要找到post这个通知在什么位置。这时候肯定就是native暴露给weex用来发送通知的那个方法了:
/**
 发送全局事件

 @param eventName 事件名称
 @param params 事件参数
 */
- (void)postGlobalEvent:(NSString *)eventName params:(NSDictionary *)params {
    [weexInstance fireGlobalEvent:eventName params:params];
}
进入这个这个方法里面得到的代码如下:
- (void)fireGlobalEvent:(NSString *)eventName params:(NSDictionary *)params
{
    if (!params){
        params = [NSDictionary dictionary];
    }
    NSDictionary * userInfo = @{
            @"weexInstance":self.instanceId,
            @"param":params
    };
    [[NSNotificationCenter defaultCenter] postNotificationName:eventName object:self userInfo:userInfo];
}
哈哈哈,看到这里就基本清楚所有的内容所在了,userInfo这个参数也是在这里设置的。其实走到这步我还是不明白我的问题该怎么解决,因为在通知callBack的两个条件,该怎么避免,我感觉官方把自己的路给堵死了,因此带这个问题去请求老司机, 得到以下回应:
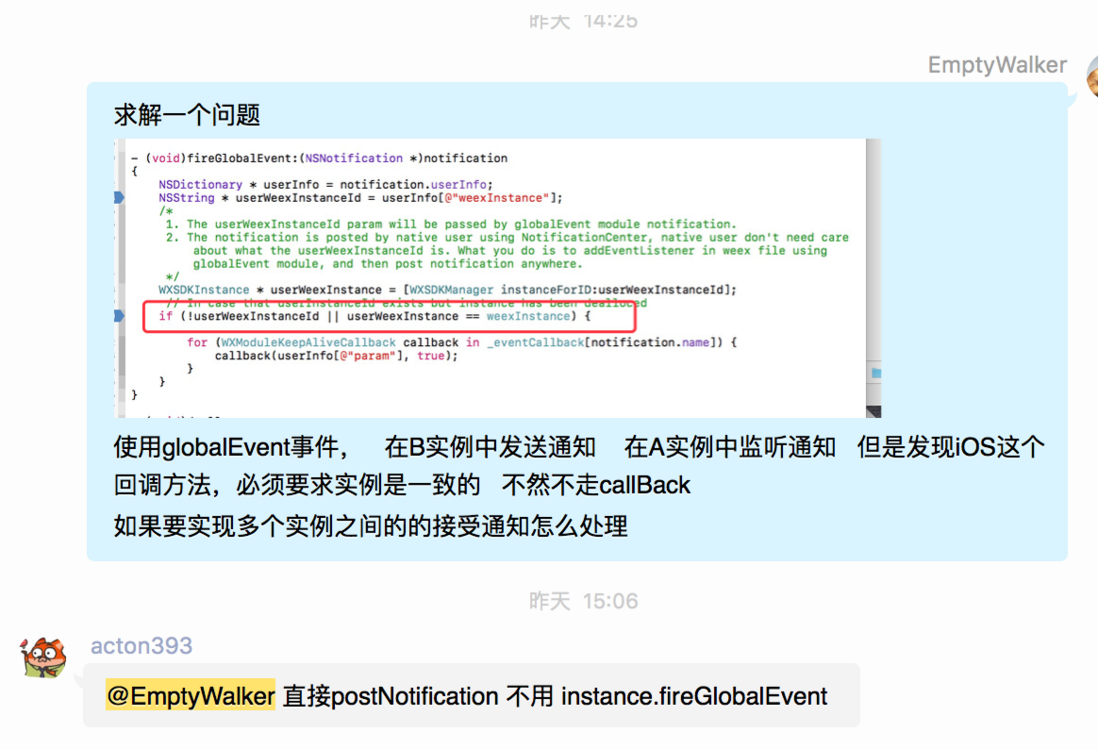

看到weex看法这这样的回应,我的内心微微一笑-_-。看来目前也只能这样了,因此调整代码:
/**
 发送全局事件

 @param eventName 事件名称
 @param params 事件参数
 */
- (void)postGlobalEvent:(NSString *)eventName params:(NSDictionary *)params {
    if (!params){
        params = [NSDictionary dictionary];
    }
    NSDictionary * userInfo = @{
                                @"param":params
                                };
    [[NSNotificationCenter defaultCenter] postNotificationName:eventName object:self userInfo:userInfo];
}
再次运行得到以下结果:
2017-06-22 11:40:02.134405 [fg128,128,128; <Weex>[log]WXJSCoreBridge.m:110, jsLog: ~~~~~~~~登录成功  发送通知 ~~~~~~~~~~~~~~~~~  [;
2017-06-22 11:40:02.138522 [fg128,128,128; <Weex>[log]WXJSCoreBridge.m:110, jsLog: ~~~~~~~~addEventListener CallBack~~~~~~~~~~~~~~~~~ login succeed  [;
2017-06-22 11:40:02.184861 哈;这次终于看到了~~~~~~~~addEventListener CallBack~~~~~~~~~~~~~~~~~的打印信了,并且也将传递的参数login succeed获取了,至此,这个坑算是踩完了。