说明:
测试的RAC只2个节点,整体步骤来自ORACLE 官方文档:
https://docs.oracle.com/cd/E11882\_01/rac.112/e41960/adddelunix.htm#RACAD7358
步骤 3从cluster中删除节点来自ORACLE 官方文档(Deleting a Cluster Node on Linux and UNIX Systems):
https://docs.oracle.com/cd/E11882\_01/rac.112/e41959/adddelclusterware.htm#CWADD90992
注意:
一共两套实验,一套是正常删除ogg数据库;一套异常删除(orcl),即RAC 节点2服务器DOWN掉极端情况,集群资源RAC2 也相应全部停掉。
RAC2 down 掉只需要执行以下步骤删除节点2:
第一步:1.1或者1.2
第二步:1.3 删除后验证
第三步:2.2.3
第四步:3.2.2、3.3.3、3.3.4
如果被删除节点2情况介于两种之间,还有活动的集群资源,需要按照一步一步的手动执行文档中所有步骤(除了3.2.2)。
实验环境情况如下:
实验
节点名称
数据库实例名
操作系统
数据库版本
正常情况删除
rac1/rax2
orcl1/orcl2
Linux 6.X
oracle11.2.0.4
异常情况删除
racdg1/racdg2
ogg1/ogg2
Linux 6.X
Oracle11.2.0.4
grid:GRID_HOME 名称为 ORACLE_HOME 路径为:/u01/app/11.2.0/grid
oracle:ORACLE_HOME 路径为:/u01/app/oracle/product/11.2.0/dbhome_1
操作大致步骤
删除ORACLE rac 实例
删除ORACLE rac软件
从cluster中删除节点
1、删除ORACLE rac 实例
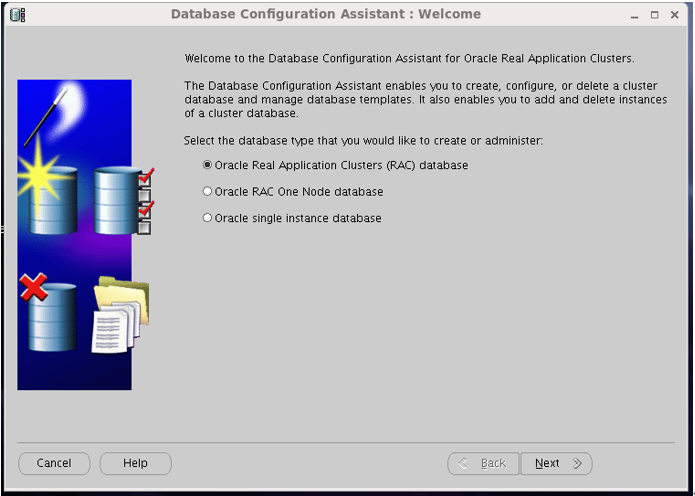
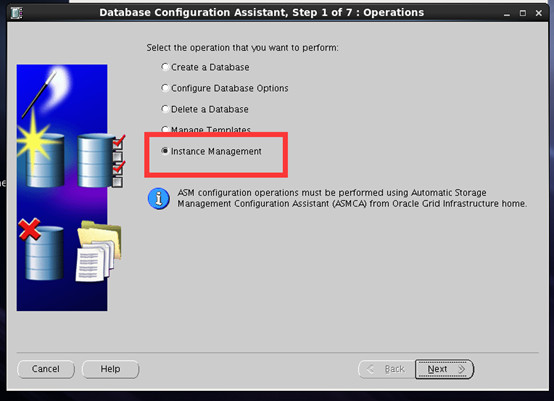
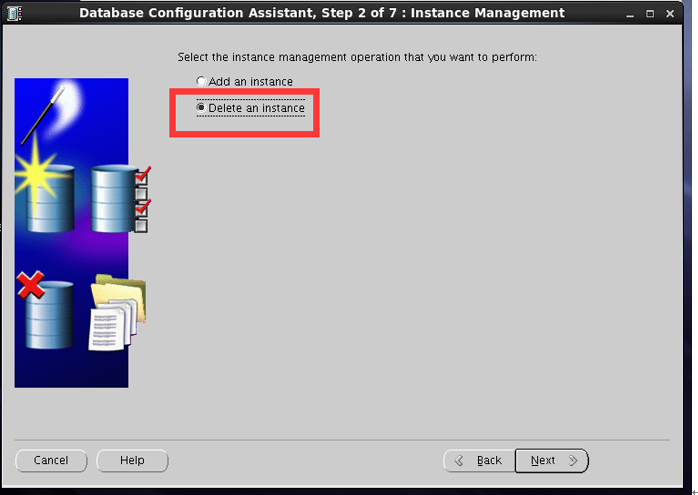
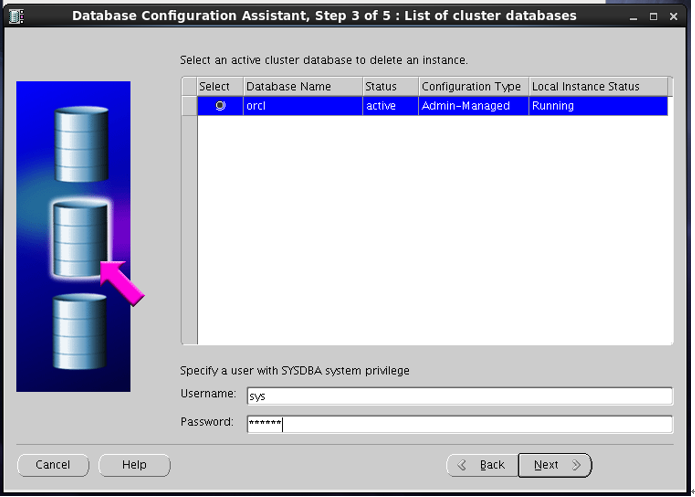
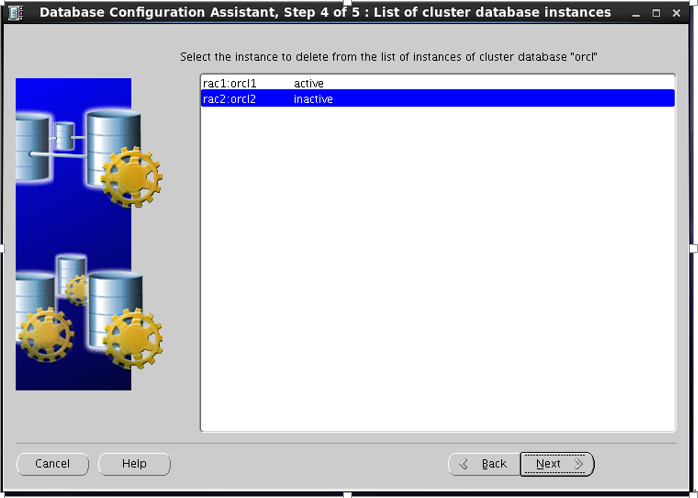
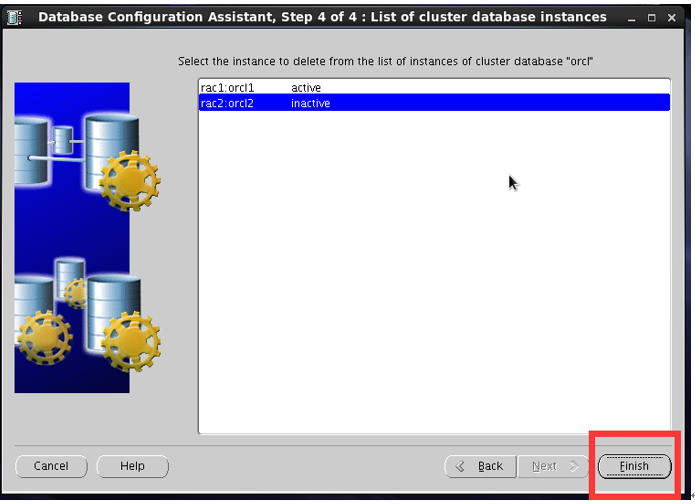
1.1dbca****图形界面删除
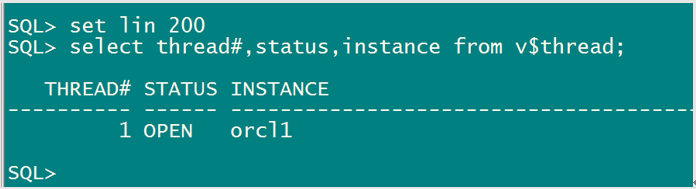
查看删除前实例线程状态:
正常库实验:
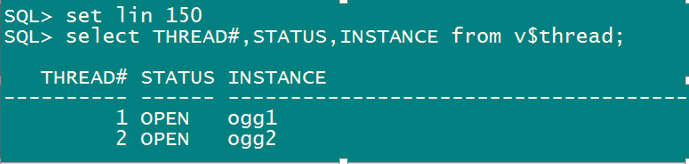
异常库实验:
Oracle 用户
dbca
例如节点2服务器坏掉,从节点1上执行dbca
以下为停止实例命令(服务器节点2 DOWN掉直接删实例):
$ srvctl stop instance -d db_unique_name -n node_name
$ srvctl relocate server -n node_name -g Free

大致步骤如下:
后面继续……
1.2 dbca****静默删除
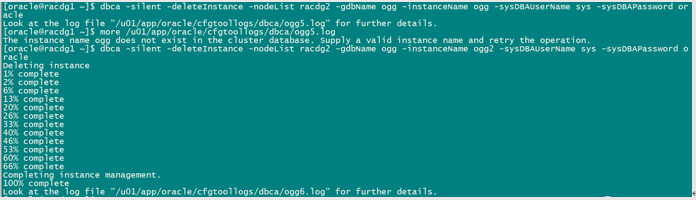
官方命令模板:
dbca -silent -deleteInstance [-nodeList node_name] -gdbName gdb_name -instanceName instance_name -sysDBAUserName sysdba -sysDBAPassword password
如删除节点2实例:
在好的节点上执行:
正常的删除:
报错如下:

查看SCAN_LISTENER 在节点2运行
处理:我是尝试重启了两台服务器(虚拟机简单粗暴先全部关闭,再启动节点1,最后启动节点2),可以尝试在节点1上启停SCAN_listener, listener,让SCAN_listener 运行在节点1。
如下删除:
dbca -silent -deleteInstance -nodeList racdg2 -gdbName ogg -instanceName ogg2 -sysDBAUserName sys -sysDBAPassword oracle
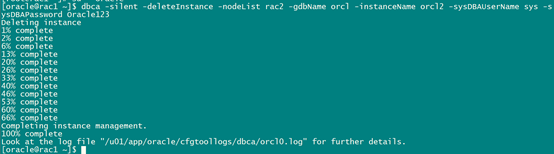
异常实验删除:
dbca -silent -deleteInstance -nodeList rac2 -gdbName orcl -instanceName orcl2 -sysDBAUserName sys -sysDBAPassword Oracle123
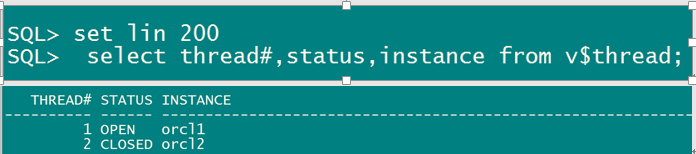
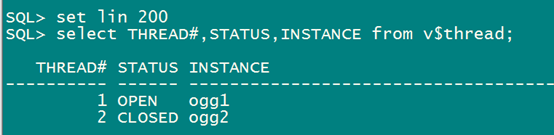
1.3删除后验证
查看活动的实例:
正产库测试:
select thread#,status,instance from v$thread;
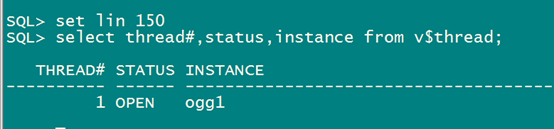
异常库测试:
select thread#,status,instance from v$thread;
如果还有节点2的redo log ,请使用以下命令:
ALTER DATABASE DISABLE THREAD 2;
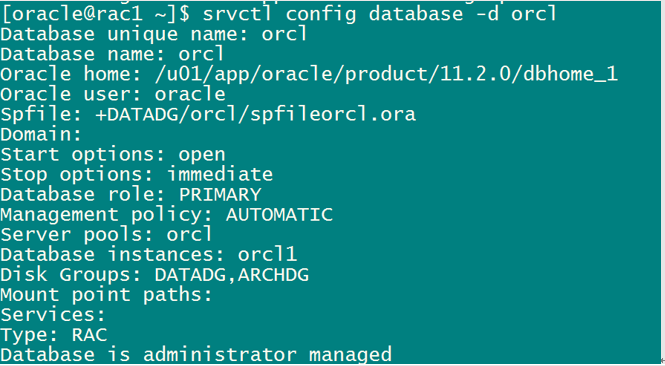
验证OCR中 数据库信息
srvctl config database -d db_unique_name
例如:
srvctl config database -d orcl
2. 卸载ORACLE rac软件
2.1停止和删除监听
异常实验不用执行以下步骤:
srvctl disable listener -l listener_name -n name_of_node_to_delete
srvctl stop listener -l listener_name -n name_of_node_to_delete
执行以下:
srvctl disable listener -l listener -n racdg2
srvctl stop listener -l listener -n racdg2

2.2 更新节点集群列表
1) 在故障节点 Oracle 用户 $ORACLE_HOME/oui/bin 下运行(正常删除节点实验)
官方:
$./runInstaller -updateNodeList ORACLE_HOME=Oracle_home_location "CLUSTER_NODES={name_of_node_to_delete}" –local
例如:
$ORACLE_HOME/oui/bin/runInstaller -updateNodeList ORACLE_HOME=$ORACLE_HOME "CLUSTER_NODES={racdg2}" -local

2) 删除Oracle RAC软件(oracle 用户-正常删除节点实验):
对于共享home,请分离节点,而不是通过从$ORACLE_HOME/oui/bin要删除的每个节点上的目录运行以下命令来卸载该节点:
./runInstaller -detachHome ORACLE_HOME=$ORACLE_HOME
对于非共享home,请通过运行以下命令从正在删除的节点中卸载Oracle主目录:
$ORACLE_HOME/deinstall/deinstall -local
3) 在所有的保留节点Oracle 用户 $ORACLE_HOME/oui/bin 下运行以下命令来更新这些节点的清单,并指定逗号分隔的其余节点名称列表(正常,异常都执行):
官方:
$./runInstaller -updateNodeList ORACLE_HOME=$ORACLE_HOME "CLUSTER_NODES={remaining_node_list}"
所有的保留节点执行:
我的就只剩一个节点例如:
cd $ORACLE_HOME/oui/bin
$./runInstaller -updateNodeList ORACLE_HOME=$ORACLE_HOME "CLUSTER_NODES={rac1,rac3……}"
正常删除:

异常删除:
./runInstaller -updateNodeList ORACLE_HOME=$ORACLE_HOME "CLUSTER_NODES={rac1}"

3. 从cluster中删除节点
来自官方文档:https://docs.oracle.com/cd/E11882\_01/rac.112/e41959/adddelclusterware.htm#CWADD90992
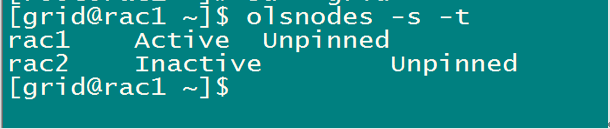
3.1查看节点运行情况
ROOT 或者grid 执行
olsnodes -s -t
正常删除:

异常删除:
如果要删除的节点为 pinned 状态,请ROOT手工执行以下命令。
官方文档如下:

提别提醒:很多网络上资料不正确,如果Unpinned(不固定的),根本不需要执行unpin 命令,不能盲目相信网上资料。
本次正常和异常实验都不需要执行以下命令。
crsctl unpin css -n
例如:crsctl unpin css -n rac2
/u01/app/11.2.0/grid/bin/crsctl unpin css -n rac2
3.2删除节点
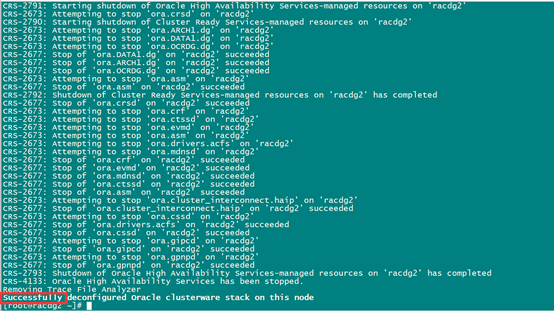
Disable Cluster 以及守护进程,利用rootcrs.pl脚本在被删除的节点上root 用户Grid_home/crs/install 目录下执行:
3.2.1正常情况删除步骤
3.2.1.1卸载GI安装目录(正常删除实验)
ROOT 执行:
/u01/app/11.2.0/grid/crs/install/rootcrs.pl -deconfig -force
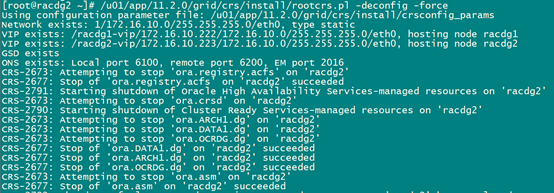
如果要删除多个节点,需要每个节点执行以上命令。
如果全部删除节点,在最后一个节点执行以下命令:
/u01/app/11.2.0/grid/crs/install/rootcrs.pl -deconfig -force -lastnode
-lastnode只能用于全部删除。
3.2.1.2删除节点(正常和异常都需要执行)
注意:以删除下语句ROOT执行删除节点
crsctl delete node -n node_to_be_deleted
执行:
/u01/app/11.2.0/grid/bin/crsctl delete node -n racdg2

3.2.1.3更新集群列表(正常实验操作)
Grid安装用户更新集群列表:
Grid_home/oui/bin下:
$ ./runInstaller -updateNodeList ORACLE_HOME=Grid_home "CLUSTER_NODES={node_to_be_deleted}" CRS=TRUE -silent -local
以下语句:
/u01/app/11.2.0/grid/oui/bin/runInstaller -updateNodeList ORACLE_HOME=$ORACLE_HOME "CLUSTER_NODES={racdg2}" CRS=TRUE -silent -local

继续后续操作:
注意:
官方文档说的是:
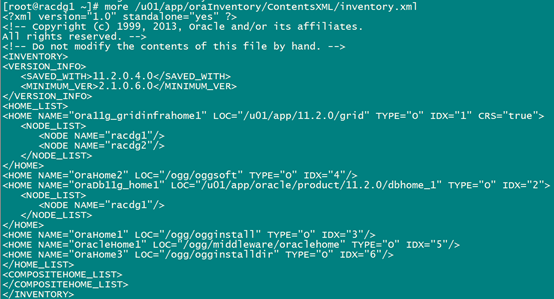
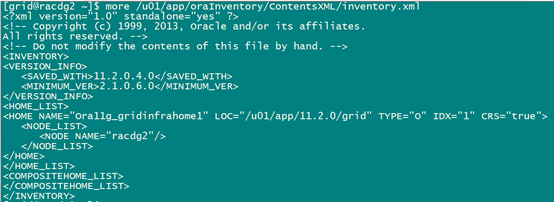
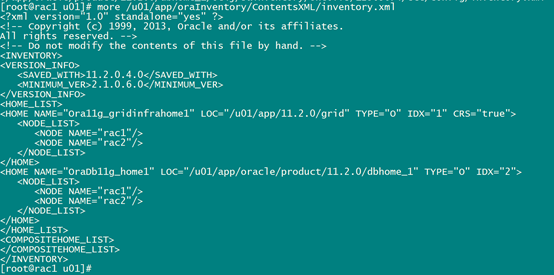
再继续之前,查看 inventory.xml 文件确保该文件没有被更新(官方文档说的有点含糊,个人测试的是节点1的不更新,被删除的那个节点文件更新了),如果节点1被更新了,后续卸载会卸载整个集群安装目录。
more /u01/app/oraInventory/ContentsXML/inventory.xml
节点1:
节点2:
卸载GI安装目录
共享目录:
在被删除节点下执行:
$ Grid_home/perl/bin/perl Grid_home/crs/install/rootcrs.pl -deconfig
$ ./runInstaller -detachHome ORACLE_HOME=Grid_home -silent -local
手动删除以下文件:
rm -fr /etc/oraInst.loc
rm -fr /etc/oratab
rm -fr /etc/oracle/
rm -fr /opt/ORCLfmap/
rm -fr /u01/app/oraInventory/
非共享目录(大多数安装都是非共享目录):
$ Grid_home/deinstall/deinstall -local
在任何运行正常,不删除的节点上运行以下命令更新CRS 信息:
Grid_home/oui/bin下:
$ ./runInstaller -updateNodeList ORACLE_HOME=Grid_home "CLUSTER_NODES={remaining_nodes_list}" CRS=TRUE -silent
操作记录如下:
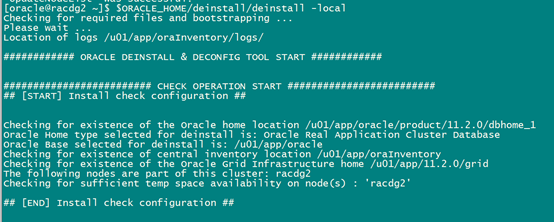
[grid@racdg2 ~]$ /u01/app/11.2.0/grid/deinstall/deinstall -local
Checking for required files and bootstrapping ...
Please wait ...
Location of logs /tmp/deinstall2018-03-02_05-41-36AM/logs/
############ ORACLE DEINSTALL & DECONFIG TOOL START ############
######################### CHECK OPERATION START #########################
## [START] Install check configuration ##
Checking for existence of the Oracle home location /u01/app/11.2.0/grid
Oracle Home type selected for deinstall is: Oracle Grid Infrastructure for a Cluster
Oracle Base selected for deinstall is: /u01/app/grid
Checking for existence of central inventory location /u01/app/oraInventory
Checking for existence of the Oracle Grid Infrastructure home
The following nodes are part of this cluster: racdg2
Checking for sufficient temp space availability on node(s) : 'racdg2'
## [END] Install check configuration ##
Traces log file: /tmp/deinstall2018-03-02_05-41-36AM/logs//crsdc.log
Enter an address or the name of the virtual IP used on node "racdg2"[racdg2-vip]
> 以下都是回车
The following information can be collected by running "/sbin/ifconfig -a" on node "racdg2"
Enter the IP netmask of Virtual IP "172.16.10.223" on node "racdg2"[255.255.255.0]
>
Enter the network interface name on which the virtual IP address "172.16.10.223" is active
>
Enter an address or the name of the virtual IP[]
>
Network Configuration check config START
Network de-configuration trace file location: /tmp/deinstall2018-03-02_05-41-36AM/logs/netdc_check2018-03-02_05-43-22-AM.log
Specify all RAC listeners (do not include SCAN listener) that are to be de-configured [LISTENER,LISTENER_SCAN1]:
Network Configuration check config END
Asm Check Configuration START
ASM de-configuration trace file location: /tmp/deinstall2018-03-02_05-41-36AM/logs/asmcadc_check2018-03-02_05-43-34-AM.log
######################### CHECK OPERATION END #########################
####################### CHECK OPERATION SUMMARY #######################
Oracle Grid Infrastructure Home is:
The cluster node(s) on which the Oracle home deinstallation will be performed are:racdg2
Since -local option has been specified, the Oracle home will be deinstalled only on the local node, 'racdg2', and the global configuration will be removed.
Oracle Home selected for deinstall is: /u01/app/11.2.0/grid
Inventory Location where the Oracle home registered is: /u01/app/oraInventory
Following RAC listener(s) will be de-configured: LISTENER,LISTENER_SCAN1
Option -local will not modify any ASM configuration.
Do you want to continue (y - yes, n - no)? [n]:y 继续 ,不修改ASM 配置
A log of this session will be written to: '/tmp/deinstall2018-03-02_05-41-36AM/logs/deinstall_deconfig2018-03-02_05-41-43-AM.out'
Any error messages from this session will be written to: '/tmp/deinstall2018-03-02_05-41-36AM/logs/deinstall_deconfig2018-03-02_05-41-43-AM.err'
######################## CLEAN OPERATION START ########################
ASM de-configuration trace file location: /tmp/deinstall2018-03-02_05-41-36AM/logs/asmcadc_clean2018-03-02_05-44-28-AM.log
ASM Clean Configuration END
Network Configuration clean config START
Network de-configuration trace file location: /tmp/deinstall2018-03-02_05-41-36AM/logs/netdc_clean2018-03-02_05-44-28-AM.log
De-configuring RAC listener(s): LISTENER,LISTENER_SCAN1
De-configuring listener: LISTENER
Stopping listener on node "racdg2": LISTENER
Warning: Failed to stop listener. Listener may not be running.
Listener de-configured successfully.
De-configuring listener: LISTENER_SCAN1
Stopping listener on node "racdg2": LISTENER_SCAN1
Warning: Failed to stop listener. Listener may not be running.
Listener de-configured successfully.
De-configuring Naming Methods configuration file...
Naming Methods configuration file de-configured successfully.
De-configuring backup files...
Backup files de-configured successfully.
The network configuration has been cleaned up successfully.
Network Configuration clean config END
---------------------------------------->
The deconfig command below can be executed in parallel on all the remote nodes. Execute the command on the local node after the execution completes on all the remote nodes.
Run the following command as the root user or the administrator on node "racdg2".
/tmp/deinstall2018-03-02_05-41-36AM/perl/bin/perl -I/tmp/deinstall2018-03-02_05-41-36AM/perl/lib -I/tmp/deinstall2018-03-02_05-41-36AM/crs/install /tmp/deinstall2018-03-02_05-41-36AM/crs/install/rootcrs.pl -force -deconfig -paramfile "/tmp/deinstall2018-03-02_05-41-36AM/response/deinstall_Ora11g_gridinfrahome1.rsp"
Press Enter after you finish running the above commands
<----------------------------------------
Remove the directory: /tmp/deinstall2018-03-02_05-41-36AM on node:
Setting the force flag to false
Setting the force flag to cleanup the Oracle Base
Oracle Universal Installer clean START
Detach Oracle home '/u01/app/11.2.0/grid' from the central inventory on the local node : Done
Delete directory '/u01/app/11.2.0/grid' on the local node : Done
Delete directory '/u01/app/oraInventory' on the local node : Done
Delete directory '/u01/app/grid' on the local node : Done
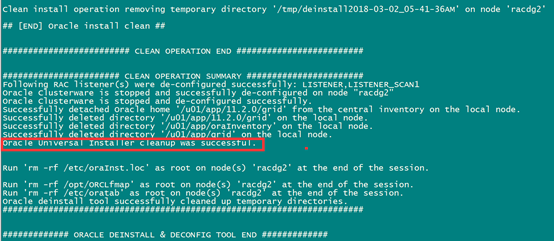
Oracle Universal Installer cleanup was successful.
Oracle Universal Installer clean END
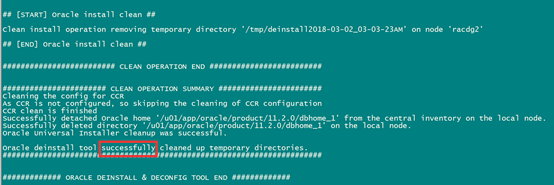
## [START] Oracle install clean ##
Clean install operation removing temporary directory '/tmp/deinstall2018-03-02_05-41-36AM' on node 'racdg2'
## [END] Oracle install clean ##
######################### CLEAN OPERATION END #########################
####################### CLEAN OPERATION SUMMARY #######################
Following RAC listener(s) were de-configured successfully: LISTENER,LISTENER_SCAN1
Oracle Clusterware is stopped and successfully de-configured on node "racdg2"
Oracle Clusterware is stopped and de-configured successfully.
Successfully detached Oracle home '/u01/app/11.2.0/grid' from the central inventory on the local node.
Successfully deleted directory '/u01/app/11.2.0/grid' on the local node.
Successfully deleted directory '/u01/app/oraInventory' on the local node.
Successfully deleted directory '/u01/app/grid' on the local node.
Oracle Universal Installer cleanup was successful.
Run 'rm -rf /etc/oraInst.loc' as root on node(s) 'racdg2' at the end of the session.
Run 'rm -rf /opt/ORCLfmap' as root on node(s) 'racdg2' at the end of the session.
Run 'rm -rf /etc/oratab' as root on node(s) 'racdg2' at the end of the session.
Oracle deinstall tool successfully cleaned up temporary directories.
#######################################################################
############# ORACLE DEINSTALL & DECONFIG TOOL END #############
执行脚本语句:

完成后的图:
例如所有保留的节点上grid执行以下命令:
$ ./runInstaller -updateNodeList ORACLE_HOME=Grid_home "CLUSTER_NODES=
{rac1,rac3……}" CRS=TRUE -silent
/u01/app/11.2.0/grid/oui/bin/runInstaller -updateNodeList ORACLE_HOME=$ORACLE_HOME "CLUSTER_NODES=
{racdg1}" CRS=TRUE -silent

3.2.2异常删除步骤
注意:如果节点已经DOWN 掉或者不可访问等情况,不能进行以上删除该节点命令在正常节点上执行以下命令:
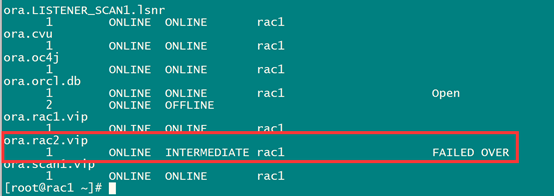
crsctl status res -t
停止以及删除VIP 资源。
停止节点2的VIP:(VIP_name 为/etc/hosts里的名称 rac2-vip)
srvctl stop vip -i vip_name -f
ROOT用户:
/u01/app/11.2.0/grid/bin/srvctl stop vip -i rac2-vip -f

srvctl remove vip -i vip_name -f
/u01/app/11.2.0/grid/bin/srvctl remove vip -i rac2-vip -f

查看VIP:
/u01/app/11.2.0/grid/bin/crsctl status res -t
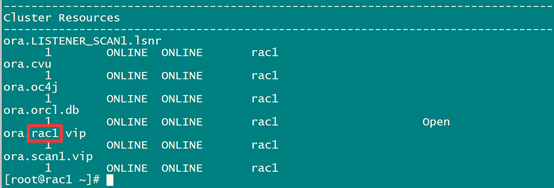
只有节点1的VIP。
在正常节点上root执行删除节点2命令:
删除异常情况的节点:
crsctl delete node -n node_to_be_deleted
/u01/app/11.2.0/grid/bin/crsctl delete node -n rac2

注意:
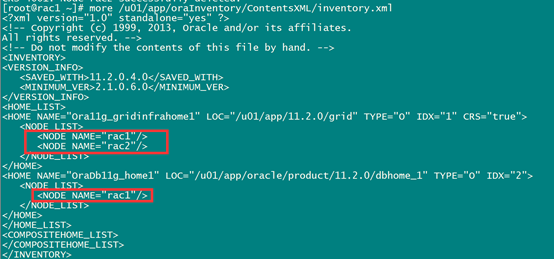
官方文档说的再继续之前,查看 inventory.xml 文件确保该文件没有被更新(官方文档说的含糊,个人测试的是有关节点1的信息不能被更新),如果被更新了,后续卸载会卸载整个集群安装目录。
more /u01/app/oraInventory/ContentsXML/inventory.xml
未做任何操作之前是:
操作完后是:
卸载GI安装目录(服务器不能访问,不用)
由于服务器不能访问或者起不来,不用卸载,直接进行下一步
更新集群资源信息
Grid用户在任何运行正常,所有保留的节点上运行以下命令:
Grid_home/oui/bin下:
$ ./runInstaller -updateNodeList ORACLE_HOME=Grid_home "CLUSTER_NODES={remaining_nodes_list}" CRS=TRUE -silent
例如:
$ ./runInstaller -updateNodeList ORACLE_HOME=Grid_home "CLUSTER_NODES={rac1,rac3……}" CRS=TRUE -silent
操作如下:
/u01/app/11.2.0/grid/oui/bin/runInstaller -updateNodeList ORACLE_HOME=$ORACLE_HOME "CLUSTER_NODES={rac1}" CRS=TRUE -silent

grid环境 Grid_home 名称为$ORACLE_HOME
3.3CVU****验证
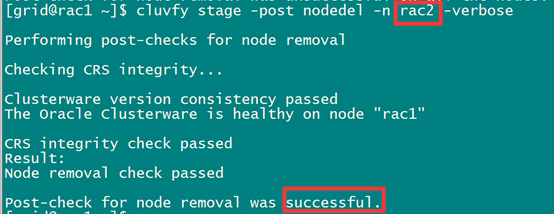
$ cluvfy stage -post nodedel -n node_list [-verbose]
正常删除验证:
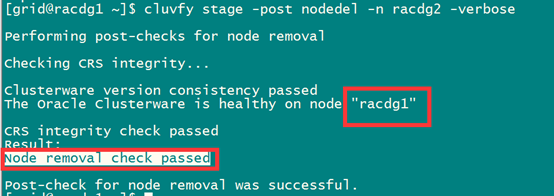
异常删除验证:
后面可以自行验证保留的集群资源,以及实例状态是否正常。
3.4后续说明
如果DOWN掉的服务器后面修好了,集群资源能够正常起的起来,还有+ASM2实例,需要完全卸载参照前面正常情况下GI卸载;
如果DOWN掉的服务器后面修好了,你想把之前删除的实例添加进去,需要先添加VIP,后(图形化或者静默)添加实例,DOWN掉的服务器并没有卸载掉ORACLE和GI软件。