nginx 启动、停止、关闭

芝士年糕
• 阅读 642

使用3A服务器搭建的centos系统安装nginx 教程在我的往期博客中 1,nginx 指定配置文件

/usr/local/nginx/sbin/nginx -c /usr/local/nginx/conf/nginx.conf 1 -c 参数 指定了要加载的nginx配置文件路径 1,从容停止Nginx: kill -QUIT 主进程号
2,快速停止Nginx: kill -TERM 主进程号

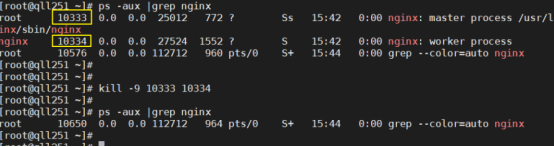
3,强制停止Nginx: kill -9 主进程号

2,使用信号管理nginx 的master、worker进程 立刻停止服务: nginx -s stop 或者 kill -SIGTERM $(cat /data/services/nginx/logs/nginx.pid)

优雅停止服务: nginx -s quit 或者 kill -QUIT $(cat /data/services/nginx/logs/nginx.pid)

重载配置文件(master不退出,重新加载worker进程): nginx -s reload kill -SIGHUP $(cat /data/services/nginx/logs/nginx.pid)

重新开始记录日志文件: nginx -s reopen 或者 kill -USR1 $(cat /data/services/nginx/logs/nginx.pid)

热升级nginx服务(主要是二进制nginx文件): kill -USR2 old_master_process #将新的请求过度到新的master进程中去 kill -WINCH old_master_process #优雅关闭所有work进程

nginx reload流程 (1)向 master 进程发送 HUP 信号(reload命令) (2)master 进程校验配置文件语法是否正确 (3)master 进程打开新的监听端口 (4)master 进程用新配置启动新的 worker 子进程 (5)master 进程向老 worker 子进程发送 QUIT 信号 (6)老 worker 进程关闭监听句柄,处理完当前连接后结束进程

nginx热升级流程 (1)将旧 nginx 文件换成新 nginx 文件 (2)向 master 进程发送 USR2 信号 (3)master 进程修改 pid 文件名,加后缀 .oldbin (4)master 进程用新 nginx 文件启动新 master 进程 (5)向老 master 进程发送 WINCH 信号,关闭老 worker (6)回滚:向老 master 发送 HUP,向新 master 发送 QUIT 3,当用systemctl 启动服务时,报start-pre时,可以考虑下/var/tmp是否存在 nginx.service failed to run ‘start-pre’

nginx 启动、停止、关闭

启动脚本:

cat >> nginx.service << EOF [Unit] Description=nginx web server Documentation=http://nginx.org/en/docs/ After=network.target remote-fs.target nss-lookup.target

[Service] Type=forking User=root Group=root PIDFile=/usr/local/nginx/logs/nginx.pid ExecStartPre=/usr/local/nginx/sbin/nginx -t -c /usr/local/nginx/conf/nginx.conf ExecStartPre=/usr/local/nginx/sbin/nginx -t ExecStart=/usr/local/nginx/sbin/nginx ExecReload=/usr/local/nginx/sbin/nginx -s reload KillSignal=SIGQUIT PrivateTmp=true

[Install] WantedBy=multi-user.target EOF

点赞
收藏
评论区
推荐文章
芝士年糕 芝士年糕
1年前
完全卸载nginx及安装的详细步骤
前言在开局配置Nginx时有可能会配置错误,报各种错误代码。看不懂或者懒得去看这个报错时,其实最简单的方式是卸载并重装咯。今天就带大家一起学习下,如何彻底卸载nginx程序。一、卸载NGINX卸载nginx程序的详细步骤1、停止Nginx软件/usr/local/nginx/sbin/nginxsstop如果不知道nginx安装路径,可以通过执行ps命
Stella981 Stella981
2年前
Nginx配置https
一、开启nginx的ssl模块1.未安装过nginx,编译安装配置参数如下:./configure\prefix/usr/local/nginx\withpcre\withhttp\_ssl\_modulessl模块\withhttp\_stub\_status\_module\wit
Wesley13 Wesley13
2年前
LNMP架构之虚拟主机配置、用户认证及域名重定向
本文索引:配置nginx虚拟主机nginx用户认证针对目录针对文件域名重定向配置nginx虚拟主机修改nginx主配置文件root@localhostnginx1.12.2vim/usr/local/nginx/conf/ngi
Wesley13 Wesley13
2年前
LNMP架构之访问日志、日志切割、静态文件不记录及过期时间设置
本文索引:Nginx访问日志Nginx日志切割静态文件不记录日志和过期时间Nginx访问日志修改nginx配置文件root@localhostvhostvim/usr/local/nginx/conf/nginx.conf搜索:/log_format
Stella981 Stella981
2年前
Nginx 模块分类
L:34!(https://oscimg.oschina.net/oscnet/3f218ca9379733d571a853b919759402668.png) 我们进入Nginx安装目录来查看上述模块的位置在src目录下每个模块对应的文件夹如下 /usr/local/nginx/nginx1.14.2/srcro
Stella981 Stella981
2年前
Nginx SSL补充安装
在centos中,配置nginx的https时,出现如下错误。nginx:\emerg\unknowndirective"ssl"in/usr/local/nginx/conf/nginx.conf:102,说明编译是没有启用SSL。到解压的nginx目录下./configurewith
Stella981 Stella981
2年前
Nginx之使用nginx搭建简单的文件服务器
  使用nginx可以搭建简单文件服务器  安装nginx(不详述)    修改配置文件/usr/local/nginx/conf/nginx.confuserroot;worker_processes1;error_loglogs/error.log;pidlog
Wesley13 Wesley13
2年前
2018.9.20笔记
Nginx默认虚拟主机去掉usr/local/nginx/conf/nginx.conf中的内容Server{.....}vim/usr/local/nginx/conf/nginx.conf//增加includevhost/.conf;
Wesley13 Wesley13
2年前
nginx配置虚拟主机相关教程
1.配置虚拟主机配置虚拟主机即:在一台服务器上启动多个网站;区分不同的网站方式:域名不同,端口不同;1.1通过端口区分虚拟主机1.1.1server节点的介绍nginx的配置文件路径:/usr/local/nginx/conf/nginx.conf一个se
胖大海 胖大海
1年前
nginx简易安装启动!
使用3A服务器搭建的centos系统安装nginx,教程在我的往期博客中,最新教程yum方式如下!添加CentOS7Nginxyum资源库rpmUvh http://nginx.org/packages/centos/7/noarc