UGUI 橡皮擦效果

Wesley13
• 阅读 647

原理主要是通过鼠标点击UI的位置,将当前图片的alpha(透明通道)改为0,然后通过Shader叠加渲染

大致效果就是这样:

UGUI 橡皮擦效果

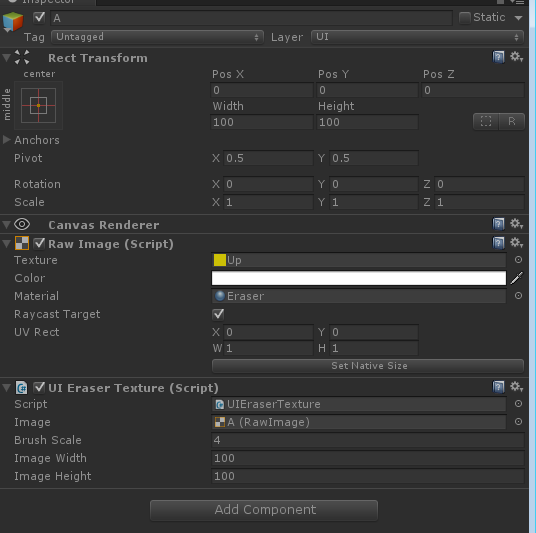
属性编辑窗口需要填写图片的大小和橡皮檫的大小

UGUI 橡皮擦效果

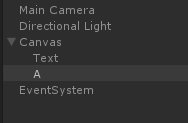
界面布局如下:

UGUI 橡皮擦效果

以下为C#脚本,主要负责计算当前需要镂空的像素位置,并将当前像素点上的颜色值Color.a=0

using UnityEngine;
using UnityEngine.UI;
using UnityEngine.EventSystems;
using System.Collections;

public class UIEraserTexture : MonoBehaviour ,IPointerDownHandler,IPointerUpHandler{
    
    public  RawImage image;
    public  int brushScale = 4;
    public int imageWidth;
    public int imageHeight;
    Texture2D texRender;
    RectTransform mRectTransform;
    Canvas canvas;
    
    void Awake(){
        mRectTransform = GetComponent<RectTransform> ();
        canvas = GameObject.Find("Canvas").GetComponent<Canvas>();
    }
    
    void Start () 
    {
        //texRender = new Texture2D(image.mainTexture.width, image.mainTexture.height,TextureFormat.ARGB32,true);
        texRender = new Texture2D(imageWidth, imageWidth,TextureFormat.ARGB32,true);
        Reset ();
        
    }
    
    bool isMove = false;
    
    public void OnPointerDown(PointerEventData data)
    {
        start = ConvertSceneToUI (data.position);
        isMove = true;
    }
    
    public void OnPointerUp(PointerEventData data)
    {
        isMove = false;
        OnMouseMove (data.position);
        start = Vector2.zero;
    }
    
    void Update(){
        if (isMove) {
            OnMouseMove (Input.mousePosition);
        }
    }
    
    Vector2 start = Vector2.zero;
    Vector2 end = Vector2.zero;
    
    Vector2 ConvertSceneToUI(Vector3 posi){
        Vector2 postion;
        if(RectTransformUtility.ScreenPointToLocalPointInRectangle(mRectTransform , posi, canvas.worldCamera, out postion)){
            return postion;
        }
        return Vector2.zero;
    }
    
    void OnMouseMove(Vector2 position)
    {
        end = ConvertSceneToUI (position);
        Draw (new Rect (end.x+texRender.width/2, end.y+texRender.height/2, brushScale, brushScale));
        
        if (start.Equals (Vector2.zero)) {
            return;
        }
        
        Rect disract = new Rect ((start+end).x/2+texRender.width/2, (start+end).y/2+texRender.height/2, Mathf.Abs (end.x-start.x), Mathf.Abs (end.y-start.y));
        
        for (int x = (int)disract.xMin; x < (int)disract.xMax; x++) {
            for (int y = (int)disract.yMin; y < (int)disract.yMax; y++) {
                Draw (new Rect (x, y, brushScale, brushScale));
            }
        }       

        start = end;
    }
    
    void Reset(){
        
        for (int i = 0; i < texRender.width; i++) {
            
            for (int j = 0; j < texRender.height; j++) {
                
                Color color = texRender.GetPixel (i,j);
                color.a = 1;
                texRender.SetPixel (i,j,color);
            }
        }
        
        texRender.Apply ();
        image.material.SetTexture ("_RendTex",texRender);
        
    }
    
    void Draw(Rect rect){
        for (int x = (int)rect.xMin; x < (int)rect.xMax; x++) {
            for (int y = (int)rect.yMin; y < (int)rect.yMax; y++) {
                if (x < 0 || x > texRender.width || y < 0 || y > texRender.height) {
                    return;
                }
                Color color = texRender.GetPixel (x,y);
                color.a = 0;
                texRender.SetPixel (x,y,color);
            }
        }
        
        texRender.Apply();
        image.material.SetTexture ("_RendTex",texRender);
    }
    
}

接下来就是shader了

Shader "Unlit/Transparent Colored Eraser"
{
    Properties
    {
        _MainTex ("Base (RGB), Alpha (A)", 2D) = "white" {}
        _RendTex ("Base (RGB), Alpha (A)", 2D) = "white" {}
    }
 
    SubShader
    {
        LOD 200
         
        Tags
        {
            "Queue" = "Transparent"
            "IgnoreProjector" = "True"
            "RenderType" = "Transparent"
        }
         
        Pass
        {
            Cull Off
            Lighting Off
            ZWrite Off
            Fog { Mode Off }
            Offset -1, -1
            ColorMask RGB
            AlphaTest Greater .01
            Blend SrcAlpha OneMinusSrcAlpha
            ColorMaterial AmbientAndDiffuse
         
            CGPROGRAM
            #pragma vertex vert
            #pragma fragment frag
            #include "UnityCG.cginc"
         
            sampler2D _MainTex;
            float4 _MainTex_ST;
            sampler2D _RendTex;
         
            struct appdata_t
            {
                float4 vertex : POSITION;
                half4 color : COLOR;
                float2 texcoord : TEXCOORD0;
            };
             
            struct v2f
            {
                float4 vertex : POSITION;
                half4 color : COLOR;
                float2 texcoord : TEXCOORD0;
            };
             
            v2f vert (appdata_t v)
            {
                v2f o;
                o.vertex = mul(UNITY_MATRIX_MVP, v.vertex);
                o.color = v.color;
                o.texcoord = v.texcoord;
                return o;
            }
         
            half4 frag (v2f IN) : COLOR
            {
                // Sample the texture
                half4 col = tex2D(_MainTex, IN.texcoord) * IN.color;
                half4 rnd = tex2D(_RendTex, IN.texcoord) * IN.color;
                col.a =  rnd.a;
                return col;
                }
            ENDCG
        }
    }
}
点赞
收藏
评论区
推荐文章
blmius blmius
2年前
MySQL:[Err] 1292 - Incorrect datetime value: ‘0000-00-00 00:00:00‘ for column ‘CREATE_TIME‘ at row 1
文章目录问题用navicat导入数据时,报错:原因这是因为当前的MySQL不支持datetime为0的情况。解决修改sql\mode:sql\mode:SQLMode定义了MySQL应支持的SQL语法、数据校验等,这样可以更容易地在不同的环境中使用MySQL。全局s
Jacquelyn38 Jacquelyn38
2年前
2020年前端实用代码段,为你的工作保驾护航
有空的时候,自己总结了几个代码段,在开发中也经常使用,谢谢。1、使用解构获取json数据let jsonData  id: 1,status: "OK",data: 'a', 'b';let  id, status, data: number   jsonData;console.log(id, status, number )
皕杰报表之UUID
​在我们用皕杰报表工具设计填报报表时,如何在新增行里自动增加id呢?能新增整数排序id吗?目前可以在新增行里自动增加id,但只能用uuid函数增加UUID编码,不能新增整数排序id。uuid函数说明:获取一个UUID,可以在填报表中用来创建数据ID语法:uuid()或uuid(sep)参数说明:sep布尔值,生成的uuid中是否包含分隔符'',缺省为
Stella981 Stella981
2年前
PhoneGap设置Icon
参考:http://cordova.apache.org/docs/en/latest/config\_ref/images.html通过config.xml中的<icon标签来设置Icon<iconsrc"res/ios/icon.png"platform"ios"width"57"height"57"densi
Wesley13 Wesley13
2年前
mysql设置时区
mysql设置时区mysql\_query("SETtime\_zone'8:00'")ordie('时区设置失败,请联系管理员!');中国在东8区所以加8方法二:selectcount(user\_id)asdevice,CONVERT\_TZ(FROM\_UNIXTIME(reg\_time),'08:00','0
Stella981 Stella981
2年前
Android蓝牙连接汽车OBD设备
//设备连接public class BluetoothConnect implements Runnable {    private static final UUID CONNECT_UUID  UUID.fromString("0000110100001000800000805F9B34FB");
Stella981 Stella981
2年前
Docker 部署SpringBoot项目不香吗?
  公众号改版后文章乱序推荐,希望你可以点击上方“Java进阶架构师”,点击右上角,将我们设为★“星标”!这样才不会错过每日进阶架构文章呀。  !(http://dingyue.ws.126.net/2020/0920/b00fbfc7j00qgy5xy002kd200qo00hsg00it00cj.jpg)  2
Stella981 Stella981
2年前
Django中Admin中的一些参数配置
设置在列表中显示的字段,id为django模型默认的主键list_display('id','name','sex','profession','email','qq','phone','status','create_time')设置在列表可编辑字段list_editable
Wesley13 Wesley13
2年前
MySQL部分从库上面因为大量的临时表tmp_table造成慢查询
背景描述Time:20190124T00:08:14.70572408:00User@Host:@Id:Schema:sentrymetaLast_errno:0Killed:0Query_time:0.315758Lock_
Python进阶者 Python进阶者
3个月前
Excel中这日期老是出来00:00:00,怎么用Pandas把这个去除
大家好,我是皮皮。一、前言前几天在Python白银交流群【上海新年人】问了一个Pandas数据筛选的问题。问题如下:这日期老是出来00:00:00,怎么把这个去除。二、实现过程后来【论草莓如何成为冻干莓】给了一个思路和代码如下:pd.toexcel之前把这