电子邮件系统
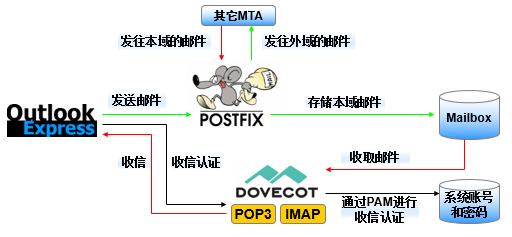
简单邮件传输协议(Simple Mail Transfer Protocol,SMTP):用于发送和中转发出的电子邮件,占用服务器的25/TCP端口。
邮局协议版本3(Post Office Protocol 3):用于将电子邮件存储到本地主机,占用服务器的110/TCP端口。
Internet消息访问协议版本4(Internet Message Access Protocol 4):用于在本地主机上访问邮件,占用服务器的143/TCP端口。

部署基础电子邮件系统
① 配置服务器主机名称,需要保证服务器主机名称与发信域名保持一致
第2步:清空iptables防火墙默认策略,并保存策略状态,避免因防火墙中默认存在的策略阻止了客户端DNS解析域名及收发邮件
第3步:为电子邮件系统提供域名解析。由于第13章已经讲解了bind-chroot服务程序的配置方法,因此这里只提供主配置文件、区域配置文件和域名数据文件的配置内容,其余配置步骤请大家自行完成。
cat /etc/named.conf 1 // 2 // named.conf 3 // 4 // Provided by Red Hat bind package to configure the ISC BIND named(8) DNS 5 // server as a caching only nameserver (as a localhost DNS resolver only). 6 // 7 // See /usr/share/doc/bind*/sample/ for example named configuration files. 8 // 9 10 options { 11 listen-on port 53 { any; }; 12 listen-on-v6 port 53 { ::1; }; 13 directory "/var/named"; 14 dump-file "/var/named/data/cache_dump.db"; 15 statistics-file "/var/named/data/named_stats.txt"; 16 memstatistics-file "/var/named/data/named_mem_stats.txt"; 17 allow-query { any; };
[root@linuxprobe ~]# cat /etc/named.rfc1912.zones zone "linuxprobe.com" IN { type master; file "linuxprobe.com.zone"; allow-update {none;}; };
[root@linuxprobe ~]# cat /var/named/linuxprobe.com.zone
$TTL 1D
@
IN SOA
linuxprobe.com.
root.linuxprobe.com.
(
0;serial
1D;refresh
1H;retry
1W;expire
3H);minimum
NS
ns.linuxprobe.com.
ns
IN A
192.168.10.10
@
IN MX 10
mail.linuxprobe.com.
IN A
192.168.10.10
[root@linuxprobe ~]# systemctl restart named [root@linuxprobe ~]# systemctl enable named ln -s '/usr/lib/systemd/system/named.service' '/etc/systemd/system/multi-user.target.wants/named.service'
配置postfix服务程序
yum install postfix
systemctl disable iptables
配置postfix
Postfix服务程序主配置文件中的重要参数
参数
作用
myhostname
邮局系统的主机名
mydomain
邮局系统的域名
myorigin
从本机发出邮件的域名名称
inet_interfaces
监听的网卡接口
mydestination
可接收邮件的主机名或域名
mynetworks
设置可转发哪些主机的邮件
relay_domains
设置可转发哪些网域的邮件
vim /etc/postfix/main.cf
75 #myhostname = host.domain.tld 76 myhostname = mail.linuxprobe.com
81 # parameters. 82 # 83 mydomain = linuxprobe.com
96 # to recipient addresses that have no @domain part. 97 # 98 #myorigin = $myhostname 99 myorigin = $mydomain
115 #inet_interfaces = $myhostname, localhost 116 inet_interfaces = all
163 # 164 mydestination = $myhostname , $mydomain 165 #mydestination = $myhostname, localhost.$mydomain, localhost, $mydomain 166 #mydestination = $myhostname, localhost.$mydomain, localhost, $mydomain,
创建电子邮件系统的登录账户
[root@linuxprobe ~]# useradd boss [root@linuxprobe ~]# echo "linuxprobe" | passwd --stdin boss Changing password for user boss. passwd: all authentication tokens updated successfully. [root@linuxprobe ~]# systemctl restart postfix [root@linuxprobe ~]# systemctl enable postfix ln -s '/usr/lib/systemd/system/postfix.service' '/etc/systemd/system/multi-user.target.wants/postfix.service'
配置Dovecot服务程序
[root@linuxprobe ~]# yum install dovecot
配置部署Dovecot服务程序
[root@linuxprobe ~]# vim /etc/dovecot/dovecot.conf ………………省略部分输出信息……………… 23 # Protocols we want to be serving. 24 protocols = imap pop3 lmtp 25 disable_plaintext_auth = no ………………省略部分输出信息………………
47 # these networks. Typically you'd specify your IMAP proxy servers here. 48 login_trusted_networks = 192.168.10.0/24
[root@linuxprobe ~]# vim /etc/dovecot/conf.d/10-mail.conf
23 # mail_location = maildir:/Maildir
24 **mail_location = mbox:/mail:INBOX=/var/mail/%u**
25 # mail_location = mbox:/var/mail/%d/%1n/%n:INDEX=/var/indexes/%d/%1n/%n
[root@linuxprobe ~]# su - boss Last login: Sat Aug 15 16:15:58 CST 2017 on pts/1 [boss@mail ~]$ mkdir -p mail/.imap/INBOX [boss@mail ~]$ exit [root@linuxprobe ~]# systemctl restart dovecot [root@linuxprobe ~]# systemctl enable dovecot
电子邮件系统及DNS服务器
RHEL 7
192.168.10.10
客户端主机
Windows 7
192.168.10.30
使用Squid部署代理缓存服务
多个主机通过一台服务器通过一个公网IP上网
①代理缓存服务
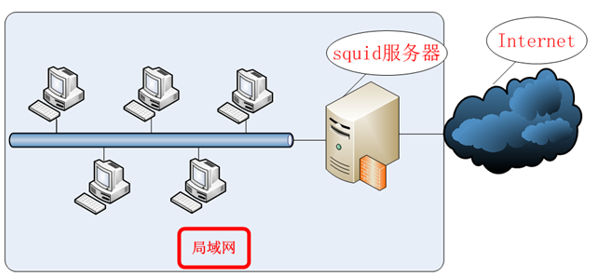
正向代理模式,是指让用户通过Squid服务程序获取网站页面等资源,以及基于访问控制列表(ACL)功能对用户访问网站行为进行限制,在具体的服务方式上又分为标准代理模式与透明代理模式 。
标准正向代理模式是把网站数据缓存到服务器本地,提高数据资源被再次访问时的效率,但是用户在上网时必须在浏览器等软件中填写代理服务器的IP地址与端口号信息,否则默认不使用代理服务。
透明正向代理模式的作用与标准正向代理模式基本相同,区别是用户不需要手动指定代理服务器的IP地址与端口号,所以这种代理服务对于用户来讲是相对透明的。
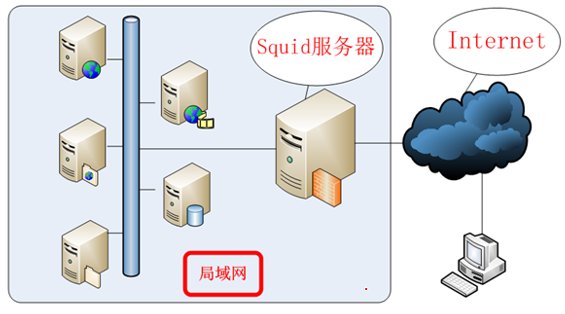
反向代理模式是指让多台节点主机反向缓存网站数据,从而加快用户访问速度 。
正向代理模式一般用于企业局域网之中 。
反向代理模式一般是为大中型网站提供缓存服务的,它把网站中的静态资源保存在国内多个节点机房中,当有用户发起静态资源的访问请求时,可以就近为用户分配节点并传输资源,因此在大中型网站中得到了普遍应用。
配置Squid服务程序
Squid服务器和客户端的操作系统和IP地址信息
主机名称
操作系统
IP地址
Squid服务器
RHEL 7
外网卡:桥接DHCP模式
内网卡:192.168.10.10
Squid客户端
Windows 7
192.168.10.20
需要配置DNS才能ping通外网
yum install squid
常用的Squid服务程序配置参数以及作用
参数
作用
http_port 3128
监听的端口号
cache_mem 64M
内存缓冲区的大小
cache_dir ufs /var/spool/squid 2000 16 256
硬盘缓冲区的大小
cache_effective_user squid
设置缓存的有效用户
cache_effective_group squid
设置缓存的有效用户组
dns_nameservers IP地址
一般不设置,而是用服务器默认的DNS地址
cache_access_log /var/log/squid/access.log
访问日志文件的保存路径
cache_log /var/log/squid/cache.log
缓存日志文件的保存路径
visible_hostname linuxprobe.com
设置Squid服务器的名称
正向代理
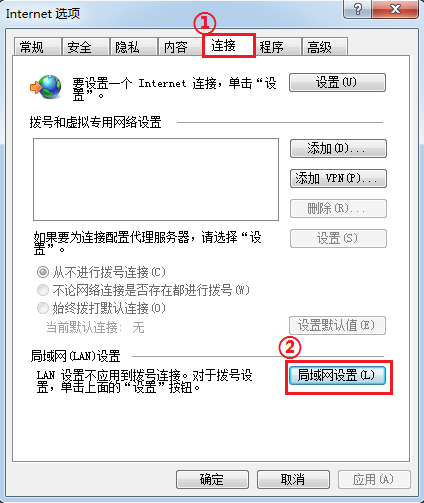
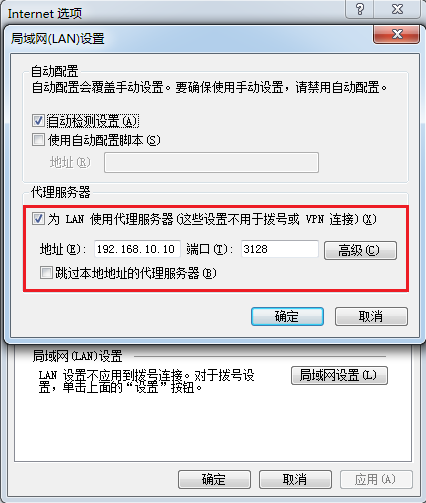
修改端口号
[root@linuxprobe ~]# vim /etc/squid/squid.conf ………………省略部分输出信息……………… 45 # 46 # INSERT YOUR OWN RULE(S) HERE TO ALLOW ACCESS FROM YOUR CLIENTS 47 # 48 49 # Example rule allowing access from your local networks. 50 # Adapt localnet in the ACL section to list your (internal) IP networks 51 # from where browsing should be allowed 52 http_access allow localnet 53 http_access allow localhost 54 55 # And finally deny all other access to this proxy 56 http_access deny all 57 58 # Squid normally listens to port 3128 59 http_port 10000 60 http_port 10000 ………………省略部分输出信息……………… [root@linuxprobe ~]# systemctl restart squid [root@linuxprobe ~]# systemctl enable squid
配置selinux域
[root@linuxprobe ~]# semanage port -l | grep squid_port_t squid_port_t tcp 3128, 3401, 4827 squid_port_t udp 3401, 4827 [root@linuxprobe ~]# semanage port -a -t squid_port_t -p tcp 10000 [root@linuxprobe ~]# semanage port -l | grep squid_port_t squid_port_t tcp 10000, 3128, 3401, 4827 squid_port_t udp 3401, 4827
ACL访问控制
Squid服务程序的访问控制列表(ACL)
实验1:只允许IP地址为192.168.10.20的客户端使用服务器上的Squid服务程序提供的代理服务,禁止其余所有的主机代理请求。
[root@linuxprobe ~]# vim /etc/squid/squid.conf 1 # 2 # Recommended minimum configuration: 3 # 4 5 # Example rule allowing access from your local networks. 6 # Adapt to list your (internal) IP networks from where browsing 7 # should be allowed 8 acl localnet src 10.0.0.0/8 # RFC1918 possible internal network 9 acl localnet src 172.16.0.0/12 # RFC1918 possible internal network 10 acl localnet src 192.168.0.0/16 # RFC1918 possible internal network 11 acl localnet src fc00::/7 # RFC 4193 local private network range 12 acl localnet src fe80::/10 # RFC 4291 link-local (directly plugged) mac hines 13 14 acl SSL_ports port 443 15 acl Safe_ports port 80 # http 16 acl Safe_ports port 21 # ftp 17 acl Safe_ports port 443 # https 18 acl Safe_ports port 70 # gopher 19 acl Safe_ports port 210 # wais 20 acl Safe_ports port 1025-65535 # unregistered ports 21 acl Safe_ports port 280 # http-mgmt 22 acl Safe_ports port 488 # gss-http 23 acl Safe_ports port 591 # filemaker 24 acl Safe_ports port 777 # multiling http 25 acl CONNECT method CONNECT 26 acl client src 192.168.10.20 27 # 28 # Recommended minimum Access Permission configuration: 29 # 30 # Deny requests to certain unsafe ports 31 http_access allow client 32 http_access deny all 33 http_access deny !Safe_ports 34 [root@linuxprobe ~]# systemctl restart squid
首先定义了一个名为client的别名。这其实类似于13.6节讲解的DNS分离解析技术,当时我们分别定义了两个名为china与american的别名变量,这样当再遇到这个别名时也就意味着与之定义的IP地址了。保存配置文件后重启Squid服务程序,这时由于客户端主机的IP地址不符合我们的允许策略而被禁止使用代理服务

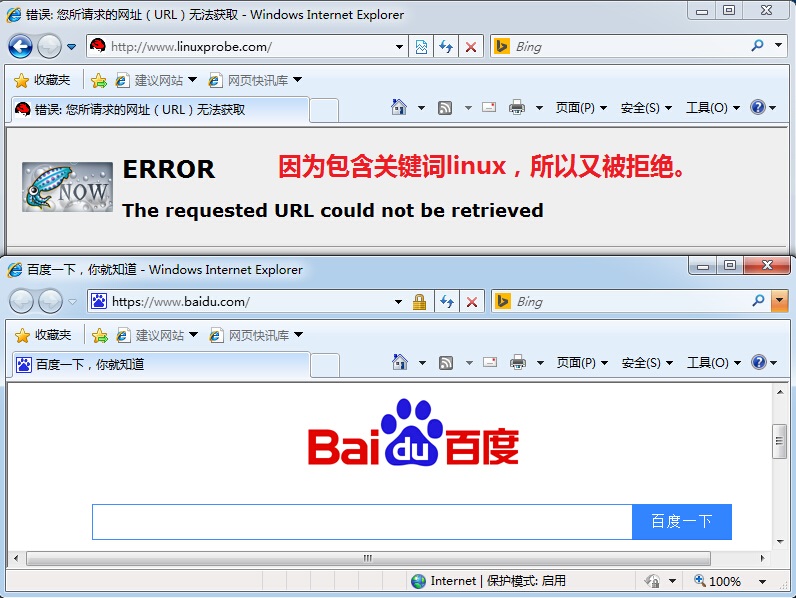
实验2:禁止所有客户端访问网址中包含linux关键词的网站。
Squid服务程序的这种ACL功能模式是比较粗犷暴力的,客户端访问的任何网址中只要包含了某个关键词就会被立即禁止访问,但是这并不影响访问其他网站。
[root@linuxprobe ~]# vim /etc/squid/squid.conf 1 # 2 # Recommended minimum configuration: 3 # 4 5 # Example rule allowing access from your local networks. 6 # Adapt to list your (internal) IP networks from where browsing 7 # should be allowed 8 acl localnet src 10.0.0.0/8 # RFC1918 possible internal network 9 acl localnet src 172.16.0.0/12 # RFC1918 possible internal network 10 acl localnet src 192.168.0.0/16 # RFC1918 possible internal network 11 acl localnet src fc00::/7 # RFC 4193 local private network range 12 acl localnet src fe80::/10 # RFC 4291 link-local (directly plugged) mac hines 13 14 acl SSL_ports port 443 15 acl Safe_ports port 80 # http 16 acl Safe_ports port 21 # ftp 17 acl Safe_ports port 443 # https 18 acl Safe_ports port 70 # gopher 19 acl Safe_ports port 210 # wais 20 acl Safe_ports port 1025-65535 # unregistered ports 21 acl Safe_ports port 280 # http-mgmt 22 acl Safe_ports port 488 # gss-http 23 acl Safe_ports port 591 # filemaker 24 acl Safe_ports port 777 # multiling http 25 acl CONNECT method CONNECT 26 acl deny_keyword url_regex -i linux 27 # 28 # Recommended minimum Access Permission configuration: 29 # 30 # Deny requests to certain unsafe ports 31 http_access deny deny_keyword 33 http_access deny !Safe_ports 34 [root@linuxprobe ~]# systemctl restart squid
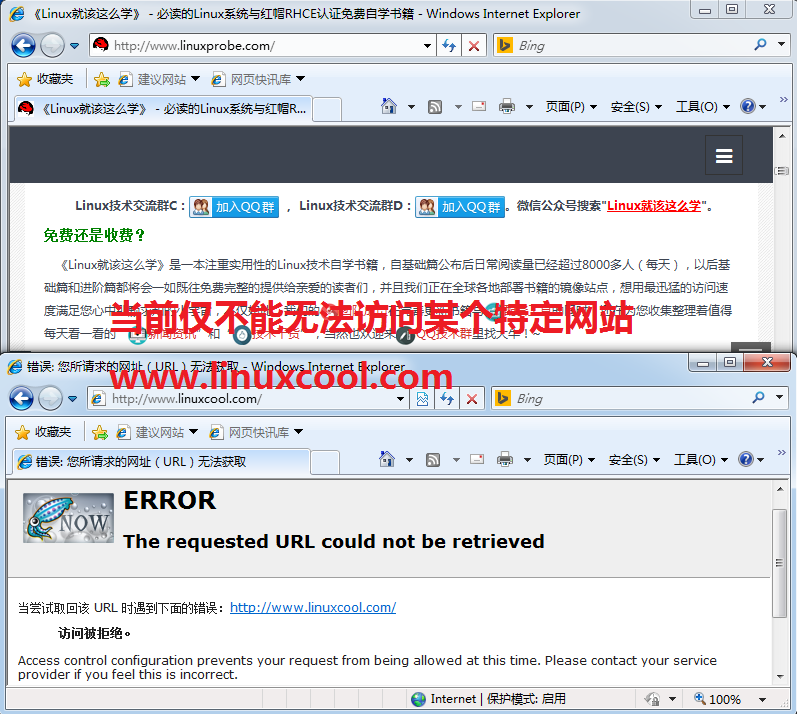
实验3:禁止所有客户端访问某个特定的网站。
[root@linuxprobe ~]# vim /etc/squid/squid.conf 24 acl Safe_ports port 777 # multiling http 25 acl CONNECT method CONNECT 26 acl deny_url url_regex http://www.linuxcool.com 27 # 28 # Recommended minimum Access Permission configuration: 29 # 30 # Deny requests to certain unsafe ports 31 http_access deny deny_url 33 http_access deny !Safe_ports 34 [root@linuxprobe ~]# systemctl restart squid
实验4:禁止员工在企业网内部下载带有某些后缀的文件。
在企业网络中,总会有一小部分人利用企业网络的高速带宽私自下载资源(比如游戏安装文件、电影文件等),从而对其他同事的工作效率造成影响。通过禁止所有用户访问.rar或.avi等后缀文件的请求,可以防止他们继续下载资源,让他们知难而退。下面按照如下所示的参数配置Squid服务程序并重启,然后进行测试
[root@linuxprobe ~]# vim /etc/squid/squid.conf 24 acl Safe_ports port 777 # multiling http 25 acl CONNECT method CONNECT 26 acl badfile urlpath_regex -i \.mp3$ \.rar$ 27 # 28 # Recommended minimum Access Permission configuration: 29 # 30 # Deny requests to certain unsafe ports 31 http_access deny badfile 33 http_access deny !Safe_ports 34 [root@linuxprobe ~]# systemctl restart squid

透明正向代理
正向代理服务一般是针对企业内部的所有员工设置的,鉴于每位员工所掌握的计算机知识不尽相同,如果您所在的公司不是IT行业的公司,想教会大家如何使用代理服务也不是一件容易的事情。再者,无论是什么行业的公司,公司领导都希望能采取某些措施限制员工在公司内的上网行为,这时就需要用到透明的正向代理模式了。
“透明”二字指的是让用户在没有感知的情况下使用代理服务,这样的好处是一方面不需要用户手动配置代理服务器的信息,进而降低了代理服务的使用门槛;另一方面也可以更隐秘地监督员工的上网行为。
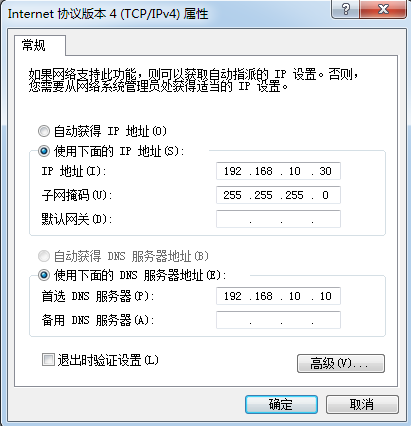
在透明代理模式中,用户无须在浏览器或其他软件中配置代理服务器地址、端口号等信息,而是由DHCP服务器将网络配置信息分配给客户端主机。这样只要用户打开浏览器便会自动使用代理服务了。如果大家此时并没有配置DHCP服务器,可以像如图16-12所示来手动配置客户端主机的网卡参数。
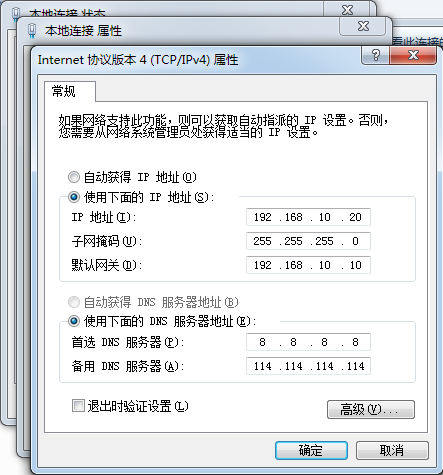
图16-12 配置Windows客户端的网络信息
[root@linuxprobe ~]# iptables -F [root@linuxprobe ~]# iptables -t nat -A POSTROUTING -p udp --dport 53 -o eno33554968 -j MASQUERADE [root@linuxprobe ~]# echo "net.ipv4.ip_forward=1" >> /etc/sysctl.conf [root@linuxprobe ~]# sysctl -p net.ipv4.ip_forward = 1
与配置DNS和SNAT技术转发相比,Squid服务程序透明代理模式的配置过程就十分简单了,只需要在主配置文件中服务器端口号后面追加上transparent单词(意思为“透明的”),然后把第62行的井号(#)注释符删除,设置缓存的保存路径就可以了。保存主配置文件并退出后再使用squid -k parse命令检查主配置文件是否有错误,以及使用squid -z命令对Squid服务程序的透明代理技术进行初始化。
[root@linuxprobe ~]# vim /etc/squid/squid.conf ………………省略部分输出信息……………… 58 # Squid normally listens to port 3128 59 http_port 3128 transparent 60 61 # Uncomment and adjust the following to add a disk cache directory. 62 cache_dir ufs /var/spool/squid 100 16 256 63 ………………省略部分输出信息……………… [root@linuxprobe ~]# squid -k parse 2017/04/13 06:40:44| Startup: Initializing Authentication Schemes ... 2017/04/13 06:40:44| Startup: Initialized Authentication Scheme 'basic' 2017/04/13 06:40:44| Startup: Initialized Authentication Scheme 'digest' 2017/04/13 06:40:44| Startup: Initialized Authentication Scheme 'negotiate' 2017/04/13 06:40:44| Startup: Initialized Authentication Scheme 'ntlm' 2017/04/13 06:40:44| Startup: Initialized Authentication. ………………省略部分输出信息……………… [root@linuxprobe ~]# squid -z 2017/04/13 06:41:26 kid1| Creating missing swap directories 2017/04/13 06:41:26 kid1| /var/spool/squid exists 2017/04/13 06:41:26 kid1| Making directories in /var/spool/squid/00 2017/04/13 06:41:26 kid1| Making directories in /var/spool/squid/01 2017/04/13 06:41:26 kid1| Making directories in /var/spool/squid/02 2017/04/13 06:41:26 kid1| Making directories in /var/spool/squid/03 2017/04/13 06:41:26 kid1| Making directories in /var/spool/squid/04 2017/04/13 06:41:26 kid1| Making directories in /var/spool/squid/05 2017/04/13 06:41:26 kid1| Making directories in /var/spool/squid/06 2017/04/13 06:41:26 kid1| Making directories in /var/spool/squid/07 2017/04/13 06:41:26 kid1| Making directories in /var/spool/squid/08 2017/04/13 06:41:26 kid1| Making directories in /var/spool/squid/09 2017/04/13 06:41:26 kid1| Making directories in /var/spool/squid/0A 2017/04/13 06:41:26 kid1| Making directories in /var/spool/squid/0B 2017/04/13 06:41:26 kid1| Making directories in /var/spool/squid/0C 2017/04/13 06:41:26 kid1| Making directories in /var/spool/squid/0D 2017/04/13 06:41:26 kid1| Making directories in /var/spool/squid/0E 2017/04/13 06:41:26 kid1| Making directories in /var/spool/squid/0F [root@linuxprobe ~]# systemctl restart squid
在配置妥当并重启Squid服务程序且系统没有提示报错信息后,接下来就可以完成SNAT数据转发功能了。它的原理其实很简单,就是使用iptables防火墙管理命令把所有客户端主机对网站80端口的请求转发至Squid服务器本地的3128端口上。SNAT数据转发功能的具体配置参数如下。
[root@linuxprobe ~]# iptables -t nat -A PREROUTING -p tcp -m tcp --dport 80 -j REDIRECT --to-ports 3128 [root@linuxprobe ~]# iptables -t nat -A POSTROUTING -s 192.168.10.0/24 -o eno33554968 -j SNAT --to 您的桥接网卡IP地址 [root@linuxprobe ~]# service iptables save iptables: Saving firewall rules to /etc/sysconfig/iptables:[ OK ]
反向代理
网站页面是由静态资源和动态资源一起组成的,其中静态资源包括网站架构CSS文件、大量的图片、视频等数据,这些数据相对于动态资源来说更加稳定,一般不会经常发生改变。但是,随着建站技术的更新换代,外加人们不断提升的审美能力,这些静态资源占据的网站空间越来越多。如果能够把这些静态资源从网站页面中抽离出去,然后在全国各地部署静态资源的缓存节点,这样不仅可以提升用户访问网站的速度,而且网站源服务器也会因为这些缓存节点的存在而降低负载。
反向代理是Squid服务程序的一种重要模式,其原理是把一部分原本向网站源服务器发起的用户请求交给Squid服务器缓存节点来处理。但是这种技术的弊端也很明显,如果有心怀不轨之徒将自己的域名和服务器反向代理到某个知名的网站上面,从理论上来讲,当用户访问到这个域名时,也会看到与那个知名网站一样的内容(有些诈骗网站就是这样骗取用户信任的)。因此,当前许多网站都默认禁止了反向代理功能。开启了CDN(内容分发网络)服务的网站也可以避免这种窃取行为。如果访问开启了防护功能的网站,一般会看到如图16-16所示的报错信息。

使用Squid服务程序来配置反向代理服务非常简单。首先找到一个网站源服务器的IP地址,然后编辑Squid服务程序的主配置文件,把端口号3128修改为网站源服务器的地址和端口号,此时正向解析服务会被暂停(它不能与反向代理服务同时使用)。然后按照下面的参数形式写入需要反向代理的网站源服务器的IP地址信息,保存退出后重启Squid服务程序。正常网站使用反向代理服务的效果如图16-17所示。
[root@linuxprobe ~]# vim /etc/squid/squid.conf ………………省略部分输出信息……………… 57 58 # Squid normally listens to port 3128 59 http_port 您的桥接网卡IP地址:80 vhost 60 cache_peer 网站源服务器IP地址 parent 80 0 originserver 61 ………………省略部分输出信息……………… [root@linuxprobe ~]# systemctl restart squid


