本节内容
- RabbitMQ队列
- Redis缓存
一、RabbitMQ队列
安装 http://www.rabbitmq.com/install-standalone-mac.html
安装python rabbitMQ module
1
2
3
4
5
6
7
pip install pika
or
easy_install pika
or
源码
https: / / pypi.python.org / pypi / pika
实现最简单的队列通信
send端
1
2
3
4
5
6
7
8
9
10
11
12
13
14
15
16
#!/usr/bin/env python
import pika
connection = pika.BlockingConnection(pika.ConnectionParameters(
'localhost' ))
channel = connection.channel()
#声明queue
channel.queue_declare(queue = 'hello' )
#n RabbitMQ a message can never be sent directly to the queue, it always needs to go through an exchange.
channel.basic_publish(exchange = '',
routing_key = 'hello' ,
body = 'Hello World!' )
print ( " [x] Sent 'Hello World!'" )
connection.close()
receive端
1
2
3
4
5
6
7
8
9
10
11
12
13
14
15
16
17
18
19
20
21
22
23
24
#_*_coding:utf-8_*_
__author__ = 'Alex Li'
import pika
connection = pika.BlockingConnection(pika.ConnectionParameters(
'localhost' ))
channel = connection.channel()
#You may ask why we declare the queue again ‒ we have already declared it in our previous code.
# We could avoid that if we were sure that the queue already exists. For example if send.py program
#was run before. But we're not yet sure which program to run first. In such cases it's a good
# practice to repeat declaring the queue in both programs.
channel.queue_declare(queue = 'hello' )
def callback(ch, method, properties, body):
print ( " [x] Received %r" % body)
channel.basic_consume(callback,
queue = 'hello' ,
no_ack = True )
print ( ' [*] Waiting for messages. To exit press CTRL+C' )
channel.start_consuming()
远程连接rabbitmq server的话,需要配置权限噢
首先在rabbitmq server上创建一个用户
1
sudo rabbitmqctl add_user alex alex3714
同时还要配置权限,允许从外面访问
1
sudo rabbitmqctl set_permissions -p / alex ".*" ".*" ".*"
set_permissions [-p _vhost_] {user} {conf} {write} {read}
vhost
The name of the virtual host to which to grant the user access, defaulting to /.
user
The name of the user to grant access to the specified virtual host.
conf
A regular expression matching resource names for which the user is granted configure permissions.
write
A regular expression matching resource names for which the user is granted write permissions.
read
A regular expression matching resource names for which the user is granted read permissions.
客户端连接的时候需要配置认证参数
1
2
3
4
5
6
credentials = pika.PlainCredentials( 'alex' , 'alex3714' )
connection = pika.BlockingConnection(pika.ConnectionParameters(
'10.211.55.5' , 5672 , '/' ,credentials))
channel = connection.channel()
Work Queues

在这种模式下,RabbitMQ会默认把p发的消息依次分发给各个消费者(c),跟负载均衡差不多
消息提供者代码


import pika
import time
connection = pika.BlockingConnection(pika.ConnectionParameters(
    'localhost'))
channel = connection.channel()

# 声明queue
channel.queue_declare(queue='task_queue')

# n RabbitMQ a message can never be sent directly to the queue, it always needs to go through an exchange.
import sys

message = ' '.join(sys.argv[1:]) or "Hello World! %s" % time.time()
channel.basic_publish(exchange='',
                      routing_key='task_queue',
                      body=message,
                      properties=pika.BasicProperties(
                          delivery_mode=2,  # make message persistent
                      )
                      )
print(" [x] Sent %r" % message)
connection.close()
View Code
消费者代码


#_*_coding:utf-8_*_

import pika, time

connection = pika.BlockingConnection(pika.ConnectionParameters(
    'localhost'))
channel = connection.channel()


def callback(ch, method, properties, body):
    print(" [x] Received %r" % body)
    time.sleep(20)
    print(" [x] Done")
    print("method.delivery_tag",method.delivery_tag)
    ch.basic_ack(delivery_tag=method.delivery_tag)


channel.basic_consume(callback,
                      queue='task_queue',
                      no_ack=True
                      )

print(' [*] Waiting for messages. To exit press CTRL+C')
channel.start_consuming()
View Code
此时,先启动消息生产者,然后再分别启动3个消费者,通过生产者多发送几条消息,你会发现,这几条消息会被依次分配到各个消费者身上
Doing a task can take a few seconds. You may wonder what happens if one of the consumers starts a long task and dies with it only partly done. With our current code once RabbitMQ delivers message to the customer it immediately removes it from memory. In this case, if you kill a worker we will lose the message it was just processing. We'll also lose all the messages that were dispatched to this particular worker but were not yet handled.
But we don't want to lose any tasks. If a worker dies, we'd like the task to be delivered to another worker.
In order to make sure a message is never lost, RabbitMQ supports message acknowledgments. An ack(nowledgement) is sent back from the consumer to tell RabbitMQ that a particular message had been received, processed and that RabbitMQ is free to delete it.
If a consumer dies (its channel is closed, connection is closed, or TCP connection is lost) without sending an ack, RabbitMQ will understand that a message wasn't processed fully and will re-queue it. If there are other consumers online at the same time, it will then quickly redeliver it to another consumer. That way you can be sure that no message is lost, even if the workers occasionally die.
There aren't any message timeouts; RabbitMQ will redeliver the message when the consumer dies. It's fine even if processing a message takes a very, very long time.
Message acknowledgments are turned on by default. In previous examples we explicitly turned them off via the no_ack=True flag. It's time to remove this flag and send a proper acknowledgment from the worker, once we're done with a task.
1
2
3
4
5
6
7
8
def callback(ch, method, properties, body):
print " [x] Received %r" % (body,)
time.sleep( body.count( '.' ) )
print " [x] Done"
ch.basic_ack(delivery_tag = method.delivery_tag)
channel.basic_consume(callback,
queue = 'hello' )
Using this code we can be sure that even if you kill a worker using CTRL+C while it was processing a message, nothing will be lost. Soon after the worker dies all unacknowledged messages will be redelivered
消息持久化
We have learned how to make sure that even if the consumer dies, the task isn't lost(by default, if wanna disable use no_ack=True). But our tasks will still be lost if RabbitMQ server stops.
When RabbitMQ quits or crashes it will forget the queues and messages unless you tell it not to. Two things are required to make sure that messages aren't lost: we need to mark both the queue and messages as durable.
First, we need to make sure that RabbitMQ will never lose our queue. In order to do so, we need to declare it as durable:
1
channel.queue_declare(queue = 'hello' , durable = True )
Although this command is correct by itself, it won't work in our setup. That's because we've already defined a queue called hello which is not durable. RabbitMQ doesn't allow you to redefine an existing queue with different parameters and will return an error to any program that tries to do that. But there is a quick workaround - let's declare a queue with different name, for exampletask_queue:
1
channel.queue_declare(queue = 'task_queue' , durable = True )
This queue_declare change needs to be applied to both the producer and consumer code.
At that point we're sure that the task_queue queue won't be lost even if RabbitMQ restarts. Now we need to mark our messages as persistent - by supplying a delivery_mode property with a value 2.
1
2
3
4
5
6
channel.basic_publish(exchange = '',
routing_key = "task_queue" ,
body = message,
properties = pika.BasicProperties(
delivery_mode = 2 , # make message persistent
))
消息公平分发
如果Rabbit只管按顺序把消息发到各个消费者身上,不考虑消费者负载的话,很可能出现,一个机器配置不高的消费者那里堆积了很多消息处理不完,同时配置高的消费者却一直很轻松。为解决此问题,可以在各个消费者端,配置perfetch=1,意思就是告诉RabbitMQ在我这个消费者当前消息还没处理完的时候就不要再给我发新消息了。

1
channel.basic_qos(prefetch_count = 1 )
带消息持久化+公平分发的完整代码
生产者端


#!/usr/bin/env python
import pika
import sys

connection = pika.BlockingConnection(pika.ConnectionParameters(
        host='localhost'))
channel = connection.channel()

channel.queue_declare(queue='task_queue', durable=True)

message = ' '.join(sys.argv[1:]) or "Hello World!"
channel.basic_publish(exchange='',
                      routing_key='task_queue',
                      body=message,
                      properties=pika.BasicProperties(
                         delivery_mode = 2, # make message persistent
                      ))
print(" [x] Sent %r" % message)
connection.close()
View Code
消费者端


#!/usr/bin/env python
import pika
import time

connection = pika.BlockingConnection(pika.ConnectionParameters(
        host='localhost'))
channel = connection.channel()

channel.queue_declare(queue='task_queue', durable=True)
print(' [*] Waiting for messages. To exit press CTRL+C')

def callback(ch, method, properties, body):
    print(" [x] Received %r" % body)
    time.sleep(body.count(b'.'))
    print(" [x] Done")
    ch.basic_ack(delivery_tag = method.delivery_tag)

channel.basic_qos(prefetch_count=1)
channel.basic_consume(callback,
                      queue='task_queue')

channel.start_consuming()
View Code
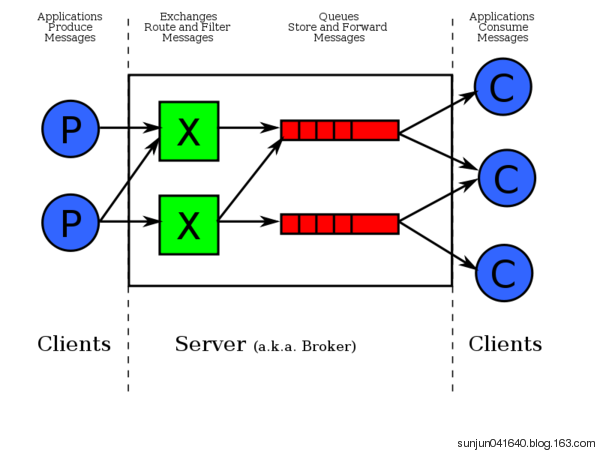
Publish\Subscribe(消息发布\订阅)
之前的例子都基本都是1对1的消息发送和接收,即消息只能发送到指定的queue里,但有些时候你想让你的消息被所有的Queue收到,类似广播的效果,这时候就要用到exchange了,
An exchange is a very simple thing. On one side it receives messages from producers and the other side it pushes them to queues. The exchange must know exactly what to do with a message it receives. Should it be appended to a particular queue? Should it be appended to many queues? Or should it get discarded. The rules for that are defined by the exchange type.
Exchange在定义的时候是有类型的,以决定到底是哪些Queue符合条件,可以接收消息
fanout: 所有bind到此exchange的queue都可以接收消息
direct: 通过routingKey和exchange决定的那个唯一的queue可以接收消息
topic:所有符合routingKey(此时可以是一个表达式)的routingKey所bind的queue可以接收消息
表达式符号说明:#代表一个或多个字符,*代表任何字符
例:#.a会匹配a.a,aa.a,aaa.a等
*.a会匹配a.a,b.a,c.a等
注:使用RoutingKey为#,Exchange Type为topic的时候相当于使用fanout
headers: 通过headers 来决定把消息发给哪些queue

消息publisher


import pika
import sys

connection = pika.BlockingConnection(pika.ConnectionParameters(
        host='localhost'))
channel = connection.channel()

channel.exchange_declare(exchange='logs',
                         type='fanout')

message = ' '.join(sys.argv[1:]) or "info: Hello World!"
channel.basic_publish(exchange='logs',
                      routing_key='',
                      body=message)
print(" [x] Sent %r" % message)
connection.close()
View Code
消息subscriber


#_*_coding:utf-8_*_
__author__ = 'Alex Li'
import pika

connection = pika.BlockingConnection(pika.ConnectionParameters(
        host='localhost'))
channel = connection.channel()

channel.exchange_declare(exchange='logs',
                         type='fanout')

result = channel.queue_declare(exclusive=True) #不指定queue名字,rabbit会随机分配一个名字,exclusive=True会在使用此queue的消费者断开后,自动将queue删除
queue_name = result.method.queue

channel.queue_bind(exchange='logs',
                   queue=queue_name)

print(' [*] Waiting for logs. To exit press CTRL+C')

def callback(ch, method, properties, body):
    print(" [x] %r" % body)

channel.basic_consume(callback,
                      queue=queue_name,
                      no_ack=True)

channel.start_consuming()
View Code
有选择的接收消息(exchange type=direct)
RabbitMQ还支持根据关键字发送,即:队列绑定关键字,发送者将数据根据关键字发送到消息exchange,exchange根据 关键字 判定应该将数据发送至指定队列。

publisher


import pika
import sys

connection = pika.BlockingConnection(pika.ConnectionParameters(
        host='localhost'))
channel = connection.channel()

channel.exchange_declare(exchange='direct_logs',
                         type='direct')

severity = sys.argv[1] if len(sys.argv) > 1 else 'info'
message = ' '.join(sys.argv[2:]) or 'Hello World!'
channel.basic_publish(exchange='direct_logs',
                      routing_key=severity,
                      body=message)
print(" [x] Sent %r:%r" % (severity, message))
connection.close()
View Code
subscriber


import pika
import sys

connection = pika.BlockingConnection(pika.ConnectionParameters(
        host='localhost'))
channel = connection.channel()

channel.exchange_declare(exchange='direct_logs',
                         type='direct')

result = channel.queue_declare(exclusive=True)
queue_name = result.method.queue

severities = sys.argv[1:]
if not severities:
    sys.stderr.write("Usage: %s [info] [warning] [error]\n" % sys.argv[0])
    sys.exit(1)

for severity in severities:
    channel.queue_bind(exchange='direct_logs',
                       queue=queue_name,
                       routing_key=severity)

print(' [*] Waiting for logs. To exit press CTRL+C')

def callback(ch, method, properties, body):
    print(" [x] %r:%r" % (method.routing_key, body))

channel.basic_consume(callback,
                      queue=queue_name,
                      no_ack=True)

channel.start_consuming()
View Code
更细致的消息过滤
Although using the direct exchange improved our system, it still has limitations - it can't do routing based on multiple criteria.
In our logging system we might want to subscribe to not only logs based on severity, but also based on the source which emitted the log. You might know this concept from the syslog unix tool, which routes logs based on both severity (info/warn/crit...) and facility (auth/cron/kern...).
That would give us a lot of flexibility - we may want to listen to just critical errors coming from 'cron' but also all logs from 'kern'.

publisher


import pika
import sys

connection = pika.BlockingConnection(pika.ConnectionParameters(
        host='localhost'))
channel = connection.channel()

channel.exchange_declare(exchange='topic_logs',
                         type='topic')

routing_key = sys.argv[1] if len(sys.argv) > 1 else 'anonymous.info'
message = ' '.join(sys.argv[2:]) or 'Hello World!'
channel.basic_publish(exchange='topic_logs',
                      routing_key=routing_key,
                      body=message)
print(" [x] Sent %r:%r" % (routing_key, message))
connection.close()
View Code
subscriber


import pika
import sys

connection = pika.BlockingConnection(pika.ConnectionParameters(
        host='localhost'))
channel = connection.channel()

channel.exchange_declare(exchange='topic_logs',
                         type='topic')

result = channel.queue_declare(exclusive=True)
queue_name = result.method.queue

binding_keys = sys.argv[1:]
if not binding_keys:
    sys.stderr.write("Usage: %s [binding_key]...\n" % sys.argv[0])
    sys.exit(1)

for binding_key in binding_keys:
    channel.queue_bind(exchange='topic_logs',
                       queue=queue_name,
                       routing_key=binding_key)

print(' [*] Waiting for logs. To exit press CTRL+C')

def callback(ch, method, properties, body):
    print(" [x] %r:%r" % (method.routing_key, body))

channel.basic_consume(callback,
                      queue=queue_name,
                      no_ack=True)

channel.start_consuming()
View Code
To receive all the logs run:
python receive_logs_topic.py "#"
To receive all logs from the facility "kern":
python receive_logs_topic.py "kern.*"
Or if you want to hear only about "critical" logs:
python receive_logs_topic.py "*.critical"
You can create multiple bindings:
python receive_logs_topic.py "kern.*" "*.critical"
And to emit a log with a routing key "kern.critical" type:
python emit_log_topic.py "kern.critical" "A critical kernel error"
Remote procedure call (RPC)
To illustrate how an RPC service could be used we're going to create a simple client class. It's going to expose a method named call which sends an RPC request and blocks until the answer is received:
1
2
3
fibonacci_rpc = FibonacciRpcClient()
result = fibonacci_rpc.call( 4 )
print ( "fib(4) is %r" % result)

RPC server


#_*_coding:utf-8_*_
__author__ = 'Alex Li'
import pika
import time
connection = pika.BlockingConnection(pika.ConnectionParameters(
        host='localhost'))

channel = connection.channel()

channel.queue_declare(queue='rpc_queue')

def fib(n):
    if n == 0:
        return 0
    elif n == 1:
        return 1
    else:
        return fib(n-1) + fib(n-2)

def on_request(ch, method, props, body):
    n = int(body)

    print(" [.] fib(%s)" % n)
    response = fib(n)

    ch.basic_publish(exchange='',
                     routing_key=props.reply_to,
                     properties=pika.BasicProperties(correlation_id = \
                                                         props.correlation_id),
                     body=str(response))
    ch.basic_ack(delivery_tag = method.delivery_tag)

channel.basic_qos(prefetch_count=1)
channel.basic_consume(on_request, queue='rpc_queue')

print(" [x] Awaiting RPC requests")
channel.start_consuming()
View Code
RPC client


import pika
import uuid

class FibonacciRpcClient(object):
    def __init__(self):
        self.connection = pika.BlockingConnection(pika.ConnectionParameters(
                host='localhost'))

        self.channel = self.connection.channel()

        result = self.channel.queue_declare(exclusive=True)
        self.callback_queue = result.method.queue

        self.channel.basic_consume(self.on_response, no_ack=True,
                                   queue=self.callback_queue)

    def on_response(self, ch, method, props, body):
        if self.corr_id == props.correlation_id:
            self.response = body

    def call(self, n):
        self.response = None
        self.corr_id = str(uuid.uuid4())
        self.channel.basic_publish(exchange='',
                                   routing_key='rpc_queue',
                                   properties=pika.BasicProperties(
                                         reply_to = self.callback_queue,
                                         correlation_id = self.corr_id,
                                         ),
                                   body=str(n))
        while self.response is None:
            self.connection.process_data_events()
        return int(self.response)

fibonacci_rpc = FibonacciRpcClient()

print(" [x] Requesting fib(30)")
response = fibonacci_rpc.call(30)
print(" [.] Got %r" % response)
View Code
二、Redis缓存
缓存数据库介绍
NoSQL(NoSQL = Not Only SQL ),意即“不仅仅是SQL”,泛指非关系型的数据库,随着互联网web2.0网站的兴起,传统的关系数据库在应付web2.0网站,特别是超大规模和高并发的SNS类型的web2.0纯动态网站已经显得力不从心,暴露了很多难以克服的问题,而非关系型的数据库则由于其本身的特点得到了非常迅速的发展。NoSQL数据库的产生就是为了解决大规模数据集合多重数据种类带来的挑战,尤其是大数据应用难题。
NoSQL数据库的四大分类
键值(Key-Value)存储数据库
这一类数据库主要会使用到一个 哈希表,这个表中有一个特定的键和一个指针指向特定的数据。Key/value模型对于IT系统来说的优势在于简单、易部署。但是如果 DBA只对部分值进行查询或更新的时候,Key/value就显得效率低下了。[3] 举例如:Tokyo Cabinet/Tyrant, Redis, Voldemort, Oracle BDB.
列存储数据库
这部分数据库通常是用来应对分布式存储的海量数据。键仍然存在,但是它们的特点是指向了多个列。这些列是由列家族来安排的。如:Cassandra, HBase, Riak.
文档型数据库
文档型数据库的灵感是来自于Lotus Notes办公软件的,而且它同第一种键值存储相类似。该类型的数据模型是版本化的文档,半结构化的文档以特定的格式存储,比如JSON。文档型数据库可 以看作是键值数据库的升级版,允许之间嵌套键值。而且文档型数据库比键值数据库的查询效率更高。如:CouchDB, MongoDb. 国内也有文档型数据库SequoiaDB,已经开源。
图形(Graph)数据库
图形结构的数据库同其他行列以及刚性结构的SQL数据库不同,它是使用灵活的图形模型,并且能够扩展到多个服务器上。NoSQL数据库没有标准的查询语言(SQL),因此进行数据库查询需要制定数据模型。许多NoSQL数据库都有REST式的数据接口或者查询API。[2] 如:Neo4J, InfoGrid, Infinite Graph.
因此,我们总结NoSQL数据库在以下的这几种情况下比较适用:1、数据模型比较简单;2、需要灵活性更强的IT系统;3、对数据库性能要求较高;4、不需要高度的数据一致性;5、对于给定key,比较容易映射复杂值的环境。
NoSQL数据库的四大分类表格分析
分类
Examples举例
典型应用场景
数据模型
优点
缺点
键值(key-value)[3]
Tokyo Cabinet/Tyrant, Redis, Voldemort, Oracle BDB
内容缓存,主要用于处理大量数据的高访问负载,也用于一些日志系统等等。[3]
Key 指向 Value 的键值对,通常用hash table来实现[3]
查找速度快
数据无结构化,通常只被当作字符串或者二进制数据[3]
列存储数据库[3]
Cassandra, HBase, Riak
分布式的文件系统
以列簇式存储,将同一列数据存在一起
查找速度快,可扩展性强,更容易进行分布式扩展
功能相对局限
文档型数据库[3]
CouchDB, MongoDb
Web应用(与Key-Value类似,Value是结构化的,不同的是数据库能够了解Value的内容)
Key-Value对应的键值对,Value为结构化数据
数据结构要求不严格,表结构可变,不需要像关系型数据库一样需要预先定义表结构
查询性能不高,而且缺乏统一的查询语法。
图形(Graph)数据库[3]
Neo4J, InfoGrid, Infinite Graph
社交网络,推荐系统等。专注于构建关系图谱
图结构
利用图结构相关算法。比如最短路径寻址,N度关系查找等
很多时候需要对整个图做计算才能得出需要的信息,而且这种结构不太好做分布式的集群方案。[3]
redis
介绍
redis是业界主流的key-value nosql 数据库之一。和Memcached类似,它支持存储的value类型相对更多,包括string(字符串)、list(链表)、set(集合)、zset(sorted set --有序集合)和hash(哈希类型)。这些数据类型都支持push/pop、add/remove及取交集并集和差集及更丰富的操作,而且这些操作都是原子性的。在此基础上,redis支持各种不同方式的排序。与memcached一样,为了保证效率,数据都是缓存在内存中。区别的是redis会周期性的把更新的数据写入磁盘或者把修改操作写入追加的记录文件,并且在此基础上实现了master-slave(主从)同步。
Redis优点
异常快速 : Redis是非常快的,每秒可以执行大约110000设置操作,81000个/每秒的读取操作。
支持丰富的数据类型 : Redis支持最大多数开发人员已经知道如列表,集合,可排序集合,哈希等数据类型。
这使得在应用中很容易解决的各种问题,因为我们知道哪些问题处理使用哪种数据类型更好解决。
操作都是原子的 : 所有 Redis 的操作都是原子,从而确保当两个客户同时访问 Redis 服务器得到的是更新后的值(最新值)。
MultiUtility工具:Redis是一个多功能实用工具,可以在很多如:缓存,消息传递队列中使用(Redis原生支持发布/订阅),在应用程序中,如:Web应用程序会话,网站页面点击数等任何短暂的数据;
安装Redis环境
要在 Ubuntu 上安装 Redis,打开终端,然后输入以下命令:
$sudo apt-get update
$sudo apt-get install redis-server
这将在您的计算机上安装Redis
启动 Redis
$redis-server
查看 redis 是否还在运行
$redis-cli
这将打开一个 Redis 提示符,如下图所示:
redis 127.0.0.1:6379>
在上面的提示信息中:127.0.0.1 是本机的IP地址,6379是 Redis 服务器运行的端口。现在输入 PING 命令,如下图所示:
redis 127.0.0.1:6379> ping
PONG
这说明现在你已经成功地在计算机上安装了 Redis。
Python操作Redis
1
2
3
4
5
6
7
sudo pip install redis
or
sudo easy_install redis
or
源码安装
详见:https: / / github.com / WoLpH / redis - py
在Ubuntu上安装Redis桌面管理器
要在Ubuntu 上安装 Redis桌面管理,可以从 http://redisdesktop.com/download 下载包并安装它。
Redis 桌面管理器会给你用户界面来管理 Redis 键和数据。
Redis API使用
redis-py 的API的使用可以分类为:
- 连接方式
- 连接池
- 操作
- String 操作
- Hash 操作
- List 操作
- Set 操作
- Sort Set 操作
- 管道
- 发布订阅
连接方式
1、操作模式
redis-py提供两个类Redis和StrictRedis用于实现Redis的命令,StrictRedis用于实现大部分官方的命令,并使用官方的语法和命令,Redis是StrictRedis的子类,用于向后兼容旧版本的redis-py。
1
2
3
4
5
import redis
r = redis.Redis(host = '10.211.55.4' , port = 6379 )
r. set ( 'foo' , 'Bar' )
print r.get( 'foo' )
2、连接池
redis-py使用connection pool来管理对一个redis server的所有连接,避免每次建立、释放连接的开销。默认,每个Redis实例都会维护一个自己的连接池。可以直接建立一个连接池,然后作为参数Redis,这样就可以实现多个Redis实例共享一个连接池。
操作
1. String操作
redis中的String在在内存中按照一个name对应一个value来存储。如图:
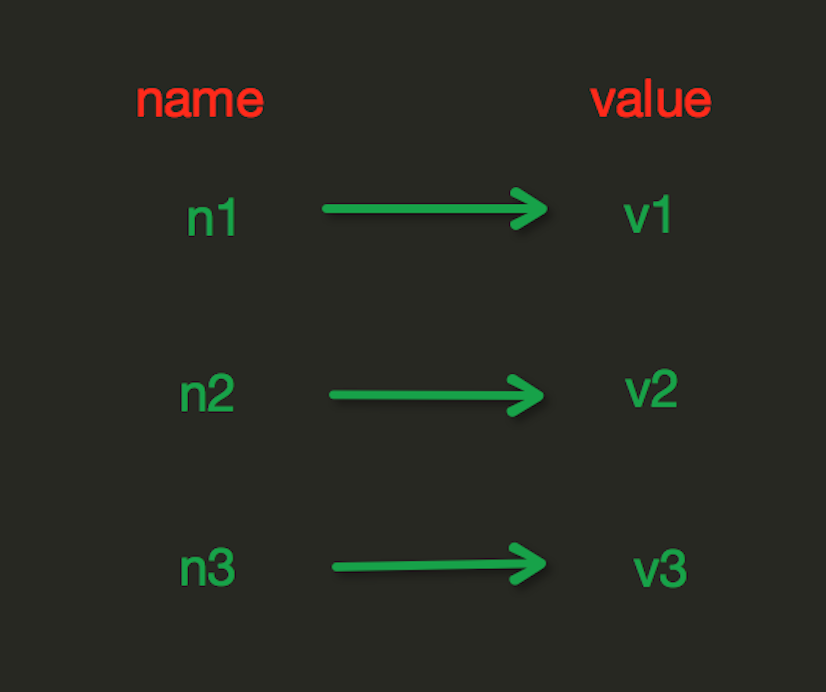
set(name, value, ex=None, px=None, nx=False, xx=False)
1
2
3
4
5
6
在Redis中设置值,默认,不存在则创建,存在则修改
参数:
ex,过期时间(秒)
px,过期时间(毫秒)
nx,如果设置为True,则只有name不存在时,当前set操作才执行
xx,如果设置为True,则只有name存在时,岗前set操作才执行
setnx(name, value)
1
设置值,只有name不存在时,执行设置操作(添加)
setex(name, value, time)
1
2
3
# 设置值
# 参数:
# time,过期时间(数字秒 或 timedelta对象)
psetex(name, time_ms, value)
1
2
3
# 设置值
# 参数:
# time_ms,过期时间(数字毫秒 或 timedelta对象)
mset(*args, **kwargs)
1
2
3
4
5
批量设置值
如:
mset(k1= 'v1' , k2= 'v2' )
或
mget({ 'k1' : 'v1' , 'k2' : 'v2' })
get(name)
1
获取值
mget(keys, *args)
1
2
3
4
5
批量获取
如:
mget( 'ylr' , 'wupeiqi' )
或
r.mget([ 'ylr' , 'wupeiqi' ])
getset(name, value)
1
设置新值并获取原来的值
getrange(key, start, end)
1
2
3
4
5
6
# 获取子序列(根据字节获取,非字符)
# 参数:
# name,Redis 的 name
# start,起始位置(字节)
# end,结束位置(字节)
# 如: "武沛齐" ,0-3表示 "武"
setrange(name, offset, value)
1
2
3
4
# 修改字符串内容,从指定字符串索引开始向后替换(新值太长时,则向后添加)
# 参数:
# offset,字符串的索引,字节(一个汉字三个字节)
# value,要设置的值
setbit(name, offset, value)
1
2
3
4
5
6
7
8
9
10
11
12
13
14
15
16
17
18
19
20
21
22
23
24
25
26
27
# 对name对应值的二进制表示的位进行操作
# 参数:
# name,redis的name
# offset,位的索引(将值变换成二进制后再进行索引)
# value,值只能是 1 或 0
# 注:如果在Redis中有一个对应: n1 = "foo",
那么字符串foo的二进制表示为: 01100110 01101111 01101111
所以,如果执行 setbit( 'n1' , 7 , 1 ),则就会将第 7 位设置为 1 ,
那么最终二进制则变成 01100111 01101111 01101111 ,即: "goo"
# 扩展,转换二进制表示:
# source = "武沛齐"
source = "foo"
for i in source:
num = ord (i)
print bin (num).replace( 'b' ,'')
特别的,如果source是汉字 "武沛齐" 怎么办?
答:对于utf - 8 ,每一个汉字占 3 个字节,那么 "武沛齐" 则有 9 个字节
对于汉字, for 循环时候会按照 字节 迭代,那么在迭代时,将每一个字节转换 十进制数,然后再将十进制数转换成二进制
11100110 10101101 10100110 11100110 10110010 10011011 11101001 10111101 10010000
- - - - - - - - - - - - - - - - - - - - - - - - - - - - - - - - - - - - - - - - - - - - - - - - - - - - - - - - - - - - - - - - - - - - - - - - - - - - - - - - - - - -
武 沛 齐
*用途举例,用最省空间的方式,存储在线用户数及分别是哪些用户在线
getbit(name, offset)
1
# 获取name对应的值的二进制表示中的某位的值 (0或1)
bitcount(key, start=None, end=None)
1
2
3
4
5
# 获取name对应的值的二进制表示中 1 的个数
# 参数:
# key,Redis的name
# start,位起始位置
# end,位结束位置
strlen(name)
1
# 返回name对应值的字节长度(一个汉字3个字节)
incr(self, name, amount=1)
1
2
3
4
5
6
7
# 自增 name对应的值,当name不存在时,则创建name=amount,否则,则自增。
# 参数:
# name,Redis的name
# amount,自增数(必须是整数)
# 注:同incrby
incrbyfloat(self, name, amount=1.0)
1
2
3
4
5
# 自增 name对应的值,当name不存在时,则创建name=amount,否则,则自增。
# 参数:
# name,Redis的name
# amount,自增数(浮点型)
decr(self, name, amount=1)
1
2
3
4
5
# 自减 name对应的值,当name不存在时,则创建name=amount,否则,则自减。
# 参数:
# name,Redis的name
# amount,自减数(整数)
append(key, value)
1
2
3
4
5
# 在redis name对应的值后面追加内容
# 参数:
key, redis的name
value, 要追加的字符串
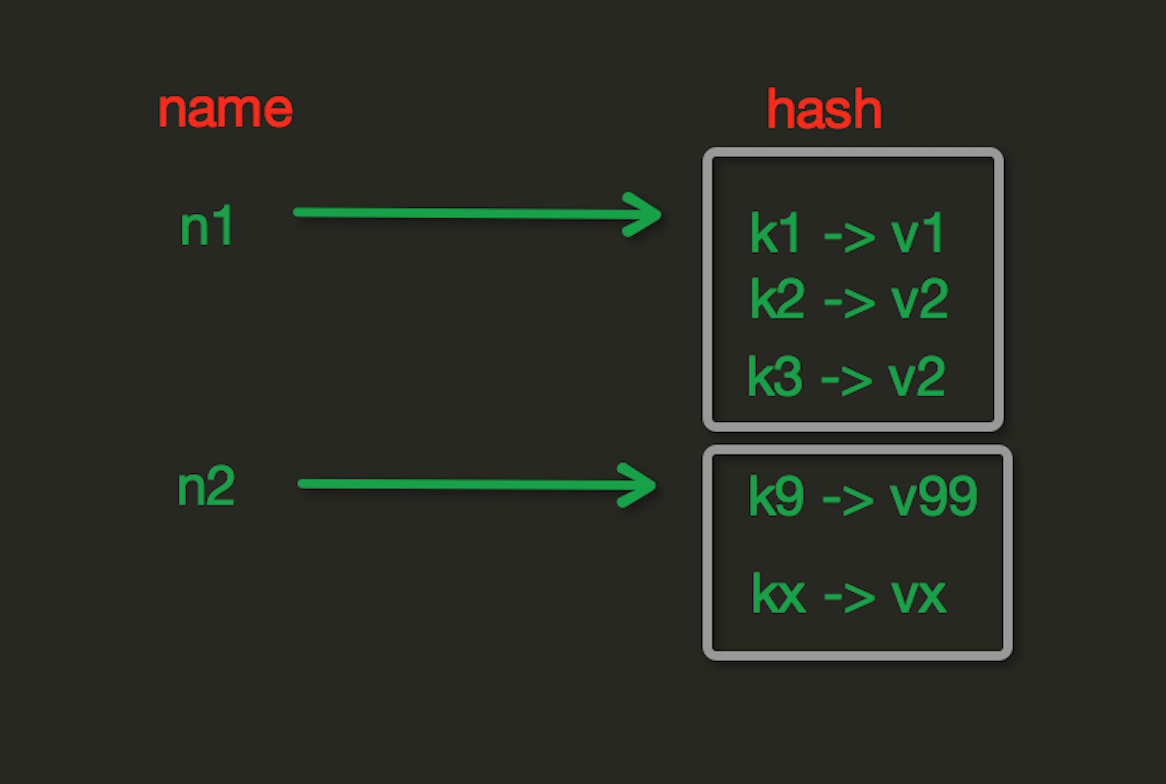
2. Hash操作
hash表现形式上有些像pyhton中的dict,可以存储一组关联性较强的数据 , redis中Hash在内存中的存储格式如下图:
hset(name, key, value)
1
2
3
4
5
6
7
8
9
# name对应的hash中设置一个键值对(不存在,则创建;否则,修改)
# 参数:
# name,redis的name
# key,name对应的hash中的key
# value,name对应的hash中的value
# 注:
# hsetnx(name, key, value),当name对应的hash中不存在当前key时则创建(相当于添加)
hmset(name, mapping)
1
2
3
4
5
6
7
8
# 在name对应的hash中批量设置键值对
# 参数:
# name,redis的name
# mapping,字典,如:{'k1':'v1', 'k2': 'v2'}
# 如:
# r.hmset('xx', {'k1':'v1', 'k2': 'v2'})
hget(name,key)
1
# 在name对应的hash中获取根据key获取value
hmget(name, keys, *args)
1
2
3
4
5
6
7
8
9
10
11
# 在name对应的hash中获取多个key的值
# 参数:
# name,reids对应的name
# keys,要获取key集合,如:['k1', 'k2', 'k3']
# *args,要获取的key,如:k1,k2,k3
# 如:
# r.mget('xx', ['k1', 'k2'])
# 或
# print r.hmget('xx', 'k1', 'k2')
hgetall(name)
1
获取name对应 hash 的所有键值
hlen(name)
1
# 获取name对应的hash中键值对的个数
hkeys(name)
1
# 获取name对应的hash中所有的key的值
hvals(name)
1
# 获取name对应的hash中所有的value的值
hexists(name, key)
1
# 检查name对应的hash是否存在当前传入的key
hdel(name,*keys)
1
# 将name对应的hash中指定key的键值对删除
hincrby(name, key, amount=1)
1
2
3
4
5
# 自增name对应的hash中的指定key的值,不存在则创建key=amount
# 参数:
# name,redis中的name
# key, hash对应的key
# amount,自增数(整数)
hincrbyfloat(name, key, amount=1.0)
1
2
3
4
5
6
7
8
# 自增name对应的hash中的指定key的值,不存在则创建key=amount
# 参数:
# name,redis中的name
# key, hash对应的key
# amount,自增数(浮点数)
# 自增name对应的hash中的指定key的值,不存在则创建key=amount
hscan(name, cursor=0, match=None, count=None)
Start a full hash scan with:
HSCAN myhash 0
Start a hash scan with fields matching a pattern with:
HSCAN myhash 0 MATCH order_*
Start a hash scan with fields matching a pattern and forcing the scan command to do more scanning with:
HSCAN myhash 0 MATCH order_* COUNT 1000
1
2
3
4
5
6
7
8
9
10
11
12
13
# 增量式迭代获取,对于数据大的数据非常有用,hscan可以实现分片的获取数据,并非一次性将数据全部获取完,从而放置内存被撑爆
# 参数:
# name,redis的name
# cursor,游标(基于游标分批取获取数据)
# match,匹配指定key,默认None 表示所有的key
# count,每次分片最少获取个数,默认None表示采用Redis的默认分片个数
# 如:
# 第一次:cursor1, data1 = r.hscan('xx', cursor=0, match=None, count=None)
# 第二次:cursor2, data1 = r.hscan('xx', cursor=cursor1, match=None, count=None)
# ...
# 直到返回值cursor的值为0时,表示数据已经通过分片获取完毕
hscan_iter(name, match=None, count=None)
1
2
3
4
5
6
7
8
9
# 利用yield封装hscan创建生成器,实现分批去redis中获取数据
# 参数:
# match,匹配指定key,默认None 表示所有的key
# count,每次分片最少获取个数,默认None表示采用Redis的默认分片个数
# 如:
# for item in r.hscan_iter('xx'):
# print item
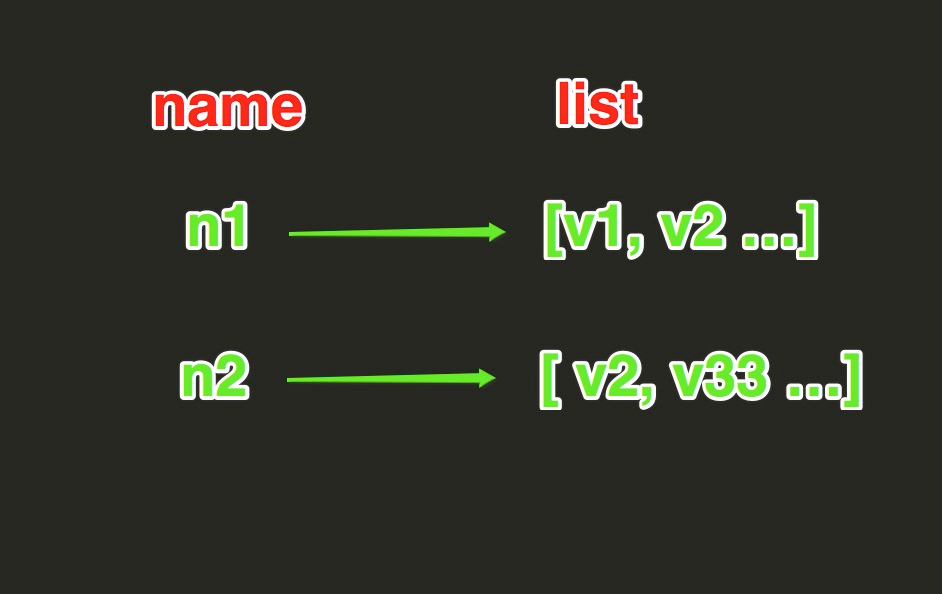
3. list
List操作,redis中的List在在内存中按照一个name对应一个List来存储。如图:
lpush(name,values)
1
2
3
4
5
6
7
8
# 在name对应的list中添加元素,每个新的元素都添加到列表的最左边
# 如:
# r.lpush('oo', 11,22,33)
# 保存顺序为: 33,22,11
# 扩展:
# rpush(name, values) 表示从右向左操作
lpushx(name,value)
1
2
3
4
# 在name对应的list中添加元素,只有name已经存在时,值添加到列表的最左边
# 更多:
# rpushx(name, value) 表示从右向左操作
llen(name)
1
# name对应的list元素的个数
linsert(name, where, refvalue, value))
1
2
3
4
5
6
7
# 在name对应的列表的某一个值前或后插入一个新值
# 参数:
# name,redis的name
# where,BEFORE或AFTER
# refvalue,标杆值,即:在它前后插入数据
# value,要插入的数据
r.lset(name, index, value)
1
2
3
4
5
6
# 对name对应的list中的某一个索引位置重新赋值
# 参数:
# name,redis的name
# index,list的索引位置
# value,要设置的值
r.lrem(name, value, num)
1
2
3
4
5
6
7
8
# 在name对应的list中删除指定的值
# 参数:
# name,redis的name
# value,要删除的值
# num, num=0,删除列表中所有的指定值;
# num=2,从前到后,删除2个;
# num=-2,从后向前,删除2个
lpop(name)
1
2
3
4
# 在name对应的列表的左侧获取第一个元素并在列表中移除,返回值则是第一个元素
# 更多:
# rpop(name) 表示从右向左操作
lindex(name, index)
1
在name对应的列表中根据索引获取列表元素
lrange(name, start, end)
1
2
3
4
5
# 在name对应的列表分片获取数据
# 参数:
# name,redis的name
# start,索引的起始位置
# end,索引结束位置
ltrim(name, start, end)
1
2
3
4
5
# 在name对应的列表中移除没有在start-end索引之间的值
# 参数:
# name,redis的name
# start,索引的起始位置
# end,索引结束位置
rpoplpush(src, dst)
1
2
3
4
# 从一个列表取出最右边的元素,同时将其添加至另一个列表的最左边
# 参数:
# src,要取数据的列表的name
# dst,要添加数据的列表的name
blpop(keys, timeout)
1
2
3
4
5
6
7
8
# 将多个列表排列,按照从左到右去pop对应列表的元素
# 参数:
# keys,redis的name的集合
# timeout,超时时间,当元素所有列表的元素获取完之后,阻塞等待列表内有数据的时间(秒), 0 表示永远阻塞
# 更多:
# r.brpop(keys, timeout),从右向左获取数据
brpoplpush(src, dst, timeout=0)
1
2
3
4
5
6
# 从一个列表的右侧移除一个元素并将其添加到另一个列表的左侧
# 参数:
# src,取出并要移除元素的列表对应的name
# dst,要插入元素的列表对应的name
# timeout,当src对应的列表中没有数据时,阻塞等待其有数据的超时时间(秒),0 表示永远阻塞
4.set集合操作
Set操作,Set集合就是不允许重复的列表
sadd(name,values)
1
# name对应的集合中添加元素scard(name)
1
获取name对应的集合中元素个数sdiff(keys, *args)
1
在第一个name对应的集合中且不在其他name对应的集合的元素集合sdiffstore(dest, keys, *args)
1
# 获取第一个name对应的集合中且不在其他name对应的集合,再将其新加入到dest对应的集合中sinter(keys, *args)
1
# 获取多一个name对应集合的并集sinterstore(dest, keys, *args)
1
# 获取多一个name对应集合的并集,再讲其加入到dest对应的集合中sismember(name, value)
1
# 检查value是否是name对应的集合的成员smembers(name)
1
# 获取name对应的集合的所有成员smove(src, dst, value)
1
# 将某个成员从一个集合中移动到另外一个集合spop(name)
1
# 从集合的右侧(尾部)移除一个成员,并将其返回srandmember(name, numbers)
1
# 从name对应的集合中随机获取 numbers 个元素srem(name, values)
1
# 在name对应的集合中删除某些值sunion(keys, *args)
1
# 获取多一个name对应的集合的并集sunionstore(dest,keys, *args)
1
# 获取多一个name对应的集合的并集,并将结果保存到dest对应的集合中sscan(name, cursor=0, match=None, count=None)
sscan_iter(name, match=None, count=None)1
# 同字符串的操作,用于增量迭代分批获取元素,避免内存消耗太大
有序集合,在集合的基础上,为每元素排序;元素的排序需要根据另外一个值来进行比较,所以,对于有序集合,每一个元素有两个值,即:值和分数,分数专门用来做排序。
zadd(name, *args, **kwargs)
1
2
3
4
5
# 在name对应的有序集合中添加元素
# 如:
# zadd('zz', 'n1', 1, 'n2', 2)
# 或
# zadd('zz', n1=11, n2=22)zcard(name)
1
# 获取name对应的有序集合元素的数量zcount(name, min, max)
1
# 获取name对应的有序集合中分数 在 [min,max] 之间的个数zincrby(name, value, amount)
1
# 自增name对应的有序集合的 name 对应的分数r.zrange( name, start, end, desc=False, withscores=False, score_cast_func=float)
1
2
3
4
5
6
7
8
9
10
11
12
13
14
15
16
17
18
# 按照索引范围获取name对应的有序集合的元素
# 参数:
# name,redis的name
# start,有序集合索引起始位置(非分数)
# end,有序集合索引结束位置(非分数)
# desc,排序规则,默认按照分数从小到大排序
# withscores,是否获取元素的分数,默认只获取元素的值
# score_cast_func,对分数进行数据转换的函数
# 更多:
# 从大到小排序
# zrevrange(name, start, end, withscores=False, score_cast_func=float)
# 按照分数范围获取name对应的有序集合的元素
# zrangebyscore(name, min, max, start=None, num=None, withscores=False, score_cast_func=float)
# 从大到小排序
# zrevrangebyscore(name, max, min, start=None, num=None, withscores=False, score_cast_func=float)zrank(name, value)
1
2
3
4
# 获取某个值在 name对应的有序集合中的排行(从 0 开始)
# 更多:
# zrevrank(name, value),从大到小排序
zrem(name, values)
1
2
3
# 删除name对应的有序集合中值是values的成员
# 如:zrem('zz', ['s1', 's2'])
zremrangebyrank(name, min, max)
1
# 根据排行范围删除
zremrangebyscore(name, min, max)
1
# 根据分数范围删除
zscore(name, value)
1
# 获取name对应有序集合中 value 对应的分数
zinterstore(dest, keys, aggregate=None)
1
2
# 获取两个有序集合的交集,如果遇到相同值不同分数,则按照aggregate进行操作
# aggregate的值为: SUM MIN MAX
zunionstore(dest, keys, aggregate=None)
1
2
# 获取两个有序集合的并集,如果遇到相同值不同分数,则按照aggregate进行操作
# aggregate的值为: SUM MIN MAX
zscan(name, cursor=0, match=None, count=None, score_cast_func=float)
zscan_iter(name, match=None, count=None,score_cast_func=float)
1
# 同字符串相似,相较于字符串新增score_cast_func,用来对分数进行操作
其他常用操作
delete(*names)
1
# 根据删除redis中的任意数据类型exists(name)
1
# 检测redis的name是否存在keys(pattern='*')
1
2
3
4
5
6
7
# 根据模型获取redis的name
# 更多:
# KEYS * 匹配数据库中所有 key 。
# KEYS h?llo 匹配 hello , hallo 和 hxllo 等。
# KEYS h*llo 匹配 hllo 和 heeeeello 等。
# KEYS h[ae]llo 匹配 hello 和 hallo ,但不匹配 hilloexpire(name ,time)
1
# 为某个redis的某个name设置超时时间rename(src, dst)
1
# 对redis的name重命名为move(name, db))
1
# 将redis的某个值移动到指定的db下randomkey()
1
# 随机获取一个redis的name(不删除)type(name)
1
# 获取name对应值的类型scan(cursor=0, match=None, count=None)
scan_iter(match=None, count=None)1
# 同字符串操作,用于增量迭代获取key
管道
redis-py默认在执行每次请求都会创建(连接池申请连接)和断开(归还连接池)一次连接操作,如果想要在一次请求中指定多个命令,则可以使用pipline实现一次请求指定多个命令,并且默认情况下一次pipline 是原子性操作。
1
2
3
4
5
6
7
8
9
10
11
12
13
14
15
16
#!/usr/bin/env python
# -*- coding:utf-8 -*-
import redis
pool = redis.ConnectionPool(host = '10.211.55.4' , port = 6379 )
r = redis.Redis(connection_pool = pool)
# pipe = r.pipeline(transaction=False)
pipe = r.pipeline(transaction = True )
pipe. set ( 'name' , 'alex' )
pipe. set ( 'role' , 'sb' )
pipe.execute()
发布订阅
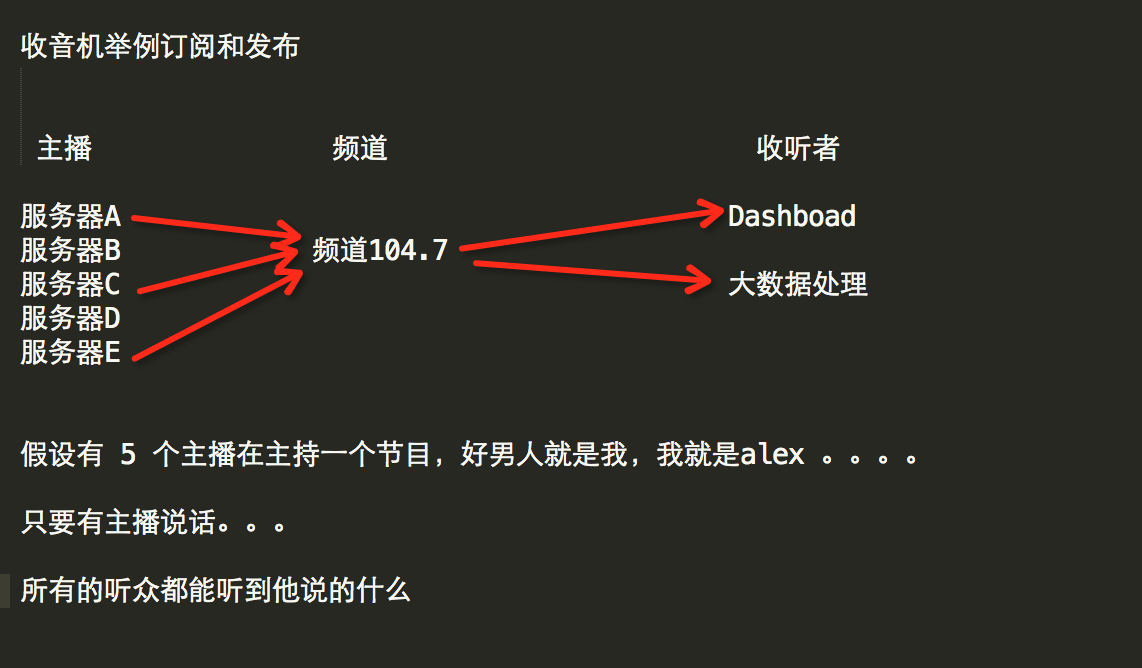
发布者:服务器
订阅者:Dashboad和数据处理
Demo如下:


import redis


class RedisHelper:

    def __init__(self):
        self.__conn = redis.Redis(host='10.211.55.4')
        self.chan_sub = 'fm104.5'
        self.chan_pub = 'fm104.5'

    def public(self, msg):
        self.__conn.publish(self.chan_pub, msg)
        return True

    def subscribe(self):
        pub = self.__conn.pubsub()
        pub.subscribe(self.chan_sub)
        pub.parse_response()
        return pub
View Code
订阅者:
1
2
3
4
5
6
7
8
9
10
11
#!/usr/bin/env python
# -*- coding:utf-8 -*-
from monitor.RedisHelper import RedisHelper
obj = RedisHelper()
redis_sub = obj.subscribe()
while True :
msg = redis_sub.parse_response()
print msg
发布者:
1
2
3
4
5
6
7
#!/usr/bin/env python
# -*- coding:utf-8 -*-
from monitor.RedisHelper import RedisHelper
obj = RedisHelper()
obj.public( 'hello' )
更多参见:https://github.com/andymccurdy/redis-py/
什么时候用关系型数据库,什么时候 用NoSQL?
Go for legacy relational databases (RDBMS) when:
- The data is well structured, and lends itself to a tabular arrangement (rows and columns) in a relational database. Typical examples: bank account info, customer order info, customer info, employee info, department info etc etc.
- Another aspect of the above point is : schema oriented data model. When you design a data model (tables, relationships etc) for a potential use of RDBMS, you need to come up with a well defined schema: there will be these many tables, each table having a known set of columns that store data in known typed format (CHAR, NUMBER, BLOB etc).
- Very Important: Consider whether the data is transactional in nature. In other words, whether the data will be stored, accessed and updated in the context of transactions providing the ACID semantics or is it okay to compromise some/all of these properties.
- Correctness is also important and any compromise is _unacceptable_. This stems from the fact that in most NoSQL databases, consistency is traded off in favor of performance and scalability (points on NoSQL databases are elaborated below).
- There is no strong/compelling need for a scale out architecture ; a database that linearly scales out (horizontal scaling) to multiple nodes in a cluster.
- The use case is not for “high speed data ingestion”.
- If the client applications are expecting to quickly stream large amounts of data in/out of the database then relational database may not be a good choice since they are not really designed for scaling write heavy workloads.
- In order to achieve ACID properties, lots of additional background work is done especially in writer (INSERT, UPDATE, DELETE) code paths. This definitely affects performance.
- The use case is not for “storing enormous amounts of data in the range of petabytes”.
Go for NoSQL databases when:
- There is no fixed (and predetermined) schema that data fits in:
- Scalability, Performance (high throughput and low operation latency), Continuous Availability are very important requirements to be met by the underlying architecture of database.
- Good choice for “High Speed Data Ingestion”. Such applications (for example IoT style) which generate millions of data points in a second and need a database capable of providing extreme write scalability.
- The inherent ability to horizontally scale allows to store large amounts of data across commodity servers in the cluster. They usually use low cost resources, and are able to linearly add compute and storage power as the demand grows.
source page https://www.quora.com/When-should-you-use-NoSQL-vs-regular-RDBMS
附赠redis性能测试
准备环境:
因为找不到可用的1000M网络机器,使用一根直通线将两台笔记本连起来组成1000M Ethernet网。没错,是直通线现在网卡都能自适应交叉线、直通线,速度不受影响,用了一段时间机器也没出问题。
服务端:T420 i5-2520M(2.5G)/8G ubuntu 11.10
客户端:Acer i5-2430M(2.4G)/4G mint 11
redis版本:2.6.9
测试脚本:./redis-benchmark -h xx -p xx -t set -q -r 1000 -l -d 20
长度
速度/sec
带宽(MByte/s) 发送+接收
CPU
CPU Detail
20Byte
17w
24M+12M
98.00%
Cpu0 : 21.0%us, 40.7%sy, 0.0%ni, 4.3%id, 0.0%wa, 0.0%hi, 34.0%si, 0.0%st
100Byte
17w
37M+12M
97.00%
Cpu0 : 20.3%us, 37.9%sy, 0.0%ni, 7.0%id, 0.0%wa, 0.0%hi, 34.9%si, 0.0%st
512Byte
12w
76M+9M
87.00%
Cpu0 : 20.9%us, 33.2%sy, 0.0%ni, 25.6%id, 0.0%wa, 0.0%hi, 20.3%si, 0.0%st
1K
9w
94M+8M
81.00%
Cpu0 : 19.9%us, 30.2%sy, 0.0%ni, 34.2%id, 0.0%wa, 0.0%hi, 15.6%si, 0.0%st
2K
5w
105M+6M
77.00%
Cpu0 : 18.0%us, 32.0%sy, 0.0%ni, 34.7%id, 0.0%wa, 0.0%hi, 15.3%si, 0.0%st
5K
2.2w
119M+3.2M
77.00%
Cpu0 : 22.5%us, 32.8%sy, 0.0%ni, 32.8%id, 0.0%wa, 0.0%hi, 11.9%si, 0.0%st
10K
1.1w
119M+1.7M
70.00%
Cpu0 : 18.2%us, 29.8%sy, 0.0%ni, 42.7%id, 0.0%wa, 0.0%hi, 9.3%si, 0.0%st
20K
0.57w
120M+1M
58.00%
Cpu0 : 17.8%us, 26.4%sy, 0.0%ni, 46.2%id, 0.0%wa, 0.0%hi, 9.6%si, 0.0%st
value 在1K以上时,1000M网卡轻松的被跑慢,而且redis-server cpu连一个核心都没占用到,可见redis高效,redis的服务也不需要太高配置,瓶颈在网卡速度。
整理看redis的us都在20%左右,用户层代码资源占用比例都很小。