Android 3种数据保存(SharedPreferences存储 内部文件存储 数据库存储)
第一步:在xml文件上界面布局
这边采用LinearLayour布局,添加3个按钮来实现界面的跳转,代码如下:
<?xml version="1.0" encoding="utf-8"?>
<LinearLayout xmlns:android="http://schemas.android.com/apk/res/android"
    xmlns:tools="http://schemas.android.com/tools"
    android:layout_width="match_parent"
    android:layout_height="match_parent"
    android:orientation="vertical"
    tools:context=".MainActivity">
    <Button
        android:id="@+id/b1"
        android:layout_marginTop="50dp"
        android:layout_width="match_parent"
        android:layout_height="wrap_content"
        android:text="内置存储"/>

    <Button
        android:id="@+id/b6"
        android:layout_marginTop="50dp"
        android:layout_width="match_parent"
        android:layout_height="wrap_content"
        android:textAllCaps="false"
        android:text="SharedPreferences存储"/>

    <Button
        android:id="@+id/b7"
        android:layout_marginTop="50dp"
        android:layout_width="match_parent"
        android:layout_height="wrap_content"
        android:textAllCaps="false"
        android:text="SQLite存储"/>

</LinearLayout>
界面截图:
第二步:在Mainactivity.java完成功能的实现
找到ID并绑定 3个按钮的监听事件(界面的跳转)
        b1.setOnClickListener(new View.OnClickListener() {


            @Override
            public void onClick(View view) {


                Intent intent=new Intent(MainActivity.this,Main2Activity.class);
                startActivity(intent);
            }
        });
        b6.setOnClickListener(new View.OnClickListener() {


            @Override
            public void onClick(View view) {


                Intent intent=new Intent(MainActivity.this,Main3Activity.class);
                startActivity(intent);
            }
        });
        b7.setOnClickListener(new View.OnClickListener() {


            @Override
            public void onClick(View view) {


                Intent intent=new Intent(MainActivity.this,Main4Activity.class);
                startActivity(intent);
            }
        });
第三步:各功能的实现
①、内部文件存储
创建一个xml文件(activity_main2)和一个java文件(Main2Activity),来实现内部文件存储界面的布局和功能的实现。
第一:这边的布局采用LinearLayout布局,首先添加一个EditText控件来输入我们要保存的信息,在添加3个按钮的实现不同的功能,点击第一个按钮把当前输入的信息保存到手机内部文件夹上,第二个按钮打开当前文件夹显示保存的信息,第三个按钮删除手机内部文件夹下所保存的文件,代码如下:
<?xml version="1.0" encoding="utf-8"?>
<LinearLayout xmlns:android="http://schemas.android.com/apk/res/android"
    xmlns:app="http://schemas.android.com/apk/res-auto"
    xmlns:tools="http://schemas.android.com/tools"
    android:layout_width="match_parent"
    android:layout_height="match_parent"
    android:orientation="vertical"
    tools:context=".Main2Activity">
    <EditText
        android:id="@+id/e1"
        android:layout_marginTop="50dp"
        android:layout_width="match_parent"
        android:layout_height="wrap_content"
        android:textSize="20dp" />
    <Button
        android:id="@+id/b2"
        android:layout_width="match_parent"
        android:layout_height="wrap_content"
        android:layout_marginTop="30dp"
        android:text="保存信息"/>
    <Button
        android:id="@+id/b3"
        android:layout_width="match_parent"
        android:layout_height="wrap_content"
        android:text="获取信息"/>
    <Button
        android:id="@+id/b4"
        android:layout_width="match_parent"
        android:layout_height="wrap_content"
        android:text="删除文件"/>
    <TextView
        android:id="@+id/t1"
        android:layout_width="match_parent"
        android:textSize="30sp"
        android:layout_marginTop="20dp"
        android:text=""
        android:gravity="center"
        android:layout_height="wrap_content"/>

</LinearLayout>
界面截图:
第二:内部文件存储功能的实现
- 获取到当前的id并绑定

- 3个按钮的监听事件
按钮1(b2)保存信息
        b2.setOnClickListener(new View.OnClickListener() {


            @Override
            public void onClick(View view) {


                try {


                }
                catch (Exception e)
                {


                    e.printStackTrace();
                }
                }

        });


        b2.setOnClickListener(new View.OnClickListener() {


            @Override
            public void onClick(View view) {


                try {


                    OutputStream outputStream=openFileOutput("myfile",MODE_PRIVATE);
                    //MODE_PRIVATE,覆盖原有的文件;MODE_APPEND,内容追加到原来的文件上。
                    if(e1.getText().toString().equals(""))
                    {


                        Toast.makeText(Main2Activity.this,"当前为空,请输入信息",Toast.LENGTH_SHORT).show();
                        return;
                    }
                        outputStream.write(e1.getText().toString().getBytes());
                        outputStream.flush();;
                        outputStream.close();
                        Toast.makeText(Main2Activity.this,"保存信息成功",Toast.LENGTH_SHORT).show();
                }
                catch (Exception e)
                {


                    e.printStackTrace();
                    Toast.makeText(Main2Activity.this,"保存信息成功失败",Toast.LENGTH_SHORT).show();
                }
                }

        });
按钮2(b3)获取信息
        b3.setOnClickListener(new View.OnClickListener() {


            @Override
            public void onClick(View view) {


                try {


                }
                catch (Exception e)
                {


                    e.printStackTrace();
                }
            }
        });


        b3.setOnClickListener(new View.OnClickListener() {


            @Override
            public void onClick(View view) {


                StringBuffer stringBuffer=new StringBuffer();
                try {


                   InputStream inputStream=openFileInput("myfile");
                   BufferedReader bufferedReader=new BufferedReader(new InputStreamReader(inputStream));
                   String cout=null;
                   while((cout=bufferedReader.readLine())!=null)
                   {


                       stringBuffer.append(cout);
                   }
                   Toast.makeText(Main2Activity.this,"获取信息成功",Toast.LENGTH_SHORT).show();
                   t1.setText(stringBuffer.toString());
                   bufferedReader.close();
                }
                catch (Exception e)
                {


                    e.printStackTrace();
                    Toast.makeText(Main2Activity.this,"获取信息失败",Toast.LENGTH_SHORT).show();
                }
            }
        });
按钮3(b4)删除文件
 b4.setOnClickListener(new View.OnClickListener() {


            @Override
            public void onClick(View view) {


                boolean b=deleteFile("myfile");
                if(b==true)
                {


                    Toast.makeText(getApplicationContext(), "删除文件成功", Toast.LENGTH_SHORT).show();
                }
                else
                {


                    Toast.makeText(getApplicationContext(), "删除文件失败", Toast.LENGTH_SHORT).show();
                }
            }
        });
界面截图:
②、SharedPreferences存储
创建一个xml文件(activity_main3)和一个java文件(Main3Activity),来实现内部文件存储界面的布局和功能的实现。
第一:这边的布局采用LinearLayout布局,首先添加两个EditText控件来输入账号和密码,在添加3个按钮的实现不同的功能,点击第一个按钮注册账号,第二个按钮重新输入信息,第三个按钮登陆账号,代码如下:
<?xml version="1.0" encoding="utf-8"?>
<LinearLayout xmlns:android="http://schemas.android.com/apk/res/android"
    xmlns:app="http://schemas.android.com/apk/res-auto"
    xmlns:tools="http://schemas.android.com/tools"
    android:layout_width="match_parent"
    android:layout_height="match_parent"
    android:orientation="vertical"
    android:gravity="center"
    tools:context=".Main3Activity">
    <LinearLayout
        android:layout_width="match_parent"
        android:layout_height="wrap_content"
        android:orientation="horizontal">
    <TextView
        android:layout_width="wrap_content"
        android:layout_height="wrap_content"
        android:padding="20dp"
        android:textSize="20sp"
        android:text="用户名:"/>
        <EditText
            android:id="@+id/username"
            android:layout_width="match_parent"
            android:layout_height="wrap_content"
            android:hint="请输入账号"
            android:singleLine="true" />
    </LinearLayout>
    <LinearLayout
        android:layout_width="match_parent"
        android:layout_height="wrap_content"
        android:padding="20dp"
        android:orientation="horizontal">
        <TextView
            android:layout_width="wrap_content"
            android:layout_height="wrap_content"
            android:padding="20dp"
            android:textSize="20sp"
            android:text="密码:"/>
        <EditText
            android:id="@+id/password"
            android:layout_width="match_parent"
            android:layout_height="wrap_content"
            android:hint="请输入密码"
            android:inputType="textPassword"
            android:singleLine="true" />
    </LinearLayout>

<LinearLayout
    android:layout_width="match_parent"
    android:layout_height="wrap_content"
    android:gravity="center"
    android:orientation="horizontal">
    <Button
        android:id="@+id/login"
        android:layout_width="0dp"
        android:layout_weight="1"
        android:layout_gravity="center"
        android:layout_height="wrap_content"
        android:text="注册"/>
    <Button
        android:id="@+id/delect"
        android:layout_width="0dp"
        android:layout_weight="1"
        android:layout_height="wrap_content"
        android:layout_marginLeft="20dp"
        android:text="重新输入"/>

</LinearLayout>
    <Button
        android:id="@+id/see"
        android:layout_width="100dp"
        android:layout_marginTop="20dp"
        android:layout_height="wrap_content"
        android:text="登陆"/>
</LinearLayout>
界面截图:
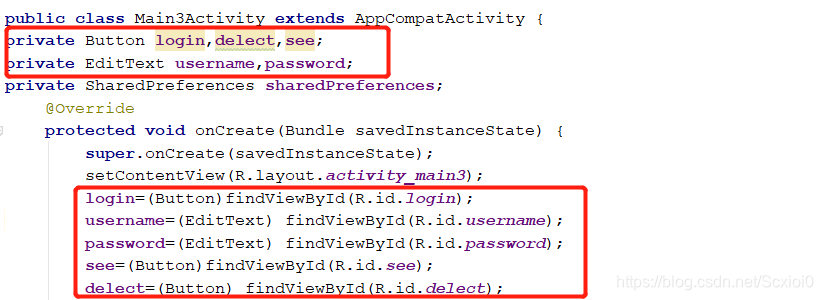
第二:SharedPreferences存储功能的实现
获取到当前的id并绑定

定义一个SharedPreferences

private SharedPreferences sharedPreferences;3个按钮的监听事件
按钮1(login)注册账号
        login.setOnClickListener(new View.OnClickListener() {


            @Override
            public void onClick(View view) {


                if(username.getText().toString().equals("")||password.getText().toString().equals(""))
                {


                    Toast.makeText(Main3Activity.this,"不能为空!",Toast.LENGTH_SHORT).show();
                    return;
                }
                sharedPreferences=getSharedPreferences("data",Context.MODE_PRIVATE);
                SharedPreferences.Editor editor=sharedPreferences.edit();
                editor.putString("username",username.getText().toString());
                editor.putString("password",password.getText().toString());
                editor.apply();
                Toast.makeText(Main3Activity.this,"注册成功!",Toast.LENGTH_SHORT).show();
            }
        });
按钮2(delect)删除文件,重新输入
        delect.setOnClickListener(new View.OnClickListener() {


            @Override
            public void onClick(View view) {


                SharedPreferences.Editor editor=sharedPreferences.edit();
                editor.clear();
                editor.apply();
                username.setText("");
                password.setText("");
                Toast.makeText(Main3Activity.this,"重新输入",Toast.LENGTH_SHORT).show();
            }
        });
按钮3(see)跳转到登陆账号界面
创建一个xml文件(activity_main5)和一个java文件(Main5Activity),来实现登陆账号功能
第一:这边的布局采用LinearLayout布局,首先添加两个EditText控件来输入账号和密码,在添加1个按钮的实现账号登陆,代码如下:
<?xml version="1.0" encoding="utf-8"?>
<LinearLayout xmlns:android="http://schemas.android.com/apk/res/android"
    xmlns:app="http://schemas.android.com/apk/res-auto"
    xmlns:tools="http://schemas.android.com/tools"
    android:layout_width="match_parent"
    android:layout_height="match_parent"
    android:orientation="vertical"
    android:gravity="center"
    tools:context=".Main5Activity">
    <LinearLayout
        android:layout_width="match_parent"
        android:layout_height="wrap_content"
        android:padding="20dp"
        android:orientation="horizontal">
    <TextView
        android:layout_width="wrap_content"
        android:layout_height="wrap_content"
        android:textSize="20sp"
        android:text="账号:"/>
        <EditText
            android:id="@+id/zh1"
            android:layout_width="match_parent"
            android:layout_height="wrap_content"
            android:textSize="20sp"
            android:text=""/>
    </LinearLayout>
    <LinearLayout
        android:layout_width="match_parent"
        android:layout_height="wrap_content"
        android:padding="20dp"
        android:orientation="horizontal">
        <TextView
            android:layout_width="wrap_content"
            android:layout_height="wrap_content"
            android:textSize="20sp"
            android:text="密码:"/>
        <EditText
            android:id="@+id/mm1"
            android:layout_width="match_parent"
            android:layout_height="wrap_content"
            android:textSize="20sp"
            android:text=""/>
    </LinearLayout>
    <Button
        android:id="@+id/success"
        android:layout_width="100dp"
        android:layout_height="wrap_content"
        android:text="确认"/>
</LinearLayout>
界面截图:
第二:功能实现(Main5Activity)
获取到当前的id并绑定
获取注册过的账号和密码
按钮的监听事件(判断账号密码是否为空和账号密码是否存在)
success.setOnClickListener(new View.OnClickListener() {


            @Override
            public void onClick(View view) {


                if(zh1.getText().toString().equals("")||mm1.getText().toString().equals(""))
                {


                    Toast.makeText(Main5Activity.this,"不能为空!",Toast.LENGTH_SHORT).show();
                    return;
                }
                else if(zh1.getText().toString().equals(userzh)&&mm1.getText().toString().equals(usermm))
                {


                    Toast.makeText(Main5Activity.this,"登陆成功",Toast.LENGTH_SHORT).show();
                }
                else
                {


                    Toast.makeText(Main5Activity.this,"账号或密码错误",Toast.LENGTH_SHORT).show();
                }

            }
        });
界面截图:
③、SQLite存储
创建一个xml文件(activity_main4)和一个java文件(Main4Activity),来实现SQLite存储界面的布局和功能的实现。
第一:这边的布局采用LinearLayout布局,首先添加两个EditText控件来输入账号和密码,在添加2个按钮的实现不同的功能,点击第一个按钮注册账号,第二个按钮重新输入,之后在定义两个TextView来显示注册的账号密码,代码如下:
<?xml version="1.0" encoding="utf-8"?>
<LinearLayout xmlns:android="http://schemas.android.com/apk/res/android"
    xmlns:app="http://schemas.android.com/apk/res-auto"
    xmlns:tools="http://schemas.android.com/tools"
    android:layout_width="match_parent"
    android:layout_height="match_parent"
    android:orientation="vertical"
    android:gravity="center"
    tools:context=".Main4Activity">
    <LinearLayout
        android:layout_width="match_parent"
        android:layout_height="wrap_content"
        android:orientation="horizontal">
        <TextView
            android:layout_width="wrap_content"
            android:layout_height="wrap_content"
            android:padding="20dp"
            android:textSize="20sp"
            android:text="用户名:"/>
        <EditText
            android:id="@+id/usernames"
            android:layout_width="match_parent"
            android:layout_height="wrap_content"
            android:hint="请输入账号"
            android:singleLine="true" />
    </LinearLayout>
    <LinearLayout
        android:layout_width="match_parent"
        android:layout_height="wrap_content"
        android:padding="20dp"
        android:orientation="horizontal">
        <TextView
            android:layout_width="wrap_content"
            android:layout_height="wrap_content"
            android:padding="20dp"
            android:textSize="20sp"
            android:text="密码:"/>
        <EditText
            android:id="@+id/passwords"
            android:layout_width="match_parent"
            android:layout_height="wrap_content"
            android:hint="请输入密码"
            android:inputType="textPassword"
            android:singleLine="true" />
    </LinearLayout>

    <LinearLayout
        android:layout_width="match_parent"
        android:layout_height="wrap_content"
        android:gravity="center"
        android:orientation="horizontal">
        <Button
            android:id="@+id/register"
            android:layout_width="100dp"
            android:layout_gravity="center"
            android:layout_height="wrap_content"
            android:text="注册"/>
        <Button
            android:id="@+id/again"
            android:layout_width="100dp"
            android:layout_height="wrap_content"
            android:layout_marginLeft="20dp"
            android:text="重新输入"/>
    </LinearLayout>
    <LinearLayout
        android:layout_width="match_parent"
        android:layout_height="wrap_content"
        android:gravity="center"
        android:layout_marginTop="50dp"
        android:orientation="horizontal">

        <TextView
            android:layout_width="wrap_content"
            android:layout_height="wrap_content"
            android:textSize="20sp"
            android:text="账号:"/>
        <TextView
            android:id="@+id/zh"
            android:layout_width="wrap_content"
            android:layout_height="wrap_content"
            android:textSize="20sp"
            android:text=""/>
        <TextView

            android:layout_width="wrap_content"
            android:layout_height="wrap_content"
            android:layout_marginLeft="50dp"
            android:textSize="20sp"
            android:text="密码:"/>
        <TextView
            android:id="@+id/mm"
            android:layout_width="wrap_content"
            android:layout_height="wrap_content"
            android:textSize="20sp"
            android:text=""/>
    </LinearLayout>

</LinearLayout>
界面截图:
第二:创建数据库文件(MyDateBase)
public class MyDateBase  {


}
继承SQLiteOpenHelper
public class MyDateBase extends SQLiteOpenHelper {


}
鼠标移至SQLiteOpenHelper按下Alt+Enter,选择第一个,之后按下ok

鼠标移至SQLiteOpenHelper按下Alt+Enter,选择第一个,之后按下ok
创建一个命名为first的数据表(id,username,password)
private String createAppTable="create table first(id integer primary key autoincrement,username varchar(20),password varchar(20))";
在onCreate函数中执行SQL语句
sqLiteDatabase.execSQL(createAppTable);
sqLiteDatabase.execSQL("insert into first(id,username,password) values(?,?,?)",new String[]{

   "1","",""});
System.out.println("创建数据库成功");
根据Id找到账号和密码并更新账号和密码,在倒数第二个花括号添加类
 public String getusernameById(SQLiteDatabase db,String id)//根据Id找到账号
    {


        Cursor cursor=db.rawQuery("select * from first where id=?",new String[]{

   id});
        if(cursor.moveToNext())
        {


            return cursor.getString(cursor.getColumnIndex("username"));
        }
        return "";
    }
    public void updateusername(SQLiteDatabase db,String id,String username)//更新账号
    {


        db.execSQL("update first set username=? where id=?",new String[]{

   username,id});
    }

    public String getpasswordById(SQLiteDatabase db,String id)//根据Id找到密码
    {


        Cursor cursor=db.rawQuery("select * from first where id=?",new String[]{

   id});
        if(cursor.moveToNext())
        {


            return cursor.getString(cursor.getColumnIndex("password"));
        }
        return "";
    }
    public void updatepassword(SQLiteDatabase db,String id,String password)//更新密码
    {


        db.execSQL("update first set password=? where id=?",new String[]{

   password,id});
    }
    public  void delectdb(SQLiteDatabase db,String id)//删除数据表中的信息
    {


        db.execSQL("delete from first where id=?",new String[]{

   id});
    }
第三:返回Main4Activity文件,实现功能的实现
获取到当前的id并绑定
并添加SQLiteDatabase和MyDateBase
访问数据表
更新用户名和密码
public void UpdateUserName()//更新账号
    {


        myDateBase.updateusername(db,"1",usernames.getText().toString());
    }
public void UpdatePassWord()//更新密码
    {


        myDateBase.updatepassword(db,"1",passwords.getText().toString());
    }
按钮的监听事件
        register.setOnClickListener(new View.OnClickListener() {


            @Override
            public void onClick(View view) {


                if(passwords.getText().toString().equals("")||usernames.getText().toString().equals(""))
                {


                    Toast.makeText(Main4Activity.this,"注册失败,不能为空!",Toast.LENGTH_SHORT).show();
                    return;
                }
                UpdateUserName();
                UpdatePassWord();
                Toast.makeText(Main4Activity.this,"注册成功!",Toast.LENGTH_SHORT).show();
                zh.setText(usernames.getText().toString());
                mm.setText(passwords.getText().toString());
            }
        });
        again.setOnClickListener(new View.OnClickListener() {


            @Override
            public void onClick(View view) {


                usernames.setText("");
                passwords.setText("");
            }
        });
获取账号和密码并显示
    public void getUserName() {

   //获取用户名
        String user=myDateBase.getusernameById(db, "1");
        zh.setText(user);
    }
    public void getPassword() {

   //获取密码
        String pass=myDateBase.getpasswordById(db, "1");
        mm.setText(pass);
    }

删除数据表的信息
public void DelectDb()
    {


        myDateBase.delectdb(db,"1");
    }
本项目的源代码链接:


