开启重试在某些情况下是有问题的,比如当压力过大,一个实例停止响应时,路由将流量转到另一个实例,很有可能导致最终所有的实例全被压垮。
说到底,断路器的其中一个作用就是防止故障或者压力扩散。用了retry,断路器就只有在该服务的所有实例都无法运作的情况下才能起作用。这种时候,断路器的形式更像是提供一种友好的错误信息,或者假装服务正常运行的假象给使用者。
不用retry,仅使用负载均衡和熔断,就必须考虑到是否能够接受单个服务实例关闭和eureka刷新服务列表之间带来的短时间的熔断。如果可以接受,就无需使用retry。
#retry
#该参数用来开启重试机制 。只设置这个开关,确定好用。 TODO : 了解下实现原理
spring.cloud.loadbalancer.retry.enabled=true
#断路器的超时时间,断路器的超时时间需要大于ribbon的超时时间,不然不会触发重试。
hystrix.command.default.execution.isolation.thread.timeoutInMilliseconds=10000
#ribbon请求连接的超时时间
ribbon.ConnectTimeout=250
#请求处理的超时时间
ribbon.ReadTimeout=1000
#对所有操作请求都进行重试
ribbon.OkToRetryOnAllOperations=true
#对当前实例的重试次数
ribbon.MaxAutoRetries=1
#对下个实例的重试次数
ribbon.MaxAutoRetriesNextServer=1
https://blog.csdn.net/zl1zl2zl3/article/details/67636901
版本1.5.6
使用Ribbon zuul hystrix
引入重试jar包
<dependency>
     <groupId>org.springframework.retry</groupId>
     <artifactId>spring-retry</artifactId>
</dependency>
参考 LoadBalancerAutoConfiguration 以及RibbonAutoConfiguration
实现原理: RetryLoadBalancerInterceptor 实现 ClientHttpRequestInterceptor 通过拦截器实现
配置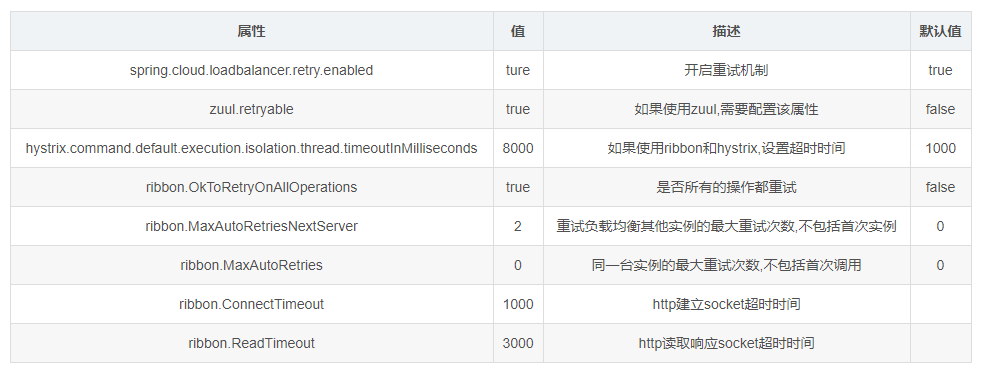
注意:
- ribbon.ConnectTimeout+ribbon.ReadTimeout<hystrix.command.default.execution.isolation.thread.timeoutInMilliseconds
- 连接失败的意思是服务宕机,请求不可到达, 并不是服务报错
https://blog.csdn.net/ACMer_AK/article/details/78865914
Springcloud实践(二)之api网关:zuul
zuul是什么?
front door. API Gateway.Zuul is a JVM based router and server side load balancer by Netflix.所有请求的入口。
As an edge service application, Zuul is built to enable dynamic routing, monitoring, resiliency and security. 作为边界应用服务,zuul能实现动态路由、监控、弹性与安全性。
用groovy编写。
Netflix uses Zuul for the following:
Authentication 认证
Insights 洞察力
Stress Testing 压力测试
Canary Testing 金丝雀测试
Dynamic Routing 动态路由
Service Migration 服务迁移
Load Shedding 减载
Security 安全
Static Response handling 静态响应处理
Active/Active traffic management
如果以后想设计网关,可按照上面进行对标设计。
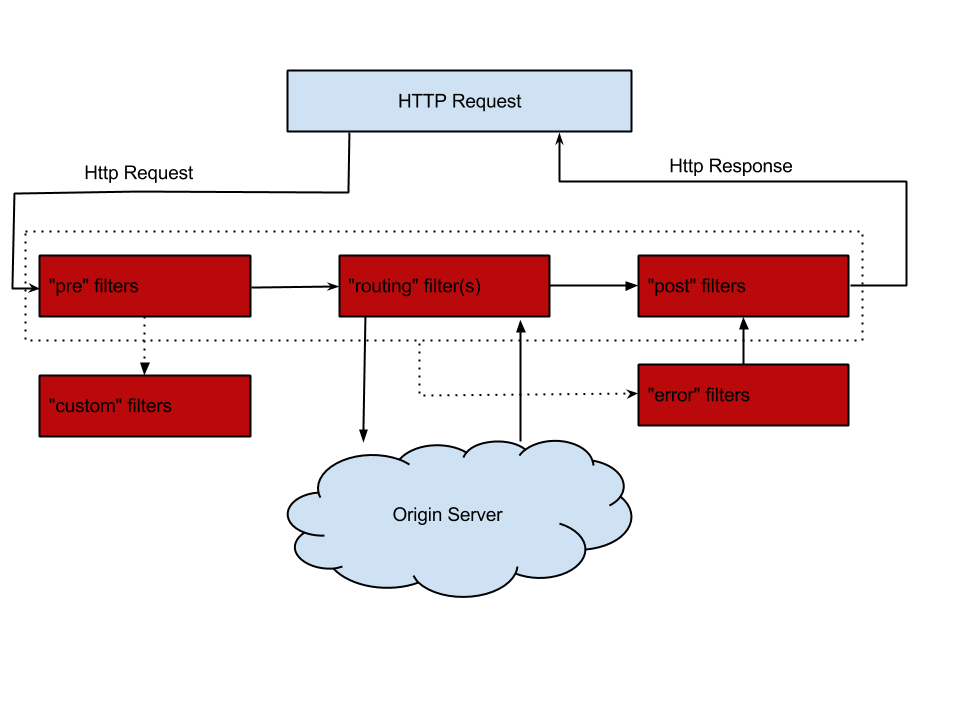
zuul 请求处理过程:
https://www.cnblogs.com/small-k/p/8137943.html
Spring Cloud之Feign、ribbon设置超时时间和重试机制的总结
一、 Feign设置超时时间
使用Feign调用接口分两层,ribbon的调用和hystrix的调用,所以ribbon的超时时间和Hystrix的超时时间的结合就是Feign的超时时间
#hystrix的超时时间
hystrix:
    command:
        default:
            execution:
              timeout:
                enabled: true
              isolation:
                    thread:
                        timeoutInMilliseconds: 9000
#ribbon的超时时间
ribbon:
  ReadTimeout: 3000
  ConnectTimeout: 3000
一般情况下 都是 ribbon 的超时时间(<)hystrix的超时时间(因为涉及到ribbon的重试机制)
因为ribbon的重试机制和Feign的重试机制有冲突,所以源码中默认关闭Feign的重试机制,源码如下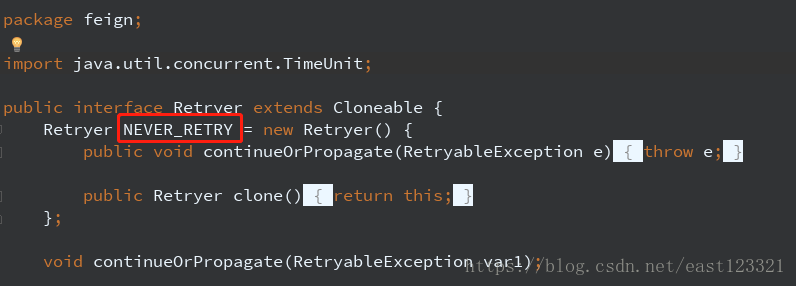
要开启Feign的重试机制如下:(Feign默认重试五次 源码中有)
@Bean
Retryer feignRetryer() {
   return new Retryer.Default();
}
二、ribbon的重试机制
设置重试次数:
ribbon:
  ReadTimeout: 3000
  ConnectTimeout: 3000
  MaxAutoRetries: 1 #同一台实例最大重试次数,不包括首次调用
  MaxAutoRetriesNextServer: 1 #重试负载均衡其他的实例最大重试次数,不包括首次调用
  OkToRetryOnAllOperations: false  #是否所有操作都重试
根据上面的参数计算重试的次数:MaxAutoRetries+MaxAutoRetriesNextServer+(MaxAutoRetries *MaxAutoRetriesNextServer) 即重试3次 则一共产生4次调用
如果在重试期间,时间超过了hystrix的超时时间,便会立即执行熔断,fallback。所以要根据上面配置的参数计算hystrix的超时时间,使得在重试期间不能达到hystrix的超时时间,不然重试机制就会没有意义
hystrix超时时间的计算: (1 + MaxAutoRetries + MaxAutoRetriesNextServer) * ReadTimeout 即按照以上的配置 hystrix的超时时间应该配置为 (1+1+1)*3=9秒
当ribbon超时后且hystrix没有超时,便会采取重试机制。当OkToRetryOnAllOperations设置为false时,只会对get请求进行重试。如果设置为true,便会对所有的请求进行重试,如果是put或post等写操作,如果服务器接口没做幂等性,会产生不好的结果,所以OkToRetryOnAllOperations慎用。
如果不配置ribbon的重试次数,默认会重试一次
注意:
默认情况下,GET方式请求无论是连接异常还是读取异常,都会进行重试
非GET方式请求,只有连接异常时,才会进行重试
原文:https://blog.csdn.net/east123321/article/details/82385816
SpringCloud重试机制配置
SpringCloud重试retry是一个很赞的功能,能够有效的处理单点故障的问题。主要功能是当请求一个服务的某个实例时,譬如你的User服务启动了2个,它们都在eureka里注册了,那么正常情况下当请求User服务时,ribbon默认会轮询这两个实例。此时如果其中一个实例故障了,发生了宕机或者超时等,如果没有配置启用重试retry策略,那么调用方就会得到错误信息或者超时无响应或者是熔断返回的信息。我们希望的自然是一个故障了,会自动切换到另一个去访问。
最简单的方法就是retry。
需要先在pom.xml里加入
<dependency>
    <groupId>org.springframework.retry</groupId>
   <artifactId>spring-retry</artifactId>
</dependency>
Ribbon、zuul、feign都可以配置各自的retry方式。
1 ribbon配置如下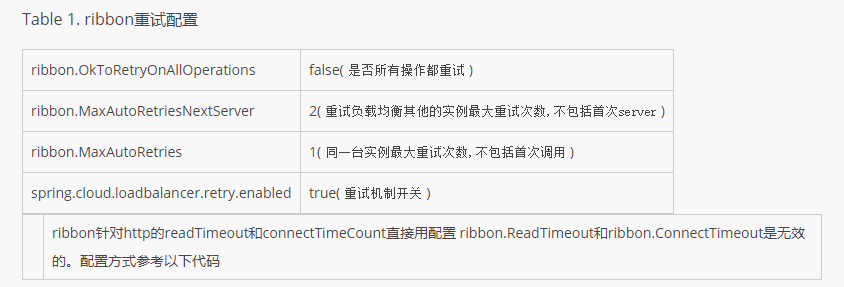
@Bean
@LoadBalanced
RestTemplate restTemplate() {
    HttpComponentsClientHttpRequestFactory httpRequestFactory =  new HttpComponentsClientHttpRequestFactory();
    httpRequestFactory.setReadTimeout(5000);
    httpRequestFactory.setConnectTimeout(5000);
    return new RestTemplate(httpRequestFactory);
}
2 zuul配置如下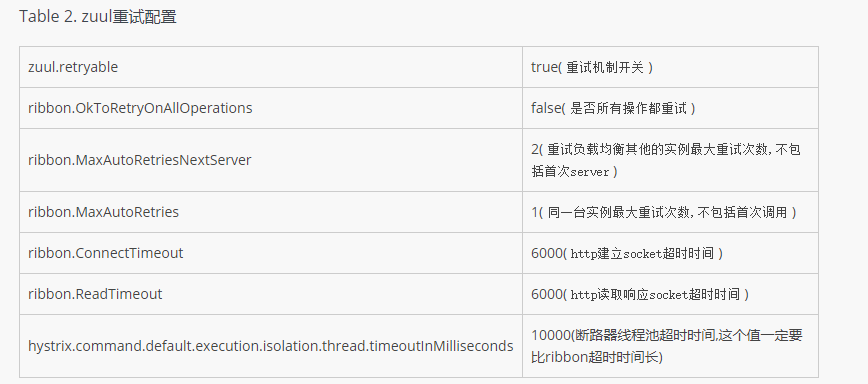
zuul的重试比较简单,不需要任何代码,直接在yml里配置即可。
注意,配置时,ribbon开头的在yml里是不给提示的,不要以为不提示就是没效果,其实是可以用的。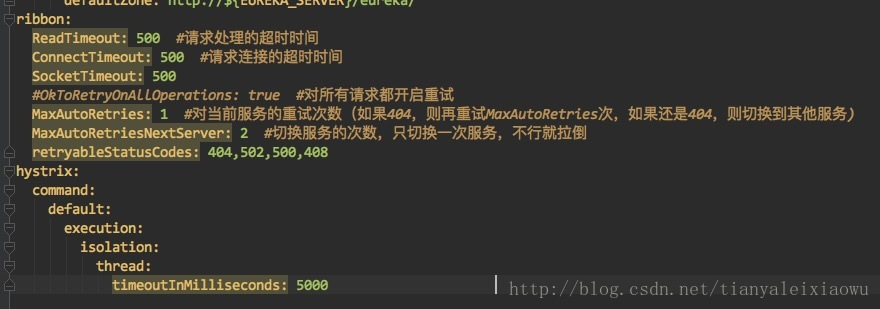
这个ReadTimeout和ConnectTimeout区别是很大的,ConnectTimeout是指建立连接的时间,如果目标服务宕机或网络故障,那么响应的就是ConnectTimeout,无法连接。而ReadTimeout则是连接建立后,等待目标服务返回响应的时间,譬如目标服务做了一个复杂操作导致耗时较长,那么会触发ReadTimeout。
譬如zuul路由了/user路径到user服务上,如果User1实例宕机了,那么配置了retry的zuul就会在重试MaxAutoRetries次数后,切换到另一个实例User2上。如果User2也故障了,那么返回404.
retryableStatusCodes里面有几个错误码,意思就是遇到哪些错误码时触发重试。默认是404,我多配了几个,仅供参考。
3 feign配置如下
feign默认是通过自己包下的Retryer进行重试配置,默认是5次
import static java.util.concurrent.TimeUnit.SECONDS;

/**
 * Cloned for each invocation to {@link Client#execute(Request, feign.Request.Options)}.
 * Implementations may keep state to determine if retry operations should continue or not.
 */
public interface Retryer extends Cloneable {

  /**
   * if retry is permitted, return (possibly after sleeping). Otherwise propagate the exception.
   */
  void continueOrPropagate(RetryableException e);

  Retryer clone();

  public static class Default implements Retryer {

    private final int maxAttempts;
    private final long period;
    private final long maxPeriod;
    int attempt;
    long sleptForMillis;

    public Default() {
      this(100, SECONDS.toMillis(1), 5);
    }

    public Default(long period, long maxPeriod, int maxAttempts) {
      this.period = period;
      this.maxPeriod = maxPeriod;
      this.maxAttempts = maxAttempts;
      this.attempt = 1;
    }
feign取消重试
@Bean
Retryer feignRetryer() {
    return Retryer.NEVER_RETRY;
}
feign请求超时设置
@Bean
Request.Options requestOptions(ConfigurableEnvironment env){
    int ribbonReadTimeout = env.getProperty("ribbon.ReadTimeout", int.class, 6000);
    int ribbonConnectionTimeout = env.getProperty("ribbon.ConnectTimeout", int.class, 3000);

    return new Request.Options(ribbonConnectionTimeout, ribbonReadTimeout);
}
Spring Cloud Zuul网关 Filter、熔断、重试、高可用的使用方式。
时间过的很快,写springcloud(十):服务网关zuul初级篇还在半年前,现在已经是2018年了,我们继续探讨Zuul更高级的使用方式。
上篇文章主要介绍了Zuul网关使用模式,以及自动转发机制,但其实Zuul还有更多的应用场景,比如:鉴权、流量转发、请求统计等等,这些功能都可以使用Zuul来实现。
Zuul的核心
Filter是Zuul的核心,用来实现对外服务的控制。Filter的生命周期有4个,分别是“PRE”、“ROUTING”、“POST”、“ERROR”,整个生命周期可以用下图来表示。
Zuul大部分功能都是通过过滤器来实现的,这些过滤器类型对应于请求的典型生命周期。
PRE: 这种过滤器在请求被路由之前调用。我们可利用这种过滤器实现身份验证、在集群中选择请求的微服务、记录调试信息等。
ROUTING:这种过滤器将请求路由到微服务。这种过滤器用于构建发送给微服务的请求,并使用Apache HttpClient或Netfilx Ribbon请求微服务。
POST:这种过滤器在路由到微服务以后执行。这种过滤器可用来为响应添加标准的HTTP Header、收集统计信息和指标、将响应从微服务发送给客户端等。
ERROR:在其他阶段发生错误时执行该过滤器。
除了默认的过滤器类型,Zuul还允许我们创建自定义的过滤器类型。例如,我们可以定制一种STATIC类型的过滤器,直接在Zuul中生成响应,而不将请求转发到后端的微服务。
Zuul中默认实现的Filter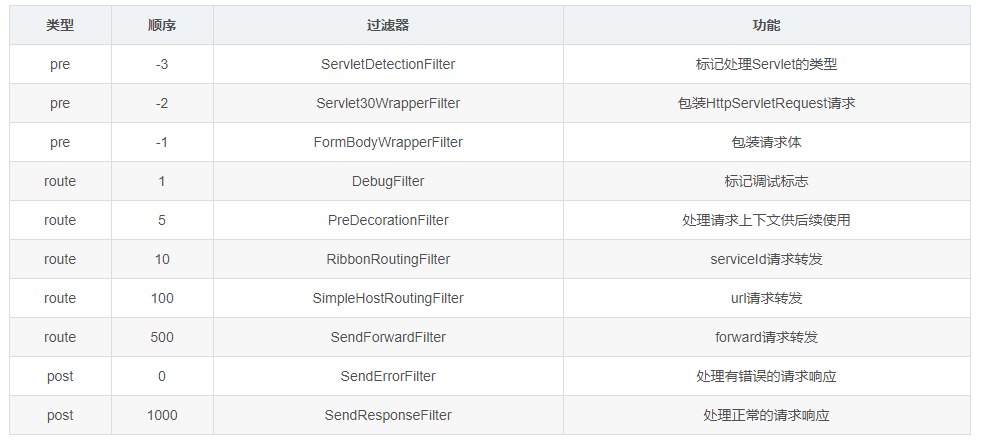
禁用指定的Filter
可以在application.yml中配置需要禁用的filter,格式:
zuul:
    FormBodyWrapperFilter:
        pre:
            disable: true
[https://blog.csdn.net/ityouknow/article/details/79215698
spring cloud各种超时时间及重试设置
https://blog.csdn.net/wudiyong22/article/details/84937648[
配置实例
##timeout config
hystrix:
  command:
    default:
      execution:
        timeout:
          enabled: true
        isolation:
          thread:
            timeoutInMilliseconds: 60000
ribbon:
  ReadTimeout: 60000
  ConnectTimeout: 60000
  MaxAutoRetries: 0
  MaxAutoRetriesNextServer: 1
  eureka:
    enabled: false

zuul:
  max:
    host:
      connections: 500
  host:
    socket-timeout-millis: 60000
    connect-timeout-millis: 60000
MaxAutoRetries
Max number of retries on the same server (excluding the first try)
MaxAutoRetriesNextServer
Max number of next servers to retry (excluding the first server)
https://segmentfault.com/a/1190000007290888
聊聊ribbon的超时时间设置
序
本文主要研究一下ribbon的超时时间设置
配置
实例
ribbon:
  ReadTimeout: 10000
  ConnectTimeout: 10000
  MaxAutoRetries: 0
  MaxAutoRetriesNextServer: 1
  eureka:
    enabled: true
RibbonClientConfiguration
spring-cloud-netflix-ribbon-2.0.0.RELEASE-sources.jar!/org/springframework/cloud/netflix/ribbon/RibbonClientConfiguration.java
@SuppressWarnings("deprecation")
@Configuration
@EnableConfigurationProperties
//Order is important here, last should be the default, first should be optional // see https://github.com/spring-cloud/spring-cloud-netflix/issues/2086#issuecomment-316281653 @Import({HttpClientConfiguration.class, OkHttpRibbonConfiguration.class, RestClientRibbonConfiguration.class, HttpClientRibbonConfiguration.class}) public class RibbonClientConfiguration { public static final int DEFAULT_CONNECT_TIMEOUT = 1000; public static final int DEFAULT_READ_TIMEOUT = 1000; @RibbonClientName private String name = "client"; // TODO: maybe re-instate autowired load balancers: identified by name they could be // associated with ribbon clients @Autowired private PropertiesFactory propertiesFactory; @Bean @ConditionalOnMissingBean public IClientConfig ribbonClientConfig() { DefaultClientConfigImpl config = new DefaultClientConfigImpl(); config.loadProperties(this.name); config.set(CommonClientConfigKey.ConnectTimeout, DEFAULT_CONNECT_TIMEOUT); config.set(CommonClientConfigKey.ReadTimeout, DEFAULT_READ_TIMEOUT); return config; } //...... }
- 这里设置默认的超时值,都是1000毫秒,设置在DefaultClientConfigImpl
AbstractLoadBalancingClient
spring-cloud-netflix-ribbon-2.0.0.RELEASE-sources.jar!/org/springframework/cloud/netflix/ribbon/support/AbstractLoadBalancingClient.java
public abstract class AbstractLoadBalancingClient<S extends ContextAwareRequest, T extends IResponse, D> extends AbstractLoadBalancerAwareClient<S, T> implements ServiceInstanceChooser { protected int connectTimeout; protected int readTimeout; //...... @Override public void initWithNiwsConfig(IClientConfig clientConfig) { super.initWithNiwsConfig(clientConfig); RibbonProperties ribbon = RibbonProperties.from(clientConfig); this.connectTimeout = ribbon.connectTimeout(DEFAULT_CONNECT_TIMEOUT); this.readTimeout = ribbon.readTimeout(DEFAULT_READ_TIMEOUT); this.secure = ribbon.isSecure(); this.followRedirects = ribbon.isFollowRedirects(); this.okToRetryOnAllOperations = ribbon.isOkToRetryOnAllOperations(); } //...... }
- 这里从RibbonProperties读取超时参数,然后放到类成员变量connectTimeout及readTimeout
- RibbonProperties就最后是从IClientConfig读取
RibbonLoadBalancingHttpClient
spring-cloud-netflix-ribbon-2.0.0.RELEASE-sources.jar!/org/springframework/cloud/netflix/ribbon/apache/RibbonLoadBalancingHttpClient.java
// TODO: rename (ie new class that extends this in Dalston) to ApacheHttpLoadBalancingClient
public class RibbonLoadBalancingHttpClient extends AbstractLoadBalancingClient<RibbonApacheHttpRequest, RibbonApacheHttpResponse, CloseableHttpClient> { //...... @Override public RibbonApacheHttpResponse execute(RibbonApacheHttpRequest request, final IClientConfig configOverride) throws Exception { IClientConfig config = configOverride != null ? configOverride : this.config; RibbonProperties ribbon = RibbonProperties.from(config); RequestConfig requestConfig = RequestConfig.custom() .setConnectTimeout(ribbon.connectTimeout(this.connectTimeout)) .setSocketTimeout(ribbon.readTimeout(this.readTimeout)) .setRedirectsEnabled(ribbon.isFollowRedirects(this.followRedirects)) .build(); request = getSecureRequest(request, configOverride); final HttpUriRequest httpUriRequest = request.toRequest(requestConfig); final HttpResponse httpResponse = this.delegate.execute(httpUriRequest); return new RibbonApacheHttpResponse(httpResponse, httpUriRequest.getURI()); } //...... }
- 这里execute方法从IClientConfig构造RequestConfig,会设置connectTimeout及socketTimeout
- 如果configOverride为null,则使用抽象类的默认配置
OkHttpLoadBalancingClient
spring-cloud-netflix-ribbon-2.0.0.RELEASE-sources.jar!/org/springframework/cloud/netflix/ribbon/okhttp/OkHttpLoadBalancingClient.java
public class OkHttpLoadBalancingClient
        extends AbstractLoadBalancingClient<OkHttpRibbonRequest, OkHttpRibbonResponse, OkHttpClient> { //...... @Override public OkHttpRibbonResponse execute(OkHttpRibbonRequest ribbonRequest, final IClientConfig configOverride) throws Exception { boolean secure = isSecure(configOverride); if (secure) { final URI secureUri = UriComponentsBuilder.fromUri(ribbonRequest.getUri()) .scheme("https").build().toUri(); ribbonRequest = ribbonRequest.withNewUri(secureUri); } OkHttpClient httpClient = getOkHttpClient(configOverride, secure); final Request request = ribbonRequest.toRequest(); Response response = httpClient.newCall(request).execute(); return new OkHttpRibbonResponse(response, ribbonRequest.getUri()); } OkHttpClient getOkHttpClient(IClientConfig configOverride, boolean secure) { IClientConfig config = configOverride != null ? configOverride : this.config; RibbonProperties ribbon = RibbonProperties.from(config); OkHttpClient.Builder builder = this.delegate.newBuilder() .connectTimeout(ribbon.connectTimeout(this.connectTimeout), TimeUnit.MILLISECONDS) .readTimeout(ribbon.readTimeout(this.readTimeout), TimeUnit.MILLISECONDS) .followRedirects(ribbon.isFollowRedirects(this.followRedirects)); if (secure) { builder.followSslRedirects(ribbon.isFollowRedirects(this.followRedirects)); } return builder.build(); } //...... }
- 这里是通过configOverride或默认的config来构建指定超时参数的OkHttpClient
- 相比较于apache httpclient通过request config来设置超时时间,OkHttpClient是通过client来设置的,这样可能存在一个问题,就是OkHttpClient没法用单例,每次都得new一个
clientConfig传递
RibbonHttpRequest
spring-cloud-netflix-ribbon-2.0.0.RELEASE-sources.jar!/org/springframework/cloud/netflix/ribbon/RibbonHttpRequest.java
public class RibbonHttpRequest extends AbstractClientHttpRequest { //...... @Override protected ClientHttpResponse executeInternal(HttpHeaders headers) throws IOException { try { addHeaders(headers); if (outputStream != null) { outputStream.close(); builder.entity(outputStream.toByteArray()); } HttpRequest request = builder.build(); HttpResponse response = client.executeWithLoadBalancer(request, config); return new RibbonHttpResponse(response); } catch (Exception e) { throw new IOException(e); } } //...... }
- 这里client.executeWithLoadBalancer(request, config)使用的是RibbonHttpRequest的config配置
RibbonClientHttpRequestFactory
spring-cloud-netflix-ribbon-2.0.0.RELEASE-sources.jar!/org/springframework/cloud/netflix/ribbon/RibbonClientHttpRequestFactory.java
public class RibbonClientHttpRequestFactory implements ClientHttpRequestFactory { private final SpringClientFactory clientFactory; public RibbonClientHttpRequestFactory(SpringClientFactory clientFactory) { this.clientFactory = clientFactory; } @Override @SuppressWarnings("deprecation") public ClientHttpRequest createRequest(URI originalUri, HttpMethod httpMethod) throws IOException { String serviceId = originalUri.getHost(); if (serviceId == null) { throw new IOException( "Invalid hostname in the URI [" + originalUri.toASCIIString() + "]"); } IClientConfig clientConfig = this.clientFactory.getClientConfig(serviceId); RestClient client = this.clientFactory.getClient(serviceId, RestClient.class); HttpRequest.Verb verb = HttpRequest.Verb.valueOf(httpMethod.name()); return new RibbonHttpRequest(originalUri, verb, client, clientConfig); } }
- ClientHttpRequest是通过RibbonClientHttpRequestFactory这个工厂创建的
- clientConfig是RibbonClientHttpRequestFactory这个工厂根据serviceId获取的,默认是DefaultClientConfigImpl,从配置文件读取,serviceId自己的个性化配置参数会覆盖默认值,读取不到的就是默认的参数。
小结
spring cloud netflix的ribbon,其超时时间配置有ReadTimeout以及ConnectTimeout,分别是设置的socketTimeout以及connectTimeout,创建请求的时候,会读取指定配置,没有的话,就取默认的配置,设置超时时间。
doc
作者:go4it
链接:https://www.jianshu.com/p/eb63697adca8
来源:简书
简书著作权归作者所有,任何形式的转载都请联系作者获得授权并注明出处。
Spring cloud 微服务架构之Ribbon/Fegin连接超时ReadTimeout问题
问题描述:
近期用Spring cloud 开发微服务架构时候,在服务与服务之间调用调试代码时候,出现链接超时。
错误信息:
Read timed out executing GET http://service-batch/batchmanagement/datatransfer/querybyplanid?planid=PL00000102。
发生原因:
用IDE开发Debug模式调试代码时候,在处理该服务与其他服务调用时候,由于debug模式调试代码花费一些时间,结果出现Fegin 连接超时问题。
解决办法:
在application.properice属性文件中添加
#Fegin 连接超时
ribbon.ReadTimeout=60000
ribbon.ConnectTimeout=60000
ribbon.MaxAutoRetries=0
ribbon.MaxAutoRetriesNextServer=1
技术讲解:
微服务间调用其实走的是http请求,debug了一下默认的ReadTimeout时间为5s,ConnectTimeout时间为2s,
我使用的是Fegin进行微服务间调用,底层用的还是Ribbon。
---------------------
作者:喜欢健身的程序员
来源:CSDN
原文:https://blog.csdn.net/m0\_38016299/article/details/78391461
版权声明:本文为博主原创文章,转载请附上博文链接!
springcloud2.x 设置feign、ribbon和hystrix的超时问题(配置文件)
#ribbon的超时时间 (一般情况下 都是 ribbon 的超时时间(<)hystrix的超时时间(因为涉及到ribbon的重试机制) )
ribbon:
ReadTimeout: 6000
ConnectTimeout: 6000
MaxAutoRetries: 1 #同一台实例最大重试次数,不包括首次调用
MaxAutoRetriesNextServer: 1 #重试负载均衡其他的实例最大重试次数,不包括首次调用
OkToRetryOnAllOperations: false #是否所有操作都重试
#hystrix的超时时间 (一般情况下 都是 ribbon 的超时时间(<)hystrix的超时时间(因为涉及到ribbon的重试机制) )
#这种写法是把默认的超时时间改成8秒,而把另外一个自定义的 Feign 客户端中的某方法超时时间定成10秒(格式是类名#方法名()
hystrix:
command:
default:
execution:
timeout:
enabled: true
isolation:
thread:
timeoutInMilliseconds: 8000
"***FeignClient#***method()": #格式是 类名#方法名()
execution:
isolation:
thread:
timeoutInMilliseconds: 10000
---------------------
作者:执意丨
来源:CSDN
原文:https://blog.csdn.net/ab52262879/article/details/84100596
版权声明:本文为博主原创文章,转载请附上博文链接!
Zuul、Ribbon、Feign、Hystrix使用时的超时时间(timeout)设置问题
写在前面
因为测试 Feign + Hystrix 搭配模式下的降级(fallback)超时时间自定义问题,算是踩了个坑,然后就顺便查+测试了下 Zuul、Ribbon + Hystrix 模式下分别怎么设置
测试这些东西费了不少力气,因为这几个模块要么搭配使用、要么有内部依赖别的模块、要么对其他模块做了封装,这个配置项就变得千奇百怪,而且网上的东西,一直觉得有个很"严重"的问题,就是版本不明,版本号都不一样,解决方案或者说配置方式可能完全不同,而很多的文章中也没有提及他们用的是哪个版本,搞得我是晕头转向(毕竟我不是这些服务模块的开发者或者长期的使用者,不是非常了解这些东西的版本演进过程)
所以这里是查了不少的资料,测试通过了一些方案,也算是自己总结记录一下
注意!
这里都是基于有 Eureka 做服务中心为前提的
工具
Eclipse Oxygen
Spring Boot 2.0.5.RELEASE
Spring Cloud Finchley.SR1
Eureka 1.9.3
Zuul 1.3.1
Ribbon 2.2.5
Feign 9.5.1
Hystrix 1.5.12
Feign + Hystrix
这个栗子的源码看这里
0. 默认基本配置
最基本的配置,是 Hystrix 自己的一长串配置:hystrix.command.default.execution.isolation.thread.timeoutInMilliseconds,但在 Feign 模块中,单独设置这个超时时间不行,还要额外设置 Ribbon 的超时时间,比如:
hystrix:
  command:
    default:
      execution:
        isolation:
          thread:
            timeoutInMilliseconds: 5000

ribbon:
  ReadTimeout: 5000
  ConnectTimeout: 5000
关于 Hystrix 的配置,这里有官方的说明:
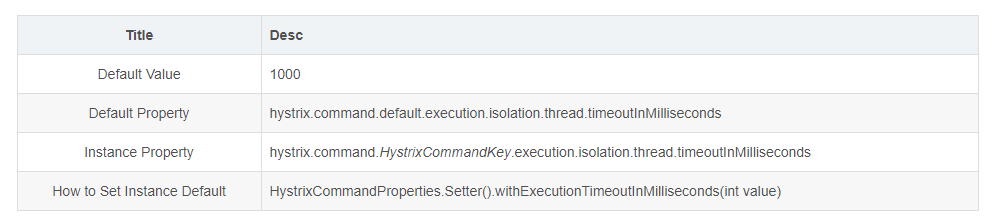
可以看到实例配置中,替代 default 的,是 HystrixCommandKey,这个值在下面会说到
1. 不同实例分别配置
如果更进一步,想把超时时间细分到不同的 service 实例上也可以实现,比如:
@FeignClient(
    value = "hello-service",
    fallback = MyFeignClientHystric.class)
public interface MyFeignClient {
    @RequestMapping("/hello")
    String sayHelloByFeign();

    @RequestMapping("/why")
    String sayWhyByFeign();
}

hystrix:
  command:
    "MyFeignClient#sayWhyByFeign()":
      execution:
        isolation:
          thread:
            timeoutInMilliseconds: 9000
    default:
      execution:
        isolation:
          thread:
            timeoutInMilliseconds: 2000

ribbon:
  ReadTimeout: 5000
  ConnectTimeout: 5000
这种写法是把默认的超时时间改成2秒,而把另外一个自定义的 Feign 客户端中的某方法超时时间定成9秒(格式是类名#方法名(),如果方法有入参,也要把入参的类型拼上),这里的 MyFeignClient#sayWhyByFeign() 就代表了上面说到的 commandKey,而这种写法,则是 Feign 模块中特殊的:
ryanjbaxter commented on 26 Jul
If you had a Feign client called MyClient and it had a method called search that took in a single String parameter than you would use the following property
hystrix.command.MyClient#search(String).execution.isolation.thread.timeoutInMilliseconds
看 issue 里 Spring Cloud 的官方人员的说法,这种格式是他们进行的封装,所以我们要设置,就只能这么写
Ribbon + Hystrix
这个栗子的源码看这里
0. 默认基本配置
在使用 Ribbon 时,只需要配置 Hystrix 的超时时间就可以生效,不需要额外配置 Ribbon 的超时时间,比如:
hystrix:
  command:
    default:
      execution:
        isolation:
          thread:
            timeoutInMilliseconds: 9000
1. 不同实例分别配置
想细分服务超时时间时:
如果是同一个服务实例下的不同接口,想使用不同的超时时间,可以把 @HystrixCommand 中的 commandKey 定义成不同的值,然后在 yml 中分别设置
@HystrixCommand(
    commandKey = "helloService-sayHello",
    fallbackMethod = "sayHelloDefault")
public String sayHelloByRibbon() {
    return restTemplate.getForObject("http://HELLO-SERVICE/hello", String.class);
}

public String sayHelloDefault() {
    return "hello service error, this is default say hello method";
}

@HystrixCommand(
    commandKey = "helloService-sayWhy",
    fallbackMethod = "sayWhyDefault")
public String sayWhyByRibbon() {
    return restTemplate.getForObject("http://HELLO-SERVICE/why", String.class);
}

public String sayWhyDefault() {
    return "hello service error, this is default say why method";
}

hystrix:
  command:
    helloService-sayWhy:
      execution:
        isolation:
          thread:
            timeoutInMilliseconds: 5000
    default:
      execution:
        isolation:
          thread:
            timeoutInMilliseconds: 1500
如果想统一设置同一个服务实例中各方法的超时时间,经测试,可以把不同方法上的 commandKey 设置成相同的值,这样在 yml 中对该 key 做超时配置就能同时生效了:
@HystrixCommand(
    commandKey = "helloService",
    fallbackMethod = "sayHelloDefault")
public String sayHelloByRibbon() {
    return restTemplate.getForObject("http://HELLO-SERVICE/hello", String.class);
}

public String sayHelloDefault() {
    return "hello service error, this is default say hello method";
}

@HystrixCommand(
    commandKey = "helloService",
    fallbackMethod = "sayWhyDefault")
public String sayWhyByRibbon() {
    return restTemplate.getForObject("http://HELLO-SERVICE/why", String.class);
}

public String sayWhyDefault() {
    return "hello service error, this is default say why method";
}

hystrix:
  command:
    helloService:
      execution:
        isolation:
          thread:
            timeoutInMilliseconds: 5000
    default:
      execution:
        isolation:
          thread:
            timeoutInMilliseconds: 1000
Zuul
这个栗子的源码看这里,Zuul 中的降级是用了 FallbackProvider,简单的使用可以看我源码中的 HelloFallbackProvider.java 和 HiFallbackProvider.java,我也是参考了官方的文档说明和例子
0. 默认基本配置
zuul 中配置超时时间,据官方的介绍,分两种情况:
用 serviceId 进行路由时,使用 ribbon.ReadTimeout 和 ribbon.SocketTimeout 设置
用指定 url 进行路由时,使用 zuul.host.connect-timeout-millis 和 zuul.host.socket-timeout-millis 设置
因为我的代码中是用 serviceId 的方式,所以参考了第一种配置,比如:
zuul:
  routes:
    helloService:
      path: /hello-service/**
      serviceId: hello-service
    hiService:
      path: /hi-service/**
      serviceId: hi-service

ribbon:
  ConnectTimeout: 5000
  ReadTimeout: 5000
1. 不同实例分别配置
Ribbon 的配置项还可以加一个 ClientName 为前缀(这个方法的出处在官方的 wiki),区分不同客户端下的配置,这个 ClientName 我是直接用了 serviceId,测试了正常,但还可以用或者说应该用什么值,这个我还没有找到官方的说明。。
zuul:
  routes:
    helloService:
      path: /hello-service/**
      serviceId: hello-service
    hiService:
      path: /hi-service/**
      serviceId: hi-service

hello-service:
  ribbon:
    ConnectTimeout: 5000
    ReadTimeout: 5000

hi-service:
  ribbon:
    ConnectTimeout: 500
    ReadTimeout: 500

hystrix:
  command:
    default:
      execution:
        isolation:
          thread:
            timeoutInMilliseconds: 3000
另外还做了测试,如果同时配置了 Ribbon 和 Hystrix 的超时时间,则以最小的为准,比如上述的配置中,如果 hi-service 的接口调用超过了 0.5 秒,则就会触发超时
总结
目前的学习和测试结果来看:
单纯的 Ribbon + Hystrix 搭配使用时,配置是最灵活的,两者没有相互干涉,可以自由定义 commandKey 来实现超时时间的配置
Feign + Hystrix 搭配时,由于 Feign 封装了 Hystrix 所需的 commandKey,我们不能自定义,所以同一个 FeignClient 下的服务接口不能方便的统一配置,如果有相应的业务需求,或许只能对每个特殊的接口方法做独立的超时配置(找到新方法的话再回来更新)
Zuul + Hystrix 搭配时,和上述的情况相反,能对不同服务实例做不同的超时配置,但不能再细化到服务下的具体接口方法
---------------------
作者:PriestM
来源:CSDN
原文:https://blog.csdn.net/mxmxz/article/details/84633098
版权声明:本文为博主原创文章,转载请附上博文链接!