2021.2.24 更新
1 概述
Spring Boot整合邮件服务,包括发送普通的文本邮件以及带附件的邮件。
2 邮箱选择
这里选择的是QQ邮箱作为发送的邮箱,当然也可以选择其他的邮箱,只是具体的配置不一样。
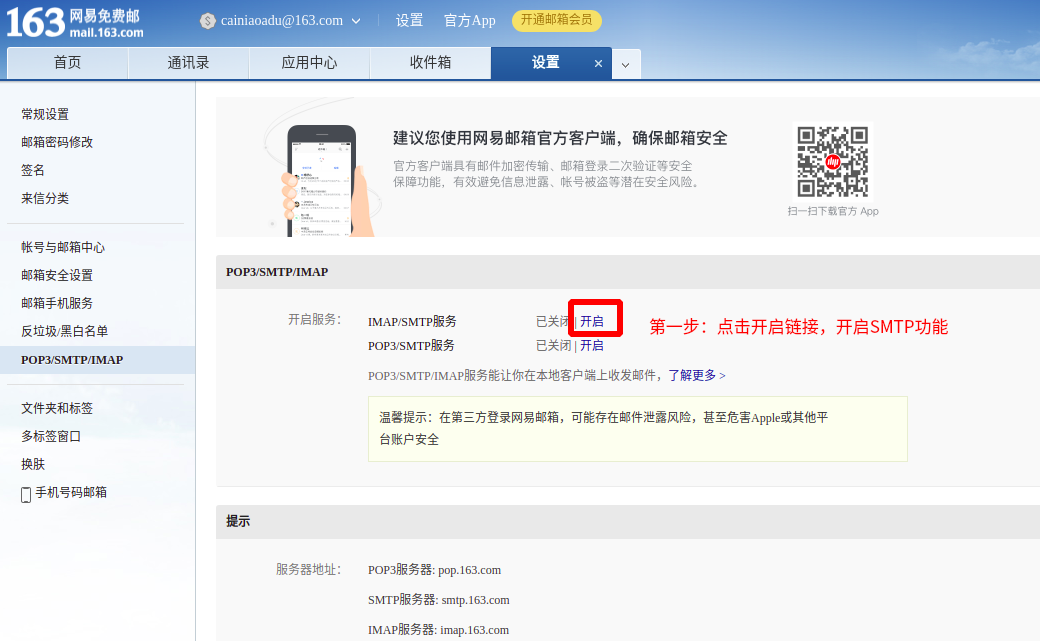
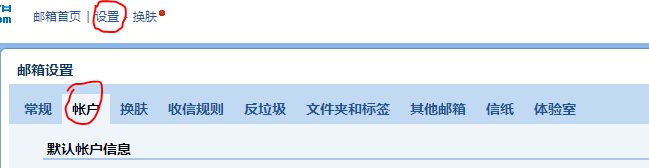
使用QQ邮箱的话,需要在个人设置中开启SMTP服务:
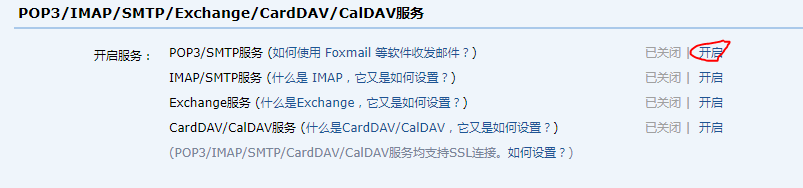
发送短信后完成验证即可,会有一个授权码,先复制下来保存。
3 具体实现
3.1 依赖
提供了starter:
<dependency>
    <groupId>org.springframework.boot</groupId>
    <artifactId>spring-boot-starter-mail</artifactId>
</dependency>
gradle:
implementation 'org.springframework.boot:spring-boot-starter-mail'
3.2 邮件接口
只有两个简单的接口,一个是发送纯文本的,一个是发送带附件的:
public interface MailService {
    void sendSimpleMail(String to,String subject,String content);
    void sendAttachmentMail(String to, String subject, String content, Path file) throws MessagingException;
}
3.3 接口实现
@Service
@RequiredArgsConstructor(onConstructor = @__(@Autowired))
public class MailServiceImpl implements MailService{
    private final JavaMailSender sender;

    @Value("${spring.mail.username}")
    private String from;

    @Override
    public void sendSimpleMail(String to, String subject, String content) {
        SimpleMailMessage message = new SimpleMailMessage();
        message.setFrom(from);
        message.setTo(to);
        message.setSubject(subject);
        message.setText(content);
        sender.send(message);
    }

    @Override
    public void sendAttachmentMail(String to, String subject, String content, Path file) throws MessagingException {
        MimeMessage message = sender.createMimeMessage();
        MimeMessageHelper helper = new MimeMessageHelper(message,true);
        helper.setFrom(from);
        helper.setTo(to);
        helper.setSubject(subject);
        helper.setText(content);
        helper.addAttachment(file.getFileName().toString(),new FileSystemResource(file));
        sender.send(message);
    }
}
JavaMailSender是Spring Boot携带的邮件发送接口,注入后可以发送SimpleMailMessage以及MimeMessage类型的信息。
SimpleMailMessage:简单的邮件信息对象,封装了一些常见的属性,比如寄信地址以及收信地址,发送日期,主题,内容等MimeMessage:发送MIME类型的邮件信息,MIME指的是Multipurpose Internet Mail Extensiosns,是描述消息内容类型的因特网标准,能包含文本,图像,音频,视频以及其他应用程序专用的数据MimeMessageHelper:用于设置MimeMessage属性的类,可以利用其中的addAttachment添加附件setFrom/setTo/setSubject/setText:分别表示设置寄信地址/收信地址/主题/内容
3.4 测试类
@SpringBootTest
@RequiredArgsConstructor(onConstructor = @__(@Autowired))
class DemoApplicationTests {
private final MailService service;
@Test
void contextLoads() throws URISyntaxException, MessagingException {
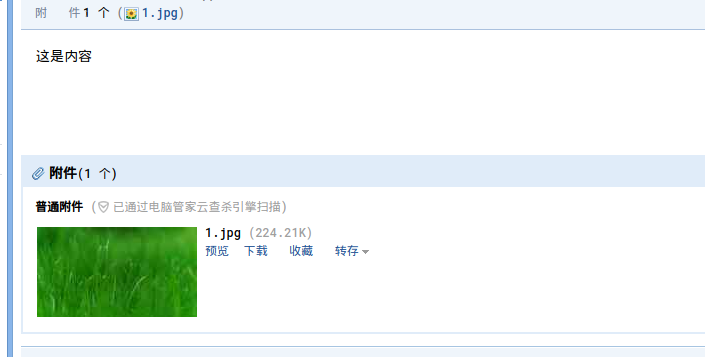
service.sendSimpleMail("xxx@xxx.com","这是主题","这是内容");
service.sendAttachmentMail("xxxx@xx.com","这是主题","这是内容", Path.of(Objects.requireNonNull(getClass().getClassLoader().getResource("pic/1.jpg")).toURI()));
//附件为resources下pic/1.jpg
service.sendAttachmentMail("xxxx@xxx.com","这是主题","这是内容", Path.of("/","srv","http","1.jpg"));
//附件为/srv/http/1.jpg
}
发送文本直接指定主题和内容即可,发送带附件的话:
- 如果是
resources下的内容,使用getClass().getClassLoader().getReource("xxx/xxx") - 如果是绝对路径,使用
Path.of("/","path1","path2",...,"filename")
3.5 配置文件
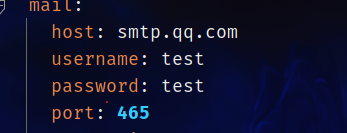
spring:
  mail:
    host: smtp.qq.com
    username: xxxxxxx@qq.com
    password: xxxxxxxxxx
    port: 465
    properties:
      mail:
        smtp:
          ssl:
            enable: true
          auth: true
          starttls:
            enable: true
            required: true
作为Demo使用只需要修改username以及password即可。
username:发送的用户邮箱password:不是邮箱密码,而是授权码,就是刚才开启SMTP服务出现的授权码
其他配置说明:
host:SMTP服务器地址port:端口,可以选择465/587,host以及port可以参考QQ邮箱文档properties:里面都是一些安全设置,开启SSL以及认证等
3.6 测试
修改测试类的邮箱,运行单元测试即可。
如果没通过,可以参考这里,罗列了常见的错误码以及可能的解决方案。
4 加密
由于用户名以及密码都直接写在了配置文件中,如果泄露的话会很危险,因此需要对配置文件进行加密。
具体的话可以参考笔者之前的原力计划文章,戳这里。
4.1 依赖
<dependency>
    <groupId>com.github.ulisesbocchio</groupId>
    <artifactId>jasypt-spring-boot-starter</artifactId>
    <version>3.0.3</version>
</dependency>
gradle:
implementation("com.github.ulisesbocchio:jasypt-spring-boot-starter:3.0.3")
4.2 配置文件
配置文件只需要加上加密口令即可:
jasypt:
  encryptor:
    password: test
默认使用的是PBE加密算法,PBE其实是一种组合加密算法,默认是采用HCMA算法(混合CMA-ES算法)+SHA512消息摘要算法+AES256对称加密算法。
另外,如果不想在配置文件直接写上加密的口令,可以使用以下三种方法对口令进行参数化:
命令行参数(运行时设置):
java -jar xxx.jar --jasypt.encryptor.password=test
应用环境变量(运行时设置):
java -Djasypt.encryptor.password=test -jar xxx.jar
系统环境变量(在配置文件中设置):
jasypt:
  encryptor:
    password: ${TEST}
# 表示获取环境变量TEST的值作为加密口令
4.3 测试类
新建一个测试类:
@SpringBootTest
@RequiredArgsConstructor(onConstructor = @__(@Autowired))
public class EncryptAndDecrypt {
private final StringEncryptor encryptor;
@Value("${spring.mail.username}")
private String username;
@Value("${spring.mail.password}")
private String password;
@Test
public void encrypt()
{
System.out.println(encryptor.encrypt(username));
System.out.println(encryptor.encrypt(password));
}
@Test
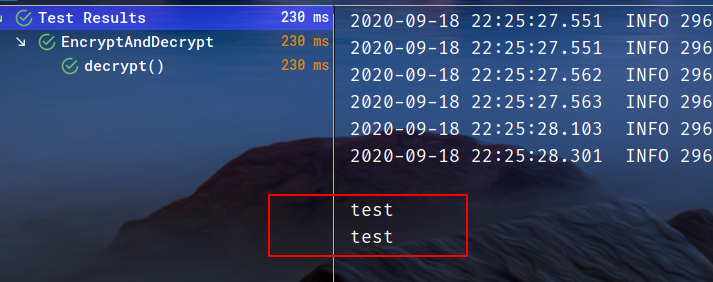
public void decrypt()
{
System.out.println(username);
System.out.println(password);
}
}
4.4 获取密文
假设明文如下:
运行encrypt即可,输出如下:

4.5 替换明文
加上前缀ENC(以及后缀)去替换明文:

4.6 测试
获取明文直接运行decrypt即可,输出:
这样就完成加密了。
5 源码
Java版:
Kotlin版: