* TabBar(顶部导航)
import 'package:flutter/material.dart';

class CategoryPage extends StatefulWidget {
  CategoryPage({Key key}) : super(key: key);

  @override
  _CategoryPageState createState() => _CategoryPageState();
}

class _CategoryPageState extends State<CategoryPage> {
  @override
  Widget build(BuildContext context) {
    return DefaultTabController(
      length: 8,
      child: Scaffold(
        appBar: AppBar(
          backgroundColor: Colors.black12,
          title: Row(
            children: <Widget>[
              Expanded(
                child: TabBar(
                  indicatorColor: Colors.red,
                  labelColor: Colors.black,
                  unselectedLabelColor: Colors.white,
                  isScrollable: true,
                  tabs: <Widget>[
                    Tab(text: "热销"),
                    Tab(text: "推荐"),
                    Tab(text: "社群"),
                    Tab(text: "推广"),
                    Tab(text: "新闻"),
                    Tab(text: "热点"),
                    Tab(text: "淘宝"),
                    Tab(text: "知乎"),
                  ],
                ),
              )
            ],
          ),
        ),
        body: TabBarView(
          children: <Widget>[
            Column(
              crossAxisAlignment: CrossAxisAlignment.start,
              mainAxisAlignment: MainAxisAlignment.center,
              children: <Widget>[
                RaisedButton(
                  child: Text("跳转到表单页面并传值"),
                  onPressed: () {
                    //普通路由的写法
                    // Navigator.of(context)
                    //     .push(MaterialPageRoute(builder: (context) => FormPage(title: "我是跳转传值",)));
                    //命名路由的写法
                    Navigator.pushNamed(context, '/form');
                  },
                  color: Theme.of(context).accentColor,
                  textTheme: ButtonTextTheme.primary,
                ),
              ],
            ),
            Text("第三个tab"),
            Text("第四个tab"),
            Text("第五个tab"),
            Text("第六个tab"),
            Text("第七个tab"),
            Text("第八个tab"),
            Text("第九个tab"),
          ],
        ),
      ),
    );
  }
}
效果图:

* 自定义TabController(上面的是默认TabController)
自定义的好处是可以在addListener中增加监听,通过setState修改状态
import 'package:flutter/material.dart';

class TabBarControllerPage extends StatefulWidget {
  TabBarControllerPage({Key key}) : super(key: key);

  @override
  _TabBarControllerPageState createState() => _TabBarControllerPageState();
}

class _TabBarControllerPageState extends State<TabBarControllerPage>
    with SingleTickerProviderStateMixin {
  TabController _tabController;
  @override
  void dispose() {
    super.dispose();
    _tabController.dispose();
  }

  @override
  void initState() {
    super.initState();
    _tabController = new TabController(
      vsync: this,
      length: 2,
    );
    _tabController.addListener(() {
      print(_tabController.index);
    });
  }

  @override
  Widget build(BuildContext context) {
    return Scaffold(
      appBar: AppBar(
        title: Text("TabBarControllerPage"),
        bottom: TabBar(
          controller: this._tabController,
          tabs: <Widget>[
            Tab(text: "热销"),
            Tab(text: "推荐"),
          ],
        ),
      ),
      body: TabBarView(
        controller: this._tabController,
        children: <Widget>[
          Center(child: Text("热销")),
          Center(child: Text("推荐")),
        ],
      ),
    );
  }
}
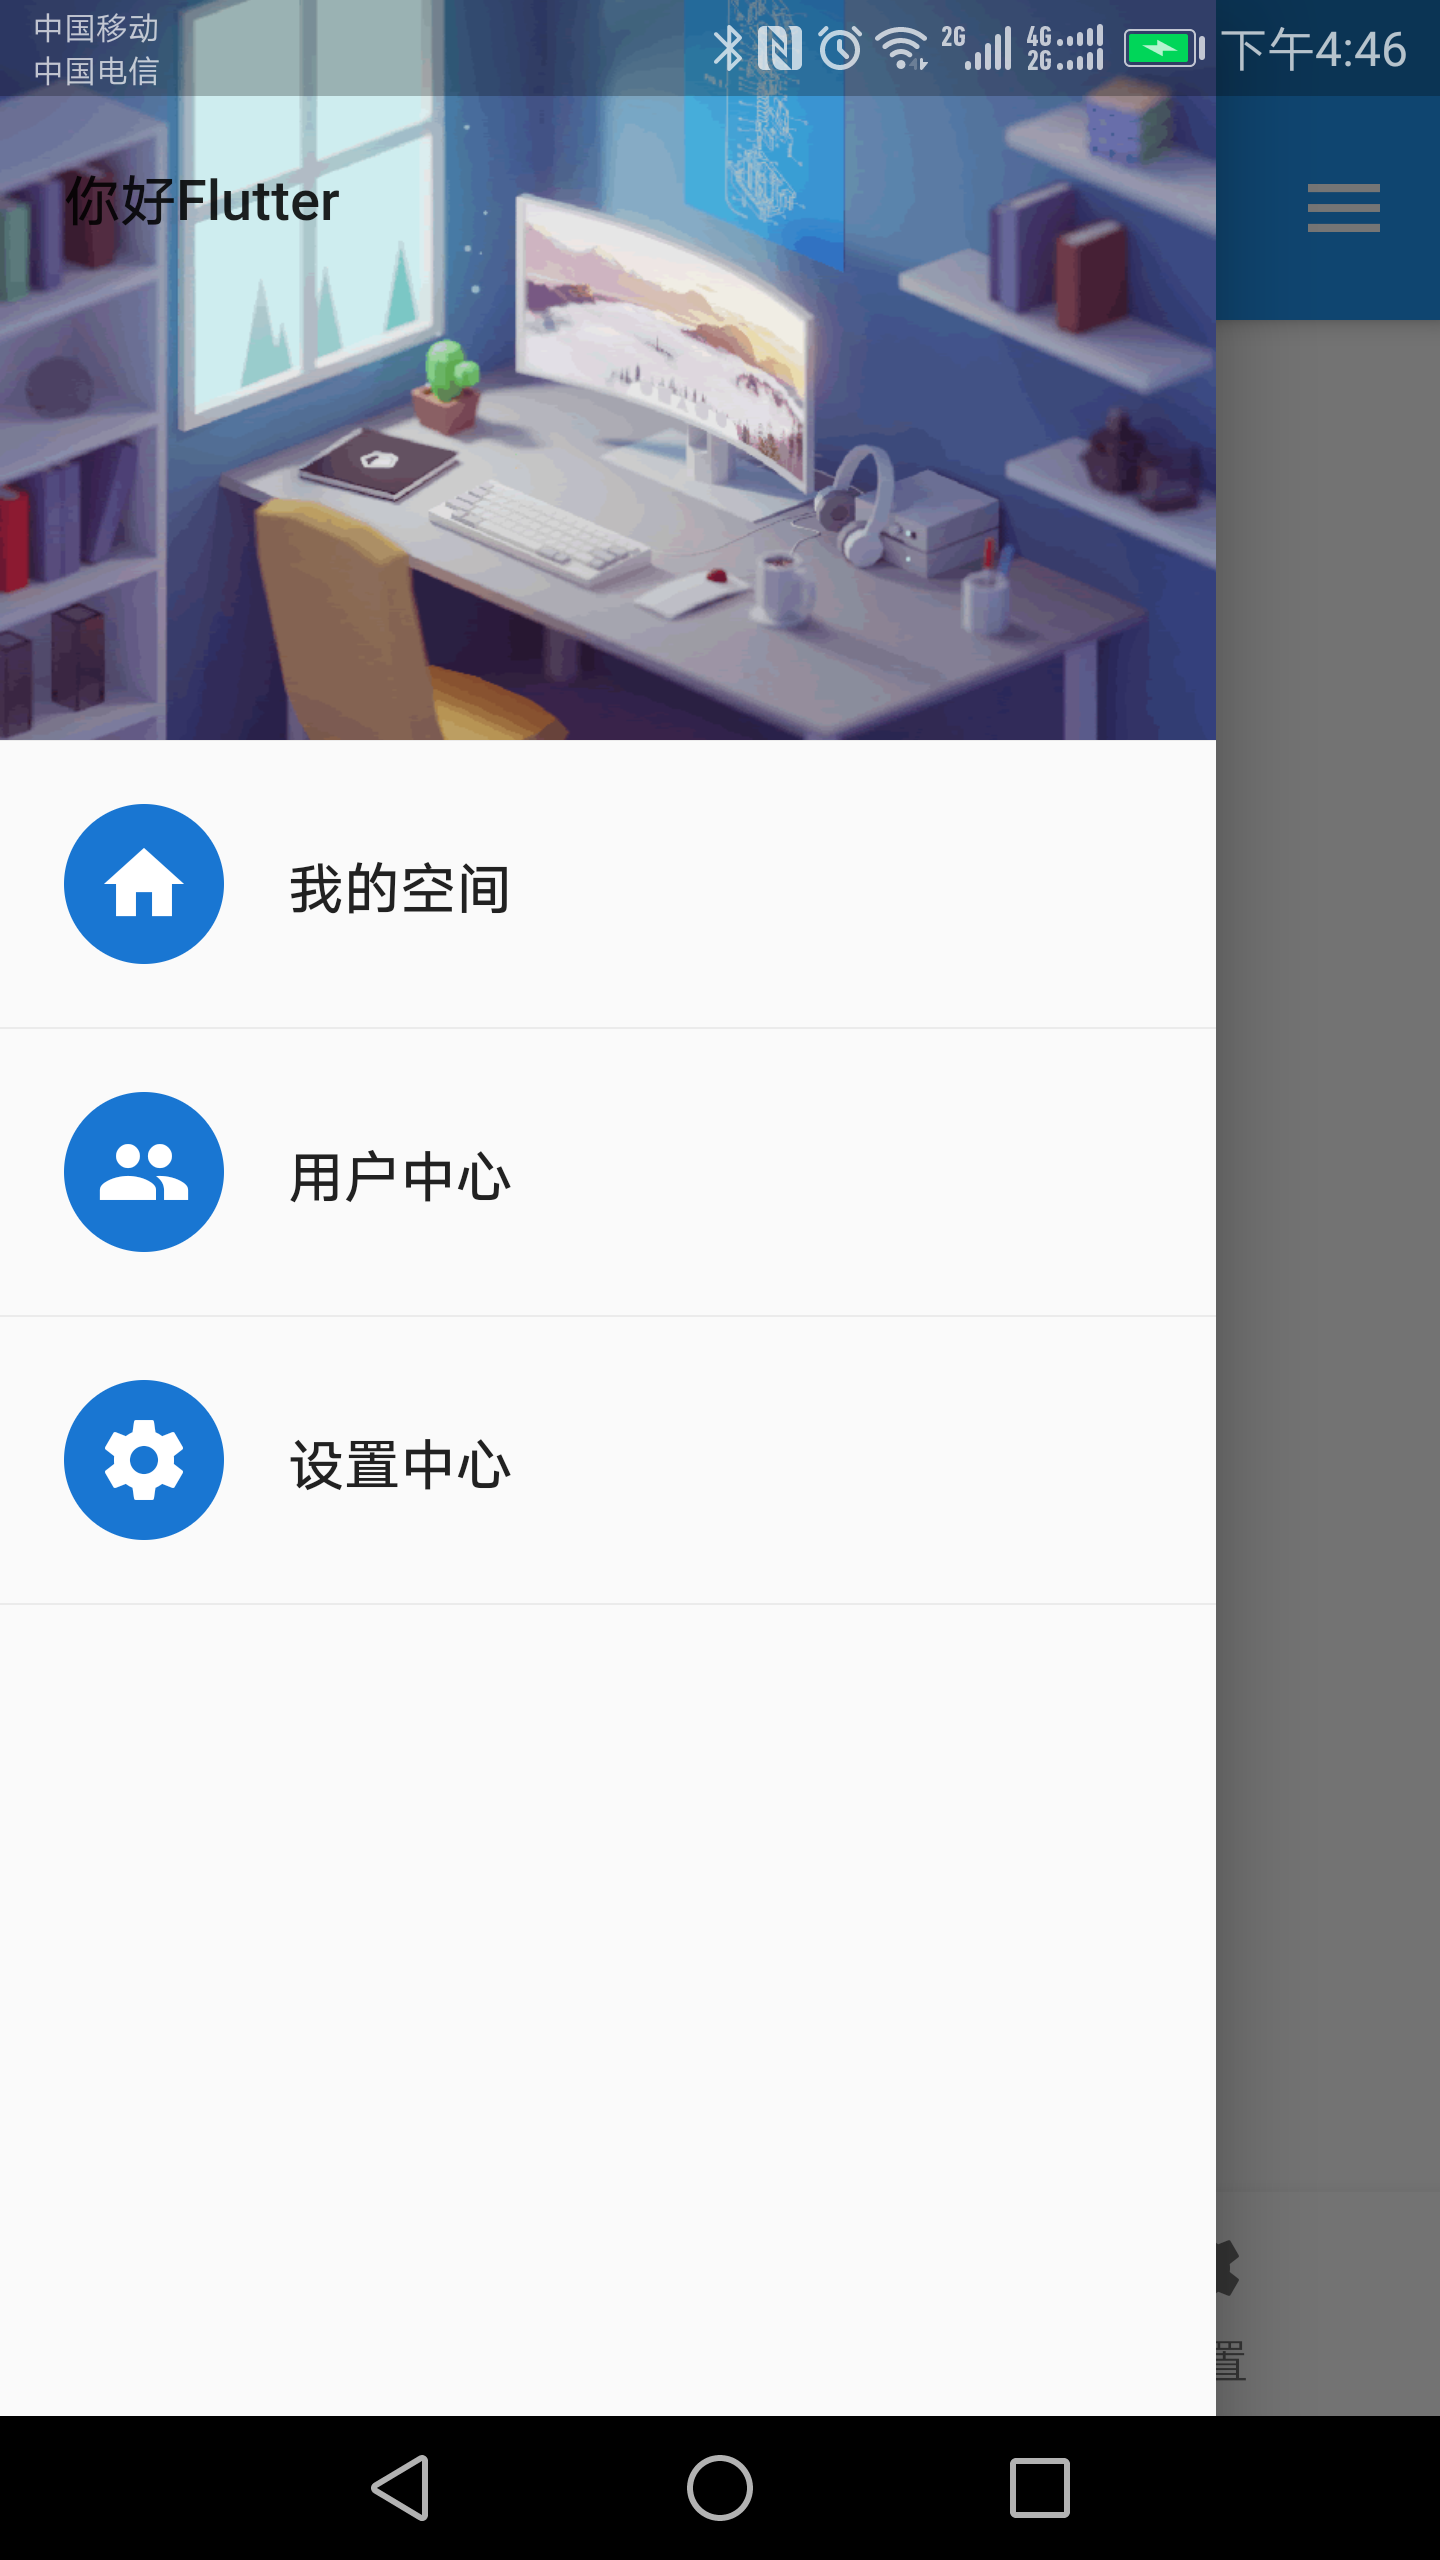
* Drawer(侧边栏)
import 'package:flutter/material.dart';
import 'tabs/Home.dart';
import 'tabs/Category.dart';
import 'tabs/Setting.dart';

class Tabs extends StatefulWidget {
  final int index;
  Tabs({Key key, this.index = 0}) : super(key: key);

  @override
  _TabsState createState() => _TabsState(index);
}

class _TabsState extends State<Tabs> {
  int _currentIndex;
  _TabsState(index) {
    this._currentIndex = index;
  }
  List _pageList = [HomePage(), CategoryPage(), SettingPage()];
  @override
  Widget build(BuildContext context) {
    return Scaffold(
      appBar: AppBar(
        title: Text('Flutter Demo'),
      ),
      body: this._pageList[this._currentIndex],
      bottomNavigationBar: BottomNavigationBar(
        currentIndex: this._currentIndex,
        onTap: (int index) {
          setState(() {
            this._currentIndex = index;
          });
        },
        // type: BottomNavigationBarType.fixed,//可以配置超过4个以上的icon
        items: [
          BottomNavigationBarItem(
            icon: Icon(Icons.home),
            title: Text("首页"),
          ),
          BottomNavigationBarItem(
            icon: Icon(Icons.category),
            title: Text("分类"),
          ),
          BottomNavigationBarItem(
            icon: Icon(Icons.settings),
            title: Text("设置"),
          ),
        ],
      ),
      //左侧边栏
      drawer: Drawer(
        child: Column(
          children: <Widget>[
            //头部
            Row(
              children: <Widget>[
                Expanded(
                  child: DrawerHeader(
                    child: Text("你好Flutter"),
                    decoration: BoxDecoration(
                        image: DecorationImage(
                            image: NetworkImage(
                                "https://www.itying.com/images/flutter/2.png"),
                            fit: BoxFit.cover)),
                  ),
                )
              ],
            ),
            ListTile(
              leading: CircleAvatar(
                child: Icon(Icons.home),
              ),
              title: Text("我的空间"),
            ),
            Divider(),
            ListTile(
              leading: CircleAvatar(
                child: Icon(Icons.people),
              ),
              title: Text("用户中心"),
            ),
            Divider(),
            ListTile(
              leading: CircleAvatar(
                child: Icon(Icons.settings),
              ),
              title: Text("设置中心"),
            ),
            Divider(),
          ],
        ),
      ),
      //右侧边栏
      endDrawer: Drawer(
        child: Text("右侧侧边栏"),
      ),
    );
  }
}
效果图
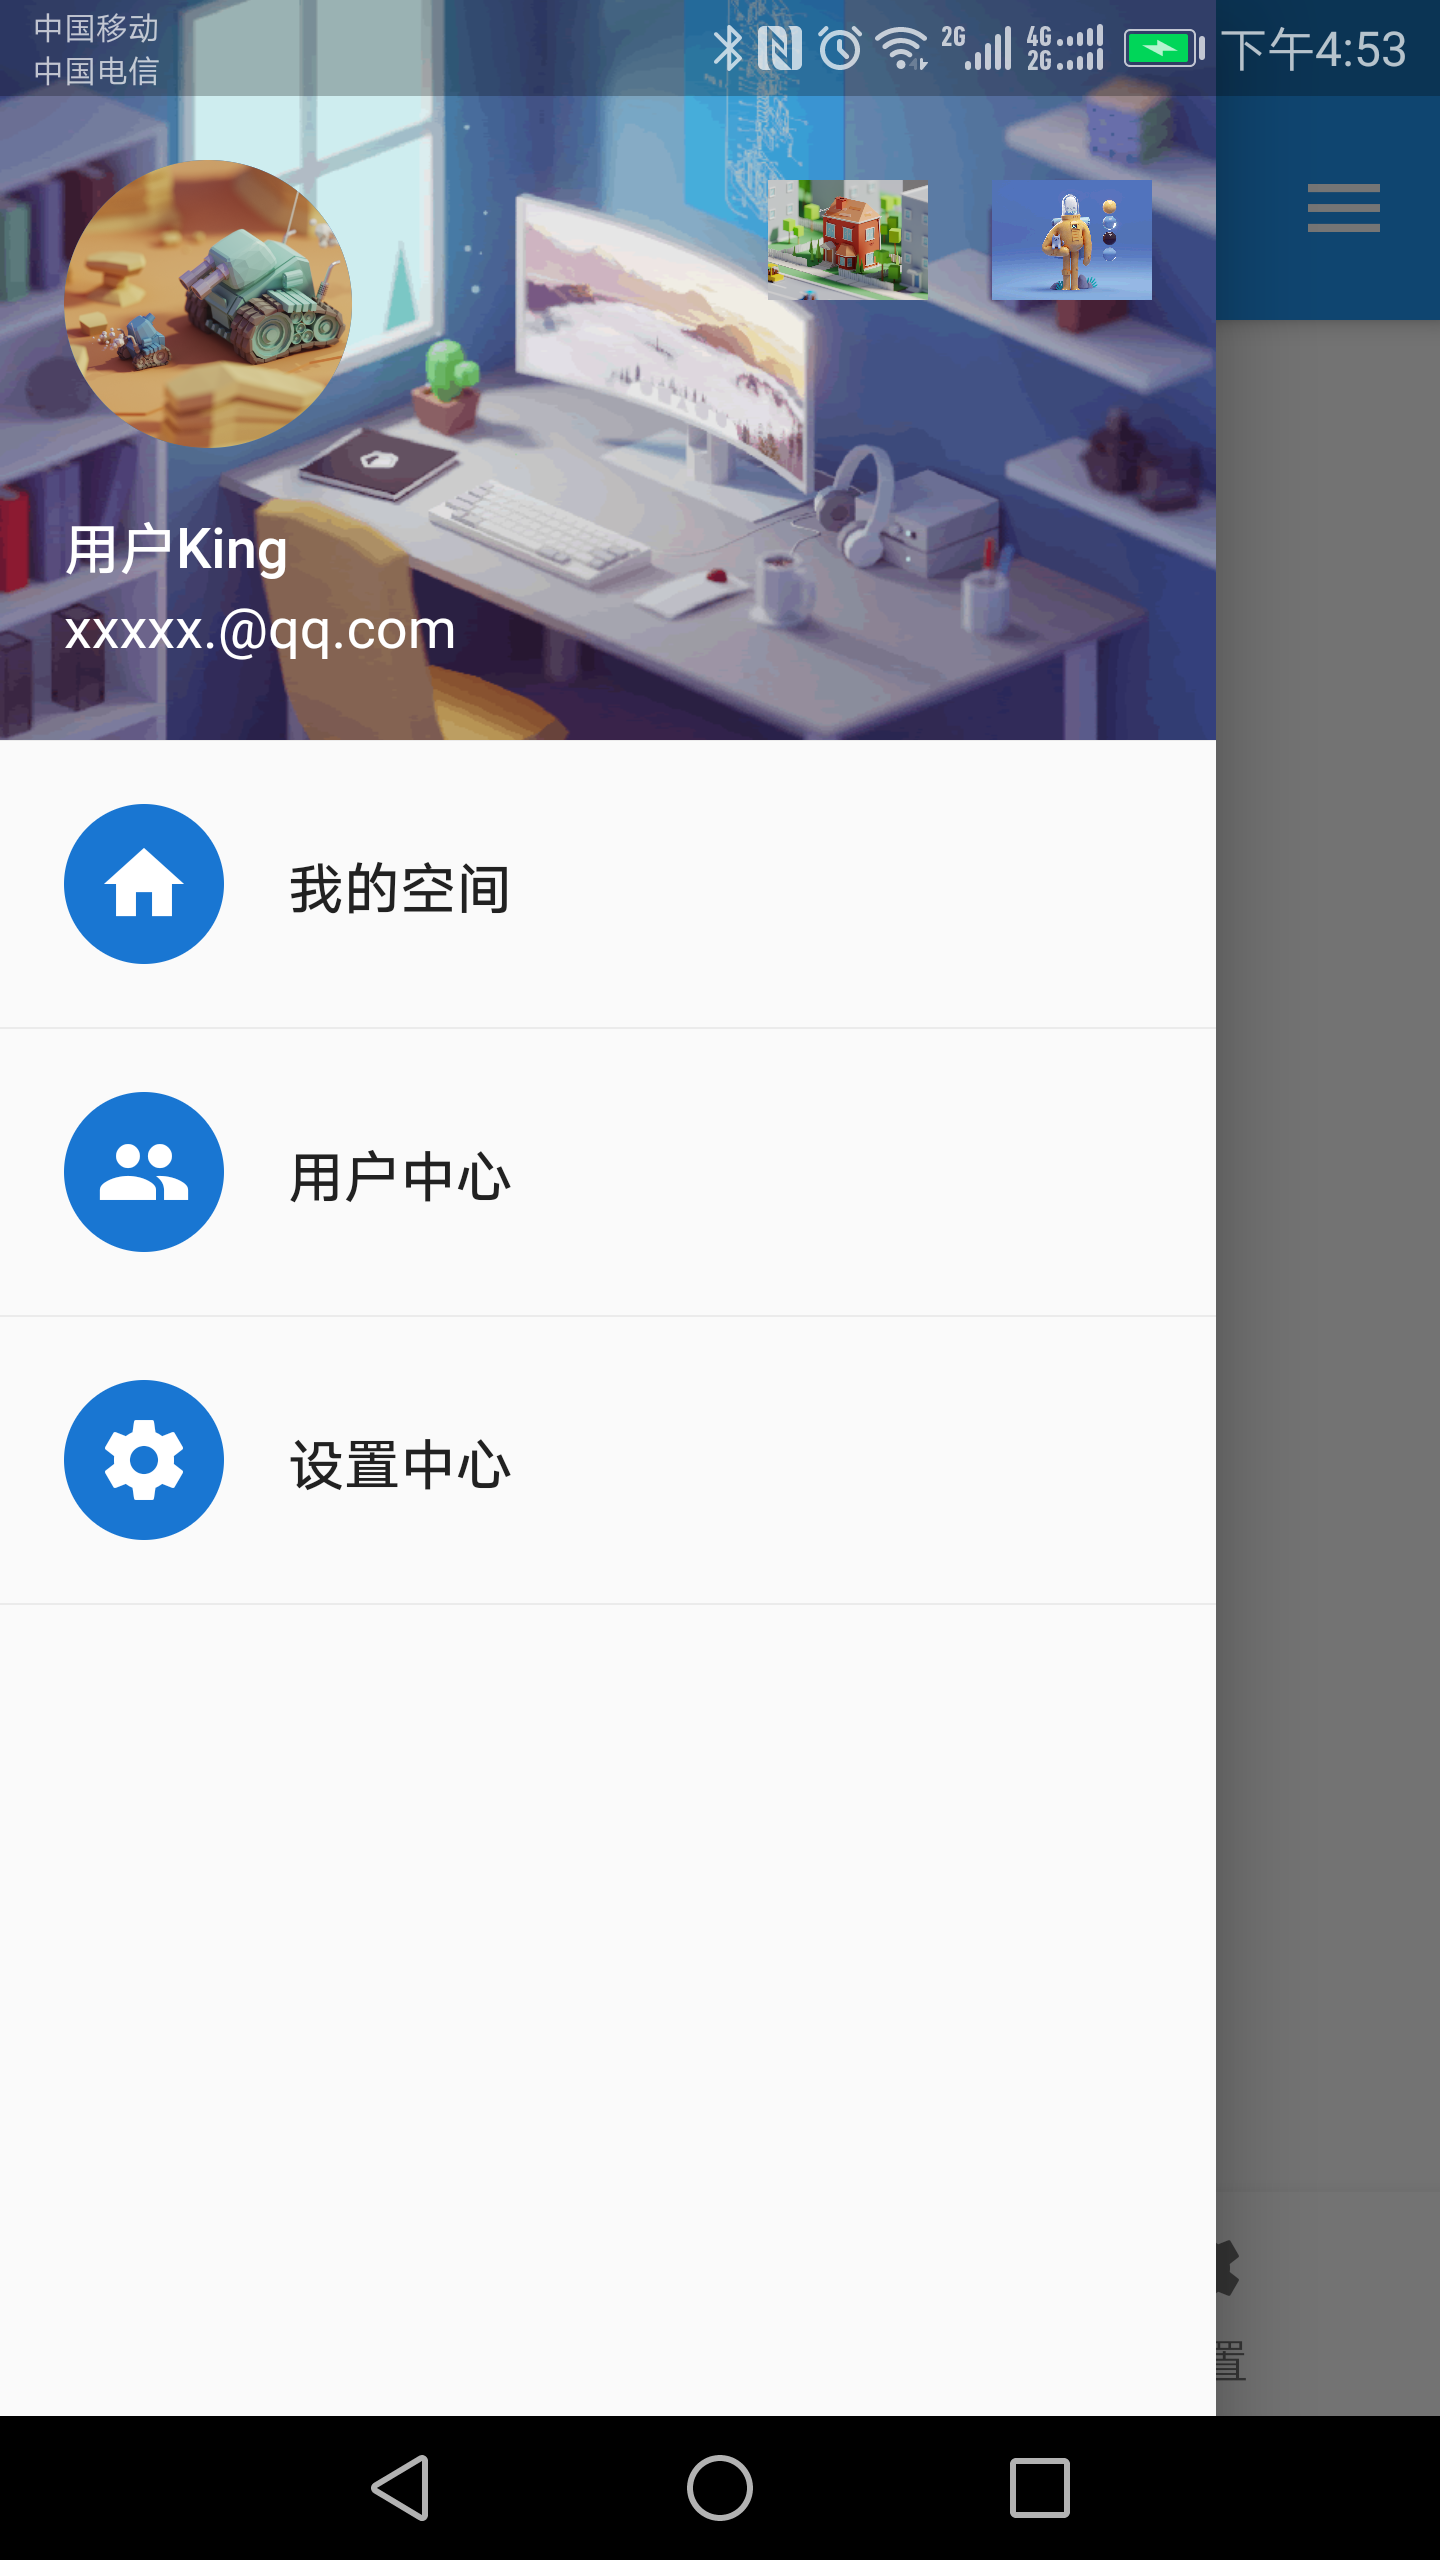
* UserAccountsDrawerHeader (用户信息侧边栏)
import 'package:flutter/material.dart';
import 'tabs/Home.dart';
import 'tabs/Category.dart';
import 'tabs/Setting.dart';

class Tabs extends StatefulWidget {
  final int index;
  Tabs({Key key, this.index = 0}) : super(key: key);

  @override
  _TabsState createState() => _TabsState(index);
}

class _TabsState extends State<Tabs> {
  int _currentIndex;
  _TabsState(index) {
    this._currentIndex = index;
  }
  List _pageList = [HomePage(), CategoryPage(), SettingPage()];
  @override
  Widget build(BuildContext context) {
    return Scaffold(
      appBar: AppBar(
        title: Text('Flutter Demo'),
      ),
      body: this._pageList[this._currentIndex],
      bottomNavigationBar: BottomNavigationBar(
        currentIndex: this._currentIndex,
        onTap: (int index) {
          setState(() {
            this._currentIndex = index;
          });
        },
        // type: BottomNavigationBarType.fixed,//可以配置超过4个以上的icon
        items: [
          BottomNavigationBarItem(
            icon: Icon(Icons.home),
            title: Text("首页"),
          ),
          BottomNavigationBarItem(
            icon: Icon(Icons.category),
            title: Text("分类"),
          ),
          BottomNavigationBarItem(
            icon: Icon(Icons.settings),
            title: Text("设置"),
          ),
        ],
      ),
      //左侧边栏
      drawer: Drawer(
        child: Column(
          children: <Widget>[
            //头部
            Row(
              children: <Widget>[
                Expanded(
                  child: UserAccountsDrawerHeader(
                    accountName: Text("用户King"),
                    accountEmail: Text("xxxxx.@qq.com"),
                    currentAccountPicture: CircleAvatar(
                      backgroundImage: NetworkImage(
                          "https://www.itying.com/images/flutter/3.png"),
                    ),
                    decoration: BoxDecoration(
                      image: DecorationImage(
                          image: NetworkImage(
                              "https://www.itying.com/images/flutter/2.png"),
                          fit: BoxFit.cover),
                    ),
                    otherAccountsPictures: <Widget>[
                      Image.network(
                          "https://www.itying.com/images/flutter/4.png"),
                      Image.network(
                          "https://www.itying.com/images/flutter/5.png"),
                    ],
                  ),
                )
              ],
            ),
            ListTile(
              leading: CircleAvatar(
                child: Icon(Icons.home),
              ),
              title: Text("我的空间"),
            ),
            Divider(),
            ListTile(
              leading: CircleAvatar(
                child: Icon(Icons.people),
              ),
              title: Text("用户中心"),
              onTap: () {
                Navigator.of(context).pop(); //隐藏侧边栏
                Navigator.pushNamed(context, '/user');
              },
            ),
            Divider(),
            ListTile(
              leading: CircleAvatar(
                child: Icon(Icons.settings),
              ),
              title: Text("设置中心"),
            ),
            Divider(),
          ],
        ),
      ),
      //右侧边栏
      endDrawer: Drawer(
        child: Text("右侧侧边栏"),
      ),
    );
  }
}
效果图
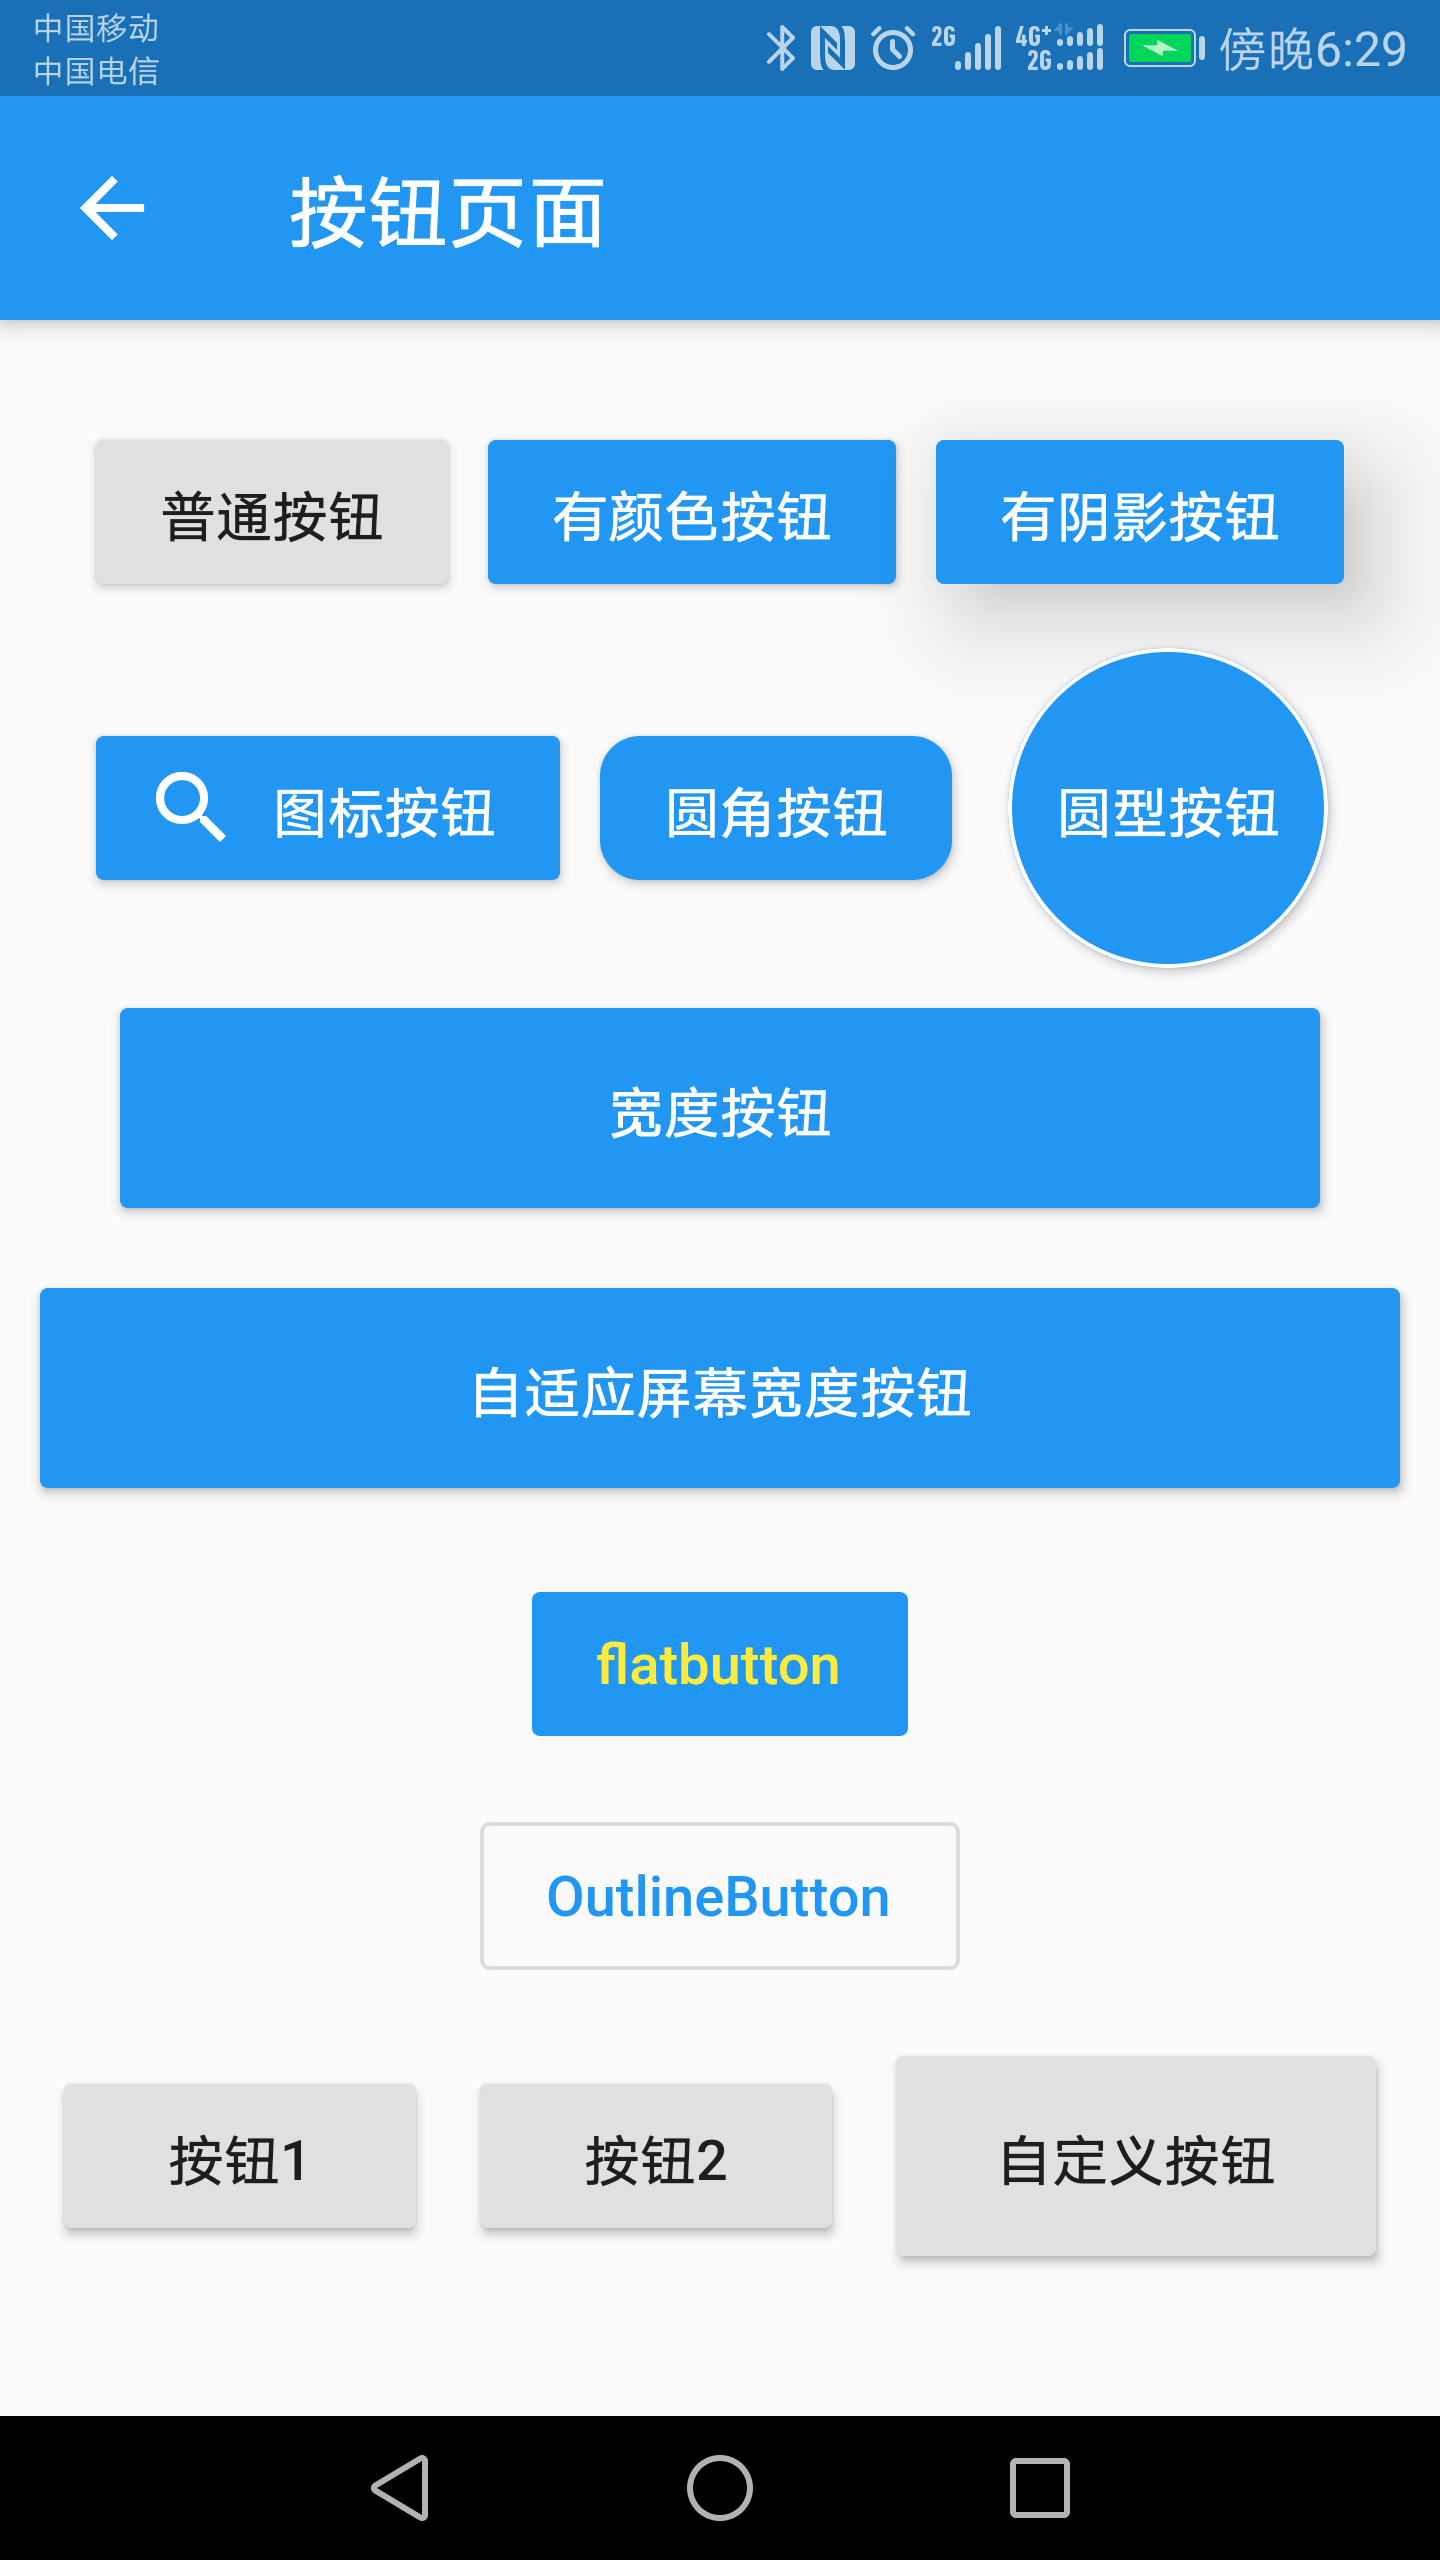
* 各种按钮
import 'package:flutter/material.dart';

class ButtonPage extends StatelessWidget {
  const ButtonPage({Key key}) : super(key: key);

  @override
  Widget build(BuildContext context) {
    return Scaffold(
      appBar: AppBar(
        title: Text("按钮页面"),
      ),
      body: Column(
        mainAxisAlignment: MainAxisAlignment.center,
        children: <Widget>[
          Row(
            mainAxisAlignment: MainAxisAlignment.center,
            children: <Widget>[
              RaisedButton(
                child: Text("普通按钮"),
                onPressed: () {
                  print("普通按钮");
                },
              ),
              SizedBox(width: 10),
              RaisedButton(
                child: Text("有颜色按钮"),
                color: Colors.blue,
                textColor: Colors.white,
                onPressed: () {
                  print("有颜色按钮");
                },
              ),
              SizedBox(width: 10),
              RaisedButton(
                child: Text("有阴影按钮"),
                color: Colors.blue,
                textColor: Colors.white,
                elevation: 20,
                onPressed: () {
                  print("有阴影按钮");
                },
              ),
            ],
          ),
          SizedBox(height: 10),
          Row(
            mainAxisAlignment: MainAxisAlignment.center,
            children: <Widget>[
              RaisedButton.icon(
                icon: Icon(Icons.search),
                label: Text("图标按钮"),
                color: Colors.blue,
                textColor: Colors.white,
                onPressed: () {
                  print("按钮图标");
                },
              ),
              SizedBox(width: 10),
              RaisedButton(
                child: Text("圆角按钮"),
                color: Colors.blue,
                textColor: Colors.white,
                shape: RoundedRectangleBorder(
                    borderRadius: BorderRadius.circular(10)),
                onPressed: () {
                  print("圆角按钮");
                },
              ),
              SizedBox(width: 10),
              Container(
                height: 80,
                child: RaisedButton(
                  child: Text("圆型按钮"),
                  color: Colors.blue,
                  textColor: Colors.white,
                  splashColor: Colors.yellow,
                  shape: CircleBorder(
                      side: BorderSide(
                    color: Colors.white,
                  )),
                  onPressed: () {
                    print("圆型按钮");
                  },
                ),
              ),
            ],
          ),
          SizedBox(height: 10),
          Row(
            mainAxisAlignment: MainAxisAlignment.center,
            children: <Widget>[
              Container(
                width: 300,
                height: 50,
                child: RaisedButton(
                  child: Text("宽度按钮"),
                  color: Colors.blue,
                  textColor: Colors.white,
                  splashColor: Colors.yellow,
                  onPressed: () {
                    print("宽度按钮");
                  },
                ),
              ),
            ],
          ),
          SizedBox(height: 10),
          Row(
            mainAxisAlignment: MainAxisAlignment.center,
            children: <Widget>[
              Expanded(
                child: Container(
                  height: 50,
                  margin: EdgeInsets.all(10),
                  child: RaisedButton(
                    child: Text("自适应屏幕宽度按钮"),
                    color: Colors.blue,
                    textColor: Colors.white,
                    onPressed: () {
                      print("自适应屏幕宽度按钮");
                    },
                  ),
                ),
              )
            ],
          ),
          SizedBox(height: 10),
          FlatButton(
            child: Text("flatbutton"),
            color: Colors.blue,
            textColor: Colors.yellow,
            onPressed: () {
              print("flatbutton");
            },
          ),
          SizedBox(height: 10),
          //无背景色效果
          OutlineButton(
            child: Text("OutlineButton"),
            color: Colors.blue, //没有效果
            textColor: Colors.blue,
            onPressed: () {
              print("OutlineButton");
            },
          ),
          Row(
            mainAxisAlignment: MainAxisAlignment.center,
            children: <Widget>[
              //按钮组
              ButtonBar(
                children: <Widget>[
                  RaisedButton(
                    child: Text("按钮1"),
                    onPressed: () {
                      print("按钮1");
                    },
                  ),
                  RaisedButton(
                    child: Text("按钮2"),
                    onPressed: () {
                      print("按钮2");
                    },
                  ),
                  MyButton(
                    text: "自定义按钮",
                    pressed: () {
                      print("自定义按钮");
                    },
                  )
                ],
              )
            ],
          )
        ],
      ),
    );
  }
}

//自定义按钮组件
class MyButton extends StatelessWidget {
  final text;
  final pressed;
  const MyButton({this.text = '', this.pressed = null});

  @override
  Widget build(BuildContext context) {
    return Container(
      height: 50,
      width: 120,
      child: RaisedButton(
        child: Text(this.text),
        onPressed: this.pressed,
      ),
    );
  }
}
效果图
* 类似闲鱼app底部导航
import 'package:flutter/material.dart';
import 'tabs/Home.dart';
import 'tabs/Category.dart';
import 'tabs/Setting.dart';

class Tabs2 extends StatefulWidget {
  final index;
  Tabs2({Key key, this.index = 0}) : super(key: key);

  _TabsState createState() => _TabsState(this.index);
}

class _TabsState extends State<Tabs2> {
  int _currentIndex;
  _TabsState(index) {
    this._currentIndex = index;
  }

  List _pageList = [
    HomePage(),
    CategoryPage(),
    SettingPage(),
  ];
  @override
  Widget build(BuildContext context) {
    return Scaffold(
      appBar: AppBar(
        title: Text("Flutter App"),
      ),
      floatingActionButton: Container(
        height: 80,
        width: 80,
        padding: EdgeInsets.all(8),
        margin: EdgeInsets.only(top: 10),
        decoration: BoxDecoration(
          borderRadius: BorderRadius.circular(40),
          color: Colors.white,
        ),
        child: FloatingActionButton(
          child: Icon(Icons.add),
          onPressed: () {
            setState(() {
              //改变状态
              this._currentIndex = 2;
            });
          },
          backgroundColor: this._currentIndex == 2 ? Colors.red : Colors.yellow,
        ),
      ),
      floatingActionButtonLocation: FloatingActionButtonLocation.centerDocked,
      body: this._pageList[this._currentIndex],
      bottomNavigationBar: BottomNavigationBar(
        currentIndex: this._currentIndex, //配置对应的索引值选中
        onTap: (int index) {
          setState(() {
            //改变状态
            this._currentIndex = index;
          });
        },
        iconSize: 36.0, //icon的大小
        fixedColor: Colors.red, //选中的颜色
        type: BottomNavigationBarType.fixed, //配置底部tabs可以有多个按钮
        items: [
          BottomNavigationBarItem(icon: Icon(Icons.home), title: Text("首页")),
          BottomNavigationBarItem(icon: Icon(Icons.message), title: Text("消息")),
          BottomNavigationBarItem(
              icon: Icon(Icons.category), title: Text("分类")),
          BottomNavigationBarItem(icon: Icon(Icons.settings), title: Text("设置")),
          BottomNavigationBarItem(icon: Icon(Icons.card_giftcard), title: Text("分享"))
        ],
      ),
      drawer: Drawer(
        child: Column(
          children: <Widget>[
            Row(
              children: <Widget>[
                Expanded(
                    child: UserAccountsDrawerHeader(
                  accountName: Text("大地老师"),
                  accountEmail: Text("dadi@itying.com"),
                  currentAccountPicture: CircleAvatar(
                    backgroundImage: NetworkImage(
                        "https://www.itying.com/images/flutter/3.png"),
                  ),
                  decoration: BoxDecoration(
                      image: DecorationImage(
                    image: NetworkImage(
                        "https://www.itying.com/images/flutter/2.png"),
                    fit: BoxFit.cover,
                  )),
                  otherAccountsPictures: <Widget>[
                    Image.network(
                        "https://www.itying.com/images/flutter/4.png"),
                    Image.network(
                        "https://www.itying.com/images/flutter/5.png"),
                  ],
                ))
              ],
            ),
            ListTile(
              leading: CircleAvatar(child: Icon(Icons.home)),
              title: Text("我的空间"),
            ),
            Divider(),
            ListTile(
              leading: CircleAvatar(child: Icon(Icons.people)),
              title: Text("用户中心"),
              onTap: () {
                Navigator.of(context).pop(); //隐藏侧边栏
                Navigator.pushNamed(context, '/user');
              },
            ),
            Divider(),
            ListTile(
              leading: CircleAvatar(child: Icon(Icons.settings)),
              title: Text("设置中心"),
            ),
            Divider(),
          ],
        ),
      ),
      endDrawer: Drawer(
        child: Text('右侧侧边栏'),
      ),
    );
  }
}
效果图

欢迎关注我的微信公众号:安卓圈