概述
前面几篇文章我们一直是在实现SpringCloud体系中的认证功能模块,验证当前登录用户的身份;本篇文章我们来讲SpringCloud体系中的授权功能,验证你是否能访问某些功能。
认证授权
很多同学分不清认证和授权,把他们当同一个概念来看待。其实他们是两个完全不同的概念,举个容易理解的例子:
你是张三,某知名论坛的版主。在你登录论坛的时候输入账号密码登录成功,这就证明了你是张三,这个过程叫做认证(authentication)。登录后系统判断你是版主,你可以给别人发表的帖子加亮、置顶,这个校验过程就是授权(authorization)。
简而言之,认证过程是告诉你你是谁,而授权过程是告诉你你能做什么?
在SpringCloud 体系中实现授权一般使用以下两种方式:
基于路径匹配器授权
系统所有请求都会经过Springcloud Gateway 网关,网关收到请求后判断当前用户是否拥有访问路径的权限,主要利用ReactiveAuthorizationManager#check(Mono<Authentication> authenticationMono, AuthorizationContext authorizationContext)方法进行校验。这种方法主要是基于用户 拥有的资源路径进行考量。
基于方法拦截
使用这种方法在网关层不进行拦截,在需要进行权限校验的方法上加上SpringSecurity注解,判断当前用户是否有访问此方法的权限,当然也可以使用自定义注解或使用AOP进行拦截校验,这几种实现方式我们都统称为基于方法拦截。这种方法一般会基于用户 拥有的资源标识进行考量。
接下来我们分别使用两种不同方式实现SpringCloud 授权过程。
核心代码实现
不管是使用哪种方式我们都得先知道当前用户所拥有的角色资源,所以我们先利用RBAC模型建立一个简单的用户、角色、资源表结构并在项目中建立对应的Service、Dao层。
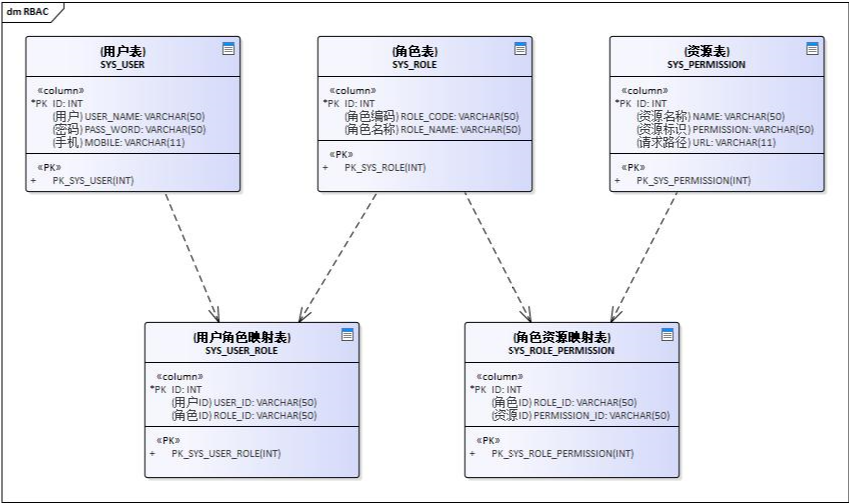 (资源表中建立了资源标识和请求路径两个字段,方便实现代码逻辑)
基于路径匹配器授权
- 改造自定义UserDetailService
还记得我们原来自定义的UserDetailService吗,在loadUserByUsername()方法中需要返回UserDetails对象。之前我们返回的是固定的 'ADMIN' 角色,这里要改成从数据库中获取真实的角色,并将与角色对应的资源都放到UserDetails对象中。
`@Override
public UserDetails loadUserByUsername(String userName) throws UsernameNotFoundException {
//获取本地用户
SysUser sysUser = sysUserMapper.selectByUserName(userName);
if(sysUser != null){
//获取当前用户的所有角色
List
sysUser.setRoles(roleList.stream().map(SysRole::getRoleCode).collect(Collectors.toList()));
List
//获取所有角色的权限
List
sysUser.setPermissions(permissionList.stream().map(SysPermission::getUrl).collect(Collectors.toList()));
//构建oauth2的用户
return buildUserDetails(sysUser);
}else{
throw new UsernameNotFoundException("用户["+userName+"]不存在");
}
}
/**
* 构建oAuth2用户,将角色和权限赋值给用户,角色使用ROLE_作为前缀
* @param sysUser 系统用户
* @return UserDetails
*/
private UserDetails buildUserDetails(SysUser sysUser) {
Set
List
if(!CollectionUtils.isEmpty(roles)){
roles.forEach(item -> authSet.add(CloudConstant.ROLE_PREFIX + item));
authSet.addAll(sysUser.getPermissions());
}
List
return new User(
sysUser.getUsername(),
sysUser.getPassword(),
authorityList
);
}
`
注意这里是将SysPermission::getUrl放入用户对应权限中。
- 改造AccessManager实现权限判断
@Autowired private AccessManager accessManager; @Bean SecurityWebFilterChain webFluxSecurityFilterChain(ServerHttpSecurity http) throws Exception{ ... http .httpBasic().disable() .csrf().disable() .authorizeExchange() .pathMatchers(HttpMethod.OPTIONS).permitAll() .anyExchange().access(accessManager) ... return http.build(); }
在原来网关配置中我们注入了自定义的ReactiveAuthorizationManager用于权限判断,我们需要实现根据请求路径与用户拥有的资源路径进行判断,若存在对应的资源访问路径则继续转发给后端服务,负责返回“没有权限访问”。
`@Slf4j
@Component
public class AccessManager implements ReactiveAuthorizationManager
private Set
private static final AntPathMatcher antPathMatcher = new AntPathMatcher();
public AccessManager (){
permitAll.add("/");
permitAll.add("/error");
permitAll.add("/favicon.ico");
//如果生产环境开启swagger调试
permitAll.add("//v2/api-docs/");
permitAll.add("//swagger-resources/");
permitAll.add("/webjars/");
permitAll.add("/doc.html");
permitAll.add("/swagger-ui.html");
permitAll.add("//oauth/**");
}
/**
* 实现权限验证判断
*/
@Override
public Mono
ServerWebExchange exchange = authorizationContext.getExchange();
//请求资源
String requestPath = exchange.getRequest().getURI().getPath();
// 是否直接放行
if (permitAll(requestPath)) {
return Mono.just(new AuthorizationDecision(true));
}
return authenticationMono.map(auth -> {
return new AuthorizationDecision(checkAuthorities(auth, requestPath));
}).defaultIfEmpty(new AuthorizationDecision(false));
}
/**
* 校验是否属于静态资源
* @param requestPath 请求路径
* @return
*/
private boolean permitAll(String requestPath) {
return permitAll.stream()
.filter(r -> antPathMatcher.match(r, requestPath)).findFirst().isPresent();
}
/**
* 权限校验
* @author http://www.javadaily.cn
* @param auth 用户权限
* @param requestPath 请求路径
* @return
*/
private boolean checkAuthorities(Authentication auth, String requestPath) {
if(auth instanceof OAuth2Authentication){
Collection<? extends GrantedAuthority> authorities = auth.getAuthorities();
return authorities.stream()
.map(GrantedAuthority::getAuthority)
.filter(item -> !item.startsWith(CloudConstant.ROLE_PREFIX))
.anyMatch(permission -> antPathMatcher.match(permission, requestPath));
}
return false;
}
}
`
- 测试
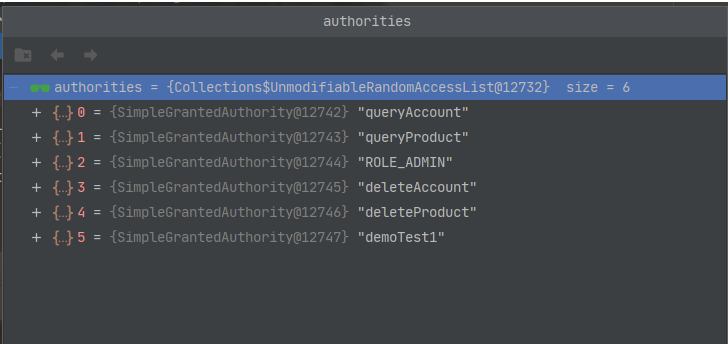
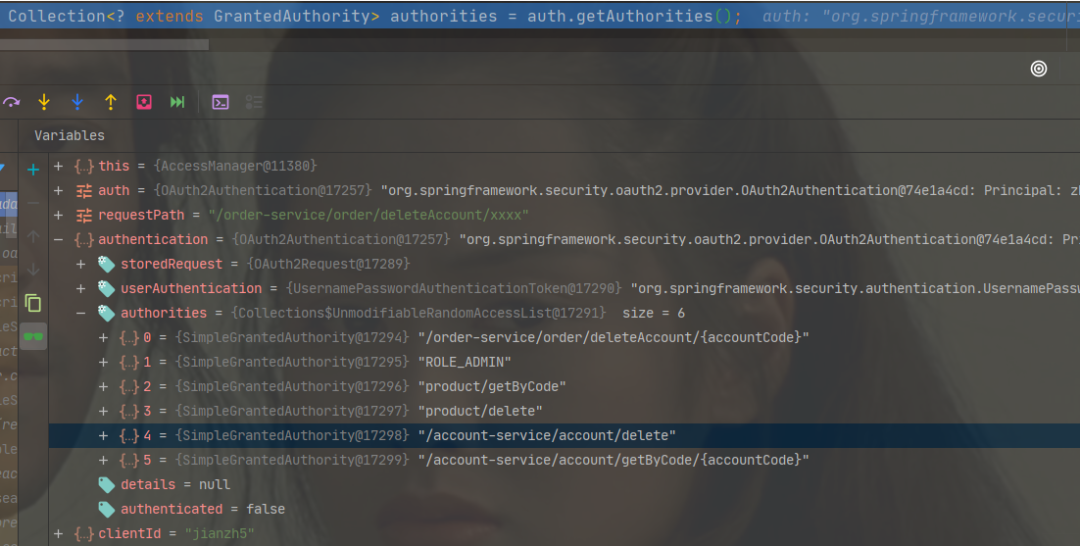 查看当前用户拥有的所有权限
 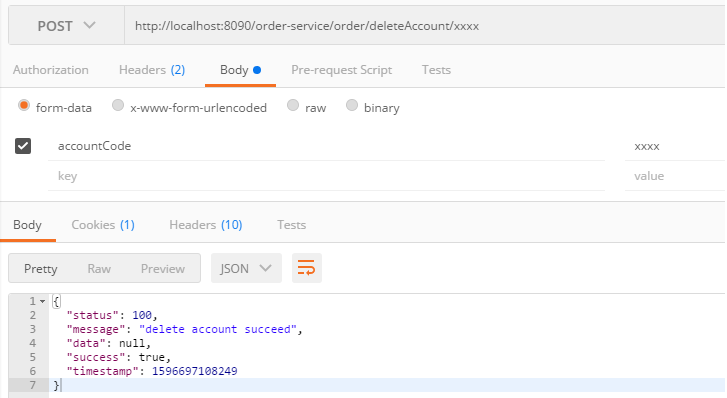 请求正常权限范围内资源
 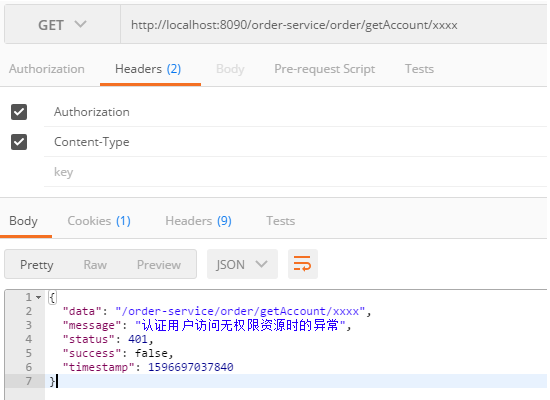 访问没有权限的资源
基于方法拦截实现
基于方法拦截实现在本文中是基于SpringSecurity内置标签@PreAuthorize,然后通过实现自定义的校验方法hasPrivilege()完成。再强调一遍这里实现方式有很多种,不一定非要采取本文的实现方式。
此方法下的代码逻辑需要写在资源服务器中,也就是提供具体业务服务的后端服务。由于每个后端服务都需要加入这些代码,所以建议抽取出公共的starter模块,各个资源服务器引用starter模块即可。
”
- 改造UserDetailService
改造过程跟上面过程一样,只不过这里是需要将资源标识放入用户权限中。
sysUser.setPermissions( permissionList.stream() .map(SysPermission::getPermission) .collect(Collectors.toList()) );
删除网关拦截配置
由于不需要使用网关拦截,所以我们需要将AccessManager中的校验逻辑删除并全部返回true。自定义方法校验逻辑
`/**
* 自定义权限校验
* @author http://www.javadaily.cn
*/
public class CustomMethodSecurityExpressionRoot extends SecurityExpressionRoot implements MethodSecurityExpressionOperations {
private static final AntPathMatcher antPathMatcher = new AntPathMatcher();
public CustomMethodSecurityExpressionRoot(Authentication authentication) {
super(authentication);
}
private Object filterObject;
private Object returnObject;
public boolean hasPrivilege(String permission){
Collection<? extends GrantedAuthority> authorities = authentication.getAuthorities();
return authorities.stream()
.map(GrantedAuthority::getAuthority)
.filter(item -> !item.startsWith(CloudConstant.ROLE_PREFIX))
.anyMatch(x -> antPathMatcher.match(x, permission));
}
...
}
`
- 自定义方法拦截处理器
`/**
* @author http://www.javadaily.cn
*/
public class CustomMethodSecurityExpressionHandler extends DefaultMethodSecurityExpressionHandler {
private AuthenticationTrustResolver trustResolver = new AuthenticationTrustResolverImpl();
@Override
protected MethodSecurityExpressionOperations createSecurityExpressionRoot(
Authentication authentication, MethodInvocation invocation) {
CustomMethodSecurityExpressionRoot root =
new CustomMethodSecurityExpressionRoot(authentication);
root.setPermissionEvaluator(getPermissionEvaluator());
root.setTrustResolver(this.trustResolver);
root.setRoleHierarchy(getRoleHierarchy());
return root;
}
}
`
- 启用方法校验
@Configuration @EnableGlobalMethodSecurity(prePostEnabled = true) public class MethodSecurityConfig extends GlobalMethodSecurityConfiguration { @Override protected MethodSecurityExpressionHandler createExpressionHandler() { CustomMethodSecurityExpressionHandler expressionHandler = new CustomMethodSecurityExpressionHandler(); return expressionHandler; } }
- 在需要权限校验的方法上加上注解
@ApiOperation("select接口") @GetMapping("/account/getByCode/{accountCode}") @PreAuthorize("hasPrivilege('queryAccount')") public ResultData<AccountDTO> getByCode(@PathVariable(value = "accountCode") String accountCode){ log.info("get account detail,accountCode is :{}",accountCode); AccountDTO accountDTO = accountService.selectByCode(accountCode); return ResultData.success(accountDTO); }
- 测试
 通过debug可以看到这里获取到的用户权限是资源表中的资源标识。
小结
个人觉得在SpringCloud微服务架构中最复杂的一个模块就是用户的认证授权模块,本文通过两种实现方法解决了授权问题,解决你能做什么的问题。
大家可以根据实际业务场景选择具体的实现方式,当然了个人还是建议使用第一种基于路径匹配器授权的方式,只需要在网关层进行拦截即可。
本篇文章是SpringCloud alibab 实战系列的第21篇,如果大家对之前的文章感兴趣可以移步至个人博客http://javadaily.cn/tags/SpringCloud 查看。
如果本文对你有帮助,
别忘记给我个三连:
点赞,转发,评论
。
咱们下期见!
收藏 等于白嫖,点赞 才是真情!
End
干货分享
这里为大家准备了一份小小的礼物,关注公众号,输入如下代码,即可获得百度网盘地址,无套路领取!
001:《程序员必读书籍》
002:《从无到有搭建中小型互联网公司后台服务架构与运维架构》
003:《互联网企业高并发解决方案》
004:《互联网架构教学视频》
006:《SpringBoot实现点餐系统》
007:《SpringSecurity实战视频》
008:《Hadoop实战教学视频》
009:《腾讯2019Techo开发者大会PPT》
010: 微信交流群
近期热文top

我就知道你“在看”

本文分享自微信公众号 - JAVA日知录(javadaily)。
如有侵权,请联系 support@oschina.cn 删除。
本文参与“OSC源创计划”,欢迎正在阅读的你也加入,一起分享。