
WEB框架的本质
对于所有的Web应用,本质上其实就是一个socket服务端,用户的浏览器其实就是一个socket客户端。
#!/usr/bin/env python
#coding:utf-8

import socket

def handle_request(client):
    buf = client.recv(1024)
    client.send("HTTP/1.1 200 OK\r\n\r\n")
    client.send("Hello, Seven")

def main():
    sock = socket.socket(socket.AF_INET, socket.SOCK_STREAM)
    sock.bind(('localhost',8000))
    sock.listen(5)

    while True:
        connection, address = sock.accept()
        handle_request(connection)
        connection.close()

if __name__ == '__main__':
    main()
上述通过socket来实现了其本质,而对于真实开发中的python web程序来说,一般会分为两部分:服务器程序和应用程序。服务器程序负责对socket服务器进行封装,并在请求到来时,对请求的各种数据进行整理。应用程序则负责具体的逻辑处理。为了方便应用程序的开发,就出现了众多的Web框架,例如:Django、Flask、web.py 等。不同的框架有不同的开发方式,但是无论如何,开发出的应用程序都要和服务器程序配合,才能为用户提供服务。这样,服务器程序就需要为不同的框架提供不同的支持。这样混乱的局面无论对于服务器还是框架,都是不好的。对服务器来说,需要支持各种不同框架,对框架来说,只有支持它的服务器才能被开发出的应用使用。这时候,标准化就变得尤为重要。我们可以设立一个标准,只要服务器程序支持这个标准,框架也支持这个标准,那么他们就可以配合使用。一旦标准确定,双方各自实现。这样,服务器可以支持更多支持标准的框架,框架也可以使用更多支持标准的服务器。
WSGI(Web Server Gateway Interface)是一种规范,它定义了使用python编写的web app与web server之间接口格式,实现web app与web server间的解耦。
python标准库提供的独立WSGI服务器称为wsgiref。
from wsgiref.simple_server import make_server


def RunServer(environ, start_response):
    start_response('200 OK', [('Content-Type', 'text/html')])
    return [bytes('<h1>Hello, web!</h1>', encoding='utf-8'), ]


if __name__ == '__main__':
    httpd = make_server('', 8000, RunServer)
    print("Serving HTTP on port 8000...")
    httpd.serve_forever()
Python的WEB框架有Django、Tornado、Flask 等多种,Django相较与其他WEB框架其优势为:大而全,框架本身集成了ORM、模型绑定、模板引擎、缓存、Session等诸多功能。
Django工程前基本配置
一、安装Django
pip install django
二、创建Django工程
- 终端命令:django-admin startproject sitename(工程名称)
- IDE创建Django程序时,本质上都是自动执行上述命令
三、程序目录
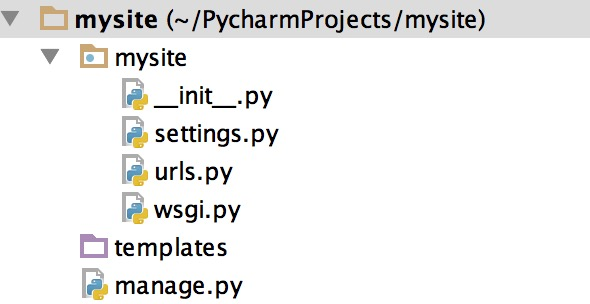
mysite
- mysite # 对整个程序进行配置
- init
- settings # 配置文件
- url # URL对应关系
- wsgi # 遵循WSIG规范,uwsgi + nginx
- manage.py # 管理Django程序:
- python manage.py
- python manage.py startapp xx
- python manage.py makemigrations
- python manage.py migrate
-templates #放置网页内容
# 运行Django功能
python manage.py runserver 127.0.0.1:8000
四、创建app
# 创建app
python manage.py startapp cmdb
python manage.py startapp openstack
python manage.py startapp xxoo....

app:
migrations 数据修改表结构
admin Django为我们提供的后台管理
apps 配置当前app
models ORM,写指定的类 通过命令可以创建数据库结构
tests 单元测试
views 业务代码
五、工程前的默认配置
1.配置模板的路径


 1 MIDDLEWARE = [
 2     'django.middleware.security.SecurityMiddleware',
 3     'django.contrib.sessions.middleware.SessionMiddleware',
 4     'django.middleware.common.CommonMiddleware',
 5     # 'django.middleware.csrf.CsrfViewMiddleware',
 6     'django.contrib.auth.middleware.AuthenticationMiddleware',
 7     'django.contrib.messages.middleware.MessageMiddleware',
 8     'django.middleware.clickjacking.XFrameOptionsMiddleware',
 9 ]
10
11 ROOT_URLCONF = 's14day19.urls'
12
13 TEMPLATES = [
14     {
15         'BACKEND': 'django.template.backends.django.DjangoTemplates',
16         'DIRS': [os.path.join(BASE_DIR, 'templates')]
17         ,
18         'APP_DIRS': True,
19         'OPTIONS': {
20             'context_processors': [
21                 'django.template.context_processors.debug',
22                 'django.template.context_processors.request',
23                 'django.contrib.auth.context_processors.auth',
24                 'django.contrib.messages.context_processors.messages',
25             ],
26         },
27     },
28 ]
settings.py
2.配置静态目录
新建static目录
settings.py中添加
STATIC_URL = '/static/'
STATICFILES_DIRS = (
    os.path.join(BASE_DIR,"static"),
)
下面就可以编写程序了
编写程序
Django请求生命周期
-> URL对应关系(匹配) -> 视图函数 -> 返回用户字符串
-> URL对应关系(匹配) -> 视图函数 -> 打开一个HTML文件,读取内容
路由系统
1.单一路由的url
urls.py
from django.contrib import admin
from django.urls import path
from cmdb import views

urlpatterns = [
    path('admin/', admin.site.urls),
    path('login/', views.login),
    path('home/', views.home),

]
2.基于正则表达式的url
re_path('detail-(\d+).html', views.detail),
#一个函数对应多个页面
re_path('detail-(\d+)-(\d+).html', views.detail),
#nid ,uid  一定按照顺序
re_path('detail-(?P<nid>\d+)-(?P<uid>\d+).html', views.detail),
#绑定nid和uid


 1 # def detail(request,nid):
 2 #     return HttpResponse(nid)
 3 #     # n = request.GET.get("nid")
 4 #
 5 #     # info = USER_DICT[nid]
 6 #     # return render(request,"detail.html",{"info":info})
 7 # def detail(request, nid):
 8 #     info = USER_DICT[nid]
 9 #     return render(request,"detail.html",{"info":info})
10 def detail(request,nid,uid):
11     print(nid,uid)
12
13     return HttpResponse(nid)
14     # info = USER_DICT[nid]
15     # return render(request,"detail.html",{"info":info})
views


 1 <!DOCTYPE html>
 2 <html lang="en">
 3 <head>
 4     <meta charset="UTF-8">
 5     <title>Title</title>
 6 </head>
 7 <body>
 8     {{ user_dict.user }}
 9     <ul>
10         {% for k,row in user_dict.items %}
11             <li><a target="_blank" href="/detail-{{ k }}.html">{{ row.user }}</a></li>
12         {% endfor %}
13     </ul>
14     <!--
15     <ul>
16         {% for k,row in user_dict.items %}
17             <li><a target="_blank" href="https://my.oschina.net/detail/?nid={{ k }}">{{ row.user }}</a></li>
18         {% endfor %}
19     </ul>
20     -->
21
22 </body>
23 </html>
index.html


 1 <!DOCTYPE html>
 2 <html lang="en">
 3 <head>
 4     <meta charset="UTF-8">
 5     <title>Title</title>
 6 </head>
 7 <body>
 8     <h1>详细信息</h1>
 9     <h3>用户名:{{ info.user }}</h3>
10     <h3>密码:{{ info.password }}</h3>
11     <h3>邮箱:{{ info.email }}</h3>
12
13 </body>
14 </html>
detail.html
3.为路由映射设置名称
对URL路由关系进行命名, ***** 以后可以根据此名称生成自己想要的URL *****
urls.py
urlpatterns = [
    path('indfasfasdfdex/', views.index, name="index1"),
    re_path('ind/(\d+)/', views.index, name="index2"),
    re_path('ind/(\d+)/(\d+)/', views.index, name="index3"),
    re_path('ind/(?P<nid>\d+)/(?P<uid>\d+)/', views.index, name="index4"),
]
views.py
def func(request, *args, **kwargs):
    from django.urls import reverse

    url1 = reverse('index1')                                         # indefasfasdfdex/
    url2 = reverse('index3', args=(1,2,))                       # ind/1/2/
    url3 = reverse('index4', kwargs={'pid': 1, "nid": 9})  #ind/1/9/
xxx.html
{% url "index1" %}                      # indfasfasdfdex/
{% url "index2" 1 2 %}                # ind/1/2/
{% url "index3" pid=1 nid=9 %}   # ind/1/9/
注:
# 当前的URL
request.path_info
4.路由分发-----多级路由
主目录下的urls.py
urlpatterns = [
    path('cmdb/',include("app01.urls")),
    path('monitor/',include("app02.urls"))

]
app01下添加urls.py
from django.urls import path,re_path
from app01 import views

urlpatterns = [

    path('index/', views.index),

]
app02下添加urls.py
from django.urls import path,re_path
from app02 import views

urlpatterns = [

    path('index/', views.index),

]
5.默认值
url(r'^manage/(?P<name>\w*)', views.manage,{'id':333}),
6.命名空间
project.urls.py
from django.conf.urls import url,include

urlpatterns = [
    url(r'^a/', include('app01.urls', namespace='author-polls')),
    url(r'^b/', include('app01.urls', namespace='publisher-polls')),
]
app01.urls.py
from django.conf.urls import url
from app01 import views

app_name = 'app01'
urlpatterns = [
    url(r'^(?P<pk>\d+)/$', views.detail, name='detail')
]
app01.views.py
def detail(request, pk):
    print(request.resolver_match)
    return HttpResponse(pk)
以上定义带命名空间的url之后,使用name生成URL时候,应该如下:
- v = reverse('app01:detail', kwargs={'pk':11})
- {% url 'app01:detail' pk=12 pp=99 %}
django中的路由系统和其他语言的框架有所不同,在django中每一个请求的url都要有一条路由映射,这样才能将请求交给对一个的view中的函数去处理。其他大部分的Web框架则是对一类的url请求做一条路由映射,从而是路由系统变得简洁。
视图
views.py
def func(request):
# 包含所有的请求数据
...
return HttpResponse('字符串')
return render(request, 'index.html', {''})
retrun redirect('URL')
from django.shortcuts import render
from django.shortcuts import HttpResponse
from django.shortcuts import redirect

USER_LIST=[
    {"username":"zhangsan","gender":"man","email":"abc@123.com"},
    {"username":"zhangsi","gender":"woman","email":"abc@123.com"},
    {"username":"zhangwu","gender":"man","email":"abc@123.com"},
]

def home(request):
    print(request.method)
    if request.method == "POST":
        user=request.POST.get("username")
        gen=request.POST.get("gender")
        ema=request.POST.get("email")
        temp = {"username":user,"gender":gen,"email":ema}
        USER_LIST.append(temp)
    return render(request,"home.html",{"user_list":USER_LIST})


def login(request):
    # f = open("templates/login.html","r",encoding="utf-8")
    # date = f.read()
    # f.close()

    error_msg = " "
    if request.method == "POST":
        user = request.POST.get("user",None)
        pwd = request.POST.get("pwd",None)

        if user=="root" and pwd=="123":
            return redirect("http://www.baidu.com")
        else:
            error_msg = "用户名密码错误"

    return render(request,"login.html",{"error_msg":error_msg})
1.获取多数据和文件上传


 1 <!DOCTYPE html>
 2 <html lang="en">
 3 <head>
 4     <meta charset="UTF-8">
 5     <title>Title</title>
 6 </head>
 7 <body>
 8     <form action="/login/" method="POST" enctype="multipart/form-data">
 9         <p>
10             <input type="text" name="user" placeholder="用户名" />
11         </p>
12         <p>
13             <input type="password" name="password" placeholder="密码" />
14         </p>
15         <p>
16             男:<input type="radio" name="gender" value="1"/>
17             女:<input type="radio" name="gender" value="2"/>
18         </p>
19         <p>
20             篮球:<input type="checkbox" name="faver" value="11" />
21             足球:<input type="checkbox" name="faver" value="22" />
22             排球:<input type="checkbox" name="faver" value="33" />
23         </p>
24         <p>
25             <select name="city" multiple>
26                 <option value="bj">北京</option>
27                 <option value="sh">上海</option>
28                 <option value="tj">天津</option>
29             </select>
30         </p>
31         <p>
32             <input type="file" name="filesss"/>
33         </p>
34         <p>
35             <input type="submit" value="提交" />
36         </p>
37     </form>
38 </body>
39 </html>
login.html


 1 from django.shortcuts import render,HttpResponse,redirect
 2
 3 # Create your views here.
 4
 5 def index(request):
 6     return HttpResponse("Welcome to Index!")
 7
 8 def login(request):
 9     '''if request.method == "GET":
10         return render(request, "login.html")
11     elif request.method == "POST":
12         u= request.POST.get("user")
13         p= request.POST.get("password")
14
15         if u == "abc" and p == "123":
16             return redirect("/index/")
17         else:
18             return render(request,"login.html")
19     else:
20         return redirect("/index/")
21     '''
22
23     if request.method == "GET":
24             return render(request, "login.html")
25     elif request.method == "POST":
26         # v = request.POST.get("gender")
27         # print(v)
28         # v = request.POST.getlist("faver")
29         # print(v)
30         # v = request.POST.getlist("city")
31         # print(v)
32
33         # 文件上传
34         obj =request.FILES.get("filesss")
35         import os
36         file_path = os.path.join("upload",obj.name)
37         f= open(file_path,mode="wb")
38         for i in obj.chunks():
39             f.write(i)
40         f.close()
41
42
43
44         return render(request, "login.html")
45     else:
46         return redirect("/index/")
views.py
2.FBV & CBV
url.py index ---> 函数名
views.py def 函数(request):................
FBV /index/ -> 函数名
CBV /index/ -> 类
from django.views import View
class Home(View):

    def get(self,request):
        print(request.method)
        return render(request,"home.html")

    def post(self,request):
        print(request.method,"post")
        return render(request, "home.html")
3.获取用户请求的相关信息以及请求头


 1 def index(request):
 2     print(type(request))
 3
 4     from django.core.handlers.wsgi import WSGIRequest
 5
 6     print(request.environ) #封装了请求的所有信息
 7
 8     for k,v in request.environ.items():  #列出所有信息
 9         print(k,v)
10
11     print(request.environ["HTTP_USER_AGENT"])
12     return HttpResponse("ok")
views.py
模板
1.模板语言
return render(request, 'index.html', {'li': [11,22,33]})
{% for item in li %}
{{item}}
{% endfor %}
*********** 索引用点 **********
{{item.0 }}


 1 <!DOCTYPE html>
 2 <html lang="en">
 3 <head>
 4     <meta charset="UTF-8">
 5     <title>Title</title>
 6 </head>
 7 <body style="margin: 0">
 8     <div style="background-color: #eeeeee;height: 50px;"></div>
 9     <form action="/home/" method="post">
10         <p>
11             <input type="text" name="username" placeholder="用户名" />
12         </p>
13         <p>
14             <input type="text" name="gender" placeholder="性别" />
15         </p>
16         <p>
17             <input type="text" name="email" placeholder="邮箱" />
18         </p>
19         <p>
20             <input type="submit" value="提交" />
21         </p>
22     </form>
23     <div>
24         <table>
25             {% for row in user_list %}
26                 <tr>
27                     <td>{{ row.username }}</td>
28                     <td>{{ row.gender }}</td>
29                     <td>{{ row.email }}</td>
30                 </tr>
31             {% endfor %}
32         </table>
33     </div>
34 </body>
35 </html>
home


 1 <!DOCTYPE html>
 2 <html lang="en">
 3 <head>
 4     <meta charset="UTF-8">
 5     <title>Title</title>
 6     <link rel="stylesheet" href="/static/commons.css" />
 7     <style>
 8         label{
 9             width: 80px;
10             text-align: right;
11             display: inline-block;
12         }
13     </style>
14 </head>
15 <body>
16         <form action="/login/" method="post">
17         <p>
18             <label for="username">用户名:</label>
19             <input id="username" name="user" type="text" />
20         </p>
21         <p>
22             <label for="password">密码:</label>
23             <input id="password" name="pwd" type="text" />
24             <input type="submit" value="提交" />
25             <span style="color: red">{{ error_msg }}</span>
26         </p>
27     </form>
28     <script src="/static/jquery-1.12.4.js"></script>
29 </body>
30 </html>
login
2.模板的继承


 1 def a1(request):
 2     u_list= [1,2,3,4,5]
 3     return render(request,"a1.html",{"u_list":u_list})
 4
 5 def a2(request):
 6     name="root"
 7     return render(request,"a2.html",{"name":name})
 8
 9 def a3(request):
10     d = "删除"
11     return render(request,"a3.html",{"d":d})
views.py
master.html是模板


 1 <!DOCTYPE html>
 2 <html lang="en">
 3 <head>
 4     <meta charset="UTF-8">
 5     <title>Title</title>
 6     <link rel="stylesheet" href="/static/commons.css" />
 7     <style>
 8         .pg-header{
 9             height: 48px;
10             background-color: gainsboro;
11             color: green;
12         }
13     </style>
14     {% block commons %} {% endblock %}
15 </head>
16 <body>
17     <div class="pg-header">信息管理</div>
18
19     {% block content %} {% endblock %}
20
21     <script src="/static/jquery.js"></script>
22     {% block jquery %} {% endblock %}
23 </body>
24 </html>
master.html
a1.html a2.html a3.html 是继承模板然后生成新的网页发给前端


1 {% extends "master.html" %}
2 {% block content %}
3     <h1>用户管理</h1>
4     <ul>
5         {% for i in u_list %}
6             <li>{{ i }}</li>
7         {% endfor %}
8     </ul>
9 {% endblock %}
a1


1 {% extends "master.html" %}
2 {% block content %}
3     <h1>{{ name }}</h1>
4 {% endblock %}
a2


1 {% extends "master.html" %}
2 {% block content %}
3    <h1>{{ d }}</h1>
4 {% endblock %}
a3
小结:
{% block 模板名称 %} 自己的内容 {% endblock %}
a.可以有多个模板继承 只要写清楚继承模板的名称
b.对于css和js同样可以继承,写在模板中正确的位置


 1 <!DOCTYPE html>
 2 <html lang="en">
 3 <head>
 4     <meta charset="UTF-8">
 5     <title>Title</title>
 6     <link rel="stylesheet" href="/static/commons.css" />
 7     <style>
 8         .pg-header{
 9             height: 48px;
10             background-color: gainsboro;
11             color: green;
12         }
13     </style>
14     {% block commons %} {% endblock %}
15 </head>
16 <body>
17     <div class="pg-header">信息管理</div>
18
19     {% block content %} {% endblock %}
20
21     <script src="/static/jquery.js"></script>
22     {% block jquery %} {% endblock %}
23 </body>
24 </html>
master.html
c.新网页上的需要继承的模板名称没有顺序之分,只要名称正确即可。
d.一个html只能继承一个模板
3.模板的导入
一个html只能继承一个模板,但是如果一个html需要多个重复的设计时,可以使用模板导入
{% include "tag.html" %}
<form>
    <input type="text" />
    <input type="text" />
    <input type="text" />
</form>

{% extends "master.html" %}
{% block content %}
    <h1>用户管理</h1>
    <ul>
        {% for i in u_list %}
            <li>{{ i }}</li>
        {% endfor %}
    </ul>

    {% include "tag.html" %}
{% endblock %}
4.自定义函数
simple_tag
a.在app下面创建templatetags文件夹
b.在文件夹下面创建任意py文件
c.创建py文件的函数
from django import template
from django.utils.safestring import mark_safe

register = template.Library()

@register.simple_tag
def ceshi(a1,a2):
    return a1+a2
d.settings中注册app
e.在html中的头部加上{% load py文件名 %} 添加内容{% 函数名 arg1 arg2 %}
filter
py文件中@register.filter
html中{{“arg1”|函数名:“arg2” }}
参数最多是2个,可以有if条件语句中
5.自定义分页操作
列表分页实例:


 1 def user_list(request):
 2     list = []
 3     for i in range(1,100):
 4         list.append(i)
 5
 6     current_page = request.GET.get("p",1)
 7     current_page = int(current_page)
 8     start = (current_page-1)*10
 9     end = current_page*10
10     data=list[start:end]
11
12     all_current=len(list)
13     count,y = divmod(all_current, 10)
14     if y:
15         count +=1
16
17     page_list=[]
18     for i in range(1,count+1):
19         if i ==current_page:
20             temp ='<a class="page active" href="https://my.oschina.net/user_list/?p=%s">%s</a>'%(i,i)
21         else:
22             temp = '<a class="page" href="https://my.oschina.net/user_list/?p=%s">%s</a>' % (i, i)
23         page_list.append(temp)
24
25     page_str="".join(page_list)
26
27     return render(request,"user_list.html",{"list":data,"temp":page_str})
views.py


 1 <!DOCTYPE html>
 2 <html lang="en">
 3 <head>
 4     <meta charset="UTF-8">
 5     <title>Title</title>
 6     <style>
 7         .q .page{
 8             display: inline-block;
 9             background-color: aqua;
10             margin: 5px;
11             padding: 5px;
12
13         }
14         .q .page.active{
15             background-color: red;
16             color: white;
17         }
18     </style>
19 </head>
20 <body>
21     <ul>
22         {% for item in list %}
23             {% include "tag.html" %}
24         {% endfor %}
25     </ul>
26
27     <div class="q">
28         {{ temp|safe }}
29     </div>
30 </body>
31 </html>
user_list.html


1 <li>{{ item }}</li>
tag.html
分页进阶实例 ---- 上一页、下一页、跳转、页面布局


 1 def user_list(request):
 2     list = []
 3     for i in range(1,1000):
 4         list.append(i)
 5     #每页显示的数据数量
 6     page_num = 10  #每页显示数量
 7     current_page = request.GET.get("p",1)
 8     current_page = int(current_page)   #当前页
 9     start = (current_page-1)*page_num
10     end = current_page*page_num
11     data=list[start:end]
12
13     #分页的数据数量
14     all_current=len(list)
15     total_count,y = divmod(all_current, page_num)
16     if y:
17         total_count +=1   #总页数
18     page_list=[]
19     start_index = current_page - 5
20     end_index = current_page + 6
21     pag = 11  #显示分页数量
22     if total_count < pag:
23         start_index = 1
24         end_index = total_count
25     else:
26         if current_page <= (pag+1)/2:
27             start_index = 1
28             end_index = pag+1
29         else:
30             start_index = current_page - (pag-1)/2
31             end_index = current_page + (pag+1)/2
32             if (current_page + (pag-1)/2) >=total_count:
33                 end_index = total_count + 1
34                 start_index = total_count - pag -1
35
36     #上一页 代码开始
37     if current_page == 1:
38         prev = '<a class="page" href="#">上一页</a>'
39     else:
40         prev = '<a class="page" href="https://my.oschina.net/user_list/?p=%s">上一页</a>' % (current_page-1)
41     page_list.append(prev)
42
43     #分页代码开始
44     for i in range(int(start_index),int(end_index)):
45         if i ==current_page:
46             temp ='<a class="page active" href="https://my.oschina.net/user_list/?p=%s">%s</a>'%(i,i)
47         else:
48             temp = '<a class="page" href="https://my.oschina.net/user_list/?p=%s">%s</a>' % (i, i)
49         page_list.append(temp)
50
51     # 下一页代码开始
52     if current_page == total_count:
53         nex = '<a class="page" href="javascript:void(0);">下一页</a>'
54     else:
55         nex = '<a class="page" href="https://my.oschina.net/user_list/?p=%s">下一页</a>' % (current_page + 1)
56     page_list.append(nex)
57
58     page_str="".join(page_list)
59
60     return render(request,"user_list.html",{"list":data,"temp":page_str})
views.py


 1 <!DOCTYPE html>
 2 <html lang="en">
 3 <head>
 4     <meta charset="UTF-8">
 5     <title>Title</title>
 6     <style>
 7         .q .page{
 8             display: inline-block;
 9             background-color: aqua;
10             margin: 5px;
11             padding: 5px;
12
13         }
14         .q .page.active{
15             background-color: red;
16             color: white;
17         }
18     </style>
19 </head>
20 <body>
21     <ul>
22         {% for item in list %}
23             {% include "tag.html" %}
24         {% endfor %}
25     </ul>
26
27     <div class="q">
28         {{ temp|safe }}
29         <input type="text" />
30         <a onclick="Go(this,'/user_list/?p=');" id="i1">GO</a>
31     </div>
32     <script>
33         function Go(th,base) {
34              var val = th.previousElementSibling.value;
35             location.href = base + val
36         }
37     </script>
38 </body>
39 </html>
user_list.html
自定义分页实例封装
新建utils文件夹


 1 class Page:
 2
 3     def __init__(self,current_page,data_count,per_page_num=10,page_num=11):
 4         self.current_page = current_page
 5         self.data_count =data_count
 6         self.per_page_num = per_page_num
 7         self.page_num = page_num
 8
 9     @property
10     def start(self):
11         return (self.current_page-1) * self.per_page_num
12
13     @property
14     def end(self):
15         return self.current_page * self.per_page_num
16
17     @property
18     def total_count(self):
19         v, y = divmod(self.data_count, self.per_page_num)
20         if y:
21             v += 1  # 总页数
22         return v
23
24     def page_str(self,base_url):
25         page_list = []
26         start_index = self.current_page - 5
27         end_index = self.current_page + 6
28
29         if self.total_count < self.page_num:
30             start_index = 1
31             end_index = self.total_count
32         else:
33             if self.current_page <= (self.page_num + 1) / 2:
34                 start_index = 1
35                 end_index = self.page_num + 1
36             else:
37                 start_index = self.current_page - (self.page_num - 1) / 2
38                 end_index = self.current_page + (self.page_num + 1) / 2
39                 if (self.current_page + (self.page_num - 1) / 2) >= self.total_count:
40                     end_index = self.total_count + 1
41                     start_index = self.total_count - self.page_num - 1
42
43         # 上一页 代码开始
44         if self.current_page == 1:
45             prev = '<a class="page" href="#">上一页</a>'
46         else:
47             prev = '<a class="page" href="%s?p=%s">上一页</a>' % (base_url,self.current_page - 1)
48         page_list.append(prev)
49
50         # 分页代码开始
51         for i in range(int(start_index), int(end_index)):
52             if i == self.current_page:
53                 temp = '<a class="page active" href="%s?p=%s">%s</a>' % (base_url,i, i)
54             else:
55                 temp = '<a class="page" href="%s?p=%s">%s</a>' % (base_url,i, i)
56             page_list.append(temp)
57
58         # 下一页代码开始
59         if self.current_page == self.total_count:
60             nex = '<a class="page" href="javascript:void(0);">下一页</a>'
61         else:
62             nex = '<a class="page" href="%s?p=%s">下一页</a>' % (base_url,self.current_page + 1)
63         page_list.append(nex)
64
65         page_str = "".join(page_list)
66
67         return page_str
pagination.py


1 def user_list(request):
2     current_page = request.GET.get("p",1)
3     current_page = int(current_page)   #当前页
4     page_obj = pagination.Page(current_page,len(list))
5     data=list[page_obj.start:page_obj.end]
6     page_str = page_obj.page_str("/user_list/")
7     return render(request,"user_list.html",{"list":data,"temp":page_str})
views.py
ORM操作
当我们的程序涉及到数据库相关操作时,我们一般都会这么搞:
创建数据库,设计表结构和字段
使用 MySQLdb 来连接数据库,并编写数据访问层代码
业务逻辑层去调用数据访问层执行数据库操作
import MySQLdb
def GetList(sql): db = MySQLdb.connect(user='root', db='wupeiqidb', passwd='1234', host='localhost') cursor = db.cursor() cursor.execute(sql) data = cursor.fetchall() db.close() return data def GetSingle(sql): db = MySQLdb.connect(user='root', db='wupeiqidb', passwd='1234', host='localhost') cursor = db.cursor() cursor.execute(sql) data = cursor.fetchone() db.close() return data
django为使用一种新的方式,即:关系对象映射(Object Relational Mapping,简称ORM)。
PHP:activerecord
Java:Hibernate
C#:Entity Framework
django中遵循 Code Frist 的原则,即:根据代码中定义的类来自动生成数据库表。
1.创建表基本结构
 1 a. 先写类(models.py)
 2         from django.db import models
 3
 4         class UserInfo(models.Model):
 5             # id列,自增,主键
 6             # 用户名列,字符串类型,指定长度
 7             username = models.CharField(max_length=32)
 8             password = models.CharField(max_length=64)
 9
10 b. 注册APP (settings.py)
11
12         INSTALLED_APPS = [
13             'django.contrib.admin',
14             'django.contrib.auth',
15             'django.contrib.contenttypes',
16             'django.contrib.sessions',
17             'django.contrib.messages',
18             'django.contrib.staticfiles',
19             'app01',
20         ]
21 c. 执行命令(cmd)
22         python manage.py  makemigrations
23         python manage.py  migrate
24
25 d. ********** 注意 ***********
26         Django默认使用MySQLdb模块链接MySQL
27         主动修改为pymysql,在project同名文件夹下的__init__文件中添加如下代码
28
29 即可:
30             import pymysql
31             pymysql.install_as_MySQLdb()
表增删改查
 1 def orm(request):
 2
 3     #增
 4     # models.UserInfo.objects.create(username="alex",password=123)
 5
 6     # dic ={"username":"root","password":456}
 7     # models.UserInfo.objects.create(**dic)
 8
 9     # obj = models.UserInfo(username="jack",password=789)
10     # obj.save()
11
12     # 查
13     # re = models.UserInfo.objects.all()
14     # re = models.UserInfo.objects.filter(username="root")
15     # print(re)
16     # for row in re:
17     #     print(row.id,row.username,row.password)
18
19     # 删除
20     # models.UserInfo.objects.all().delete()
21     # models.UserInfo.objects.filter(id=3).delete()
22
23     # 修改
24     models.UserInfo.objects.filter(id=3).update(password=825)
25
26     return HttpResponse("ORM")
2.连表结构
一对多
a. 外键
b.
外键字段_id models.foreignkey("user_type",to_field="id") #约束条件
c.
models.tb.object.create(name='root', user_group_id=1)
d.
userlist = models.tb.object.all()
for row in userlist:
row.id
row.user_group_id
row.user_group.caption
a.一对多获取单表数据的方式
html


 1 <!DOCTYPE html>
 2 <html lang="en">
 3 <head>
 4     <meta charset="UTF-8">
 5     <title>Title</title>
 6 </head>
 7 <body>
 8     <h1>业务线列表</h1>
 9     <ul>
10         {% for row in v1 %}
11             <li>{{ row.id }}--{{ row.caption }}--{{ row.code }}</li>
12         {% endfor %}
13     <h2>zidian</h2>
14         {% for row in v2 %}
15             <li>{{ row.id }}--{{ row.caption }}</li>
16         {% endfor %}
17     <h2>yuanzu</h2>
18         {% for row in v3 %}
19             <li>{{ row.0}}--{{ row.1 }}</li>
20         {% endfor %}
21     </ul>
22 </body>
23 </html>
html
views


1 def biness(request):
2      v1 = models.Biness.objects.all()
3
4      v2 = models.Biness.objects.all().values("id","caption")
5
6      v3 = models.Biness.objects.all().values_list("id","caption")
7
8      return render(request,"biness.html",{"v1":v1,"v2":v2,"v3":v3})
views
b.一对多跨表操作的方式
html


 1 <!DOCTYPE html>
 2 <html lang="en">
 3 <head>
 4     <meta charset="UTF-8">
 5     <title>Title</title>
 6 </head>
 7 <body>
 8
 9     <table border="1">
10         <thead>
11             <tr>
12 {#                <th>主机ID</th>#}
13                 <th>主机名</th>
14                 <th>IP</th>
15 {#                <th>端口号</th>#}
16                 <th>业务线ID</th>
17                 <th>业务线名</th>
18 {#                <th>业务线code</th>#}
19             </tr>
20         </thead>
21         <tbody>
22             {% for row in v1 %}
23                 <tr nid="{{ row.nid }}",bid="{{ row.b_id }}">
24 {#                    <td>{{ row.nid }}</td>#}
25                     <td>{{ row.host }}</td>
26                     <td>{{ row.ip }}</td>
27                     <td>{{ row.port }}</td>
28 {#                    <td>{{ row.b_id }}</td>#}
29                     <td>{{ row.b.caption }}</td>
30 {#                    <td>{{ row.b.code }}</td>#}
31                 </tr>
32             {% endfor %}
33         </tbody>
34     </table>
35
36     <table border="1">
37         <thead>
38             <tr>
39                 <th>主机ID</th>
40                 <th>主机名</th>
41                 <th>IP</th>
42 {#                <th>端口号</th>#}
43                 <th>业务线ID</th>
44                 <th>业务线名</th>
45 {#                <th>业务线code</th>#}
46             </tr>
47         </thead>
48         <tbody>
49             {% for row in v2 %}
50                 <tr>
51                     <td>{{ row.nid }}</td>
52                     <td>{{ row.host}}</td>
53                     <td>{{ row.ip }}</td>
54 {#                    <td>{{ row.port }}</td>>#}
55                     <td>{{ row.b_id }}</td>
56                     <td>{{ row.b.caption }}</td>
57 {#                    <td>{{ row.b.code }}</td>#}
58                 </tr>
59             {% endfor %}
60         </tbody>
61     </table>
62
63     <table border="1">
64         <thead>
65             <tr>
66                 <th>主机ID</th>
67                 <th>主机名</th>
68                 <th>IP</th>
69 {#                <th>端口号</th>#}
70                 <th>业务线ID</th>
71                 <th>业务线名</th>
72 {#                <th>业务线code</th>#}
73             </tr>
74         </thead>
75         <tbody>
76             {% for row in v3 %}
77                 <tr >
78                     <td>{{ row.0 }}</td>
79                     <td>{{ row.1 }}</td>
80                     <td>{{ row.2 }}</td>
81 {#                    <td>{{ row.port }}</td>#}
82                     <td>{{ row.3 }}</td>
83                     <td>{{ row.4 }}</td>
84 {#                    <td>{{ row.b.code }}</td>#}
85                 </tr>
86             {% endfor %}
87         </tbody>
88     </table>
89
90 </body>
91 </html>
html
views


1 def host(request):
2     # v1 = models.Host.objects.all()
3     v1 = models.Host.objects.filter(nid__gt=0)
4     v2 = models.Host.objects.filter(nid__gt=0).values("nid","host","ip","b_id","b__caption")
5     v3 = models.Host.objects.filter(nid__gt=0).values_list("nid","host","ip","b_id","b__caption")
6
7     return render(request, "host.html", {"v1": v1,"v2":v2,"v3":v3})
views
实例:增加一对多的数据
host.html


  1 <!DOCTYPE html>
  2 <html lang="en">
  3 <head>
  4     <meta charset="UTF-8">
  5     <title>Title</title>
  6     <style>
  7         .hide{
  8             display: none;
  9         }
 10         .shade{
 11             position: fixed;
 12             top:0;
 13             right: 0;
 14             bottom: 0;
 15             left: 0;
 16             background-color: black;
 17             opacity: 0.6;
 18             z-index: 9;
 19         }
 20         .content{
 21             position:fixed;
 22             height: 300px;
 23             width: 500px;
 24             top:100px;
 25             left: 50%;
 26             background-color: white;
 27             border: white 1px solid;
 28             z-index: 10;
 29             margin-left: -250px;
 30         }
 31     </style>
 32 </head>
 33 <body>
 34     <div>
 35         <input id="add_host" type="button" value="添加" />
 36     </div>
 37     <table border="1">
 38         <thead>
 39             <tr>
 40 {#                <th>主机ID</th>#}
 41                 <th>主机名</th>
 42                 <th>IP</th>
 43                 <th>端口号</th>
 44 {#                <th>业务线ID</th>#}
 45                 <th>业务线名</th>
 46 {#                <th>业务线code</th>#}
 47             </tr>
 48         </thead>
 49         <tbody>
 50             {% for row in v1 %}
 51                 <tr nid="{{ row.nid }}",bid="{{ row.b_id }}">
 52 {#                    <td>{{ row.nid }}</td>#}
 53                     <td>{{ row.host }}</td>
 54                     <td>{{ row.ip }}</td>
 55                     <td>{{ row.port }}</td>
 56 {#                    <td>{{ row.b_id }}</td>#}
 57                     <td>{{ row.b.caption }}</td>
 58 {#                    <td>{{ row.b.code }}</td>#}
 59                 </tr>
 60             {% endfor %}
 61         </tbody>
 62     </table>
 63
 64     <table border="1">
 65         <thead>
 66             <tr>
 67                 <th>主机ID</th>
 68                 <th>主机名</th>
 69                 <th>IP</th>
 70 {#                <th>端口号</th>#}
 71                 <th>业务线ID</th>
 72                 <th>业务线名</th>
 73 {#                <th>业务线code</th>#}
 74             </tr>
 75         </thead>
 76         <tbody>
 77             {% for row in v2 %}
 78                 <tr>
 79                     <td>{{ row.nid }}</td>
 80                     <td>{{ row.host}}</td>
 81                     <td>{{ row.ip }}</td>
 82 {#                    <td>{{ row.port }}</td>>#}
 83                     <td>{{ row.b_id }}</td>
 84                     <td>{{ row.b.caption }}</td>
 85 {#                    <td>{{ row.b.code }}</td>#}
 86                 </tr>
 87             {% endfor %}
 88         </tbody>
 89     </table>
 90
 91     <table border="1">
 92         <thead>
 93             <tr>
 94                 <th>主机ID</th>
 95                 <th>主机名</th>
 96                 <th>IP</th>
 97 {#                <th>端口号</th>#}
 98                 <th>业务线ID</th>
 99                 <th>业务线名</th>
100 {#                <th>业务线code</th>#}
101             </tr>
102         </thead>
103         <tbody>
104             {% for row in v3 %}
105                 <tr >
106                     <td>{{ row.0 }}</td>
107                     <td>{{ row.1 }}</td>
108                     <td>{{ row.2 }}</td>
109 {#                    <td>{{ row.port }}</td>#}
110                     <td>{{ row.3 }}</td>
111                     <td>{{ row.4 }}</td>
112 {#                    <td>{{ row.b.code }}</td>#}
113                 </tr>
114             {% endfor %}
115         </tbody>
116     </table>
117
118 {#    遮罩层#}
119     <div class="shade hide"></div>
120 {#    弹出层#}
121     <div class="content hide">
122         <form action="/host/" method="POST">
123             <div class="group">
124                 <input type="text" placeholder="hostname" name="hostname" />
125             </div>
126             <div class="group">
127                 <input type="text" placeholder="ip" name="ip" />
128             </div>
129             <div class="group">
130                 <input type="text" placeholder="port" name="port" />
131             </div>
132             <div>
133                 <select name="b_id">
134                     {% for row in b_list %}
135                     <option value="{{ row.id }}">{{ row.caption }}</option>
136                     {% endfor %}
137
138                 </select>
139             </div>
140
141             <p><input type="submit" value="提交" />
142                 <input id="del" type="button" value="取消" /></p>
143         </form>
144     </div>
145
146     <script src="/static/jquery-1.12.4.js"></script>
147     <script>
148         $(function(){
149             $("#add_host").click(function () {
150                 $(".shade,.content").removeClass("hide")
151             })
152
153             $("#del").click(function () {
154                 $(".shade,.content").addClass("hide")
155             })
156         })
157
158     </script>
159 </body>
160 </html>
View Code
views.py


 1 def host(request):
 2     if request.method == "GET":
 3         # v1 = models.Host.objects.all()
 4         v1 = models.Host.objects.filter(nid__gt=0)
 5         v2 = models.Host.objects.filter(nid__gt=0).values("nid","host","ip","b_id","b__caption")
 6         v3 = models.Host.objects.filter(nid__gt=0).values_list("nid","host","ip","b_id","b__caption")
 7
 8         b_list=models.Biness.objects.all()
 9
10
11         return render(request, "host.html", {"v1": v1,"v2":v2,"v3":v3,"b_list":b_list})
12     elif request.method == "POST":
13         h = request.POST.get("hostname")
14         i = request.POST.get("ip")
15         p = request.POST.get("port")
16         b = request.POST.get("b_id")
17         models.Host.objects.create(host=h,ip=i,port=p,b_id=b)
18
19         return redirect("/host")
View Code
使用ajax方式进行一对多的数据操作:


 1  $("#add_ajax").click(function(){
 2             $.ajax({
 3                 url:"/test_ajax/",
 4                 type:"POST",
 5                 data:{"hostname":$("#host").val(),"ip":$("#ip").val(),"port":$("#port").val(),"b_id":$("#sel").val()},
 6                 success:function(data){
 7                     var obj =JSON.parse(data);
 8                     if(obj.stauts){
 9                         location.reload()
10                     }else{
11                         $("#host_p").text(obj.error)
12                     }
13                 }
14             })
15         })
host.html


 1 def test_ajax(request):
 2
 3     ret={"stauts":True,"error":None,"data":None}
 4     try:
 5         h = request.POST.get("hostname")
 6         i = request.POST.get("ip")
 7         p = request.POST.get("port")
 8         b = request.POST.get("b_id")
 9         # print(h,i,p,b)
10         if h and len(h) > 8:
11             models.Host.objects.create(host=h, ip=i, port=p, b_id=b)
12
13         else:
14             ret["stauts"]=False
15             ret["error"]="Lack of longth "
16
17     except Exception as e:
18         ret["stauts"] = False
19         ret["error"] = "this is error"
20
21     return HttpResponse(json.dumps(ret))
views
ajax更多:https://docs.djangoproject.com/en/dev/ref/csrf/#ajax
编辑一对多表实例:


  1 <!DOCTYPE html>
  2 <html lang="en">
  3 <head>
  4     <meta charset="UTF-8">
  5     <title>Title</title>
  6     <style>
  7         .hide{
  8             display: none;
  9         }
 10         .shade{
 11             position: fixed;
 12             top:0;
 13             right: 0;
 14             bottom: 0;
 15             left: 0;
 16             background-color: black;
 17             opacity: 0.6;
 18             z-index: 9;
 19         }
 20         .content,.edit_content{
 21             position:fixed;
 22             height: 300px;
 23             width: 500px;
 24             top:100px;
 25             left: 50%;
 26             background-color: white;
 27             border: white 1px solid;
 28             z-index: 10;
 29             margin-left: -250px;
 30         }
 31     </style>
 32 </head>
 33 <body>
 34     <div>
 35         <input id="add_host" type="button" value="添加" />
 36     </div>
 37     <table border="1">
 38         <thead>
 39             <tr>
 40 {#                <th>主机ID</th>#}
 41                 <th>主机名</th>
 42                 <th>IP</th>
 43                 <th>端口号</th>
 44 {#                <th>业务线ID</th>#}
 45                 <th>业务线名</th>
 46                 <th>操作</th>
 47             </tr>
 48         </thead>
 49         <tbody>
 50             {% for row in v1 %}
 51                 <tr nid="{{ row.nid }}" bid="{{ row.b_id }}">
 52 {#                    <td>{{ row.nid }}</td>#}
 53                     <td>{{ row.host }}</td>
 54                     <td>{{ row.ip }}</td>
 55                     <td>{{ row.port }}</td>
 56 {#                    <td>{{ row.b_id }}</td>#}
 57                     <td>{{ row.b.caption }}</td>
 58                     <td>
 59                         <span class="edit">编辑</span>|<a href="/del_host?nid={{ row.nid }}">删除</a>
 60                     </td>
 61                 </tr>
 62             {% endfor %}
 63         </tbody>
 64     </table>
 65
 66 {#    <table border="1">#}
 67 {#        <thead>#}
 68 {#            <tr>#}
 69 {#                <th>主机ID</th>#}
 70 {#                <th>主机名</th>#}
 71 {#                <th>IP</th>#}
 72 {#                <th>端口号</th>#}
 73 {#                <th>业务线ID</th>#}
 74 {#                <th>业务线名</th>#}
 75 {#                <th>业务线code</th>#}
 76 {#            </tr>#}
 77 {#        </thead>#}
 78 {#        <tbody>#}
 79 {#            {% for row in v2 %}#}
 80 {#                <tr>#}
 81 {#                    <td>{{ row.nid }}</td>#}
 82 {#                    <td>{{ row.host}}</td>#}
 83 {#                    <td>{{ row.ip }}</td>#}
 84 {#                    <td>{{ row.port }}</td>>#}
 85 {#                    <td>{{ row.b_id }}</td>#}
 86 {#                    <td>{{ row.b.caption }}</td>#}
 87 {#                    <td>{{ row.b.code }}</td>#}
 88 {#                </tr>#}
 89 {#            {% endfor %}#}
 90 {#        </tbody>#}
 91 {#    </table>#}
 92 {##}
 93 {#    <table border="1">#}
 94 {#        <thead>#}
 95 {#            <tr>#}
 96 {#                <th>主机ID</th>#}
 97 {#                <th>主机名</th>#}
 98 {#                <th>IP</th>#}
 99 {#                <th>端口号</th>#}
100 {#                <th>业务线ID</th>#}
101 {#                <th>业务线名</th>#}
102 {#                <th>业务线code</th>#}
103 {#            </tr>#}
104 {#        </thead>#}
105 {#        <tbody>#}
106 {#            {% for row in v3 %}#}
107 {#                <tr >#}
108 {#                    <td>{{ row.0 }}</td>#}
109 {#                    <td>{{ row.1 }}</td>#}
110 {#                    <td>{{ row.2 }}</td>#}
111 {#                    <td>{{ row.port }}</td>#}
112 {#                    <td>{{ row.3 }}</td>#}
113 {#                    <td>{{ row.4 }}</td>#}
114 {#                    <td>{{ row.b.code }}</td>#}
115 {#                </tr>#}
116 {#            {% endfor %}#}
117 {#        </tbody>#}
118 {#    </table>#}
119
120 {#    遮罩层#}
121     <div class="shade hide"></div>
122 {#    弹出层#}
123     <div class="content hide">
124         <form action="/host/" method="POST">
125             <div class="group">
126                 <input id="host" type="text" placeholder="hostname" name="hostname" />
127                 <span id="host_p" style="color: red"></span>
128             </div>
129             <div class="group">
130                 <input id="ip" type="text" placeholder="ip" name="ip" />
131             </div>
132             <div class="group">
133                 <input id="port" type="text" placeholder="port" name="port" />
134             </div>
135             <div class="group">
136                 <select id="sel" name="b_id">
137                     {% for row in b_list %}
138                     <option value="{{ row.id }}">{{ row.caption }}</option>
139                     {% endfor %}
140                 </select>
141             </div>
142
143             <p><input type="submit" value="提交" />
144                 <a id="add_ajax" style="background-color: aqua">悄悄提交</a>
145                 <input id="del" type="button" value="取消" /></p>
146         </form>
147     </div>
148
149      <div class="edit_content hide">
150         <form id="edit_form" action="/host/" method="POST">
151             <div><input type="text" name="nid" style="display: none" /></div>
152             <div>
153                 <input  type="text" placeholder="hostname" name="hostname" />
154             </div>
155             <div>
156                 <input  type="text" placeholder="ip" name="ip" />
157             </div>
158             <div>
159                 <input  type="text" placeholder="port" name="port" />
160             </div>
161             <div>
162                 <select  name="b_id">
163                     {% for row in b_list %}
164                     <option value="{{ row.id }}">{{ row.caption }}</option>
165                     {% endfor %}
166                 </select>
167             </div>
168
169             <p>
170                 <a id="add_ajax_edit" style="background-color: aqua">确认编辑</a>
171                 <input id="edit_del" type="button" value="取消" /></p>
172         </form>
173     </div>
174
175     <script src="/static/jquery-1.12.4.js"></script>
176     <script>
177         $(function(){
178             $("#add_host").click(function () {
179                 $(".shade,.content").removeClass("hide")
180             });
181
182             $("#del").click(function () {
183                 $(".shade,.content").addClass("hide")
184             });
185
186             $(".edit").click(function(){
187                $(".shade,.edit_content") .removeClass("hide");
188
189                var h = $(this).parent().parent().children().first().text();
190                $("#edit_form").find("input[name='hostname']").val(h);
191
192                var i = $(this).parent().parent().children().first().next().text();
193                $("#edit_form").find("input[name='ip']").val(i);
194
195                var p = $(this).parent().parent().children().first().next().next().text();
196                $("#edit_form").find("input[name='port']").val(p);
197
198                var bid = $(this).parent().parent().attr("bid");
199                $("#edit_form").find("select").val(bid);
200
201                var nid = $(this).parent().parent().attr("nid");
202                $("#edit_form").find("input[name='nid']").val(nid);
203
204
205             });
206
207             $("#edit_del").click(function () {
208                 $(".shade,.edit_content").addClass("hide")
209             });
210
211             $("#add_ajax").click(function(){
212                 $.ajax({
213                 url:"/test_ajax/",
214                 type:"POST",
215                 data:{"hostname":$("#host").val(),"ip":$("#ip").val(),"port":$("#port").val(),"b_id":$("#sel").val()},
216                 success:function(data){
217                     var obj =JSON.parse(data);
218                     if(obj.stauts){
219                         location.reload()
220                     }else{
221                         $("#host_p").text(obj.error)
222                         }
223                     }
224                 })
225             });
226
227             $("#add_ajax_edit").click(function(){
228                 $.ajax({
229                 url:"/test_ajax_edit/",
230                 type:"POST",
231                 {#data:{"hostname":$("#host").val(),"ip":$("#ip").val(),"port":$("#port").val(),"b_id":$("#sel").val()},#}
232                 data:$("#edit_form").serialize(),
233                 success:function(data){
234                     var obj =JSON.parse(data);
235                     if(obj.stauts){
236                         location.reload()
237                     }else{
238                         $("#host_p").text(obj.error)
239                         }
240                     }
241                 })
242             });
243         })
244     </script>
245 </body>
246 </html>
host.html


 1 """s14day20 URL Configuration
 2
 3 The `urlpatterns` list routes URLs to views. For more information please see:
 4     https://docs.djangoproject.com/en/2.0/topics/http/urls/
 5 Examples:
 6 Function views
 7     1. Add an import:  from my_app import views
 8     2. Add a URL to urlpatterns:  path('', views.home, name='home')
 9 Class-based views
10     1. Add an import:  from other_app.views import Home
11     2. Add a URL to urlpatterns:  path('', Home.as_view(), name='home')
12 Including another URLconf
13     1. Import the include() function: from django.urls import include, path
14     2. Add a URL to urlpatterns:  path('blog/', include('blog.urls'))
15 """
16 from django.contrib import admin
17 from django.urls import path
18 from app01 import views
19
20 urlpatterns = [
21     path('admin/', admin.site.urls),
22     path('biness/', views.biness),
23     path('host/', views.host),
24     path('test_ajax/', views.test_ajax),
25     path('del_host/', views.del_host),
26     path('test_ajax_edit/', views.test_ajax_edit),
27 ]
url.py


 1 from django.shortcuts import render,redirect,HttpResponse
 2 import json
 3
 4 from app01 import models
 5
 6 # Create your views here.
 7 def biness(request):
 8      v1 = models.Biness.objects.all()
 9
10      v2 = models.Biness.objects.all().values("id","caption")
11
12      v3 = models.Biness.objects.all().values_list("id","caption")
13
14      return render(request,"biness.html",{"v1":v1,"v2":v2,"v3":v3})
15
16 def host(request):
17     if request.method == "GET":
18         # v1 = models.Host.objects.all()
19         v1 = models.Host.objects.filter(nid__gt=0)
20         v2 = models.Host.objects.filter(nid__gt=0).values("nid","host","ip","b_id","b__caption")
21         v3 = models.Host.objects.filter(nid__gt=0).values_list("nid","host","ip","b_id","b__caption")
22
23         b_list=models.Biness.objects.all()
24
25
26         return render(request, "host.html", {"v1": v1,"v2":v2,"v3":v3,"b_list":b_list})
27     elif request.method == "POST":
28         h = request.POST.get("hostname")
29         i = request.POST.get("ip")
30         p = request.POST.get("port")
31         b = request.POST.get("b_id")
32         models.Host.objects.create(host=h,ip=i,port=p,b_id=b)
33
34         return redirect("/host")
35
36 def test_ajax(request):
37
38     ret={"stauts":True,"error":None,"data":None}
39     try:
40         h = request.POST.get("hostname")
41         i = request.POST.get("ip")
42         p = request.POST.get("port")
43         b = request.POST.get("b_id")
44         # print(h,i,p,b)
45         if h and len(h) > 8:
46             models.Host.objects.create(host=h, ip=i, port=p, b_id=b)
47
48         else:
49             ret["stauts"]=False
50             ret["error"]="Lack of longth "
51
52     except Exception as e:
53         ret["stauts"] = False
54         ret["error"] = "this is error"
55
56     return HttpResponse(json.dumps(ret))
57
58 def test_ajax_edit(request):
59     ret = {"stauts": True, "error": None, "data": None}
60     try:
61         id  = request.POST.get("nid")
62         h = request.POST.get("hostname")
63         i = request.POST.get("ip")
64         p = request.POST.get("port")
65         b = request.POST.get("b_id")
66         # print(h,i,p,b)
67
68         models.Host.objects.filter(nid=id).update(host=h, ip=i, port=p, b_id=b)
69
70     except Exception as e:
71         ret["stauts"] = False
72         ret["error"] = "this is error"
73
74     return HttpResponse(json.dumps(ret))
75
76 def del_host(request):
77     nnid = request.GET.get("nid")
78     models.Host.objects.filter(nid=nnid).delete()
79     return redirect("/host/")
views.py
实现了编辑表内容和删除表数据,编辑时候显示正在编辑的数据。使用ajax编辑。
c.创建多对多数据
models.py


 1 方法一: 自定义创建多对多
 2 from django.db import models
 3
 4 # Create your models here.
 5
 6 class Biness(models.Model):
 7     caption = models.CharField(max_length=32)
 8     code = models.CharField(max_length=32,default="sa")
 9
10 class Host(models.Model):
11     nid = models.AutoField(primary_key=True)
12     host = models.CharField(max_length=32,db_index=True)
13     ip = models.GenericIPAddressField(db_index=True)
14     port = models.IntegerField()
15     b = models.ForeignKey(to="Biness",to_field="id",on_delete=models.CASCADE,)
16
17 class Application(models.Model):
18     name = models.CharField(max_length=32)
19
20
21 class HostToApp(models.Model):
22     nobj = models.ForeignKey("Host",to_field="nid",on_delete=models.CASCADE,)
23     aobj = models.ForeignKey("Application",to_field="id",on_delete=models.CASCADE,)
24
25 方法二:自动创建多对多
26 from django.db import models
27
28 # Create your models here.
29
30 class Biness(models.Model):
31     caption = models.CharField(max_length=32)
32     code = models.CharField(max_length=32,default="sa")
33
34 class Host(models.Model):
35     nid = models.AutoField(primary_key=True)
36     host = models.CharField(max_length=32,db_index=True)
37     ip = models.GenericIPAddressField(db_index=True)
38     port = models.IntegerField()
39     b = models.ForeignKey(to="Biness",to_field="id",on_delete=models.CASCADE,)
40
41 class Application(models.Model):
42     name = models.CharField(max_length=32)
43
44     t = models.ManyToManyField("Host")
View Code
views.py


1 def app(request):
2
3     app_list = models.Application.objects.all()
4
5
6     return render(request,"app.html",{"app_list":app_list})
View Code
app.html


 1 <!DOCTYPE html>
 2 <html lang="en">
 3 <head>
 4     <meta charset="UTF-8">
 5     <title>Title</title>
 6 </head>
 7 <body>
 8     <h1>应用列表</h1>
 9     <table border="1">
10         <thead>
11             <tr>
12                 <th>应用名称</th>
13                 <th>应用主机列表</th>
14             </tr>
15         </thead>
16         <tbody>
17             {% for row in app_list %}
18                 <tr>
19                     <td>{{ row.name }}</td>
20                     <td>
21                         {% for host in row.t.all %}
22                             <span style="background-color: aqua ;display: inline-block;padding: 3px;">{{ host.ip }}</span>
23                         {% endfor %}
24                     </td>
25                 </tr>
26             {% endfor %}
27         </tbody>
28     </table>
29 </body>
30 </html>
View Code
多对多增加、删除、编辑实例:


  1 <!DOCTYPE html>
  2 <html lang="en">
  3 <head>
  4     <meta charset="UTF-8">
  5     <title>Title</title>
  6     <style>
  7         .hide{
  8             display: none;
  9         }
 10         .shade{
 11             position: fixed;
 12             top:0;
 13             right: 0;
 14             bottom: 0;
 15             left: 0;
 16             background-color: black;
 17             opacity: 0.6;
 18             z-index: 9;
 19         }
 20         .content,.edit_content{
 21             position:fixed;
 22             height: 300px;
 23             width: 500px;
 24             top:100px;
 25             left: 50%;
 26             background-color: white;
 27             border: white 1px solid;
 28             z-index: 10;
 29             margin-left: -250px;
 30         }
 31     </style>
 32 </head>
 33 <body>
 34     <h1>应用列表</h1>
 35     <div>
 36         <input id="add_host" type="button" value="添加" />
 37     </div>
 38     <table border="1">
 39         <thead>
 40             <tr>
 41                 <th>应用名称</th>
 42                 <th>应用主机列表</th>
 43                 <th>操作</th>
 44             </tr>
 45         </thead>
 46         <tbody>
 47             {% for row in app_list %}
 48                 <tr aid="{{ row.id }}">
 49                     <td>{{ row.name }}</td>
 50                     <td>
 51                         {% for host in row.t.all %}
 52                             <span style="background-color: aqua ;display: inline-block;padding: 3px;" hid="{{ host.nid }}">{{ host.ip }}</span>
 53                         {% endfor %}
 54                     </td>
 55                     <td>
 56                         <span class="edit">编辑</span>|<a href="/del_app?nid={{ row.id }}">删除</a>
 57                     </td>
 58                 </tr>
 59             {% endfor %}
 60         </tbody>
 61     </table>
 62
 63     {#    遮罩层#}
 64     <div class="shade hide"></div>
 65     {#    弹出层#}
 66     <div class="content hide">
 67         <form action="/app/" method="POST" id="add_form">
 68             <div class="group">
 69                 <input id="app_name" type="text" placeholder="app_name" name="app_name" />
 70                 <span id="host_p" style="color: red"></span>
 71             </div>
 72             <div class="group">
 73                 <select id="ip_name" name="ip_name" multiple>
 74                     {% for row in host_list %}
 75                     <option value="{{ row.nid }}">{{ row.ip}}</option>
 76                     {% endfor %}
 77                 </select>
 78             </div>
 79
 80             <p><input type="submit" value="提交" />
 81                 <input id="add_app_ajax" type="button" value="悄悄提交">
 82                 <input id="del" type="button" value="取消" />
 83             </p>
 84         </form>
 85     </div>
 86
 87      <div class="edit_content hide">
 88         <form id="edit_form" action="/app/" method="POST">
 89             <div><input type="text" name="nid" style="display: none"/></div>
 90             <div>
 91                 <input  type="text" placeholder="app" name="app_name" />
 92             </div>
 93             <div>
 94                <select id="edit_ip_name" name="edit_ip_name" multiple>
 95                     {% for row in host_list %}
 96                     <option value="{{ row.nid }}">{{ row.ip}}</option>
 97                     {% endfor %}
 98                 </select>
 99             </div>
100
101             <p>
102                 <input id="ajax_edit" type="button" value="确认编辑">
103                 <input id="edit_del" type="button" value="取消" /></p>
104         </form>
105     </div>
106
107     <script src="/static/jquery-1.12.4.js"></script>
108     <script>
109         $(function(){
110             $("#add_host").click(function () {
111                 $(".shade,.content").removeClass("hide")
112             });
113
114             $("#del").click(function () {
115                 $(".shade,.content").addClass("hide")
116             });
117
118             $(".edit").click(function(){
119                $(".shade,.edit_content") .removeClass("hide");
120
121                var i = $(this).parent().parent().children().first().text();
122                $("#edit_form").find("input[name='app_name']").val(i);
123
124                var aid = $(this).parent().parent().attr("aid");
125                $("#edit_form").find("input[name='nid']").val(aid);
126
127                var hid_list=[];
128                $(this).parent().prev().children().each(function(){
129                    var hid = $(this).attr("hid");
130                    hid_list.push(hid)
131                });
132
133                $("#edit_form").find("select").val(hid_list);
134
135             });
136
137             $("#edit_del").click(function () {
138                 $(".shade,.edit_content").addClass("hide")
139             });
140
141             $("#add_app_ajax").click(function () {
142                 $.ajax({
143                     url:"/app_ajax/",
144                     type:"POST",
145                     dataType:"JSON",
146                     traditional:true,
147                     data:$("#add_form").serialize(),
148                     success:function(obj){
149                         if(obj.stauts){
150                             location.reload()
151                         }else{
152                             $("#host_p").text(obj.error)
153                         }
154                     }
155                 })
156             });
157
158             $("#ajax_edit").click(function(){
159                 $.ajax({
160                     url:"/test_app_edit/",
161                     type:"POST",
162                     dataType:"JSON",
163                     traditional:true,
164                     data:$("#edit_form").serialize(),
165                     success:function(obj){
166                         if(obj.stauts){
167                             location.reload()
168                         }else{
169                             $("#host_p").text(obj.error)
170                             }
171                     }
172                 })
173             });
174         })
175     </script>
176 </body>
177 </html>
app.html


 1 def del_app(request):
 2     nnid = request.GET.get("nid")
 3     models.Application.objects.filter(id=nnid).delete()
 4
 5     return redirect("/app/")
 6
 7 def app(request):
 8     if request.method == "GET":
 9         app_list = models.Application.objects.all()
10         host_list = models.Host.objects.all()
11
12         return render(request,"app.html",{"app_list":app_list,"host_list":host_list})
13     elif request.method == "POST":
14         app_name = request.POST.get("app_name")
15         ip_name = request.POST.getlist("ip_name")
16         print(app_name,ip_name)
17
18         obj = models.Application.objects.create(name=app_name)
19         obj.t.add(*ip_name)
20
21         return redirect("/app/")
22
23 def app_ajax(request):
24     ret ={"stauts":True,"error":None,"data":None}
25     try:
26         app_name = request.POST.get("app_name")
27         ip_name = request.POST.getlist("ip_name")
28         print(app_name,ip_name)
29
30         obj = models.Application.objects.create(name=app_name)
31         obj.t.add(*ip_name)
32     except Exception as e:
33         ret["stauts"] = False
34         ret["error"] = "this is error"
35
36     return HttpResponse(json.dumps(ret))
37
38 def test_app_edit(request):
39     ret = {"stauts": True, "error": None, "data": None}
40     try:
41         id = request.POST.get("nid")
42         name = request.POST.get("app_name")
43         ip_list = request.POST.getlist("edit_ip_name")
44         print(id,name,ip_list)
45
46         obj = models.Application.objects.get(id =id)
47         obj.name = name
48
49         obj.t.set(ip_list)
50         obj.save()
51     except Exception as e:
52         ret["stauts"] = False
53         ret["error"] = "this is error"
54
55     return HttpResponse(json.dumps(ret))
views.py
*******************************To Be Continue************************************


