第一步 第一个Netty应用
服务端 (serverChannel)
- EchoServerHandler 简单的接收打印,将所接收的消息返回给发送者
- 冲刷所有待审消息到远程节点
- 关闭通道后,操作完成
服务端 (server)
- EchoServer 创建EventLoopGroup、ServerBootstrap
- 指定 Channel
- 设置 socket 地址使用所选的端口
- 添加 EchoServerHandler 到 Channel 的 ChannelPipeline
- 绑定的服务器;sync 等待服务器关闭
- 关闭 channel 和 块,直到它被关闭
- 关机的 EventLoopGroup,释放所有资源
客户端 (client) -> Bootstrap的构建过程
第二步 熟悉组件
- 学习步骤如下:
Channel、ChannelHandler
Encode、Decode、ByteBuf
ChannelHandlerContext
ReferenceCountUtil
ChannelFuture、Promise
ChannelPipeline、ChannelInitializer
EventLoop、EventLoopGroup
Attributekey
CharsetUtil
尽量,按照其在整个通信过程中所属顺位,讲解所有 Netty 主要组件。大致结构图如下:
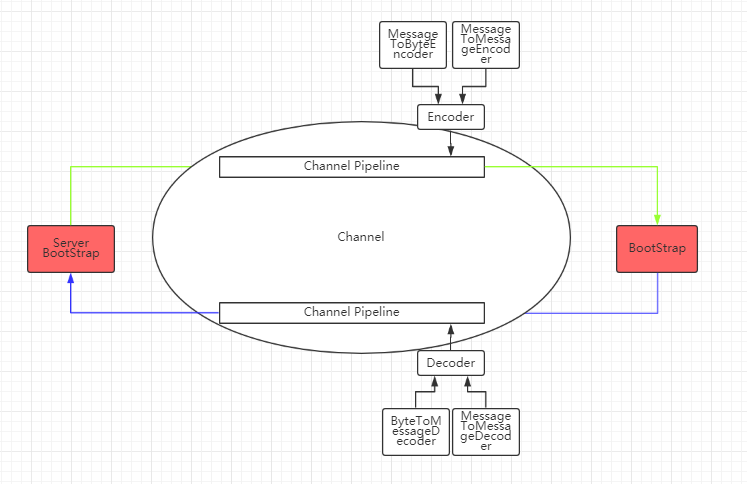
1.Channel、ChannelHandler
熟悉ChannelInboundHandlerAdapter 抽象类里面每个方法的用处。
利用责任单一原则,把消息
2.Encode、Decode、ByteBuf
Encode、Decode
ByteBuf
(ByteBuf和相关辅助类)[http://www.cnblogs.com/wade-luffy/p/6196481.html]
(WroldClock)[https://netty.io/4.0/xref/io/netty/example/worldclock/WorldClockServerHandler.html]
第三步 难点、要点
- EventLoop 数量、名称
- 粘包、半包
- 心跳 3次
- 重连
- session
- 不想转关键字
- 内存保护、溢出oom
- 连接数与释放
- 拒绝连接、黑名单、白名单
- Nginx
- fail over重试与幂等性
第四步 高阶原理
- ByteBuf
- Channel 和Unsafe
- ChannelPipeline 和ChannelHandler
- EventLoop 和EventLoopGroup
- Future 和Promise