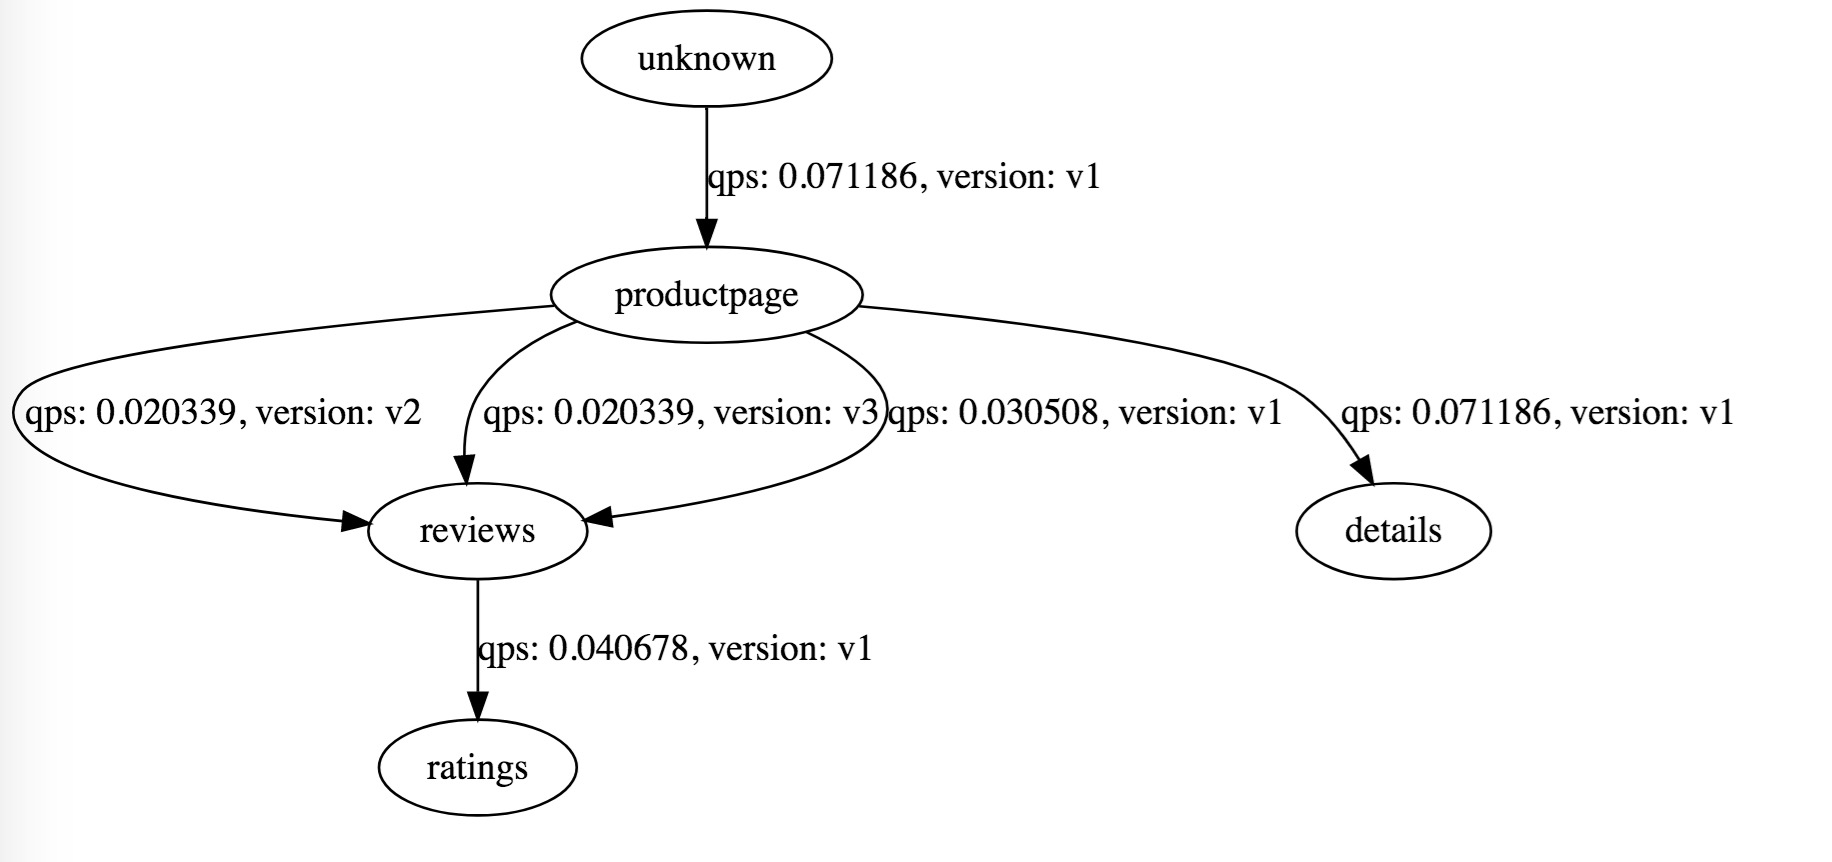
Istio是Google、IBM和Lyft联合开源的微服务Service Mesh框架,旨在解决大量微服务的发现、连接、管理、监控以及安全等问题。
Istio的主要特性包括:
- HTTP、gRPC和TCP网络流量的自动负载均衡
- 丰富的路由规则,细粒度的网络流量行为控制
- 流量加密、服务间认证,以及强身份声明
- 全范围(Fleet-wide)策略执行
- 深度遥测和报告
原理
Istio从逻辑上可以分为数据平面和控制平面:
- 数据平面主要由一系列的智能代理(Envoy)组成,管理微服务之间的网络通信
- 控制平面负责管理和配置这些智能代理,并动态执行策略
Istio架构可以如下图所示
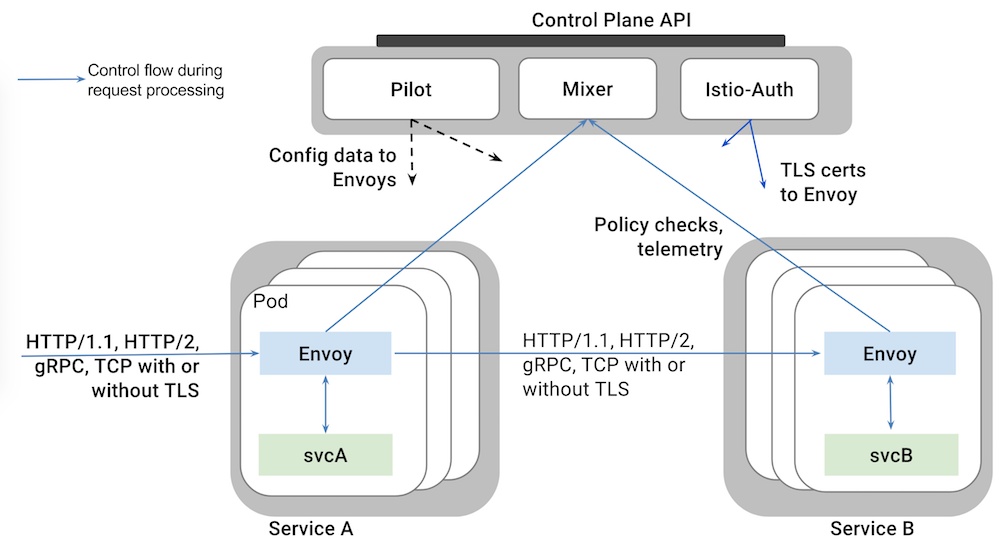
主要由以下组件构成
- Envoy:Lyft开源的高性能代理总线,支持动态服务发现、负载均衡、TLS终止、HTTP/2和gPRC代理、健康检查、性能测量等功能。Envoy以sidecar的方式部署在相关的服务的Pod中。
- Mixer:负责访问控制、执行策略并从Envoy代理中收集遥测数据。Mixer支持灵活的插件模型,方便扩展
- Pilot:用户和Istio的接口,验证用户提供的配置和路由策略并发送给Istio组件,管理Envoy示例的生命周期
- Istio-Auth:提供服务间和终端用户的认证机制
安装环境
- CentOS 7.2
- Docker 17.04.0-ce
- Kubernetes 1.6.2
- Istio 0.1.6
安装
1.下载安装包
下载地址:https://github.com/istio/istio/releases
下载Linux版本的当前最新版安装包
wget https://github.com/istio/istio/releases/download/0.1.6/istio-0.1.6-linux.tar.gz
2.解压
解压后,得到的目录结构如下:
[root@cz_fbsdb500_06 istio]# tree istio-0.1.6
istio-0.1.6
├── bin
│   └── istioctl
├── CONTRIBUTING.md
├── install
│   ├── kubernetes
│   │   ├── addons
│   │   │   ├── grafana.yaml
│   │   │   ├── prometheus.yaml
│   │   │   ├── servicegraph.yaml
│   │   │   └── zipkin.yaml
│   │   ├── istio-auth-with-cluster-ca.yaml
│   │   ├── istio-auth.yaml
│   │   ├── istio-rbac-alpha.yaml
│   │   ├── istio-rbac-beta.yaml
│   │   ├── istio.yaml
│   │   ├── README.md
│   │   └── templates
│   │       ├── istio-auth
│   │       │   ├── istio-cluster-ca.yaml
│   │       │   ├── istio-egress-auth.yaml
│   │       │   ├── istio-ingress-auth.yaml
│   │       │   └── istio-namespace-ca.yaml
│   │       ├── istio-egress.yaml
│   │       ├── istio-ingress.yaml
│   │       ├── istio-mixer.yaml
│   │       └── istio-pilot.yaml
│   └── README.md
├── istio.VERSION
├── LICENSE
├── README.md
└── samples
    ├── apps
    │   ├── bookinfo
    │   │   ├── bookinfo-ingress.yaml
    │   │   ├── bookinfo-v1.yaml
    │   │   ├── bookinfo.yaml
    │   │   ├── cleanup.sh
    │   │   ├── destination-ratings-test-delay.yaml
    │   │   ├── loadbalancing-policy-reviews.yaml
    │   │   ├── mixer-rule-additional-telemetry.yaml
    │   │   ├── mixer-rule-empty-rule.yaml
    │   │   ├── mixer-rule-ratings-denial.yaml
    │   │   ├── mixer-rule-ratings-ratelimit.yaml
    │   │   ├── README.md
    │   │   ├── route-rule-all-v1.yaml
    │   │   ├── route-rule-delay.yaml
    │   │   ├── route-rule-reviews-50-v3.yaml
    │   │   ├── route-rule-reviews-test-v2.yaml
    │   │   ├── route-rule-reviews-v2-v3.yaml
    │   │   └── route-rule-reviews-v3.yaml
    │   ├── httpbin
    │   │   ├── httpbin.yaml
    │   │   └── README.md
    │   └── sleep
    │       ├── README.md
    │       └── sleep.yaml
    └── README.md

11 directories, 46 files
3.安装istioctl
将./bin/istioctl拷贝到你的$PATH目录下。
4.检查RBAC
因为我们安装的kuberentes版本是1.6.2默认支持RBAC,这一步可以跳过。如果你使用的其他版本的kubernetes,请参考官方文档操作。
执行以下命令,正确的输出是这样的:
$ kubectl api-versions | grep rbac rbac.authorization.k8s.io/v1alpha1 rbac.authorization.k8s.io/v1beta1
5.创建角色绑定
$ kubectl create -f install/kubernetes/istio-rbac-beta.yaml clusterrole "istio-manager" created clusterrole "istio-ca" created clusterrole "istio-sidecar" created clusterrolebinding "istio-manager-admin-role-binding" created clusterrolebinding "istio-ca-role-binding" created clusterrolebinding "istio-ingress-admin-role-binding" created clusterrolebinding "istio-sidecar-role-binding" created
注意:官网的安装包中的该文件中存在RoleBinding错误,应该是集群级别的clusterrolebinding,而release里的代码只是普通的rolebinding,查看该Issue Istio manager cannot list of create k8s TPR when RBAC enabled #327。
6.安装istio核心组件
用到的镜像有:
docker.io/istio/mixer:0.1.6 docker.io/istio/pilot:0.1.6 docker.io/istio/proxy_debug:0.1.6
我们暂时不开启Istio Auth。
注意:本文中用到的所有yaml文件中的type: LoadBalancer去掉,使用默认的ClusterIP,然后配置Traefik ingress,就可以在集群外部访问。请参考安装Traefik ingress。
bash kubectl apply -f install/kubernetes/istio.yaml
7.安装监控插件
用到的镜像有:
docker.io/istio/grafana:0.1.6 quay.io/coreos/prometheus:v1.1.1 gcr.io/istio-testing/servicegraph:latest docker.io/openzipkin/zipkin:latest
安装插件
bash kubectl apply -f install/kubernetes/addons/prometheus.yaml kubectl apply -f install/kubernetes/addons/grafana.yaml kubectl apply -f install/kubernetes/addons/servicegraph.yaml kubectl apply -f install/kubernetes/addons/zipkin.yaml
在traefik ingress中增加以上几个服务的配置,同时增加istio-ingress配置。
Yaml - host: grafana.istio.io http: paths: - path: / backend: serviceName: grafana servicePort: 3000 - host: servicegraph.istio.io http: paths: - path: / backend: serviceName: servicegraph servicePort: 8088 - host: prometheus.istio.io http: paths: - path: / backend: serviceName: prometheus servicePort: 9090 - host: zipkin.istio.io http: paths: - path: / backend: serviceName: zipkin servicePort: 9411 - host: ingress.istio.io http: paths: - path: / backend: serviceName: istio-ingress servicePort: 80
测试
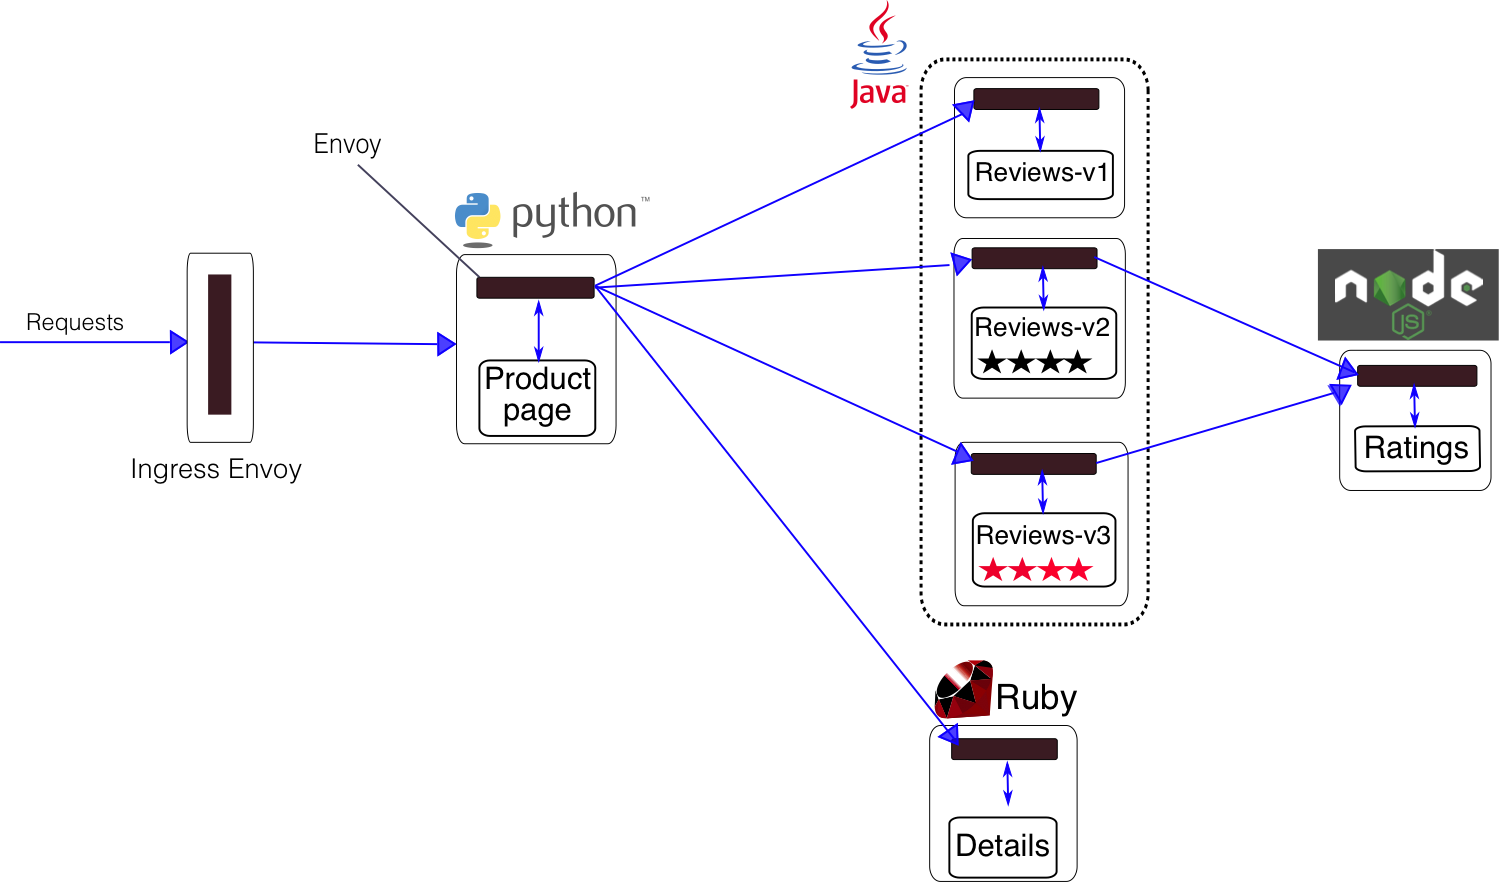
我们使用Istio提供的测试应用bookinfo微服务来进行测试。该应用架构图如下:
部署应用
kubectl create -f <(istioctl kube-inject -f samples/apps/bookinfo/bookinfo.yaml)
Istio kube-inject命令会在bookinfo.yaml文件中增加Envoy sidecar信息。参考:https://istio.io/docs/referenc ... nject
在本机的/etc/hosts下增加VIP节点和ingress.istio.io的对应信息。具体步骤参考:边缘节点配置
在浏览器中访问http://ingress.istio.io/productpage
监控
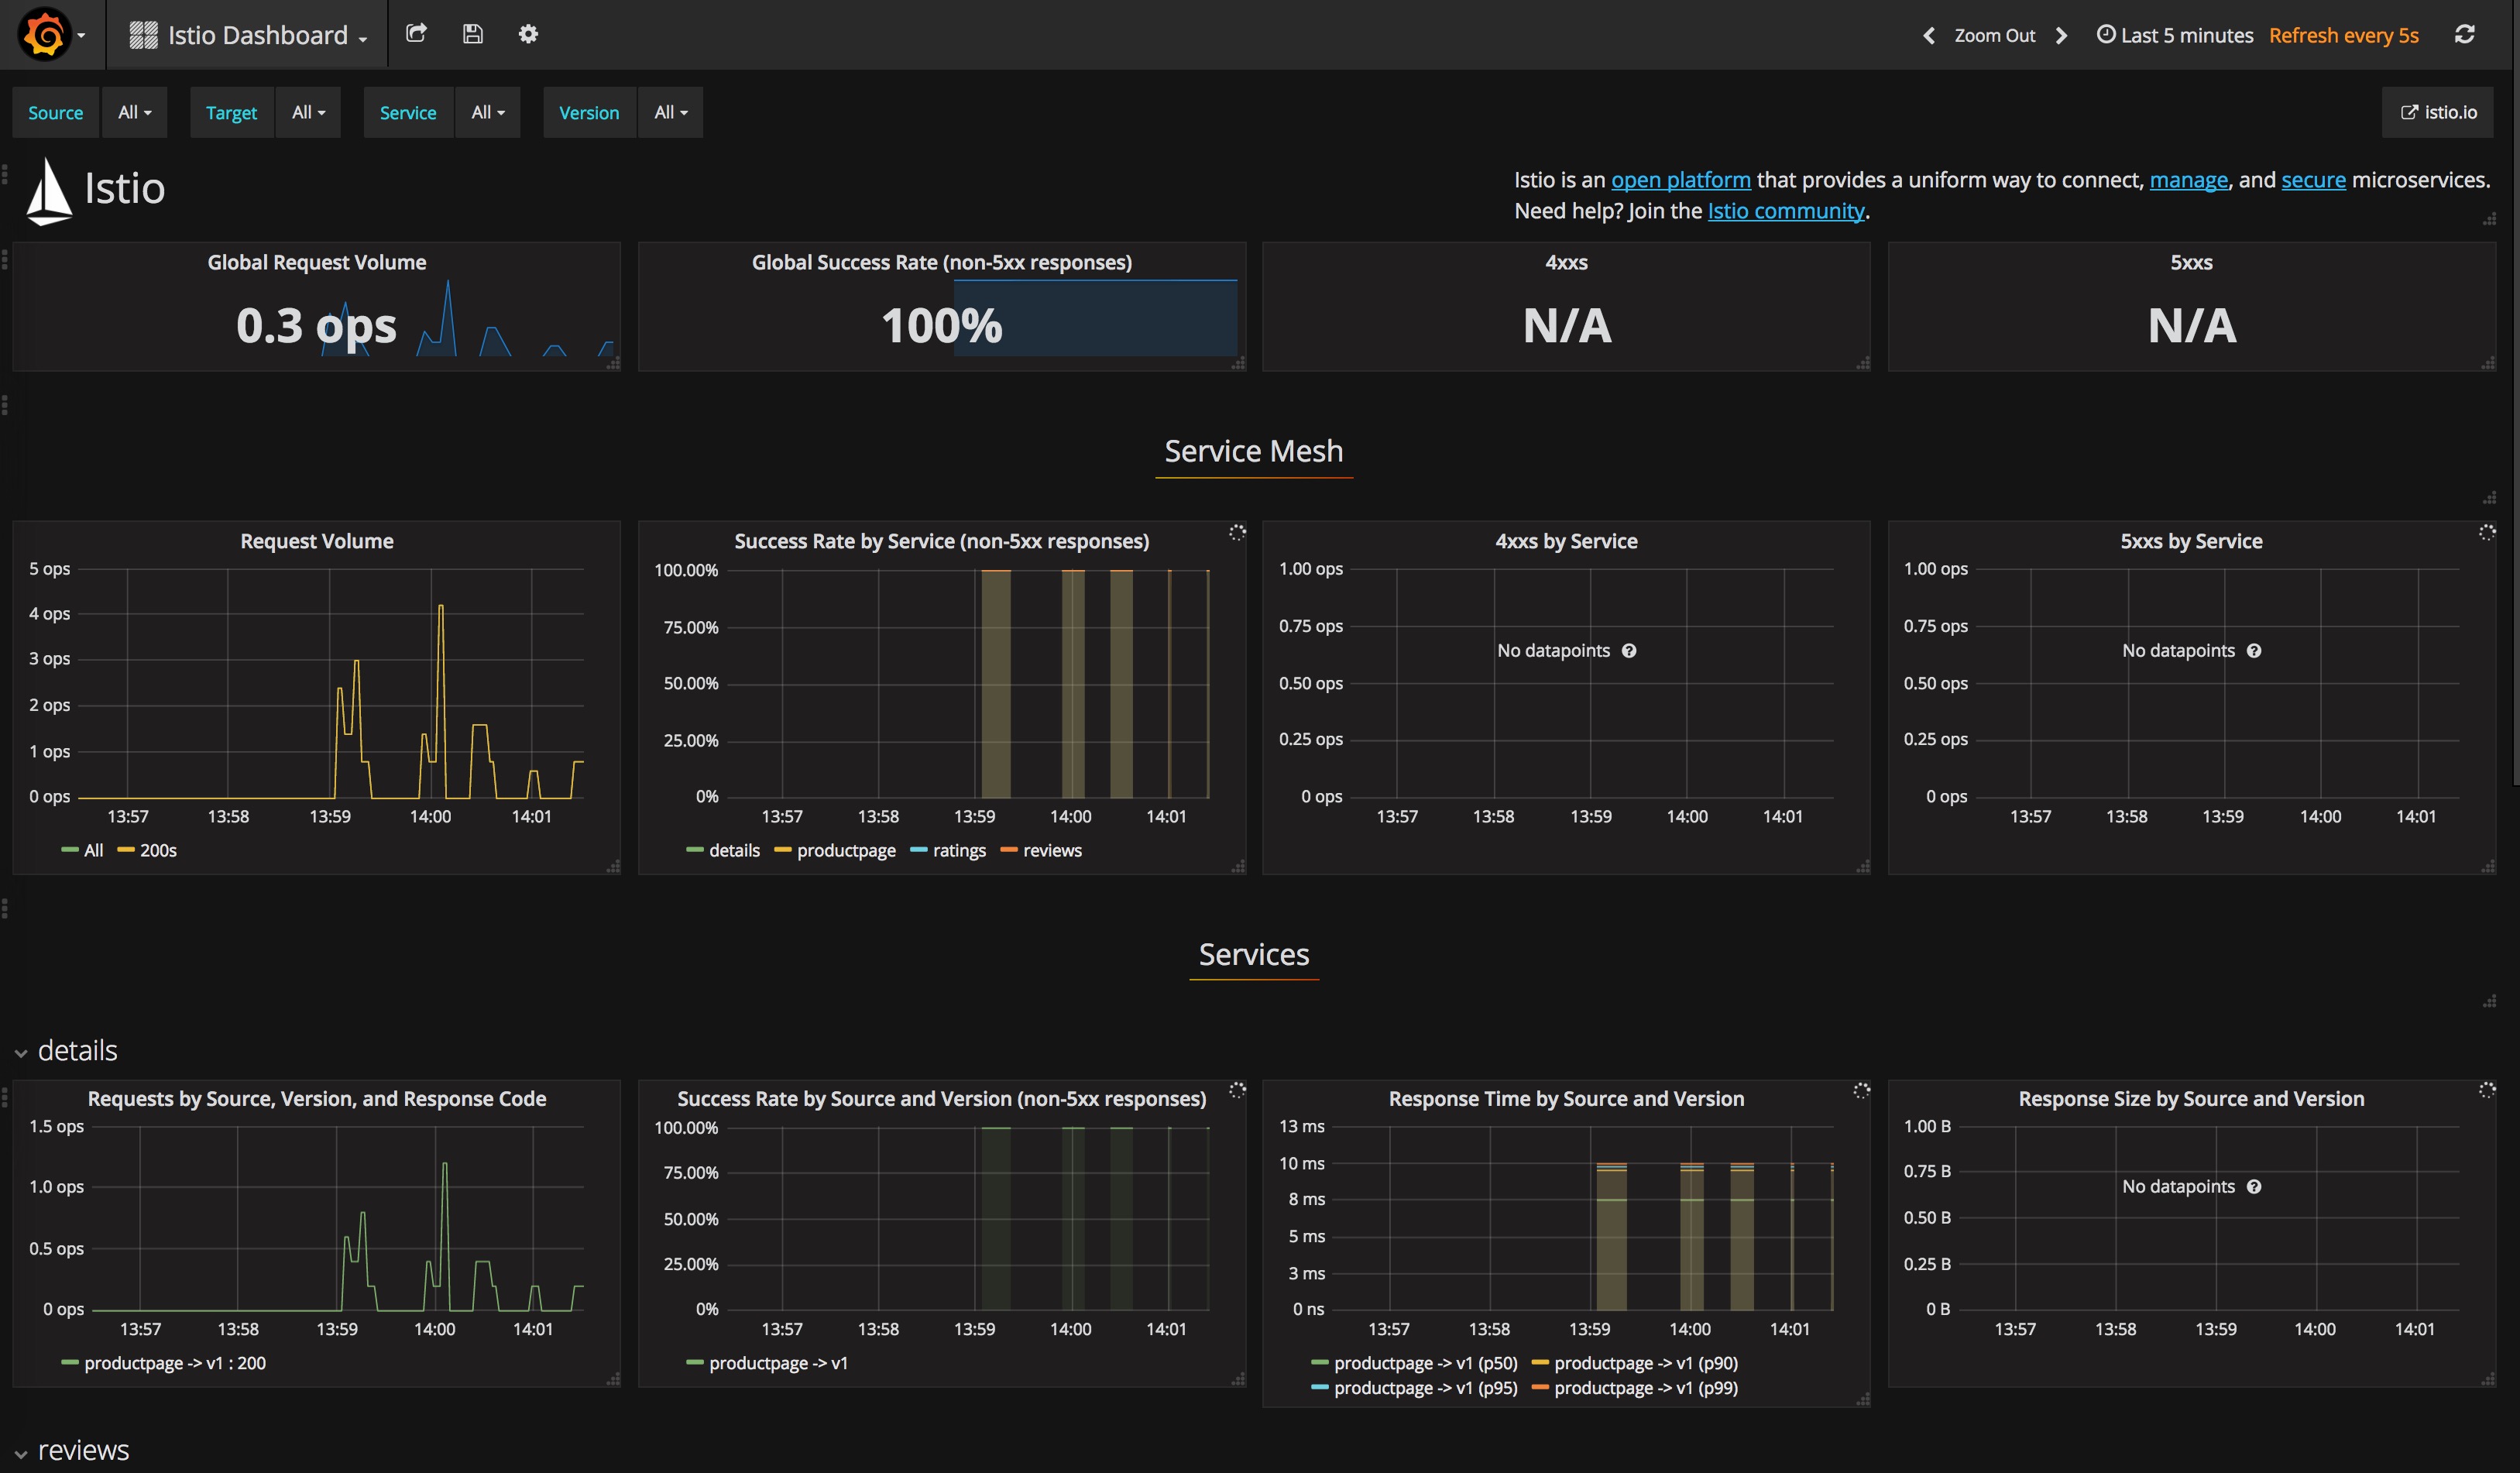
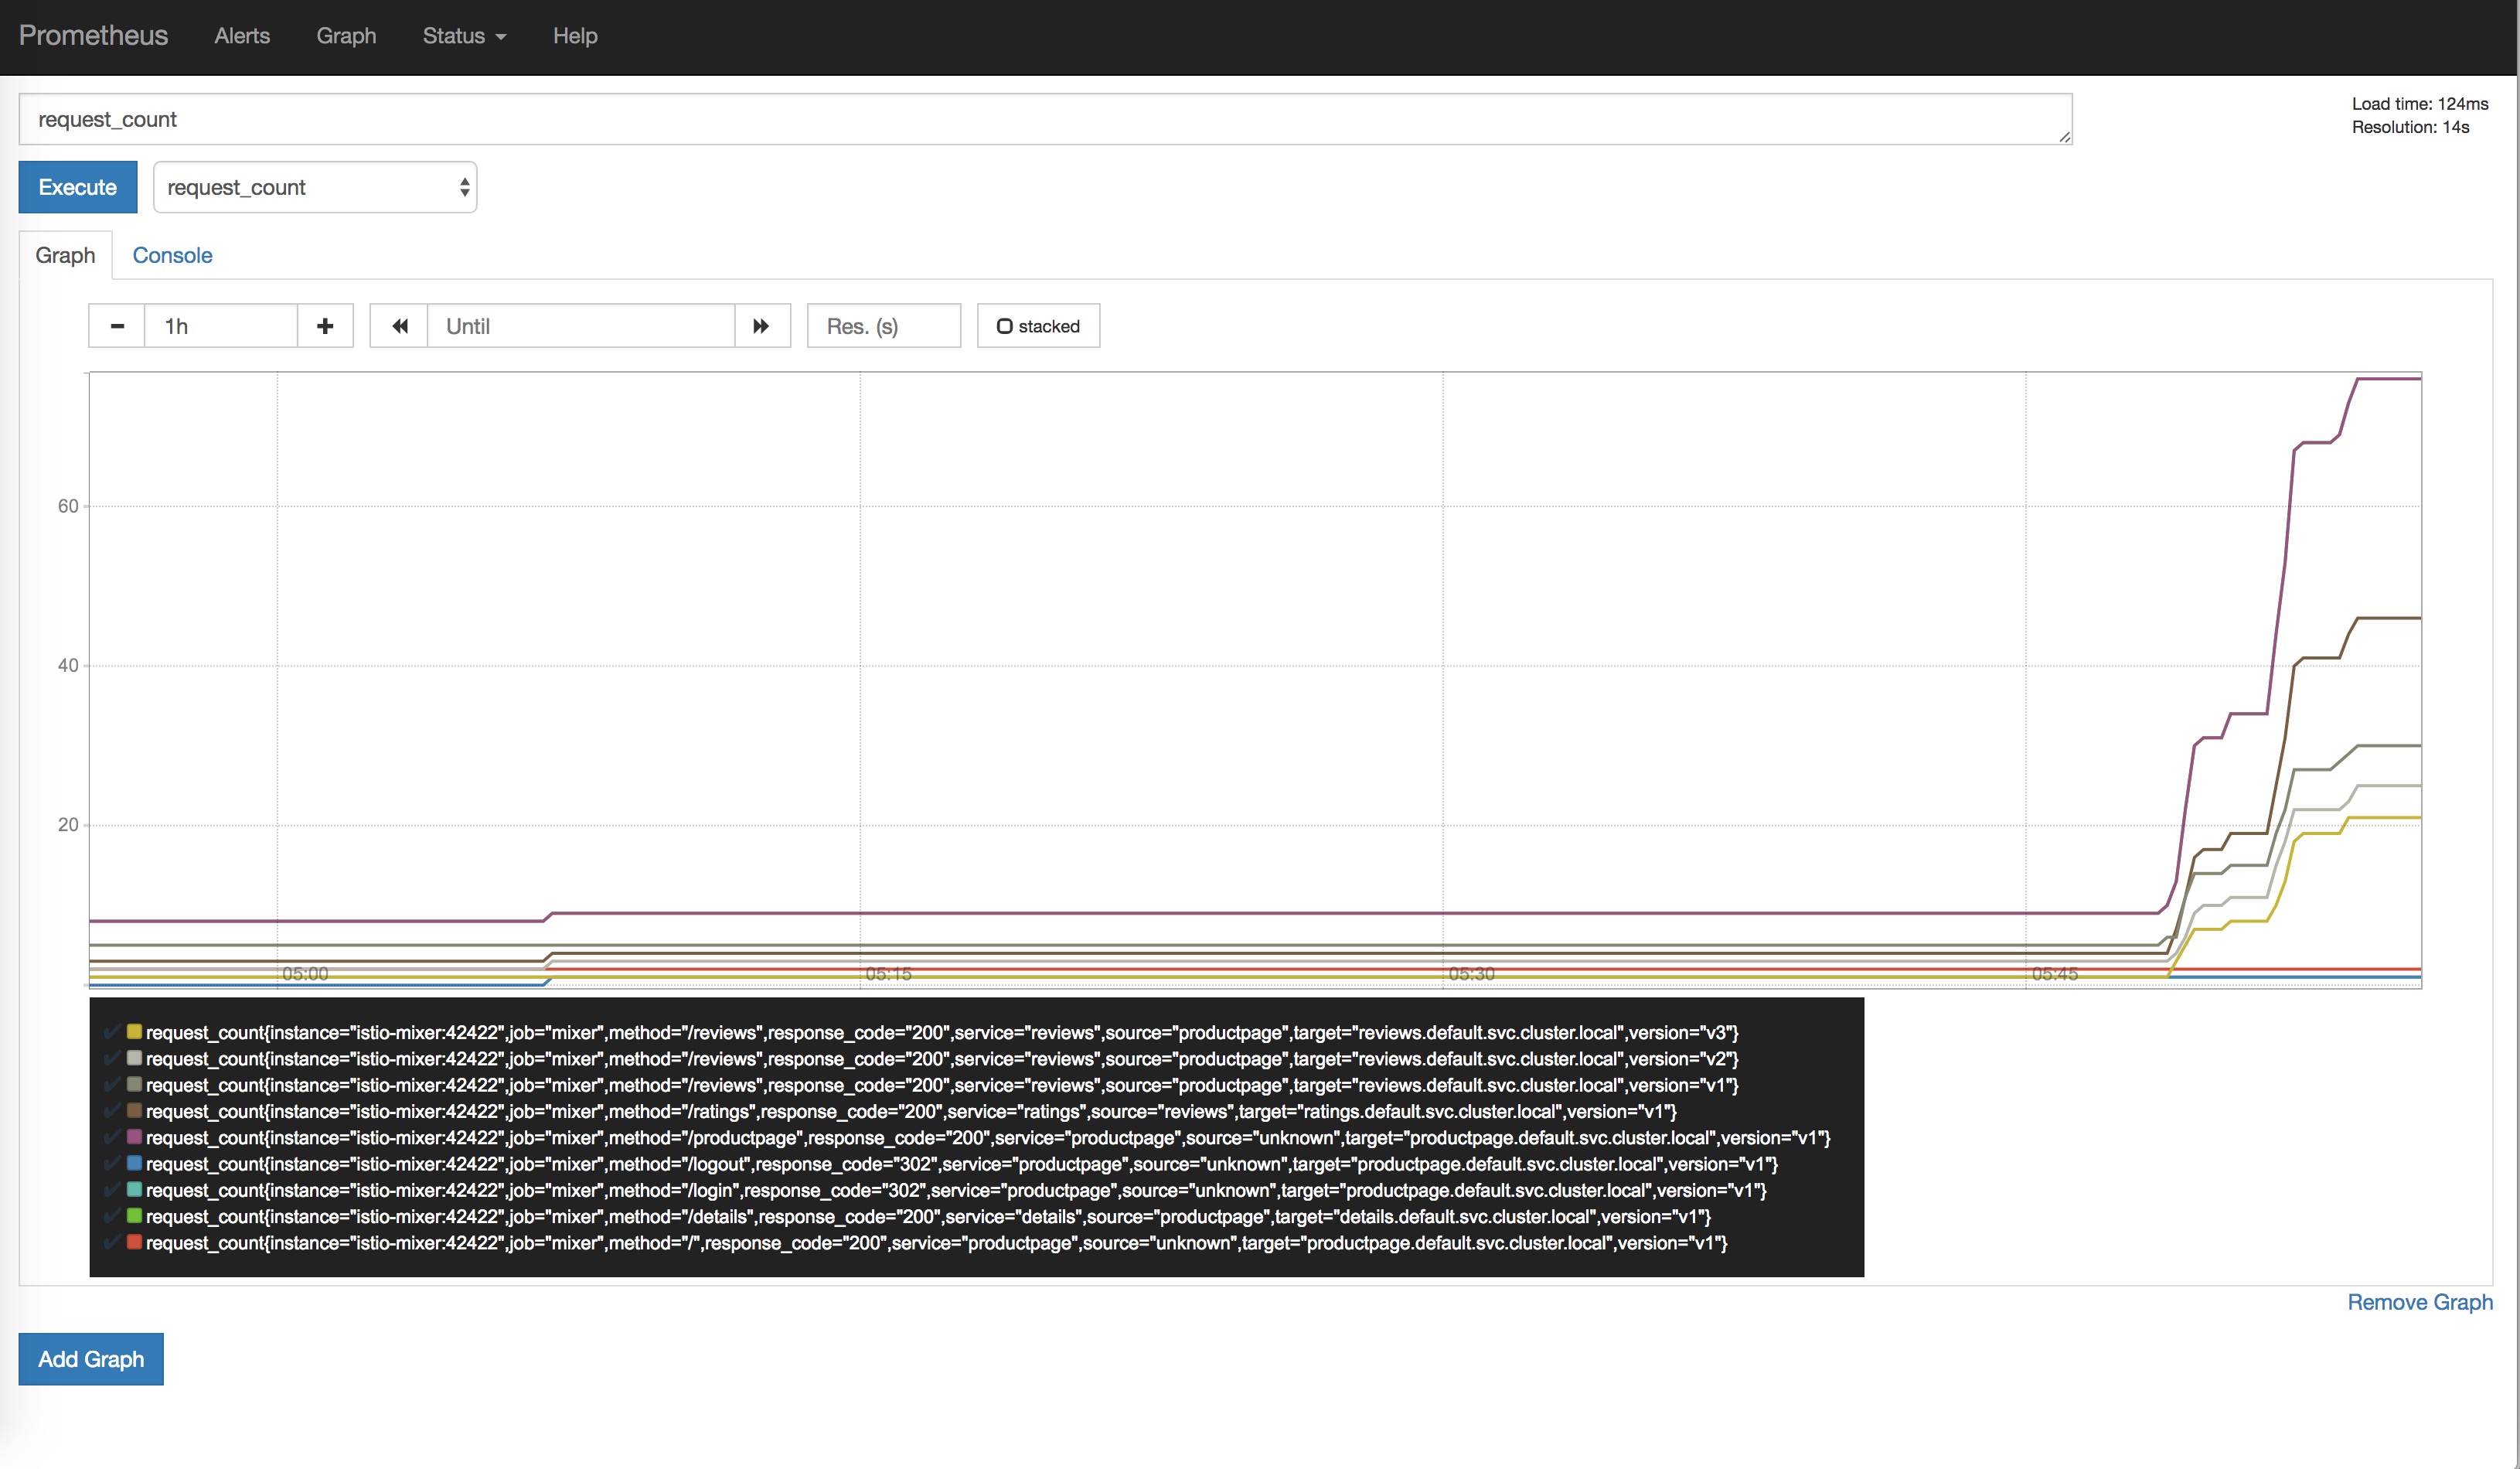
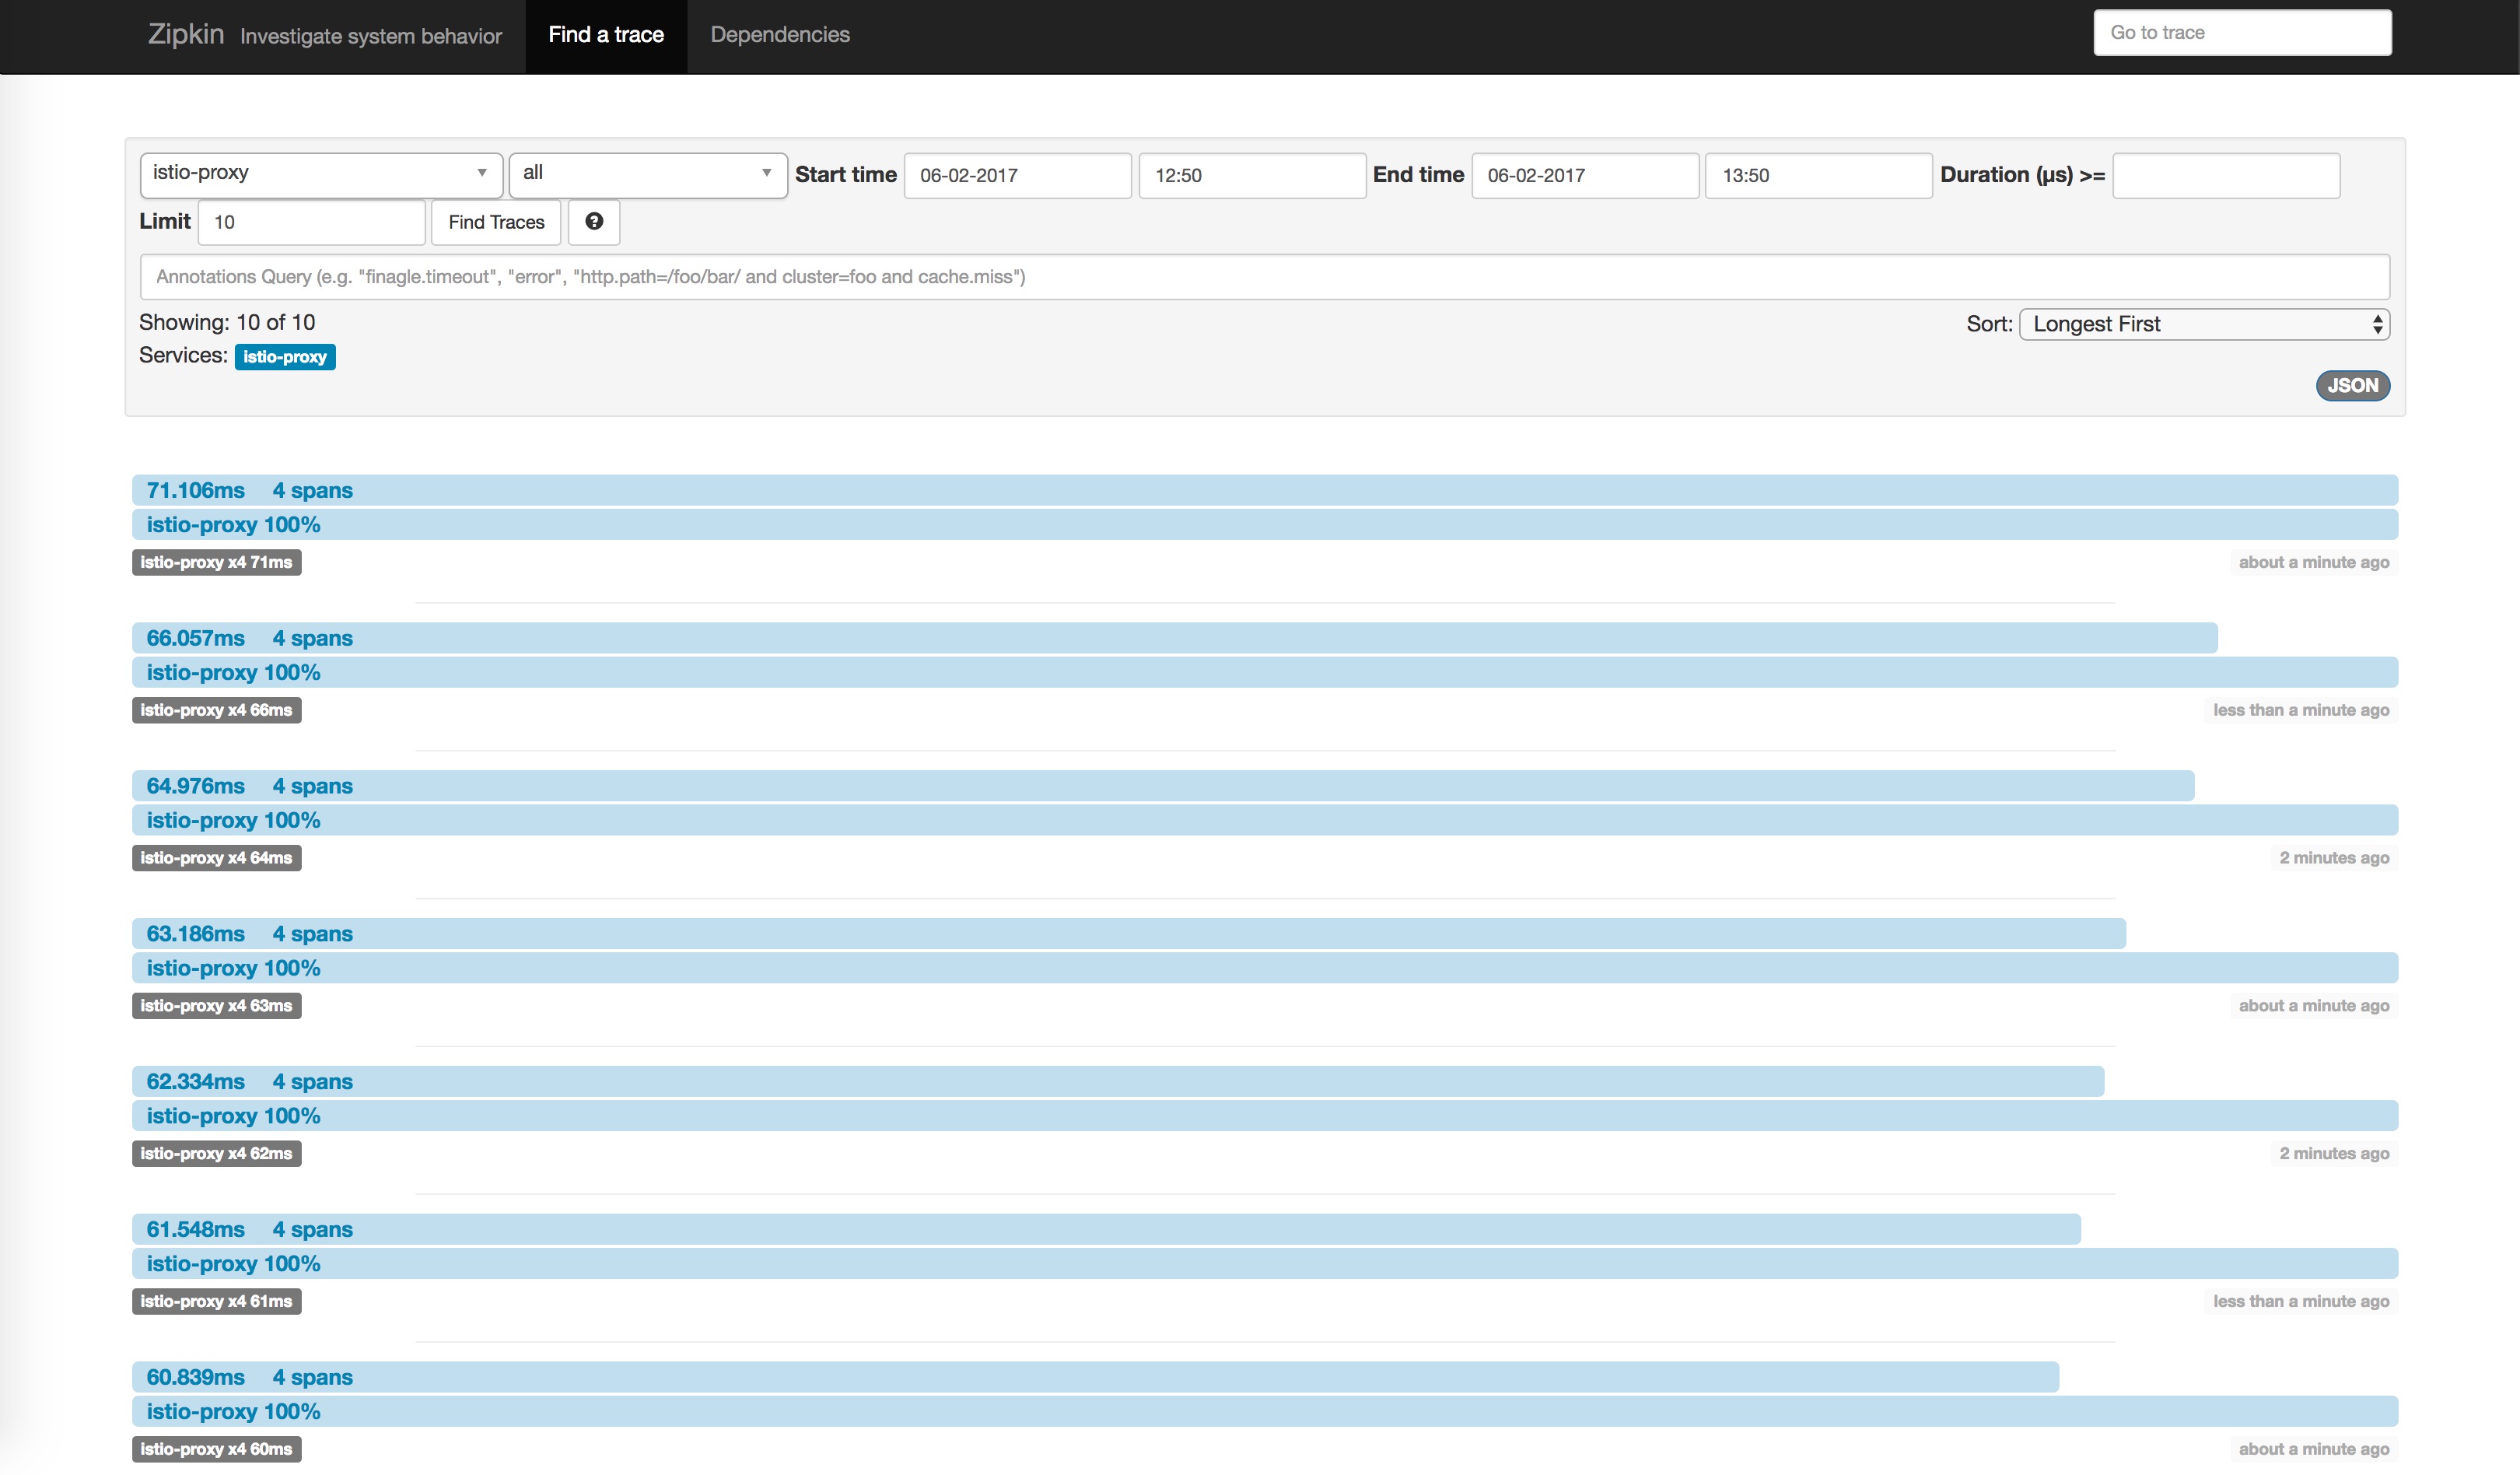
不断刷新productpage页面,将可以在以下几个监控中看到如下界面。
Grafana页面
http://grafana.istio.io
Prometheus页面
http://prometheus.istio.io
Zipkin页面
http://zipkin.istio.io
ServiceGraph页面
http://servicegraph.istio.io/dotviz
可以用来查看服务间的依赖关系。
展示服务之间调用关系图 ,访问http://servicegraph.istio.io/graph
