本系列代码地址:https://github.com/HashZhang/spring-cloud-scaffold/tree/master/spring-cloud-iiford
我们使用 Spring Boot 的 SPI 机制对 Undertow 进行订制,主要有如下两个方面:
- 需要在 accesslog 中打开响应时间统计。
- 期望通过 JFR 监控每个 Http 请求,同时占用空间不能太大。
接下来我们依次实现这两个需求:

首先,我们的框架作为基础组件,应该按照基础组件的标准来开发,使用 这个系列之前介绍的 spring.factories 这个 Spring Boot SPI 机制,在引入我们这个基础组件依赖的时候,就自动加载对应配置。
然后,对于是否打开响应时间统计,应该根据用户配置的 accesslog 格式而定(Undertow 的 accesslog 配置可以参考这个系列之前的文章)。
由此我们来编写代码。目前比较遗憾的是,Spring Boot 对接 Undertow 并没有直接的配置可以让 Undertow 打开响应时间统计,但是可以通过实现 WebServerFactoryCustomizer 接口的方式,对构造 WebServer 的 WebServerFactory 进行订制。其底层实现原理非常简单(以下参考源码:WebServerFactoryCustomizerBeanPostProcessor.java):
- Spring Boot 中指定了
WebServerFactoryCustomizerBeanPostProcessor这个BeanPostProcessor. WebServerFactoryCustomizerBeanPostProcessor的postProcessBeforeInitialization方法(即在所有 Bean 初始化之前会调用的方法)中,如果 Bean 类型是WebServerFactory,就将其作为参数传入注册的所有WebServerFactoryCustomizerBean 中进行自定义。
接下来我们来实现自定义的 WebServerFactoryCustomizer
DefaultWebServerFactoryCustomizer
package com.github.hashjang.spring.cloud.iiford.spring.cloud.webmvc.undertow;

import io.undertow.UndertowOptions;
import org.apache.commons.lang.StringUtils;
import org.springframework.boot.autoconfigure.web.ServerProperties;
import org.springframework.boot.web.embedded.undertow.ConfigurableUndertowWebServerFactory;
import org.springframework.boot.web.server.WebServerFactoryCustomizer;

public class DefaultWebServerFactoryCustomizer implements WebServerFactoryCustomizer<ConfigurableUndertowWebServerFactory> {

    private final ServerProperties serverProperties;

    public DefaultWebServerFactoryCustomizer(ServerProperties serverProperties) {
        this.serverProperties = serverProperties;
    }

    @Override
    public void customize(ConfigurableUndertowWebServerFactory factory) {
        String pattern = serverProperties.getUndertow()
                .getAccesslog().getPattern();
        // 如果 accesslog 配置中打印了响应时间,则打开记录请求开始时间配置
        if (logRequestProcessingTiming(pattern)) {
            factory.addBuilderCustomizers(builder ->
                    builder.setServerOption(
                            UndertowOptions.RECORD_REQUEST_START_TIME,
                            true
                    )
            );
        }
    }

    private boolean logRequestProcessingTiming(String pattern) {
        //如果没有配置 accesslog,则直接返回 false
        if (StringUtils.isBlank(pattern)) {
            return false;
        }
        //目前只有 %D 和 %T 这两个占位符和响应时间有关,通过这个判断
        //其他的占位符信息,请参考系列之前的文章
        return pattern.contains("%D") || pattern.contains("%T");
    }
}
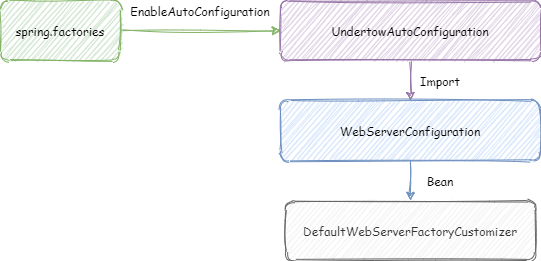
然后我们通过 spring.factories SPI 机制将这个类以一个单例 Bean 的形式,注册到我们应用 ApplicationContext 中,如图所示:

在 Configuration 和 spring.factories 之间多了一层 AutoConfiguration 的原因是:
- 隔离 SPI 与 Configuration,在 AutoConfiguration 同一管理相关的 Configuration。
@AutoConfigurationBefore等类似的注解只能用在 SPI 直接加载的 AutoConfiguration 类上面才有效,隔离这一层也是出于这个考量。

在系列前面的文章中,我们提到过我们引入了 prometheus 的依赖。在引入这个依赖后,对于每个 http 请求,都会在请求结束返回响应的时候,将响应时间以及响应码和异常等,记入统计,其中的内容类似于:
http_server_requests_seconds_count{exception="None",method="POST",outcome="SUCCESS",status="200",uri="/query/orders",} 120796.0
http_server_requests_seconds_sum{exception="None",method="POST",outcome="SUCCESS",status="200",uri="/query/orders",} 33588.274025738
http_server_requests_seconds_max{exception="None",method="POST",outcome="SUCCESS",status="200",uri="/query/orders",}  0.1671125
http_server_requests_seconds_count{exception="MissingRequestHeaderException",method="POST",outcome="CLIENT_ERROR",status="400",uri="/query/orders",} 6.0
http_server_requests_seconds_sum{exception="MissingRequestHeaderException",method="POST",outcome="CLIENT_ERROR",status="400",uri="/query/orders",} 0.947300794
http_server_requests_seconds_max{exception="MissingRequestHeaderException",method="POST",outcome="CLIENT_ERROR",status="400",uri="/query/orders",}  0.003059704
可以看出,记录了从程序开始到现在,以 exception,method,outcome,status,uri 为 key 的调用次数,总时间和最长时间。
同时呢,还可以搭配 @io.micrometer.core.annotation.Timer 注解,订制监控并且增加 Histogram,例如:
//@Timer 注解想生效需要注册一个 io.micrometer.core.aop.TimedAspect Bean 并且启用切面
@Bean
public TimedAspect timedAspect(MeterRegistry registry) {
    return new TimedAspect(registry);
}

@Timed(histogram=true)
@RequestMapping("/query/orders")
public xxxx xxxx() {
    .....
}
这样就会除了上面的数据额外得到类似于 bucket 的统计数据:
http_server_requests_seconds_bucket{exception="None",method="GET",outcome="SUCCESS",status="200",uri="/facts-center/query/frontend/market-info",le="0.001",} 0.0
http_server_requests_seconds_bucket{exception="None",method="GET",outcome="SUCCESS",status="200",uri="/facts-center/query/frontend/market-info",le="0.001048576",} 0.0
http_server_requests_seconds_bucket{exception="None",method="GET",outcome="SUCCESS",status="200",uri="/facts-center/query/frontend/market-info",le="0.001398101",} 0.0
http_server_requests_seconds_bucket{exception="None",method="GET",outcome="SUCCESS",status="200",uri="/facts-center/query/frontend/market-info",le="0.001747626",} 0.0
//省略中间的时间层级
http_server_requests_seconds_bucket{exception="None",method="GET",outcome="SUCCESS",status="200",uri="/facts-center/query/frontend/market-info",le="30.0",} 1.0
http_server_requests_seconds_bucket{exception="None",method="GET",outcome="SUCCESS",status="200",uri="/facts-center/query/frontend/market-info",le="+Inf",} 1.0
以上这些统计给我们分析问题带来了如下不便的地方:
- 采集分析压力过大:我们采用了 grafana 采集 prometheus 上报的指标数据,grafana 的时序数据库会将采集到的数据全部保存。自带的 http 监控指标过多,一个路径,一个结果,一个异常,一个方法就有一个特定指标,如果是有将参数作为路径参数的接口,那么这个指标就更多更多了,例如将 userId 放入路径中。我们其实只关注出问题的时间段的请求状况,但是我们并不能预测啥时候出问题,也就无法按需提取,只能一直采集并保存,这也就导致压力过大。
- 指标对于压力不敏感,无法很准确的用指标进行报警:由于指标并不是采集后就清空,而是从程序开始就一直采集。所以随着程序的运行,这些指标对于瞬时压力的表现波动越来越小。
所以,我们基本不会通过这个指标进行问题定位,也就没必要开启了,于是我们禁用这个 http 请求响应采集,目前没有很优雅的方式单独禁用,只能通过自动扫描注解中排除,例如:
@SpringBootApplication(
        scanBasePackages = {"com.test"}
        //关闭 prometheus 的 http request 统计,我们用不到
        , exclude = WebMvcMetricsAutoConfiguration.class
) 
- 首先,JFR 采集是进程内的,并且 JVM 做了很多优化,性能消耗很小,可以指定保留多少天或者保留最多多大的 JFR 记录(保存在本地临时目录),我们可以随用随取。
- 并且,我们可以将我们感兴趣的信息放入 JFR 事件,作比较灵活的定制。
- 对于某个请求时间过长一直没有响应的,我们可以分为收到请求和请求响应两个 JFR 事件。
我们来定义这两个 JFR 事件,一个是收到请求的事件,另一个是请求响应的事件:
HttpRequestReceivedJFREvent.java
package com.github.hashjang.spring.cloud.iiford.spring.cloud.webmvc.undertow.jfr;

import jdk.jfr.Category;
import jdk.jfr.Event;
import jdk.jfr.Label;
import jdk.jfr.StackTrace;

import javax.servlet.ServletRequest;

@Category({"Http Request"})
@Label("Http Request Received")
@StackTrace(false)
public class HttpRequestReceivedJFREvent extends Event {
    //请求的 traceId,来自于 sleuth
    private final String traceId;
    //请求的 spanId,来自于 sleuth
    private final String spanId;

    public HttpRequestReceivedJFREvent(ServletRequest servletRequest, String traceId, String spanId) {
        this.traceId = traceId;
        this.spanId = spanId;
    }
}package com.github.hashjang.spring.cloud.iiford.spring.cloud.webmvc.undertow.jfr;
import io.undertow.servlet.spec.HttpServletRequestImpl;
import io.undertow.servlet.spec.HttpServletResponseImpl;
import jdk.jfr.Category;
import jdk.jfr.Event;
import jdk.jfr.Label;
import jdk.jfr.StackTrace;
import javax.servlet.ServletRequest;
import javax.servlet.ServletResponse;
import java.util.Enumeration;
@Category({"Http Request"})
@Label("Http Request")
@StackTrace(false)
public class HttpRequestJFREvent extends Event {
//请求的 http 方法
private final String method;
//请求的路径
private final String path;
//请求的查询参数
private final String query;
//请求的 traceId,来自于 sleuth
private String traceId;
//请求的 spanId,来自于 sleuth
private String spanId;
//发生的异常
private String exception;
//http 响应码
private int responseStatus;
public HttpRequestJFREvent(ServletRequest servletRequest, String traceId, String spanId) {
HttpServletRequestImpl httpServletRequest = (HttpServletRequestImpl) servletRequest;
this.method = httpServletRequest.getMethod();
this.path = httpServletRequest.getRequestURI();
this.query = httpServletRequest.getQueryParameters().toString();
Enumeration<String> headerNames = httpServletRequest.getHeaderNames();
StringBuilder stringBuilder = new StringBuilder();
headerNames.asIterator().forEachRemaining(s -> stringBuilder.append(s).append(":").append(httpServletRequest.getHeader(s)).append("\n"));
this.traceId = traceId;
this.spanId = spanId;
}
public void setResponseStatus(ServletResponse servletResponse, Throwable throwable) {
this.responseStatus = ((HttpServletResponseImpl) servletResponse).getStatus();
this.exception = throwable != null ? throwable.toString() : null;
}
}然后,我们仿照文中前面关闭的 WebMvcMetricsAutoConfiguration 中的 WebMvcMetricsFilter 编写我们自己的 Filter 并仿照注册,这里我们只展示核心代码:
@Override
public void doFilter(ServletRequest servletRequest, ServletResponse servletResponse, FilterChain filterChain) throws IOException, ServletException {
    HttpRequestJFREvent httpRequestJFREvent = null;
    try {
        //从 sleuth 中获取 traceId 和 spanId
        TraceContext context = tracer.currentSpan().context();
        String traceId = context.traceId();
        String spanId = context.spanId();
        //收到请求就创建 HttpRequestReceivedJFREvent 并直接提交
        HttpRequestReceivedJFREvent httpRequestReceivedJFREvent = new HttpRequestReceivedJFREvent(servletRequest, traceId, spanId);
        httpRequestReceivedJFREvent.commit();
        httpRequestJFREvent = new HttpRequestJFREvent(servletRequest, traceId, spanId);
        httpRequestJFREvent.begin();
    } catch (Exception e) {
        log.error("JFRTracingFilter-doFilter failed: {}", e.getMessage(), e);
    }

    Throwable throwable = null;
    try {
        filterChain.doFilter(servletRequest, servletResponse);
    } catch (IOException | ServletException t) {
        throwable = t;
        throw t;
    } finally {
        try {
            //无论如何,都会提交 httpRequestJFREvent
            if (httpRequestJFREvent != null) {
                httpRequestJFREvent.setResponseStatus(servletResponse, throwable);
                httpRequestJFREvent.commit();
            }
        } catch (Exception e) {
            log.error("JFRTracingFilter-doFilter final failed: {}", e.getMessage(), e);
        }
    }
}
我们这一节针对 Undertow 进行了两个定制:分别是需要在 accesslog 中打开响应时间统计以及通过 JFR 监控每个 Http 请求,同时占用空间不能太大。下一节,我们将开始介绍我们微服务的注册中心 Eureka 的使用以及细节配置。
微信搜索“我的编程喵”关注公众号,每日一刷,轻松提升技术,斩获各种offer:


